

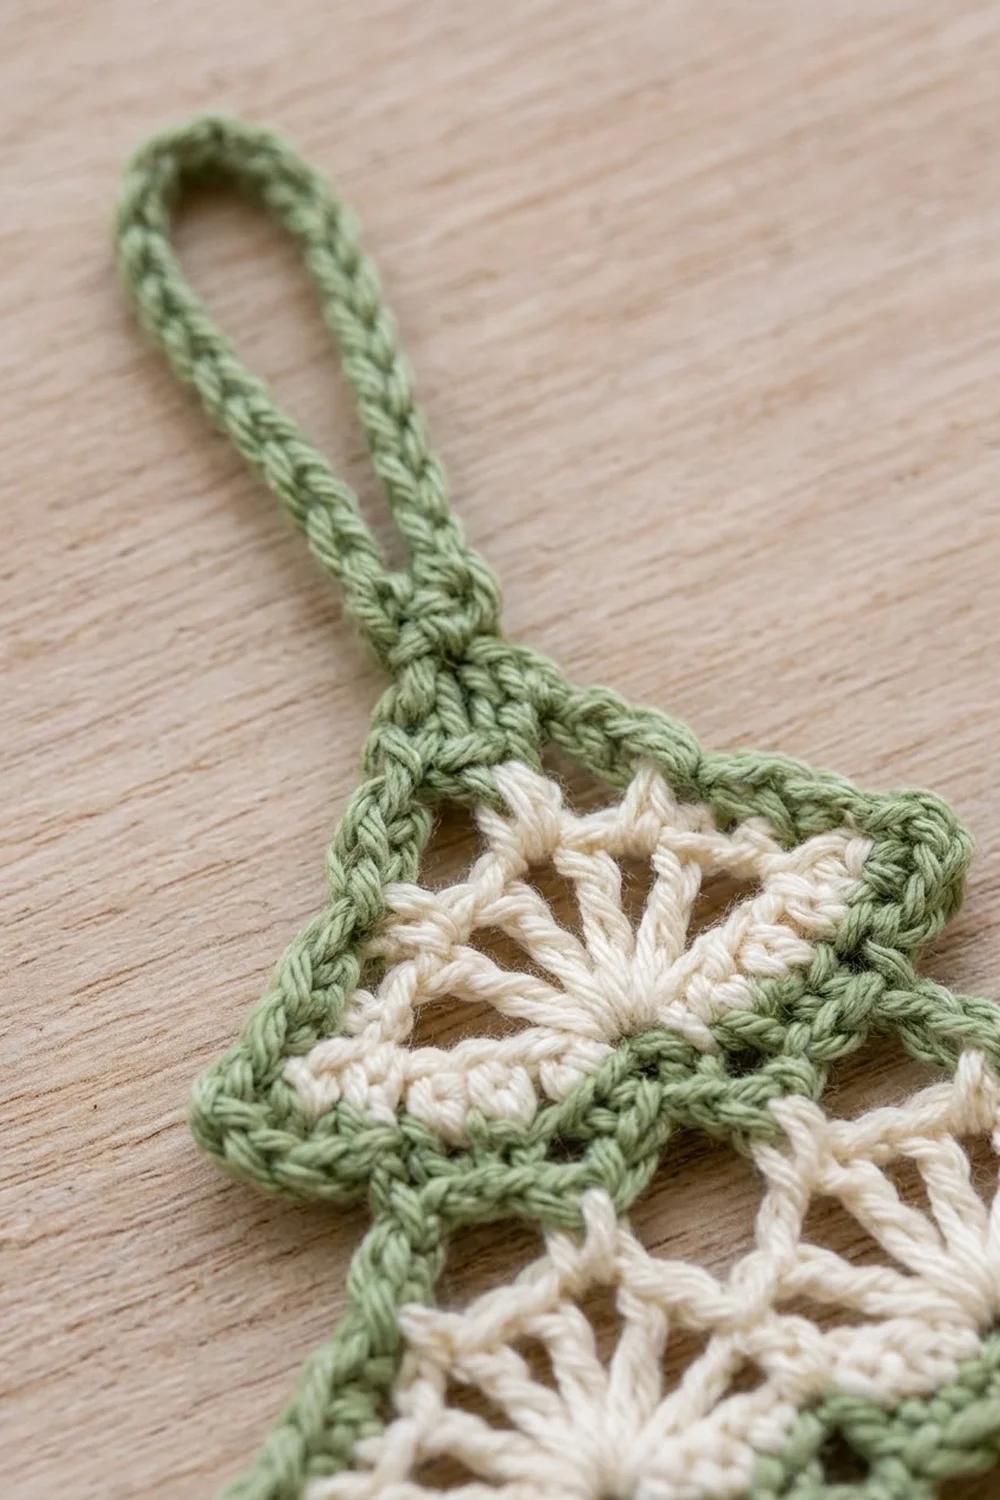
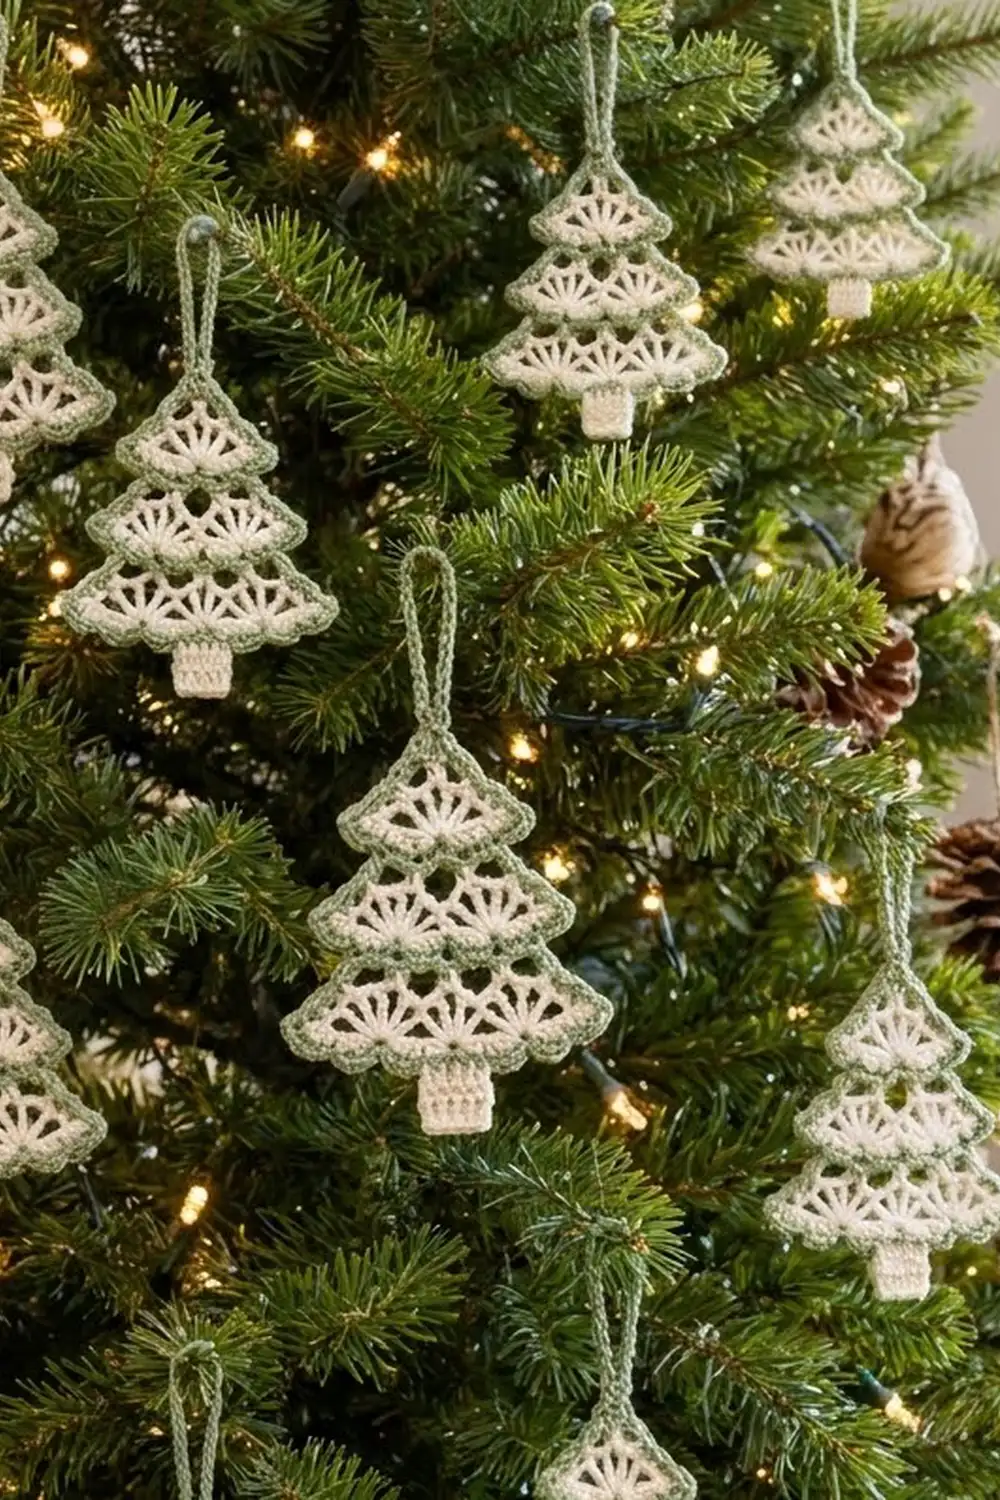
This little tree ornament uses three tiers of open, lacy fans. Every fan starts from a single point and opens downward, so each tier looks like a small snowy scallop. The tiers are cream, and sage green stripes and a rope-like edge give the tree its outline.
The palette is soft and calm: cream for the fans and trunk, sage green for the stripes, edging and hanging loop. Make one as a gift topper, or make a dozen and fill a whole tree.
This pattern uses US crochet terms. The finished ornament is about 4.75 in (12.1 cm) wide and 5 in (12.7 cm) tall, plus a 2 in (5.1 cm) hanging loop, for a total height of about 7 in (17.8 cm).
You make the tree in one piece. Work it in rows, starting with the single-fan tier, and change color every row. After the last tier, add the trunk, then flip the piece over so the first fan becomes the top. Finish with a two-row green border along the sides and a covered hanging loop.
Finished Size and Construction
- Finished size: 4.75 in (12.1 cm) wide x 5 in (12.7 cm) tall, not counting the loop
- Height with loop: about 7 in (17.8 cm)
- Skill level: Easy+ (you need to work fans and reverse single crochet)
- Terminology: US
- Yarn weight: Worsted (#4) cotton
- Hook: 4.0 mm (G-6)
- Number of pieces: 1
- Layout: One tree; three tiers of 1, 2 and 3 fans, plus a trunk
- Piece size before border: 4.25 in (10.8 cm) wide x 4.75 in (12.1 cm) tall (tiers plus trunk)
- Border depth: 0.25 in (0.6 cm) on each side and at the top point
Materials
Choose a smooth, mercerized or matte worsted-weight cotton. Cotton shows the fan spokes clearly and blocks to a crisp, flat shape. Avoid fuzzy or heavily textured yarn, because it fills in the gaps between the spokes.
- Color A (cream): 10 g, about 15 m (16 yd), for the fans and trunk
- Color B (sage green): 8 g, about 12 m (13 yd), for the stripes, border and loop
These amounts include a margin of about 25% for your swatch and the weaving-in tails.
Tools:
- 4.0 mm (G-6) crochet hook
- Tapestry needle
- Scissors
- 4 locking stitch markers
- Rustproof pins and a foam blocking mat
- Spray bottle with water
- Ruler or tape measure
Abbreviations (US Terms)
- ch – chain
- sl st – slip stitch
- sc – single crochet
- dc – double crochet
- tr – treble crochet (yarn over twice, insert hook, pull up a loop, [yarn over, pull through 2 loops] 3 times)
- rev sc – reverse single crochet (crab stitch), worked from left to right
- sp – space
- st(s) – stitch(es)
- RS – right side
- A / B – Color A / Color B
Special stitch – Fan: Work (tr, ch 1) 6 times, then 1 more tr, all in the same stitch. Each fan has 7 tr and 6 ch-1 spaces, which is 13 stitches across its top.
Gauge and Checkpoints
Gauge: 18 sc = 4 in (10.2 cm) with a 4.0 mm hook. One fan is about 1.5 in (3.8 cm) wide across its scallop and 1 in (2.5 cm) tall.
Make one complete ornament before you start a batch. Measure it at each of these stages:
- After Row 2 (top tier): 1.5 in (3.8 cm) wide, 1.25 in (3.2 cm) tall
- After Row 4 (two tiers): 3 in (7.6 cm) wide
- After Row 6 (three tiers): 4.25 in (10.8 cm) wide, 3.5 in (8.9 cm) tall
- After the trunk: 4.75 in (12.1 cm) tall in total
- After the border: 4.75 in (12.1 cm) wide x 5 in (12.7 cm) tall
Too big? Go down half a hook size, to 3.75 mm. Too small, or the fans cup? Go up to 4.5 mm. If only the fans are off and the sc rows match gauge, wrap the yarn more loosely or more tightly on the tr stitches.
Pattern
Orientation: Work every row with the RS facing you. Do not turn. Fasten off at the end of each row and join the next color at the right-hand edge. This keeps the front of every fan the same. While you work, the fans point down toward the starting ring. Once the piece is finished you flip it upside down, so the ring becomes the top of the tree.
Tier 1
Row 1 (A): Make a magic ring. Ch 5 (counts as tr and ch-1). (Tr, ch 1) 5 times into the ring, then 1 tr into the ring. Pull the ring tightly closed and fasten off. You now have 7 tr and 6 ch-1 sp (13 sts), forming a wedge-shaped fan. Don’t stretch it into a half circle. The outer tr stitches become the sloped sides of the tree top.
Row 2 (B): Join B in the 4th ch of the beginning ch-5. Ch 1, then sc in the same st. Sc in the next ch-1 sp, then sc in the next tr. Repeat from * 5 more times. You should have 13 sc* (1 + 12). Fasten off.
Tier 2
Row 3 (A): Join A in the first sc. Ch 1, then sc in the same st (sc 1). Skip 2 sc and work a Fan in the next sc (sc 4). Skip 2 sc and sc in the next sc (sc 7). Skip 2 sc and work a Fan in the next sc (sc 10). Skip 2 sc and sc in the last sc (sc 13). This row has 2 Fans and 3 sc (29 sts). Fasten off.
Row 4 (B): Join B in the first sc. Ch 1, then sc in the same st. Work 13 sc across the first Fan, one sc in each tr and each ch-1 sp. Sc in the center sc, then work 13 sc across the second Fan and sc in the last sc. You should have 29 sc (1 + 13 + 1 + 13 + 1). Fasten off.
Tier 3
Row 5 (A): Join A in the first sc. Ch 1, then sc in the same st (sc 1). Skip 3 and work a Fan in sc 5. Skip 4 and sc in sc 10. Skip 4 and work a Fan in sc 15, the center stitch. Skip 4 and sc in sc 20. Skip 4 and work a Fan in sc 25. Skip 3 and sc in sc 29. This row has 3 Fans and 4 sc (43 sts). The skips are 3-4-4-4-4-3, which keeps the row symmetrical around sc 15. Fasten off.
Row 6 (B): Join B in the first sc. Ch 1, then sc in the same st. Work 13 sc across the next Fan, then sc in the next sc. Repeat from * 2 more times. You should have 43 sc* (1 + 13 + 1 + 13 + 1 + 13 + 1). Fasten off.
Checkpoint: The piece measures 4.25 in (10.8 cm) wide and 3.5 in (8.9 cm) tall. Place markers in sc 20 and sc 24 of Row 6.
Trunk
Trunk Row 1 (A): Join A in sc 20 of Row 6. Ch 3 (counts as dc), then dc in sc 21, 22, 23 and 24. You should have 5 dc. The trunk is centered because sc 22 is the middle of 43 stitches.
Trunk Rows 2–3: Ch 3 (counts as dc) and turn. Dc in each of the next 4 sts. You should have 5 dc in each row. Fasten off.
The trunk is 1.1 in (2.8 cm) wide and 1.25 in (3.2 cm) tall. Now flip the whole piece upside down: the magic ring is the top point and the trunk hangs below Row 6. The fans now point up and open downward, with a green stripe under each tier.
Border
Border gauge: Use the same 4.5 sc per inch as your main gauge. Each side of the tree runs diagonally for about 3.75 in (9.5 cm). At 4.5 sc per inch, 3.75 x 4.5 = 16.9 stitches, so each side gets 17 sc.
Count the stitches along one side, from the bottom corner up to the top point:
- Row 6 end sc: 1 sc
- Row 5: 4 sc along the outer tr of the end Fan, plus 1 sc in the row-end sc = 5
- Row 4 end sc: 1 sc
- Row 3: 4 sc along the outer tr, plus 1 sc in the row-end sc = 5
- Row 2 end sc: 1 sc
- Row 1: 4 sc along the outer tr (or the beginning ch-5)
That makes 17 sc per side: 1 + 5 + 1 + 5 + 1 + 4. The sc in the end stitch of Row 6 belongs to the side, so the bottom corner is not counted twice. The border runs along the sides only. The green bottom edge is already Row 6, and the trunk stays plain cream.
Border Row 1 (B): Hold the tree upright with the RS facing you. Join B in the right-hand end sc of Row 6 (the bottom-right corner). Ch 1 and work 17 sc up the right side, ending at the top of Row 1. Work 1 sc into the center of the magic ring for the top point. Work 17 sc down the left side, ending in the left-hand end sc of Row 6. You should have 35 sc (17 + 1 + 17). Do not turn.
Border Row 2 (B): Ch 1. Work rev sc in each sc from left to right, all the way back to the starting corner. You should have 35 rev sc. Fasten off.
Why the math works: Each tier has the same 5 border stitches (Row 1 has 4) plus 1 stitch for each green row end. Because of that, the two sides match exactly, and the top-point stitch (st 18 of 35) is the true center. The 4 sc along each tr post match the post’s diagonal length at your gauge. Fewer stitches would pucker the steps, and more would make them ruffle.
Hanging Loop
Join B in the top-point stitch (st 18). Ch 24, then sl st in the same st to form a ring.
Loop round: Ch 1. Work 32 sc over the chain ring, then sl st in the first sc. Fasten off.
The covered loop stands about 2 in (5.1 cm) tall. That gives a total height of about 7 in (17.8 cm).
Final Blocking
- Weave in all ends along same-color stitches: cream into cream, green into green. Weave in each direction so the ends can’t pull loose.
- Spray the ornament lightly until it is damp. Don’t soak it.
- Pin it RS up to 4.75 in (12.1 cm) wide at the bottom tier and 5 in (12.7 cm) tall from the top point to the bottom of the trunk.
- Pin each tier’s tips symmetrically, measuring from a center line that runs from the top point through the middle of the trunk.
- Ease every fan’s spokes open so the gaps between them look even. Pin the scallops of each green stripe into gentle curves.
- Pin the trunk into a square-cornered rectangle, 1.1 in (2.8 cm) wide.
- Let the ornament dry completely. Unpin it, then shape the loop by hand.
Final Quality-Control Checklist
- Row counts: 13, 13, 29, 29, 43, 43; trunk 5 dc in each of 3 rows
- The tiers have 1, 2 and 3 Fans, and each Fan has 7 tr
- The center Fan of Tier 3 sits right above the trunk
- 17 border stitches on each side and 1 at the top point (35 in total)
- Size: 4.75 in (12.1 cm) x 5 in (12.7 cm), with a 2 in (5.1 cm) loop
- The left and right zigzags mirror each other
- No loose ends, and none showing through the fan gaps
Troubleshooting
- Fans cup or curl: Your tr stitches are too tight, or the hook is too small. Go up half a size, or block more firmly.
- The tier edges ruffle: You worked more than 13 sc across a Fan. Count again, one sc per tr and per ch-1 sp.
- The tree leans: You skipped stitches unevenly in Row 3 or Row 5. Compare your skips with the given positions.
- The trunk is off center: Count from both ends of Row 6. The trunk must use sc 20 to 24.
- The border puckers the steps: Work 4 sc along every outer tr post, not 3.
- The loop flops over: Pack the 32 sc tightly, or add 2 more sc.
Care
Hand wash in cool water with mild soap and press out the water in a towel. Reshape the ornament and lay it flat to dry, pinning it again if the fans need it.
Final Notes
Here is the whole measurement chain. With 18 sc = 4 in (10.2 cm), the top tier measures 1.5 in (3.8 cm) wide and 1.25 in (3.2 cm) tall. Two tiers measure 3 in (7.6 cm) wide, and three tiers measure 4.25 in (10.8 cm) by 3.5 in (8.9 cm). The trunk brings the height to 4.75 in (12.1 cm). The 0.25 in (0.6 cm) border brings the finished ornament to 4.75 in (12.1 cm) x 5 in (12.7 cm), and the 2 in (5.1 cm) loop brings the total to about 7 in (17.8 cm). If you match each checkpoint as you go, every tree in your batch will come out the same size. Make one tree, measure it, and then make the rest.
Happy crocheting!