
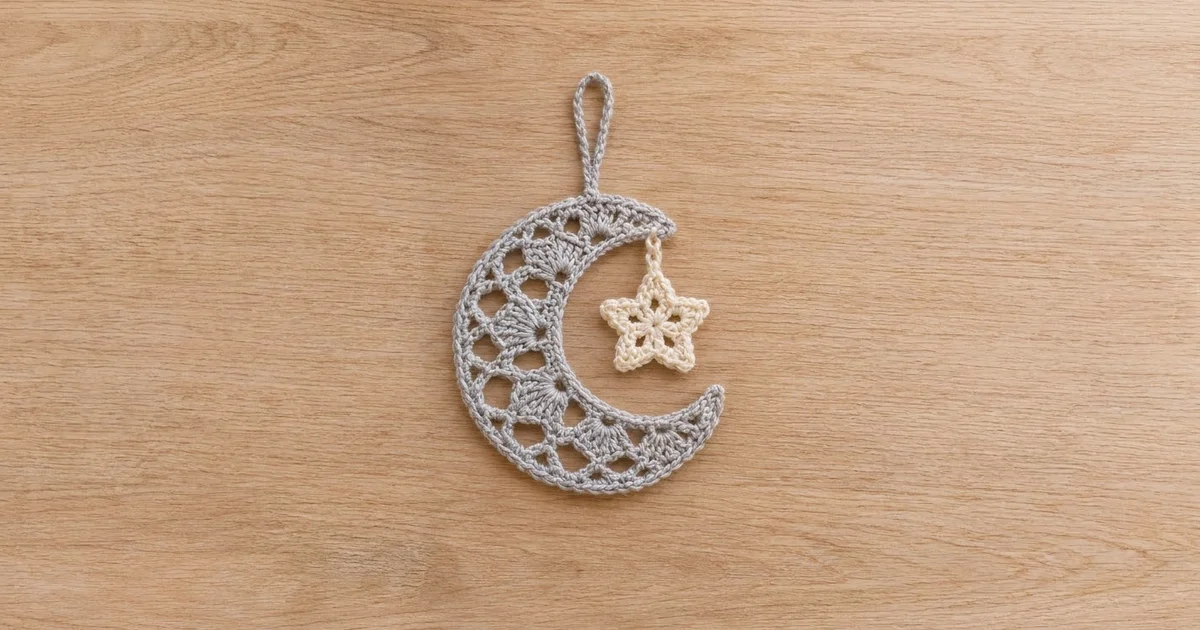
The Silver Lullaby Moon is a lacy crescent ornament with a small cream star hanging inside its curve. The moon has a row of double-crochet fans framed by little open windows, and a firm single-crochet edge keeps the outline crisp. It looks delicate, but each moon takes less than an hour.
The palette is soft: light silver gray for the moon and creamy ivory for the star. Hung on a green tree, the gray reads like moonlight and the star stands out with a quiet glow. The style suits Scandinavian, farmhouse or classic white-and-silver holiday decor. It also works as a nursery mobile drop or as a gift-tag topper.
This pattern uses US crochet terms. The finished moon is about 5 in (12.7 cm) tall and 4 in (10.2 cm) wide. The hanging loop adds about 1.5 in (3.8 cm), and the star is about 1.5 in (3.8 cm) from point to point.
Construction is simple. You crochet the moon flat in four short rows over a foundation chain, which becomes the inner curve. The outer rows have more stitches than the inner row, so the strip curves into a crescent on its own. One round of single crochet then edges the whole moon and forms the tip points. Last, you make the star in the round, add a hanging loop to the moon, and attach the star with a short chain.
Finished Size and Construction
- Finished size (moon): 5 in (12.7 cm) tall × 4 in (10.2 cm) wide
- Hanging loop: about 1.5 in (3.8 cm) tall
- Star: about 1.5 in (3.8 cm) from point to point
- Skill level: Easy-intermediate
- Terminology: US crochet terms
- Yarn weight: Sport / #2 fine, cotton or cotton blend
- Hook: 3.25 mm (US D/3)
- Number of pieces: 1 ornament (a moon with a star attached by a chain)
- Layout: Single ornament, no assembly grid
- Moon band width: 1.25 in (3.2 cm) at the widest point
- Size before border: about 4.6 in (11.7 cm) tall × 3.6 in (9.1 cm) wide
- Border depth: 1 round of sc, about 0.2 in (0.5 cm)
Materials
Yarn: Use a smooth, tightly plied sport-weight cotton or cotton blend. Cotton shows the fan texture clearly and holds its crescent shape after blocking. Avoid fuzzy or very soft acrylics, because the small openings will close up.
- Color A, light silver gray (moon and hanging loop): 10 g / 31 m
- Color B, cream or ivory (star and star chain): 3 g / 9 m
These amounts include a margin of about 20 percent for your gauge swatch and weaving in ends. If you are making a full set for a tree, one 50 g ball of gray makes about 5 moons, and one 50 g ball of cream makes plenty of stars.
Tools:
– 3.25 mm (US D/3) crochet hook
– Tapestry needle
– Scissors
– Rust-proof pins and a blocking board or foam mat
– Spray bottle
– Stitch marker (optional)
– Fabric stiffener (optional)
Abbreviations (US Terms)
- ch – chain
- sl st – slip stitch
- sc – single crochet
- hdc – half double crochet
- dc – double crochet
- st(s) – stitch(es)
- sp – space
- RS – right side
- beg – beginning
Special stitch – Fan: Work 7 dc into the same stitch.
Gauge and Checkpoints
Gauge: 6 sc and 7 sc rows = 1 in (2.5 cm).
To check it, ch 13, work 12 sc, and work 8 rows. The 12 sc should measure 2 in (5.1 cm) across. Your first moon is also your real test piece, so measure at each checkpoint below before you make a set.
- After Row 1: The strip lies straight and measures 6.5 in (16.5 cm) long.
- After Row 2: The strip starts to bow, and the fan row is about 0.5 in (1.3 cm) tall.
- After Row 4: The piece curls into a crescent about 4.6 in (11.7 cm) tall × 3.6 in (9.1 cm) wide. The outer edge measures about 11.5 in (29.2 cm) along the curve.
- After the border: 5 in (12.7 cm) tall × 4 in (10.2 cm) wide.
Too big? Go down to a 3.0 mm hook. Too small? Go up to a 3.5 mm (US E/4) hook. If Row 1 matches but the crescent ruffles after Row 4, your fans are too loose, so go down half a hook size for Rows 2 to 4 only.

Moon
With Color A, ch 40.
Row 1 (RS): Sc in the 2nd ch from the hook and in each ch across. Turn. (39 sc)
Row 2: Ch 1. Sc in the first 3 sts, then hdc in the next 2 sts. Skip 2 sts, Fan in the next st, skip 2 sts, sc in the next st. Repeat from * to * 3 more times. Skip 2 sts, Fan in the next st, skip 2 sts. Hdc in the next 2 sts and sc in the last 3 sts. Turn. (49 sts: 6 sc, 4 hdc, 4 separating sc, 5 Fans of 7 dc each)
The fans land on stitches 8, 14, 20, 26 and 32 of Row 1, and the separating sc land on stitches 11, 17, 23 and 29. The skipped stitches next to each fan make the small open windows. The sc and hdc at each end keep the tips low and pointed.
Row 3: Ch 1. Sc in the first 3 sc and in the next 2 hdc (5 sc).
Over each fan: [ch 3, skip 1 dc, sc in the next dc] 3 times. This places a sc in the 2nd, 4th and 6th dc of the fan.
Between fans: ch 3, sc in the separating sc.
Repeat the fan and between-fan steps across all 5 fans, leaving out the between-fan step after the last fan. After the last fan, ch 3 and sc in the next hdc. Then sc in the next hdc and in the last 3 sc. Turn. (29 sc and 20 ch-3 arches)
Check the count: 5 sc at the start, 15 sc on the fans, 4 sc between fans and 5 sc at the end makes 29 sc. Each fan has 3 arches (15), there are 4 arches between fans, and there is 1 arch after the last fan, for 20 arches.
Row 4: Ch 1. Work sc in each sc and 2 sc in each ch-3 arch across. Do not turn. (69 sc: 29 in the sc + 40 in the arches)
This row is 69 stitches long, compared with 39 in Row 1. That difference is what curves the strip into a crescent. Pinch the piece into a moon shape now. It should curve on its own without cupping.
The tip where Row 4 ends is Tip A, and this becomes the upper tip. The opposite end is Tip B.
Border
Border gauge: 6 sc = 1 in (2.5 cm), the same as the body. The border adds about 0.2 in (0.5 cm) all around.
Round 5 (border): Without turning, ch 1 and rotate the piece so you can work down the row ends at Tip A.
- Tip A edge: Sc in the ends of Rows 4, 3 and 2 (3 sc). Work (sc, ch 2, sc) in the end of Row 1 to form the point.
- Inner edge: Working into the free loops of the foundation chain, sc in each ch across (39 sc).
- Tip B edge: Work (sc, ch 2, sc) in the end of Row 1 to form the point. Sc in the ends of Rows 2, 3 and 4 (3 sc).
- Outer edge: Sc in each st across Row 4 (69 sc).
Sl st to the first sc. Fasten off and weave in the ends. (118 sc and 2 ch-2 points)
Edge-by-edge count:
– Tip A: 3 + 2 = 5 sc
– Inner edge: 39 sc
– Tip B: 2 + 3 = 5 sc
– Outer edge: 69 sc
– Total: 118 sc
Why the math works: Each long edge gets exactly 1 sc per existing stitch: 39 on the inner edge to match Row 1, and 69 on the outer edge to match Row 4. Since no stitches are added along the curves, the crescent keeps the curvature built into the rows. Each short tip edge gets 1 sc per row end, which suits sc-height row ends. The single (sc, ch 2, sc) at each point turns the corner sharply without adding bulk.
Hanging Loop
Lay the moon RS up with the opening facing right and Tip A at the top. On the outer edge, count 12 border sc from Tip A, not counting the tip stitches. This puts the loop at the top of the outer curve.
Join Color A with a sl st in that 12th sc. Ch 22, then sl st in the same sc to close the loop. Sl st in each of the 22 ch around the loop to firm it into a cord. Sl st in the base sc, fasten off and weave in the ends. (22 ch, 22 sl st)
The loop should stand about 1.5 in (3.8 cm) tall.
Star
With Color B, make a magic ring.
Round 1: Ch 5 (counts as dc + ch 2). [Dc in the ring, ch 2] 4 times. Pull the ring closed and sl st to the 3rd ch of the beg ch-5. (5 dc, 5 ch-2 sps)
Checkpoint: about 0.75 in (1.9 cm) across, with a pentagon-shaped hole in the center.
Round 2: Ch 1. Sc in the next dc, then work (hdc, dc, ch 2, dc, hdc) in the next ch-2 sp. Repeat from * to * 4 more times. Sl st to the first sc. (30 sts: 5 sc, 10 hdc, 10 dc, plus 5 ch-2 point sps)
Round 3: Sl st in the next sc (valley), sc in the next hdc, sc in the next dc, work (sc, ch 2, sc) in the ch-2 sp, sc in the next dc, sc in the next hdc. Repeat from * to * 4 more times. Sl st to the first sl st. (30 sc, 5 sl st, 5 ch-2 points)
Each point gets 6 sc in this round: 4 worked 1-per-stitch and 2 added at the tip.
Fasten off, leaving a 6 in (15.2 cm) tail, and weave in the beginning tail. The star should measure 1.5 in (3.8 cm) from point to point.
Attaching the Star
Pick one point as the top of the star. Join Color B with a sl st in that point’s ch-2 sp. Ch 8 (about 1 in / 2.5 cm).
Find the inner edge just below Tip A, and sl st in the 3rd inner-edge sc from the Tip A point. Fasten off and weave the end into the moon’s border so it doesn’t show.
The star should hang freely inside the hollow of the crescent without touching the lower tip. If it touches, shorten the chain to 6 ch.
Final Blocking
- Mist the moon and star until they are damp, or soak them in cool water and press them in a towel.
- Draw a 5 in (12.7 cm) circle on paper and slip it under a clear sheet on your blocking board.
- Pin the outer edge of the moon along the circle. Space the pins about 0.75 in (1.9 cm) apart.
- Pin each tip to a sharp point, with both tips about 3 in (7.6 cm) apart.
- Pin a dc in the center of each fan so the fans spread into even half-circles, and open each small window with your fingertip.
- Pin the star flat, with 1 pin at each ch-2 point.
- Let everything dry completely. For a stiffer ornament, brush on fabric stiffener and let it dry again.
- Unpin the pieces and hang the ornament to check that the star hangs straight.
Final Quality-Control Checklist
- Row 1 has 39 sc, and the inner edge border has 39 sc.
- Row 2 has 5 even fans of 7 dc each.
- Row 3 has 20 arches. Row 4 and the outer border each have 69 sc.
- The border has 118 sc in total, with a sharp ch-2 point at each tip.
- The moon measures 5 in (12.7 cm) × 4 in (10.2 cm) after blocking.
- The hanging loop is centered at the top of the outer curve.
- The star is 1.5 in (3.8 cm) across with 5 matching points.
- The star chain hangs freely from just below Tip A.
- All ends are woven in invisibly.
Troubleshooting
The crescent ruffles or waves. The outer edge is too long for your tension. Go down half a hook size for Rows 2 to 4, or work the fans more snugly.
The moon barely curves. The fans are too tight. Relax your tension on Row 2, or go up half a hook size for that row only.
The tips look blunt. Make sure the (sc, ch 2, sc) goes into the Row 1 row end, then pin the tips firmly while blocking.
The windows have closed up. Double-check that you skipped 2 stitches on each side of every fan, then open the windows with pins while the piece is damp.
The star points are rounded. Pull each ch-2 point tight during blocking and pin it right at the tip.
The ornament tilts when hung. Move the loop 1 to 2 stitches toward Tip A or Tip B until the moon balances.
Care
Hand wash in cool water with a mild soap, press out the water in a towel, and dry flat, reshaping as needed. If you used stiffener, store the ornament flat in tissue paper and re-stiffen it if it softens.

Final Notes
The measurement chain is short:
– 39 sc in Row 1 measure 6.5 in (16.5 cm).
– These grow to 69 sc in Row 4, which measure 11.5 in (29.2 cm) and curve the strip into a crescent.
– The 118-stitch border brings the moon from 4.6 in (11.7 cm) to 5 in (12.7 cm) tall.
– A 1.5 in (3.8 cm) star hangs on a 1 in (2.5 cm) chain inside the curve.
If your Row 1 length matches the checkpoint, the rest of the measurements should follow. Make one, then make a whole sky of them.
Happy crocheting!