

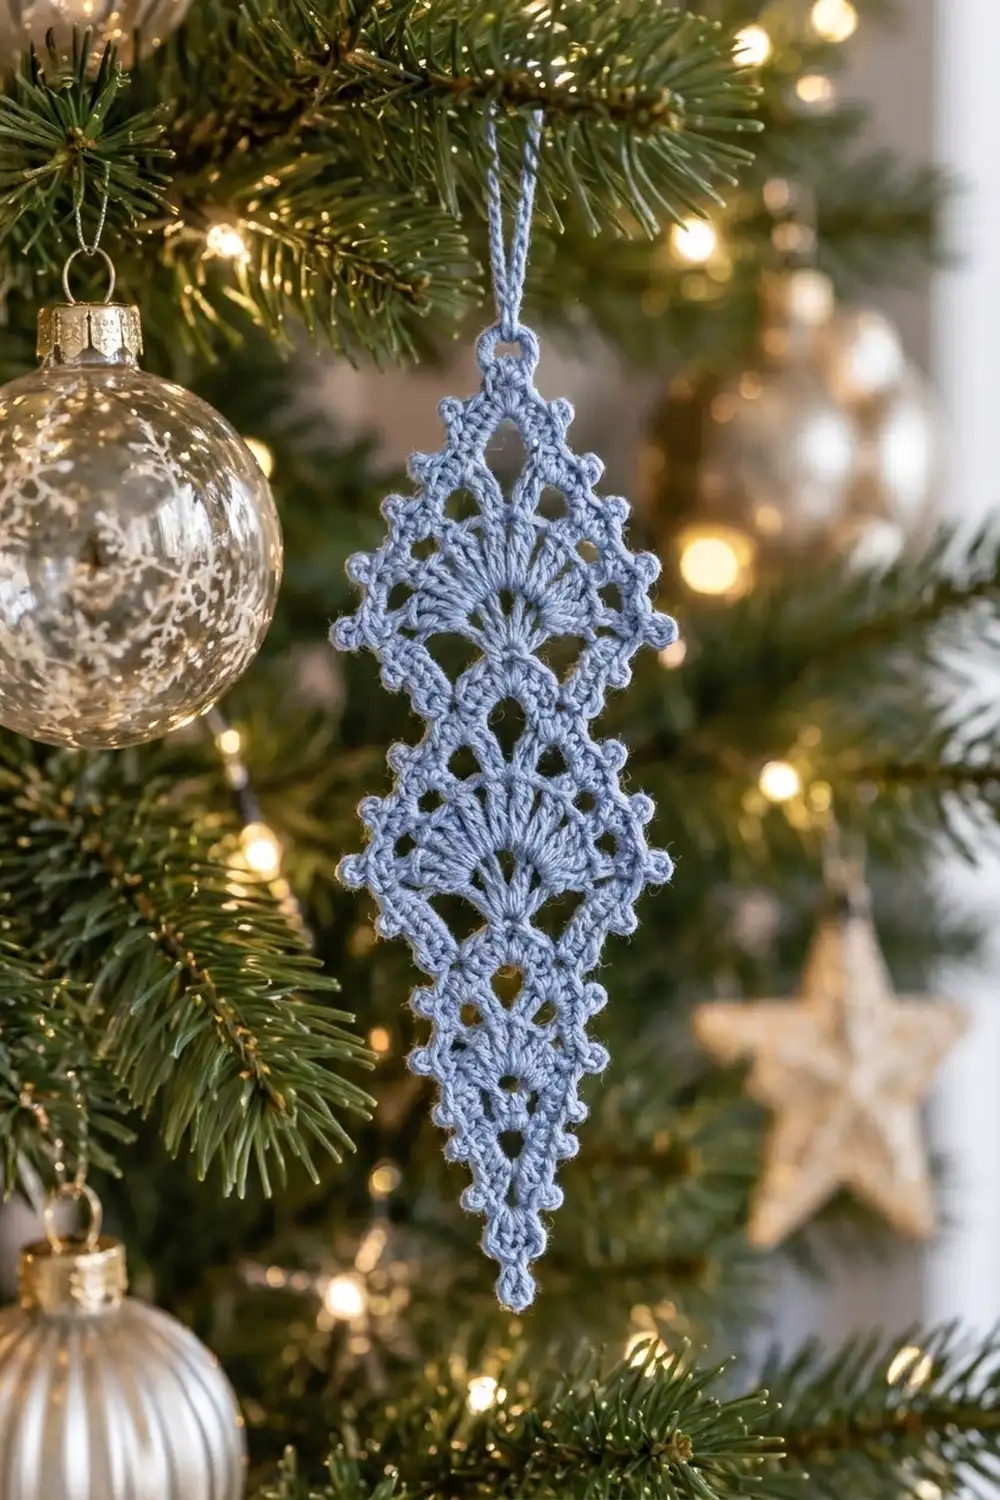
The Frosted Icicle Lace Ornament is a slim, pointed diamond of thread lace that catches the light on a Christmas tree. A column of small fans runs down the center inside an open diamond lattice, and a picot edge outlines every step of the shape.
The sample uses one color, a soft periwinkle blue cotton thread, for a frosty, Scandinavian look. White, silver gray or pale ice blue work just as well. All instructions use US crochet terms.
The finished ornament measures 2.25 in (5.7 cm) wide and 6.25 in (15.9 cm) long. The hanging loop adds 1 in (2.5 cm), for a total length of 7.25 in (18.4 cm).
The construction is simple and continuous. You work the body in turned rows from the bottom tip upward. You add one loop per row up to the widest point, then remove one loop per row up to the top point. One round of picot border goes around the whole outline, and the hanging loop is built into that border. The ornament is one single piece, so there is no joining.
Finished Size and Construction
- Finished size: 2.25 in (5.7 cm) wide x 6.25 in (15.9 cm) long, plus a 1 in (2.5 cm) loop
- Skill level: Intermediate (thread lace and careful counting)
- Terminology: US crochet terms
- Yarn weight: Size 10 crochet thread (lace weight, category 0)
- Hook: 1.75 mm steel hook
- Number of pieces: 1
- Layout: One vertical diamond, worked from bottom to top
- Piece size before border: 2 in (5.1 cm) wide x 6 in (15.2 cm) long
- Border depth: 0.125 in (0.3 cm) on every edge
Materials
Choose a mercerized cotton thread in size 10. It holds crisp fans, blocks well and has a slight sheen that suits ornaments. Avoid fuzzy or very soft thread, because the lattice will blur.
- Periwinkle blue size 10 cotton thread: 8 g, about 35 m (38 yd)
Tools:
- 1.75 mm steel crochet hook
- Fine tapestry needle
- Small sharp scissors
- Blocking board or foam, and rustproof pins
- Fabric stiffener or spray starch (optional but recommended)
The quantity includes a margin of about 25 percent for your test rows and for weaving in ends. One ornament uses about 6 g (26 m).
Abbreviations (US Terms)
- ch – chain
- sl st – slip stitch
- sc – single crochet
- dc – double crochet
- sk – skip
- L – ch-5 loop
- F – fan
- st(s) – stitch(es)
Special stitches
- Fan (F): 9 dc worked into the same ch-5 loop.
- Picot: ch 3, sl st into the 3rd ch from the hook.
- Edge increase: at the end of a row, work (sc, ch 5, sc) in the last loop. This adds one loop on that edge.
Counting rule: This pattern counts each row in “items.” A ch-5 loop is one item, and a fan is one item. When you work a lattice row over a fan, you place one sc in the 5th (center) dc of the fan. That way the fan acts just like a loop in the next row.
Gauge and Checkpoints
Gauge matters less for an ornament than for a garment, but it controls the final length. Work Rows 1–6 first as your test.
- After Row 3: 0.75 in (1.9 cm) wide x 1 in (2.5 cm) tall
- After Row 6: 1.25 in (3.2 cm) wide x 2 in (5.1 cm) tall
- After Row 9: 1.75 in (4.4 cm) wide x 3 in (7.6 cm) tall
- After Row 11: 2 in (5.1 cm) wide x 3.75 in (9.5 cm) tall
- After Row 18: 2 in (5.1 cm) wide x 6 in (15.2 cm) tall
- After the border: 2.25 in (5.7 cm) wide x 6.25 in (15.9 cm) long
Pin the piece gently flat to measure it, without stretching. If your Row 6 test is more than 0.25 in (0.6 cm) too big, change to a 1.5 mm hook. If it is more than 0.25 in (0.6 cm) too small, change to a 2.0 mm hook. Blocking will even out small differences.
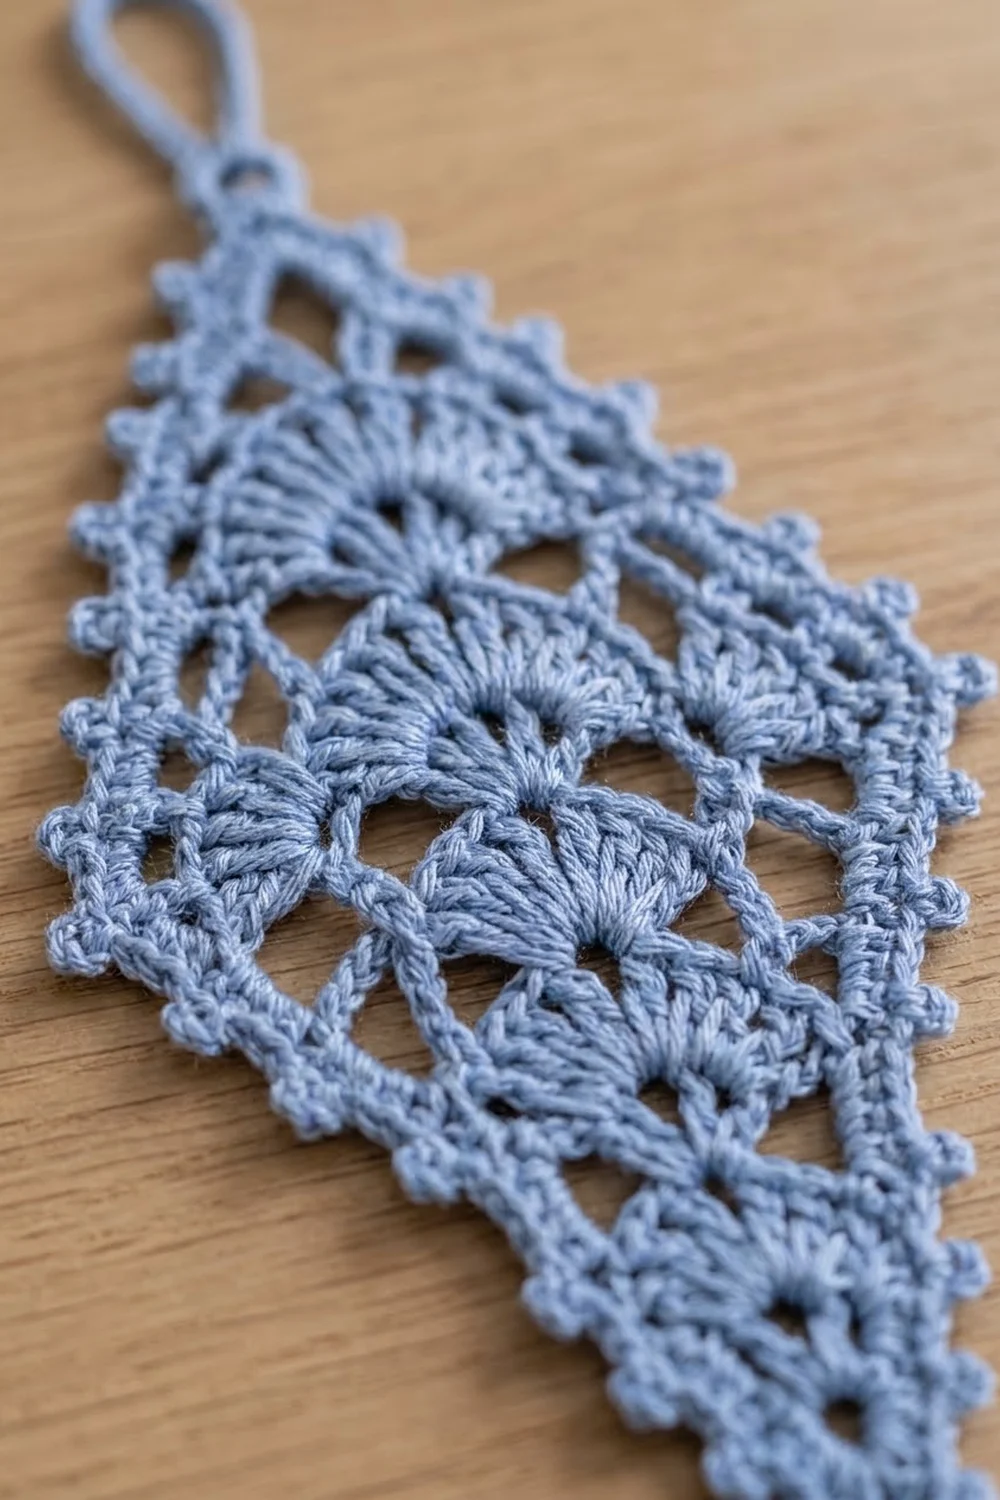
Ornament Body
Work in turned rows. From Row 2 onward, every row is made of ch-5 loops. Fan rows also have one fan in the exact center.
Row 1 (bottom fan): Ch 4, sl st in the first ch to form a ring. Ch 3 (counts as the first dc), 8 dc in the ring. Turn. (9 dc = 1 F)
Row 2 (lattice): Ch 5, sk the first 2 dc, sc in the next dc (3rd dc). Ch 5, sk 3 dc, sc in the next dc (7th dc). Ch 5, sk 1 dc, sc in the top of the turning ch. Turn. (3 L)
The center loop of Row 2 spans the middle dc of the fan, so the next fan sits directly above the first one.
Row 3 (fan row, increase): Ch 5, sc in the first L, F in the next L, sc in the last L, ch 5, sc in the same L. Turn. (3 items: 1 L, 1 F, 1 L)
Row 4 (lattice, increase): Ch 5, sc in the first L, ch 5, sc in the 5th dc of the F, ch 5, sc in the last L, ch 5, sc in the same L. Turn. (4 L)
Row 5 (lattice, increase): Ch 5, sc in the first L, (ch 5, sc in the next L) 3 times, ch 5, sc in the same L. Turn. (5 L)
Row 6 (fan row, increase): Ch 5, sc in the first L, ch 5, sc in the next L, F in the next L, sc in the next L, ch 5, sc in the last L, ch 5, sc in the same L. Turn. (5 items: 2 L, 1 F, 2 L)
Row 7 (lattice, increase): Ch 5, sc in the first L, ch 5, sc in the next L, ch 5, sc in the 5th dc of the F, (ch 5, sc in the next L) twice, ch 5, sc in the same L. Turn. (6 L)
Row 8 (lattice, increase): Ch 5, sc in the first L, (ch 5, sc in the next L) 5 times, ch 5, sc in the same L. Turn. (7 L)
Row 9 (fan row, increase): Ch 5, sc in the first L, (ch 5, sc in the next L) twice, F in the next L, sc in the next L, (ch 5, sc in the next L) twice, ch 5, sc in the same L. Turn. (7 items: 3 L, 1 F, 3 L)
Row 10 (lattice, increase): Ch 5, sc in the first L, (ch 5, sc in the next L) twice, ch 5, sc in the 5th dc of the F, (ch 5, sc in the next L) 3 times, ch 5, sc in the same L. Turn. (8 L)
Row 11 (lattice, increase, widest row): Ch 5, sc in the first L, (ch 5, sc in the next L) 7 times, ch 5, sc in the same L. Turn. (9 L)
Checkpoint: Row 11 measures 2 in (5.1 cm) across.
From here on, every row decreases. Do not make a turning loop, and do not make an edge increase.
Row 12 (fan row, decrease): Sl st in the first 3 ch of the first L, sc in the same L, (ch 5, sc in the next L) 3 times, F in the next L, sc in the next L, (ch 5, sc in the next L) 3 times. Turn. (7 items: 3 L, 1 F, 3 L)
Row 13 (lattice, decrease): Sl st in the first 3 ch of the first L, sc in the same L, (ch 5, sc in the next L) twice, ch 5, sc in the 5th dc of the F, (ch 5, sc in the next L) 3 times. Turn. (6 L)
Rows 14–18 (lattice, decrease): Sl st in the first 3 ch of the first L, sc in the same L, (ch 5, sc in the next L) across. Turn. (Row 14: 5 L; Row 15: 4 L; Row 16: 3 L; Row 17: 2 L; Row 18: 1 L)
Row 18 is the single loop at the top point. Fasten off.
Why the counts work:
– Increase row: you make one turning loop, one loop between each pair of sc (items minus 1), and one edge-increase loop. The count goes up by exactly 1.
– Decrease row: you only make the loops between the sc, so the count goes down by exactly 1.
– Fan row: the fan takes the place of the two loops around the center loop. The count therefore changes by one less than in a lattice row. This keeps every fan centered and every row symmetrical.
Border
The border is one round of sc with picots, worked into the edge loop of every row. Each row has one edge step on each side, so each slanted side gets one picot per row.
Border gauge: 4 sc fill one ch-5 edge loop. The border adds 0.125 in (0.3 cm) on every edge.
Edge map (per side):
- Lower side: the Row 1 edge dc plus the edge loops of Rows 2–10 (9 loops)
- Side corner: the Row 11 edge loop
- Upper side: the edge loops of Rows 12–17 (6 loops)
- Top: the Row 18 loop
- Bottom tip: the foundation ring
Border round: With the right side facing, join the thread in the foundation ring at the bottom tip.
- Bottom tip: (sc, picot, sc) in the ring. (2 sc, 1 picot)
- Lower right side: 3 sc around the post of the Row 1 edge dc, then (2 sc, picot, 2 sc) in each edge loop of Rows 2–10. (39 sc, 9 picots)
- Right corner: (3 sc, picot, 3 sc) in the Row 11 edge loop. (6 sc, 1 picot)
- Upper right side: (2 sc, picot, 2 sc) in each edge loop of Rows 12–17. (24 sc, 6 picots)
- Top and hanging loop: In the Row 18 loop, work 3 sc. Ch 30, sl st in the last sc made, work 36 sc into the ch-30 space, and sl st in the same sc. Then work 3 more sc in the Row 18 loop. (6 sc in the loop, plus 36 sc on the hanger)
- Upper left side: (2 sc, picot, 2 sc) in each edge loop of Rows 17–12. (24 sc, 6 picots)
- Left corner: (3 sc, picot, 3 sc) in the Row 11 edge loop. (6 sc, 1 picot)
- Lower left side: (2 sc, picot, 2 sc) in each edge loop of Rows 10–2, then 3 sc around the post of the Row 1 turning ch. (39 sc, 9 picots)
- Sl st in the first sc to join. Fasten off.
Round total (not counting the hanger): 2 + 39 + 6 + 24 + 6 + 24 + 6 + 39 = 146 sc, and 1 + 9 + 1 + 6 + 6 + 1 + 9 = 33 picots. The hanger adds 36 sc.
Why the math works: A ch-5 loop easily holds 4 sc and a picot without ruffling or pulling. The corners and the top turn a sharper angle, so they get 6 sc instead of 4. The Row 1 posts only need 3 sc each because that row is short. The sc all sit inside existing loops, so the border adds 0.125 in (0.3 cm) of depth without changing the shape of the body.
Final Blocking
- Weave in all ends along the sc border, never through the open lattice.
- Soak the ornament in cool water for 10 minutes, then press out the water in a towel. Do not wring it.
- If you are stiffening it, dip it in fabric stiffener or starch solution and blot off the excess.
- Pin the bottom tip, the top point and both side corners first. Check that the piece is 6.25 in (15.9 cm) long and 2.25 in (5.7 cm) wide.
- Pin each picot outward, working down each side, so each edge runs in a straight line from point to corner.
- Use a pin tip to open each fan into a smooth arc and to open each diamond in the lattice.
- Pin the hanging loop into an even teardrop 1 in (2.5 cm) tall.
- Let it dry completely, at least 12 hours, before you unpin it.
Final Quality-Control Checklist
- [ ] The body has 18 rows, with fans in Rows 1, 3, 6, 9 and 12
- [ ] Each fan sits centered above the one below it
- [ ] Row 11 has 9 loops and is the widest row
- [ ] Row 18 is a single loop at the top point
- [ ] The border has 146 sc and 33 picots, plus 36 sc on the hanger
- [ ] Both lower sides have 9 picots, and both upper sides have 6 picots
- [ ] The finished size is 2.25 in (5.7 cm) x 6.25 in (15.9 cm), plus a 1 in (2.5 cm) loop
- [ ] All ends are hidden and the ornament hangs straight
Troubleshooting
The fan is off-center. Recount the previous row. The fan goes in the center loop, with the same number of items on each side.
The edges are wavy. You may have added extra sc in the border. Keep to 4 sc per edge loop and 6 sc at the corners.
The lower part is too long or too narrow. Your chains are tight. Go up one hook size, or chain more loosely while keeping your sc firm.
The fans cup or ruffle. Your dc are loose compared to your chains. Try a smaller hook for the fan stitches only, or block more firmly.
The ornament twists when it hangs. Block it again with stiffener, and check that the sc on the hanger are even all the way around.
You lost count of your rows. Count the fans. From Row 3 to Row 12 there are two lattice rows between each pair of fans.
Care
Hand wash in cool water with mild soap, press dry in a towel and block flat again. Store it flat or hanging where it won’t be crushed, so the picots and fans keep their shape.
Final Notes
The measurements build in a simple chain:
– Rows 1–6 measure 1.25 in (3.2 cm) wide x 2 in (5.1 cm) tall.
– Row 11 reaches the full body width of 2 in (5.1 cm).
– Row 18 brings the body to 6 in (15.2 cm) long.
– The picot border adds 0.125 in (0.3 cm) on every edge, for a finished 2.25 in (5.7 cm) x 6.25 in (15.9 cm).
– The hanging loop brings the total length to 7.25 in (18.4 cm).
One ornament takes an evening. Make a few more for a matching set on the tree, or tuck one into a holiday card.
Happy crocheting!