

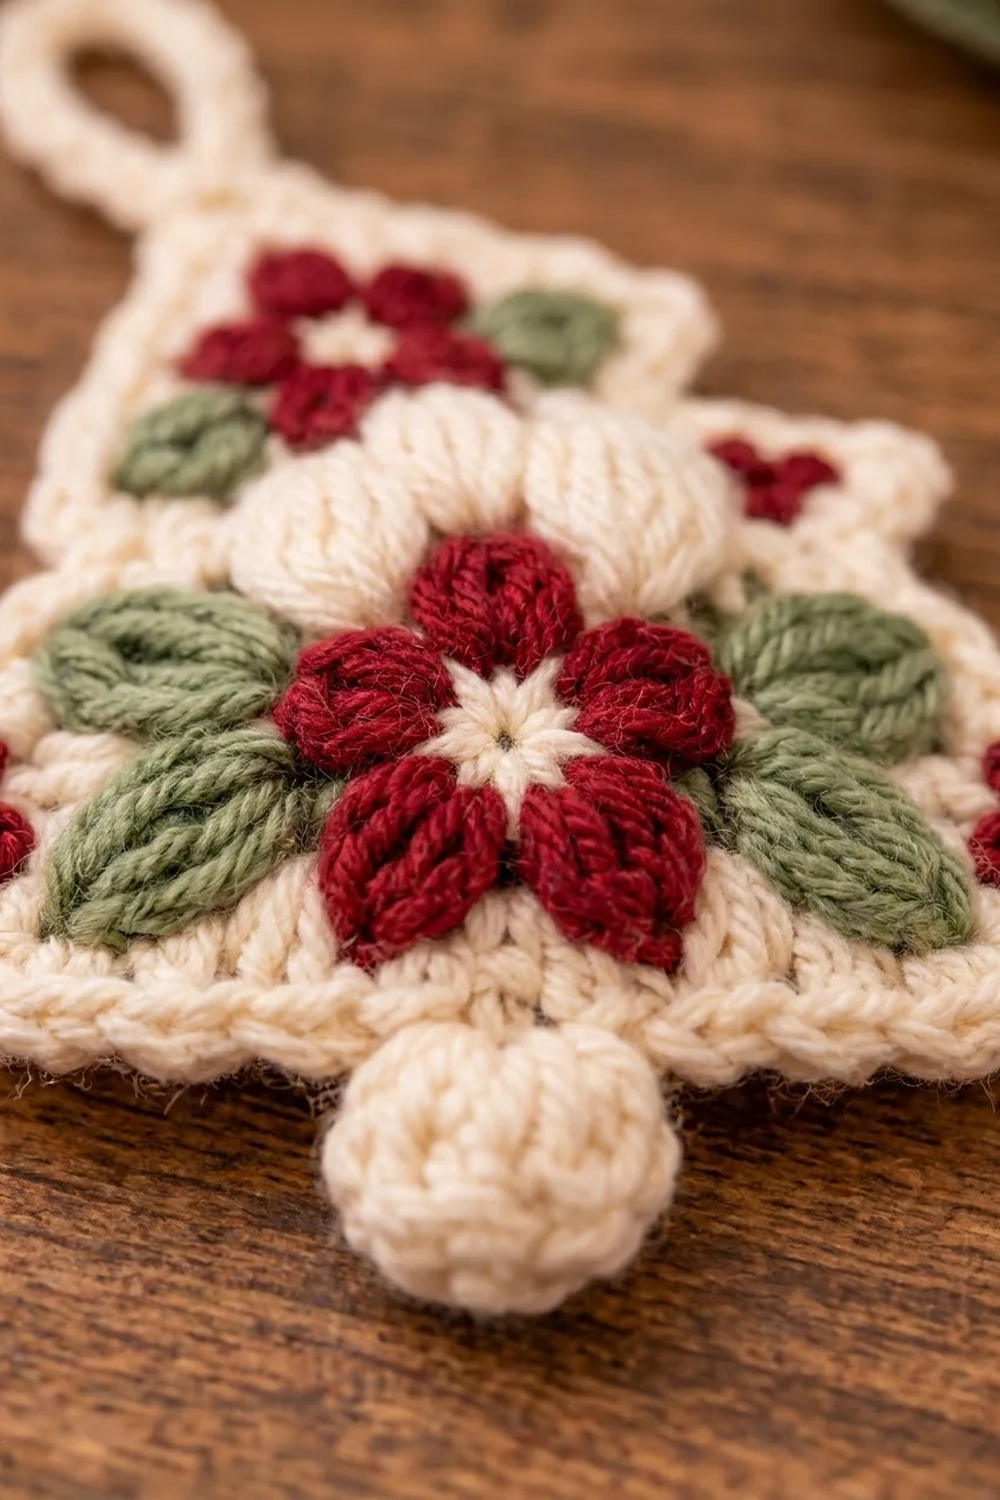
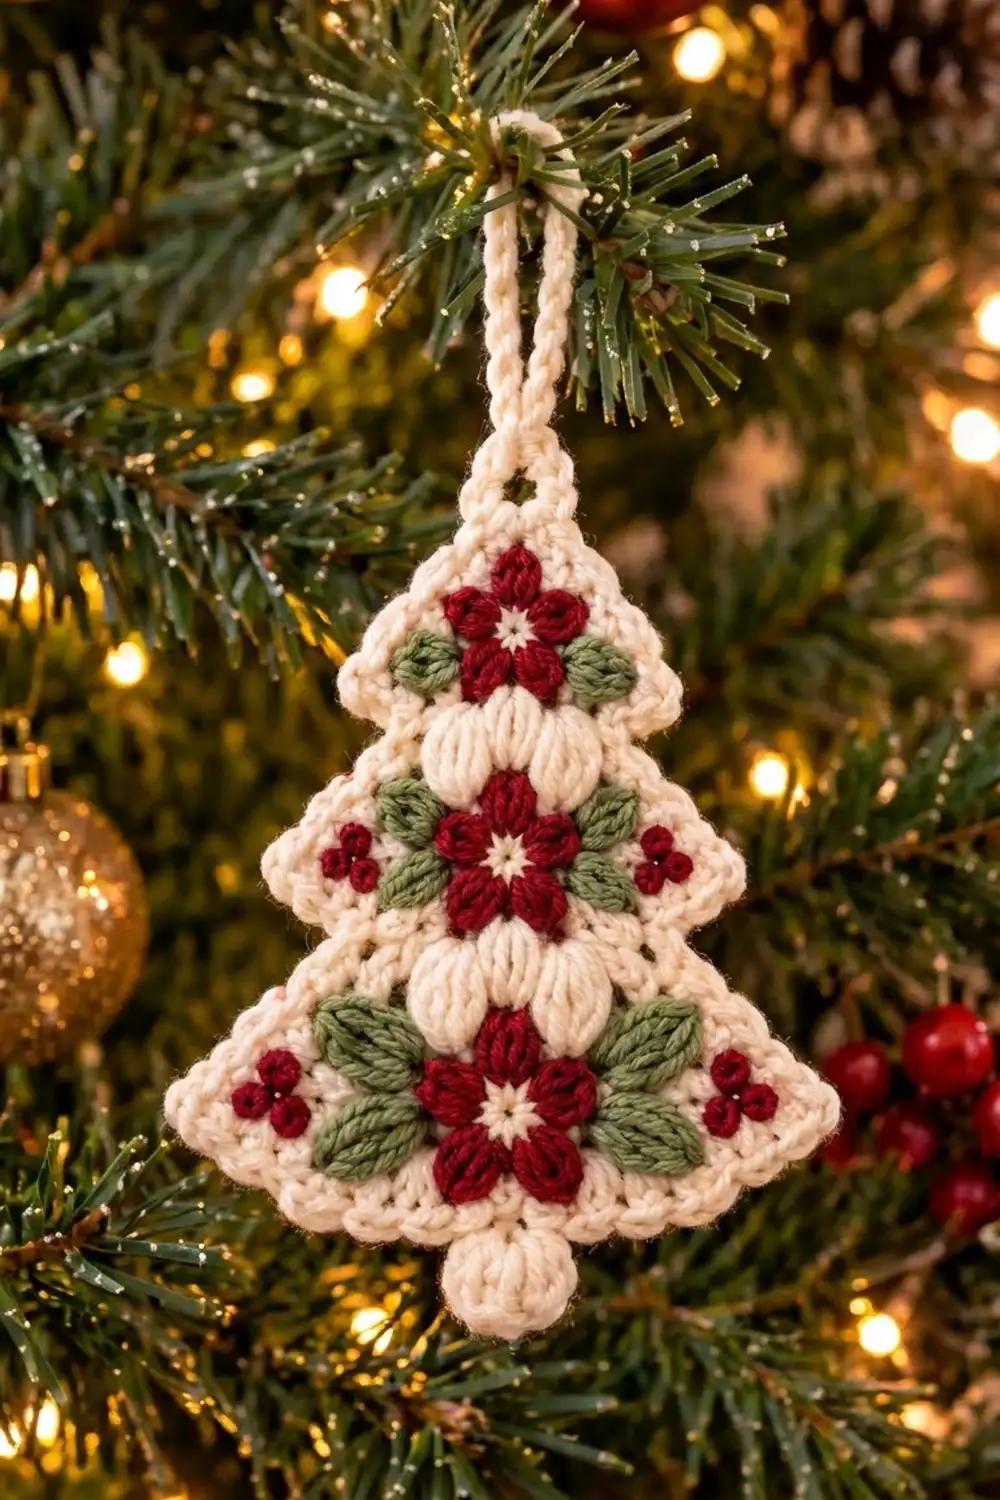
This little three-tier tree mixes cozy texture with a vintage holiday palette. A cream body gets a red puff-stitch flower on every tier, sage green leaves, tiny berry clusters, and a corded edge that looks like twisted rope.
The colors are cream, cranberry red, and sage green. The look is cottage-style and a little old-fashioned. It works on a tree, as a gift topper, or on a wreath. All instructions use US crochet terms.
The finished ornament measures about 4.3 in (10.9 cm) wide and 5.1 in (13.0 cm) tall, not counting the loop. With the loop, it is about 6.3 in (16.0 cm) tall.
The tree body is worked flat in one piece from the tip down. You build three tiers and finish with the trunk. Puff stitches are worked into the body as you go. Next, a two-round border goes all the way around. Last, you make the flowers, leaves, and berries separately and sew them on.
Finished Size and Construction
- Finished size: about 4.3 × 5.1 in (10.9 × 13.0 cm) without the loop
- Skill level: Intermediate (beginners can manage it with some patience)
- Terminology: US
- Yarn weight: Sport (#2) cotton or cotton blend
- Hook: 3.0 mm
- Number of pieces: 1 body; appliqués are sewn on (3 flowers, 8 leaves, 12 berries)
- Layout: Single ornament with no joining
- Body size before border: 3.83 × 4.57 in (9.7 × 11.6 cm)
- Border depth: about 0.25 in (0.6 cm) on each side
Materials
Use a smooth, mercerized cotton so the puffs and the crab stitch edge stay crisp. Pick a cream with no gray in it so it doesn’t look dull against the red.
- Cream: 10 g (about 30 m) for the body, border, loop, and flower centers
- Cranberry red: 4 g (about 12 m) for the flower petals and berries
- Sage green: 3 g (about 9 m) for the leaves
- 3.0 mm crochet hook
- Tapestry needle
- 2 stitch markers
- Scissors
- Blocking mat and rustproof pins
- Optional: spray starch or fabric stiffener
These amounts include a safety margin of roughly 25%.
Abbreviations (US Terms)
- ch – chain
- sl st – slip stitch
- sc – single crochet
- hdc – half double crochet
- dc – double crochet
- sc2tog – single crochet 2 together
- rev sc – reverse single crochet (crab stitch)
- st(s) – stitch(es)
- RS / WS – right side / wrong side
Puff (P): (Yarn over, insert hook in the stitch, yarn over, pull up a loop to the height of a dc) 4 times in the same stitch, so you have 9 loops on your hook. Yarn over and pull through all 9 loops. A puff counts as 1 stitch.
Bobble (bob): (Yarn over, insert hook, pull up a loop, yarn over, pull through 2 loops) 3 times in the same stitch. Yarn over and pull through all 4 loops.
Body note: Puffs in the body are always worked on WS rows. That makes them pop out on the RS.
Gauge and Checkpoints
Gauge: 6 sc and 7 rows = 1 in (2.5 cm). Crochet a swatch of 12 sc by 14 rows. It should measure 2 × 2 in (5.1 × 5.1 cm).
Make one complete body before cutting any extra lengths of yarn. Measure it at each of these points:
- After Row 8 (Tier 1): 11 sts, 1.83 in (4.6 cm) wide, 1.14 in (2.9 cm) tall
- After Row 18 (Tier 2): 17 sts, 2.83 in (7.2 cm) wide, 2.57 in (6.5 cm) from the tip
- After Row 28 (Tier 3): 23 sts, 3.83 in (9.7 cm) wide, 4.0 in (10.2 cm) from the tip
- After the trunk: 4.57 in (11.6 cm) total height
- After the border: about 4.3 × 5.1 in (10.9 × 13.0 cm)
If your piece is too big, switch to a 2.75 mm hook. If it’s too small, switch to a 3.25 mm hook. Being off by one row per tier is fine. Being off by a whole stitch per inch is not.
Tree Body
Use cream. Ch 1 at the start of each row is a turning chain and does not count as a stitch. Row 1 is the RS.
Tier 1 (Top Tier)
Row 1 (RS): Ch 2. Work 3 sc in the 2nd ch from the hook, ch 1, and turn. (3 sts)
Row 2 (WS): 2 sc in the first st, sc in the next st, 2 sc in the last st. Ch 1 and turn. (5 sts)
Row 3: Sc in each st across. Ch 1 and turn. (5 sts)
Row 4: 2 sc in the first st, sc across to the last st, 2 sc in the last st. Ch 1 and turn. (7 sts)
Row 5: Sc across. (7 sts)
Row 6: Repeat Row 4. (9 sts)
Row 7: Sc across. (9 sts)
Row 8: Repeat Row 4. Do not ch 1. Turn. (11 sts)
Check your size: 11 sts, 1.83 in (4.6 cm) wide.
Tier 2 (Middle Tier)
Row 9 (RS, step-in): Sl st in the first 2 sts. Ch 1, sc in the next 7 sts, and leave the last 2 sts unworked. Ch 1 and turn. (7 sts; 2 + 7 + 2 = 11)
Row 10 (WS, puff row): 2 sc in the first st, (P, sc) twice, P, 2 sc in the last st. Ch 1 and turn. (9 sts, including 3 puffs)
Row 11: Sc across. Push each puff to the RS as you work past it. (9 sts)
Row 12: Repeat Row 4. (11 sts)
Row 13: Sc across. (11 sts)
Row 14: Repeat Row 4. (13 sts)
Row 15: Sc across. (13 sts)
Row 16: Repeat Row 4. (15 sts)
Row 17: Sc across. (15 sts)
Row 18: Repeat Row 4. Do not ch 1. Turn. (17 sts)
Check your size: 17 sts, 2.83 in (7.2 cm) wide.
Tier 3 (Bottom Tier)
Row 19 (RS, step-in): Sl st in the first 2 sts. Ch 1, sc in the next 13 sts, and leave the last 2 sts unworked. Ch 1 and turn. (13 sts; 2 + 13 + 2 = 17)
Row 20 (WS, puff row): 2 sc in the first st, sc in the next 3 sts, (P, sc) twice, P, sc in the next 3 sts, 2 sc in the last st. Ch 1 and turn. (15 sts, including 3 puffs)
Row 21: Sc across. (15 sts)
Row 22: Repeat Row 4. (17 sts)
Row 23: Sc across. (17 sts)
Row 24: Repeat Row 4. (19 sts)
Row 25: Sc across. (19 sts)
Row 26: Repeat Row 4. (21 sts)
Row 27: Sc across. (21 sts)
Row 28: Repeat Row 4. Do not ch 1. Turn. (23 sts)
Check your size: 23 sts, 3.83 in (9.7 cm) wide, 4.0 in (10.2 cm) tall.
Trunk
Row 29 (RS): Sl st in the first 9 sts. Ch 1, sc in the next 5 sts, and leave the last 9 sts unworked. Ch 1 and turn. (5 sts; 9 + 5 + 9 = 23)
Row 30 (WS): Sc in the next 2 sts, P, sc in the next 2 sts. Ch 1 and turn. (5 sts)
Row 31: Sc across. Ch 1 and turn. (5 sts)
Row 32: Sc2tog, sc, sc2tog. (3 sts)
The trunk should be 0.83 in (2.1 cm) wide and 0.57 in (1.4 cm) tall. Don’t fasten off yet. You will start the border from here.
Appliqués
Flowers (make 3)
Rnd 1: With cream, make a magic ring. Ch 1, work 6 sc into the ring, and join with a sl st to the first sc. Fasten off. (6 sts)
Rnd 2: Join red with a sl st in any st. (Ch 2, P, ch 2, sl st) in the same st, then sl st in the next st. Repeat from * 5 more times. The final sl st lands in the joining st. (6 petals)
Fasten off and leave a 10 in (25.4 cm) tail. The flower should measure about 1 in (2.5 cm) across.
Small Leaves (make 4, sage)
Ch 5. Sc in the 2nd ch from the hook, hdc in the next ch, dc in the next ch, 3 dc in the last ch. Rotate and work along the other side of the chain: dc in the next ch, hdc in the next ch, sc in the next ch. Sl st into the skipped tip ch. (10 sts)
The leaf should be about 0.7 in (1.8 cm) long. The foundation chain shows as the center vein.
Large Leaves (make 4, sage)
Ch 6. Sc in the 2nd ch from the hook, hdc in the next ch, dc in the next 2 ch, 3 dc in the last ch. Rotate and work along the other side: dc in the next 2 ch, hdc in the next ch, sc in the next ch. Sl st into the tip ch. (12 sts)
The leaf should be about 0.9 in (2.3 cm) long.
Berries (make 12, red)
Ch 2. Work a bob in the 2nd ch from the hook, then ch 1 to lock it. Fasten off and leave both tails. Each berry should measure about 0.25 in (0.6 cm).
Border
Border gauge: 6 sts per 1 in (2.5 cm) along stitch edges. Along the sloped sides, work 1 sc per row end.
Corner rule: Work 3 sc into the corner stitch at every outer tier point and at the bottom corners of the trunk. On the side where you worked the sl sts, put your border stitches into the stitch tops under the sl sts.
Rnd 1 (RS, cream): Continue from the trunk. Work around the tree in this order, starting at the tip and going down one side:
- Tip: 3 sc in the center st of Row 1. (3)
- Tier 1 side: 1 sc in each row end of Rows 1–7 (7 sc). Then 3 sc in the corner st of Row 8, and 1 sc in the next step st. (11)
- Tier 2 side: 1 sc in each row end of Rows 9–17 (9 sc). Then 3 sc in the corner st of Row 18, and 1 sc in the next step st. (13)
- Tier 3 side: 1 sc in each row end of Rows 19–27 (9 sc). Then 3 sc in the corner st of Row 28. (12)
- Bottom of Tier 3: 1 sc in each of the next 8 sts of Row 28. (8)
- Trunk side: 1 sc in each row end of Rows 29–31. (3)
That makes 47 sts on one side. Then work the trunk bottom: 3 sc in the first st of Row 32, sc in the center st, and 3 sc in the last st (7). Go up the other side and mirror the first side (47). Join with a sl st to the first sc.
Total: 3 + 47 + 7 + 47 = 104 sts.
Rnd 2: Ch 1 and rev sc in each st around. (104 sts) Join and fasten off.
Hanging loop: Join cream in the center sc of the tip. Ch 20, then sl st in the same st. Work 30 sc over the chain loop, then sl st in the tip again. Fasten off. The loop should stand about 1.25 in (3.2 cm) tall.
Why the math works: Each tier grows by 1 st at each edge every 2 rows. So 2 rows move the edge 1/6 in out and 2/7 in down, which gives a slope of about 0.33 in (0.8 cm). The 2 border sc you work there also cover 0.33 in at 6 sts per inch. Because those match, the edge lies flat without ruffling or cupping. The 3-sc corners keep the tier points sharp. Working 1 sc per stitch along the step edges and bottom edges keeps them straight.
Sewing the Appliqués
Work on the RS. Sew the leaves first, then the flowers on top of them, so the flowers cover the base of each leaf.
- Tier 1: Sew 1 small leaf on each side of center, around Rows 5–7, with the tips angled out. Then sew a flower in the center, over Rows 3–8.
- Tier 2: Sew 1 small leaf on each side, around Rows 13–16. Then sew a flower in the center over Rows 12–17, just below the puffs.
- Tier 3: On each side, sew 2 large leaves stacked one above the other, around Rows 22–27. Then sew a flower in the center over Rows 22–27.
- Berries: Sew 3 berries in a small triangle just inside each outer point of Tiers 2 and 3. That’s 4 clusters in all.
Use small backstitches through the back loops of the appliqués so the stitching doesn’t show.
Final Blocking
- Mist the ornament lightly, or dampen it and then roll it in a towel.
- Pin it RS up to 4.3 × 5.1 in (10.9 × 13.0 cm). Put a pin at each tier point.
- Pull the step edges straight and push each puff and petal up from underneath.
- Spray with starch if you want a firmer ornament.
- Let it dry completely before you unpin it, usually 6–8 hours.
Final Quality-Control Checklist
- The body rows match the counts at Rows 8, 18, and 28 (11, 17, and 23 sts).
- All 7 body puffs pop out on the RS.
- Border Rnd 1 has 104 sts.
- Each tier point is sharp and the tiers mirror each other.
- The flowers cover the base of every leaf.
- There are 4 berry clusters, each with 3 berries.
- The loop is firmly attached at the exact center of the tip.
- All ends are woven in on the WS.
Troubleshooting
- The puffs sink to the back: You worked them on an RS row. Redo that row on the WS.
- The edge ruffles: You are working more than 1 sc per row end. Go back to 1 per row.
- The edge cups: Your border stitches are too tight. Go up a hook size for the border only.
- The tier step looks like a gap: Make sure the step st gets 1 sc in Rnd 1.
- The flower petals flop: Tighten your ch 2 and keep all 4 puff loops the same height.
- The tree leans: You missed an increase. Count each even row.
Care
Hand wash in cool water with mild soap and press out the water with a towel. Reshape and lay flat to dry, then re-starch if needed.
Final Notes
The measurement chain goes like this:
- Your gauge of 6 sc and 7 rows per 1 in (2.5 cm) sets the tier widths: 1.83, 2.83, and 3.83 in (4.6, 7.2, and 9.7 cm).
- The trunk brings the body to 3.83 × 4.57 in (9.7 × 11.6 cm).
- The 104-st border adds 0.25 in (0.6 cm) on each side, for a finished size of 4.3 × 5.1 in (10.9 × 13.0 cm).
If you check each of these steps, the ornament will come out right. Make one for every branch.
Happy crocheting!