

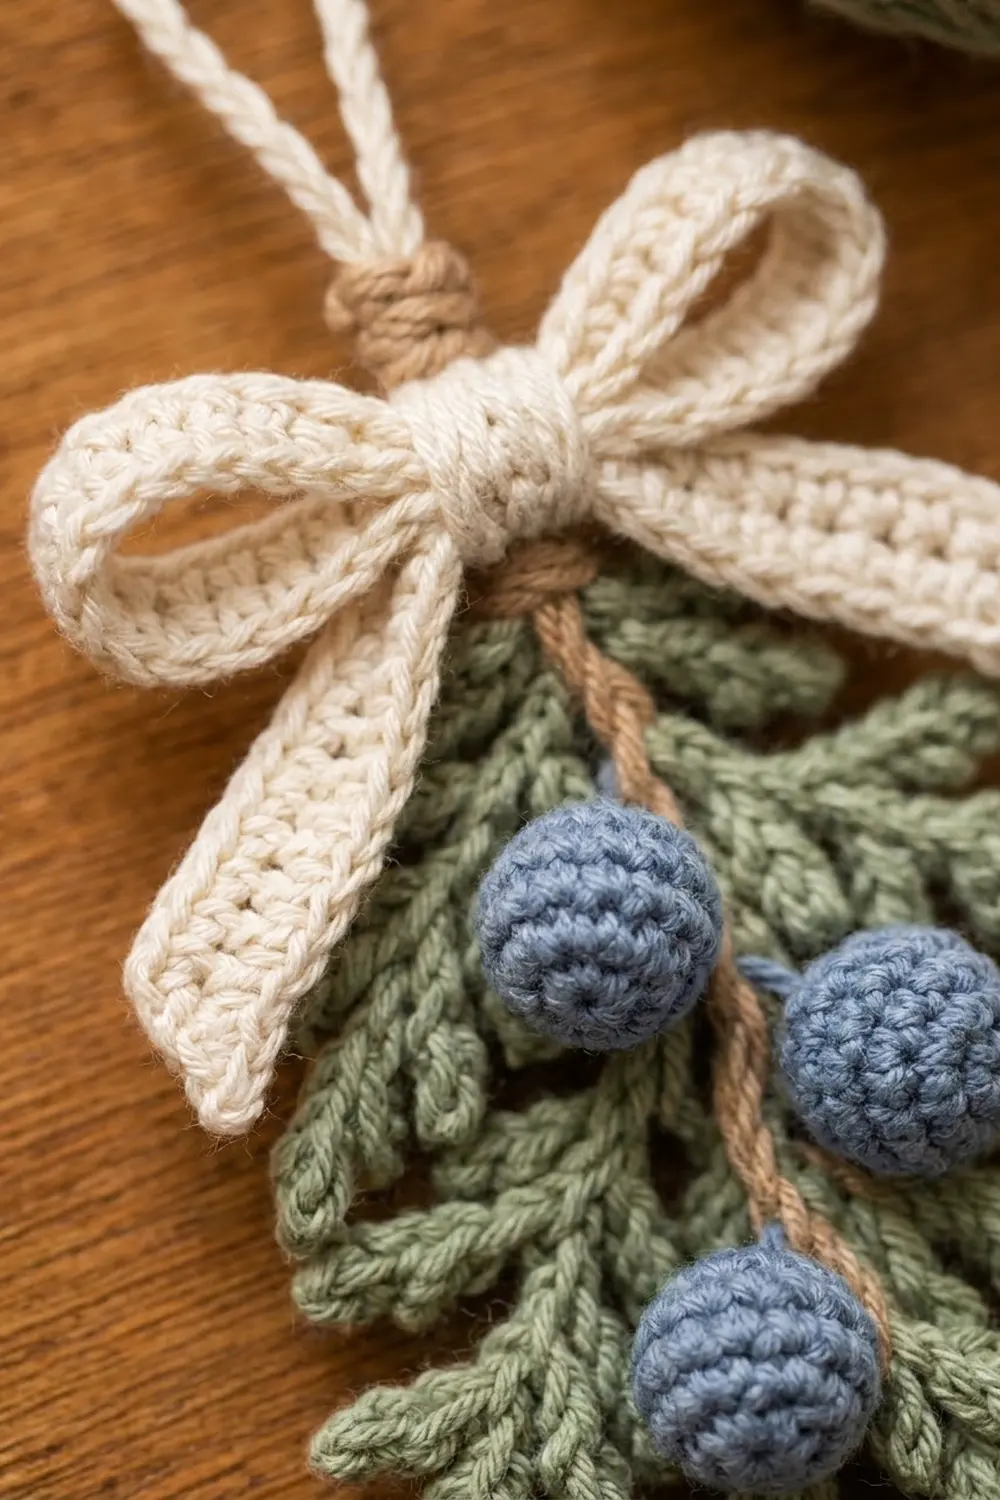
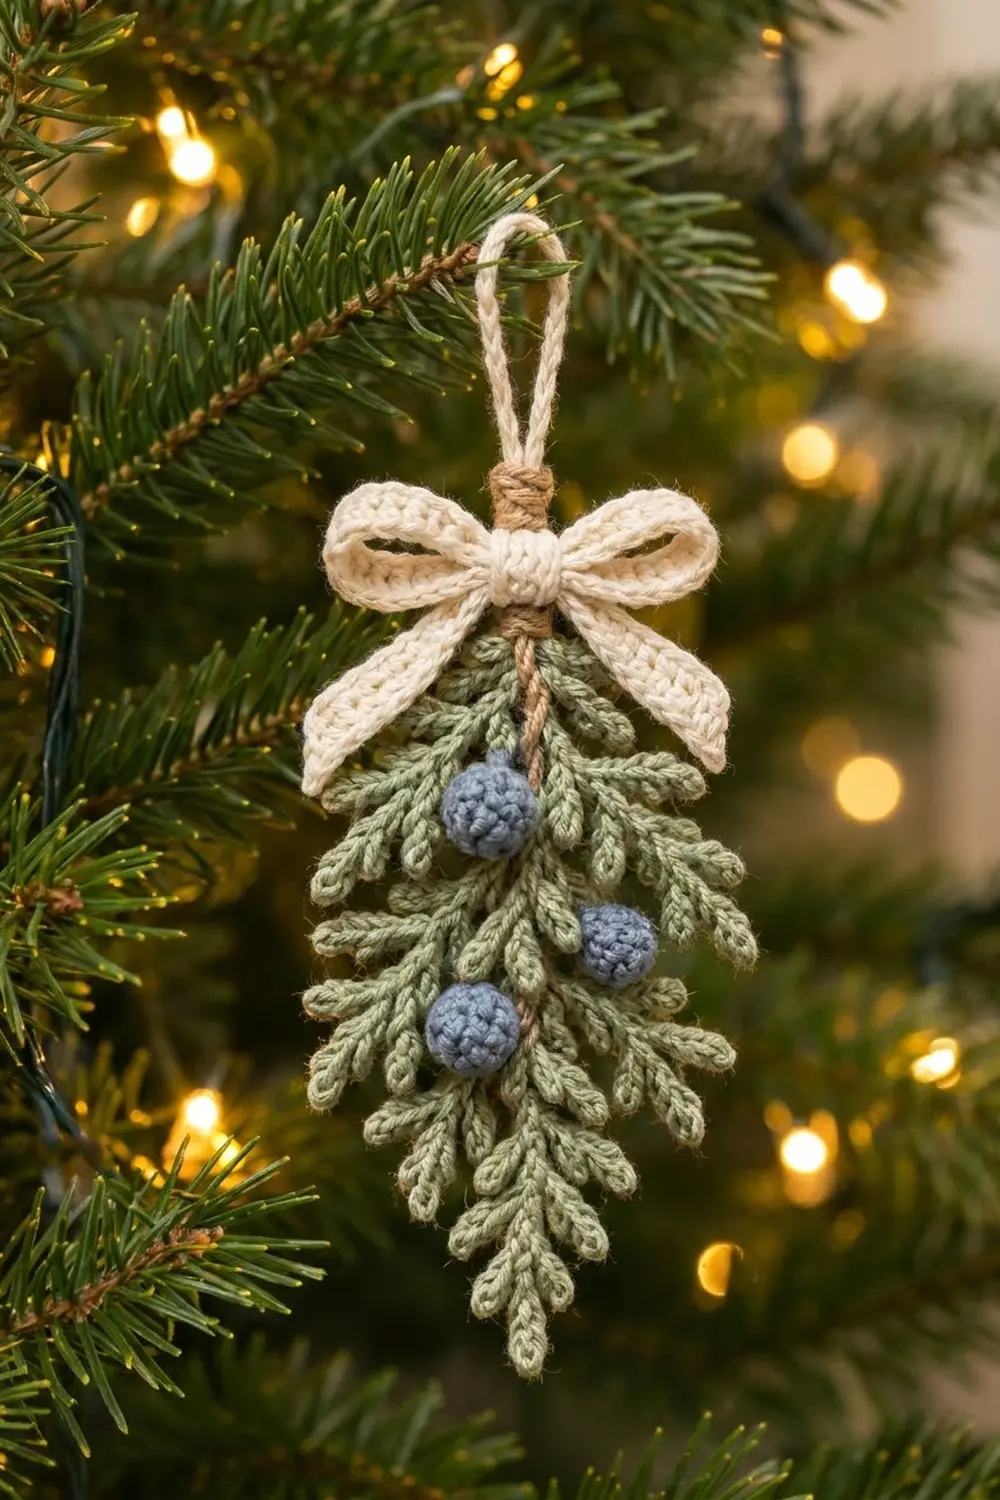
This ornament is a small, quiet piece of winter: three sage-green juniper sprigs gathered into a teardrop, three dusty-blue berries, a tan cord stem and a soft cream bow. It looks natural and Scandinavian, and it works on a tree, a wreath or a gift.
The palette is four colors: sage green for the foliage, dusty blue for the berries, tan for the stem and wrap, and cream for the bow and hanging loop. The needle texture comes from pairs of slip-stitch picots that splay into tiny V shapes along every frond.
All instructions use US crochet terms. The finished ornament measures about 9.5 in (24.1 cm) long including the loop. The sprig cluster is about 6 in (15.2 cm) long and 4 in (10.2 cm) wide.
Construction is simple. You crochet each sprig from a chain stem, working fronds back down the chain. Then you make the berries, two cords, a bow strip, a tails strip and a center band, and sew everything into one ornament.
Finished Size and Construction
- Finished size: 9.5 in (24.1 cm) long with loop; cluster 6 in x 4 in (15.2 x 10.2 cm)
- Skill level: Easy-intermediate (chains, slip stitches, picots, sc in the round)
- Terminology: US
- Yarn weight: DK (3), cotton or cotton blend
- Hook: 3.5 mm (E-4)
- Number of pieces: 11 (3 sprigs, 3 berries, 1 stem cord, 1 hanger cord, 1 bow loop strip, 1 tails strip, 1 center band)
- Layout: Center sprig pointing down, with one side sprig angled out to each side, all stems gathered at the top
- Piece sizes: Center sprig 6 in (15.2 cm); side sprigs about 4.25 in (10.8 cm); berries 0.75 in (1.9 cm)
- Bow strip size before border: 7 in x 0.8 in (17.8 x 2.0 cm)
- Border depth: 0.2 in (0.5 cm) per edge, one round of sc
Materials
Use a smooth, matte DK cotton so the picot needles stay crisp and readable. Fuzzy yarns blur the herringbone texture. The amounts below assume about 2.4 m per gram.
- Sage green: 10 g, about 24 m (sprigs)
- Dusty blue: 3 g, about 7 m (berries and stuffing)
- Cream: 6 g, about 14 m (bow, tails, band, hanger)
- Tan: 2 g, about 5 m (stem cord and wrap)
Tools:
- 3.5 mm (E-4) hook
- Tapestry needle
- Scissors
- Stitch marker
- Rustproof pins and a foam blocking mat
- Spray bottle
- Optional: fabric stiffener for the bow
All quantities include a margin of about 20% for swatching and sewing tails.
Abbreviations (US Terms)
- ch – chain
- sl st – slip stitch
- sc – single crochet
- sc2tog – single crochet 2 together
- MR – magic ring
- st(s) – stitch(es)
- BB – back bump of the chain
Special stitches:
- Picot (P): Ch 3, sl st into the same stitch or chain the picot started from. This makes one closed needle.
- Needle Pair (NP): Work P twice into the same chain. The two loops splay into a V, one to each side of the frond.
- Small Frond (SF): Ch 5. Ch 3, sl st in 4th ch from hook (the frond’s 5th ch), making the tip needle. Working in BB down the frond: [sl st in next ch, NP] 3 times, sl st in last frond ch. (3 needle pairs + 1 tip = 7 needles; length about 1 in / 2.5 cm.)
- Medium Frond (MF): Ch 7. Ch 3, sl st in 4th ch from hook (the tip needle). Working in BB down the frond: [sl st in next ch, NP] 5 times, sl st in last frond ch. (5 needle pairs + 1 tip = 11 needles; length about 1.5 in / 3.8 cm.)
- Frond Pair: Make one frond, then make a second identical frond from the same stem chain, with no sl st in between. They splay into a V.
Gauge and Checkpoints
Chain gauge: 10 sl sts worked into the BB of a chain = 2 in (5.1 cm), so 5 sts per inch.
Fabric gauge: 10 sc x 10 rows = 2 in (5.1 cm) square.
Before making all the parts, make one Medium Frond on a short chain and check it.
Checkpoints:
- Medium Frond: 1.5 in (3.8 cm) from stem to tip needle.
- Center sprig stem chain (25 ch): 5 in (12.7 cm) before you work back down it.
- Finished center sprig: 6 in (15.2 cm) including the tip frond.
- Berry: 0.75 in (1.9 cm) across.
- Bow loop strip: 7 in x 0.8 in (17.8 x 2.0 cm) before border, 7.4 in x 1.2 in (18.8 x 3.0 cm) after border.
If the piece is too big, go down to a 3.25 mm hook or tighten your chains. If it is too small, go up to a 3.75 mm hook. Size matters most for the bow, because the bow has to cover the gathered sprig tops.
Sprigs
Work every frond into the BB of its chain so the front of the stem stays smooth. Leave a 6 in (15.2 cm) tail at the start and end of each sprig for sewing.
Center Sprig (make 1, sage green)
Stem: Ch 25. The last chain you made (ch 25) is the bottom tip of the sprig, and ch 1 is the top.
Tip: Work 1 SF, anchored at ch 25.
Down the stem (work in BB):
- Sl st in next 3 stem ch (ch 24, 23, 22). Work a Frond Pair of SF.
- Sl st in next 3 ch (ch 21, 20, 19). Work a Frond Pair of SF.
- Sl st in next 3 ch (ch 18, 17, 16). Work a Frond Pair of MF.
- Sl st in next 3 ch (ch 15, 14, 13). Work a Frond Pair of MF.
- Sl st in next 3 ch (ch 12, 11, 10). Work a Frond Pair of MF.
- Sl st in next 3 ch (ch 9, 8, 7). Work a Frond Pair of MF.
- Sl st in each of the last 6 ch (ch 6 to 1). This is the bare top stem.
Fasten off.
Count check:
- Stem sl sts: 18 + 6 = 24, worked into ch 24 to 1. Ch 25 holds the tip frond.
- Fronds: 1 tip + 6 pairs = 13 fronds (5 SF, 8 MF).
- Size: 6 in (15.2 cm) long and about 3 in (7.6 cm) wide, with the fronds angled downward.
Side Sprigs (make 2, sage green)
Stem: Ch 16.
Tip: Work 1 SF, anchored at ch 16.
Down the stem (work in BB):
- Sl st in ch 15, 14, 13. Work a Frond Pair of SF.
- Sl st in ch 12, 11, 10. Work a Frond Pair of MF.
- Sl st in ch 9, 8, 7. Work a Frond Pair of MF.
- Sl st in each of the last 6 ch (ch 6 to 1).
Fasten off.
Count check:
- Stem sl sts: 9 + 6 = 15.
- Fronds: 1 tip + 3 pairs = 7 fronds (3 SF, 4 MF).
- Size: about 4.25 in (10.8 cm) long.
Berries (make 3, dusty blue)
Work in continuous rounds and mark the first stitch of each round.
- Rnd 1: 6 sc in MR. (6)
- Rnd 2: 2 sc in each st around. (12)
- Rnd 3: Sc in each st around. (12)
- Rnd 4: Sc in each st around. (12)
Stuff firmly with dusty-blue yarn scraps so no white fiberfill shows through.
- Rnd 5: Sc2tog 6 times. (6)
Fasten off, leaving an 8 in (20.3 cm) tail. Weave the tail through the front loops of the last round and pull it closed. Keep the tail for attaching the berry. Each berry should be 0.75 in (1.9 cm) across.
Cords and Bow Pieces
Stem Cord (tan): Ch 31. Sl st in BB of 2nd ch from hook and each ch across. (30 sl sts) Fasten off. The cord measures 6 in (15.2 cm) and has a twisted, ropey look.
Hanger Cord (cream): Ch 26. Sl st in BB of 2nd ch from hook and each ch across. (25 sl sts) Fasten off. The cord measures 5 in (12.7 cm).
Bow Loop Strip (cream):
- Ch 36.
- Row 1: Sc in 2nd ch from hook and each ch across. (35)
- Rows 2–4: Ch 1, turn, sc in each st across. (35)
- Do not fasten off; continue to the Border. Before the border, the strip measures 7 in x 0.8 in (17.8 x 2.0 cm).
Tails Strip (cream):
- Ch 21.
- Row 1: Sc in 2nd ch from hook and each ch across. (20)
- Rows 2–3: Ch 1, turn, sc in each st across. (20)
- Continue to the Border. Before the border, the strip measures 4 in x 0.6 in (10.2 x 1.5 cm).
Center Band (cream):
- Ch 4.
- Row 1: Sc in 2nd ch from hook and each ch across. (3)
- Rows 2–8: Ch 1, turn, sc in each st across. (3)
- Fasten off with a 10 in (25.4 cm) tail. The band measures 0.6 in x 1.6 in (1.5 x 4.1 cm) and has a ribbed look from the row ridges.
Make All Pieces
Totals by color:
- Sage green: 1 center sprig, 2 side sprigs
- Dusty blue: 3 berries
- Tan: 1 stem cord, plus a 24 in (61.0 cm) length of yarn for wrapping
- Cream: 1 hanger cord, 1 bow loop strip, 1 tails strip, 1 center band
Layout (front view, top to bottom):
            ( cream loop )
                 ||
            [ tan wrap ]
                 |   <- bare tan cord, 1 in
        ==== cream bow ====
       /    tails    \
   SIDE L   CENTER   SIDE R
      \    (B1)       /
       \     |  (B2) /
        \  (B3)     /
             |
            tip
B1 sits left of the stem near the top, B2 sits right of the stem in the middle, and B3 sits left of the stem below B2.
Joining
The parts are sewn together, not joined stitch to stitch. Use matching yarn tails and keep every stitch on the back.
- Stack the sprigs. Lay the center sprig face up. Place the side sprigs on top, lining up their 6-ch bare stems with the center sprig’s bare stem. Angle each side sprig about 30 degrees outward. Using the green tails, whipstitch the three bare stems together through the BB loops, 1 stitch per chain, over the top 6 chains.
- Add the stem cord. Lay the tan cord over the center stem so 1.5 in (3.8 cm) extends above the sprig tops. Tack the lower 4.5 in (11.4 cm) of cord to the stem every 3 chains (about every 0.6 in / 1.5 cm) with tan yarn.
- Add the hanger. Fold the hanger cord in half. Lay both ends over the top 0.5 in (1.3 cm) of the tan cord, so 2 in (5.1 cm) of loop shows above.
- Wrap. Wrap the tan yarn tightly 8 times around that 0.5 in (1.3 cm) overlap. Knot it at the back and bury the ends inside the wrap.
- Add the berries. Sew B1, B2 and B3 in the positions shown in the layout, passing each tail through the stem twice.
Tension advice: Snug every stitch, but don’t pucker the fronds. The sprigs should still lie flat.
Size checkpoint: The ornament should measure 9.5 in (24.1 cm) from the top of the loop to the center tip, and the cluster should be 4 in (10.2 cm) wide.
Border
The border is one round of sc on the bow loop strip and on the tails strip. Border gauge matches the body: 5 sc per inch. Ch-1 corners are separate from the side counts.
Bow Loop Strip Border: Keep working from the end of Row 4.
- Ch 1, turn. Sc in each of the 35 sts across. Ch 1 for the corner.
- Work 4 sc down the short side, 1 in each row end. Ch 1.
- Work 35 sc along the foundation chain, 1 in each ch. Ch 1.
- Work 4 sc up the last short side. Ch 1. Sl st to the first sc.
- Total: 35 + 4 + 35 + 4 = 78 sc, plus 4 ch-1 corners.
- After the border, the strip measures 7.4 in x 1.2 in (18.8 x 3.0 cm).
Tails Strip Border: Work the same way: 20 sc, ch 1, 3 sc, ch 1, 20 sc, ch 1, 3 sc, ch 1, then join.
- Total: 20 + 3 + 20 + 3 = 46 sc, plus 4 ch-1 corners.
- After the border, the strip measures 4.4 in x 1.0 in (11.2 x 2.5 cm).
Why the math works: One sc row is 0.2 in (0.5 cm) tall, which equals the width of one sc. So 1 sc per row end keeps the short edges flat, and 1 sc per stitch keeps the long edges flat. Each ch-1 corner turns the edge without bunching. The border adds 0.2 in (0.5 cm) on every edge, so 7 in becomes 7.4 in and 0.8 in becomes 1.2 in.
Building the bow:
- Fold both short ends of the bow loop strip to the center, overlapping them by 0.4 in (1.0 cm). This gives a bow (7.4 − 0.4) ÷ 2 = 3.5 in (8.9 cm) wide.
- Pinch the tails strip at its center into a V and place it behind the loops.
- Wrap the center band around everything and sew the band ends together at the back.
- Sew the bow over the gathered sprig tops, 1 in (2.5 cm) below the tan wrap.
Final Blocking
- Mist the ornament until it is damp, not soaked.
- Pin it face up on the mat.
- Open each Needle Pair into a clear V with your fingertip, then angle every frond about 45 degrees downward.
- Pin the tips so the cluster measures 6 in x 4 in (15.2 x 10.2 cm).
- Shape the bow loops round by putting a rolled scrap of paper towel inside each one. Brush the bow lightly with fabric stiffener if you want it to hold its shape.
- Let it dry completely, at least 12 hours, before unpinning.
Final Quality-Control Checklist
- [ ] Center sprig has 13 fronds; each side sprig has 7
- [ ] Every frond has paired needles plus 1 tip needle
- [ ] Berries are 0.75 in (1.9 cm) across, and no stuffing shows
- [ ] Tan cord is tacked flat and does not twist off the stem
- [ ] Hanger loop shows 2 in (5.1 cm) above the wrap
- [ ] Bow is 3.5 in (8.9 cm) wide, and the loops are even
- [ ] Bow borders: 78 sc on the loop strip, 46 sc on the tails strip
- [ ] Total length is 9.5 in (24.1 cm)
- [ ] All tails are buried on the back
Troubleshooting
- Fronds curl into spirals: Your chains are tighter than your slip stitches. Chain more loosely, or go up 0.25 mm for chains only.
- Needles flop to one side: Make sure both picots of a pair go into the same chain, then re-block them as a V.
- Bow is too small to cover the sprig tops: Check fabric gauge. Add 1 row to the bow loop strip (5 rows, 5 sc per short side in the border) to make it taller.
- Bow edges ruffle: You worked more than 1 sc per row end. Undo the border and recount.
- Berries look flat: Stuff more firmly before Rnd 5.
- Ornament tilts on the tree: Center the hanger ends exactly over the tan cord before wrapping.
Care
Spot clean with cool water and mild soap, then reshape and dry flat. Store the ornament flat in tissue so the bow loops and fronds keep their shape.
Final Notes
The measurement chain is simple:
- 5 sts per inch gives a 1.5 in (3.8 cm) Medium Frond.
- The fronds build a 6 in (15.2 cm) center sprig and a 6 x 4 in (15.2 x 10.2 cm) cluster.
- A 35-stitch strip with its 78-sc border folds into a 3.5 in (8.9 cm) bow.
- With the 2 in (5.1 cm) loop, the ornament totals 9.5 in (24.1 cm).
Check each link as you go and the finished ornament will come out the right size. Make one for the tree, a few for gift toppers, and enjoy the calm, quiet stitching.
Happy crocheting!