

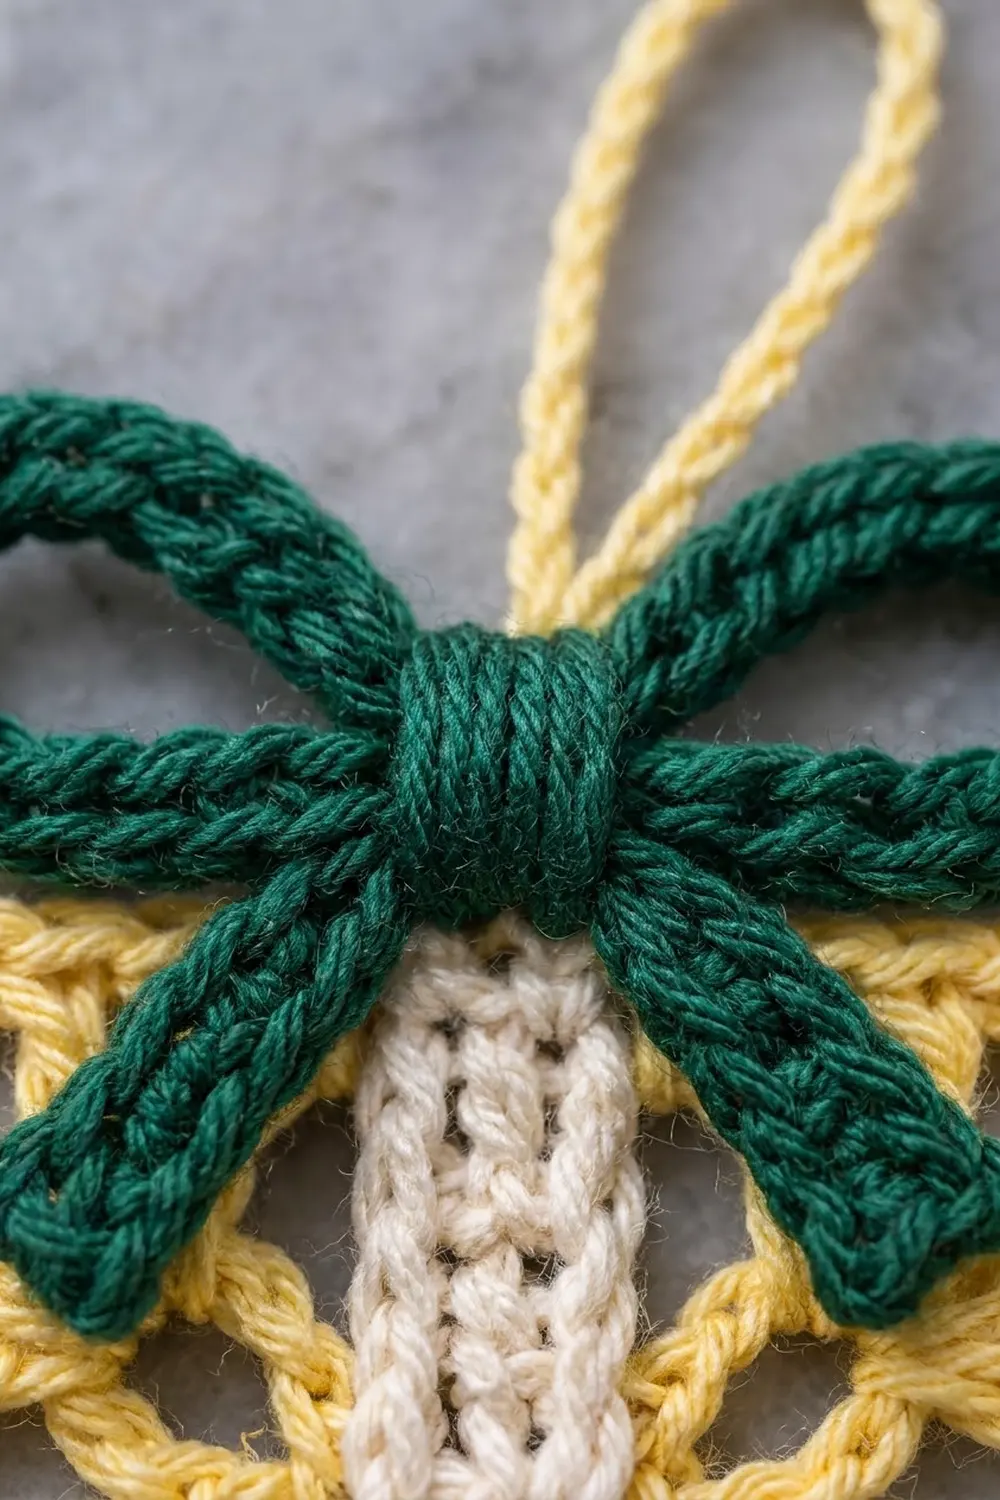
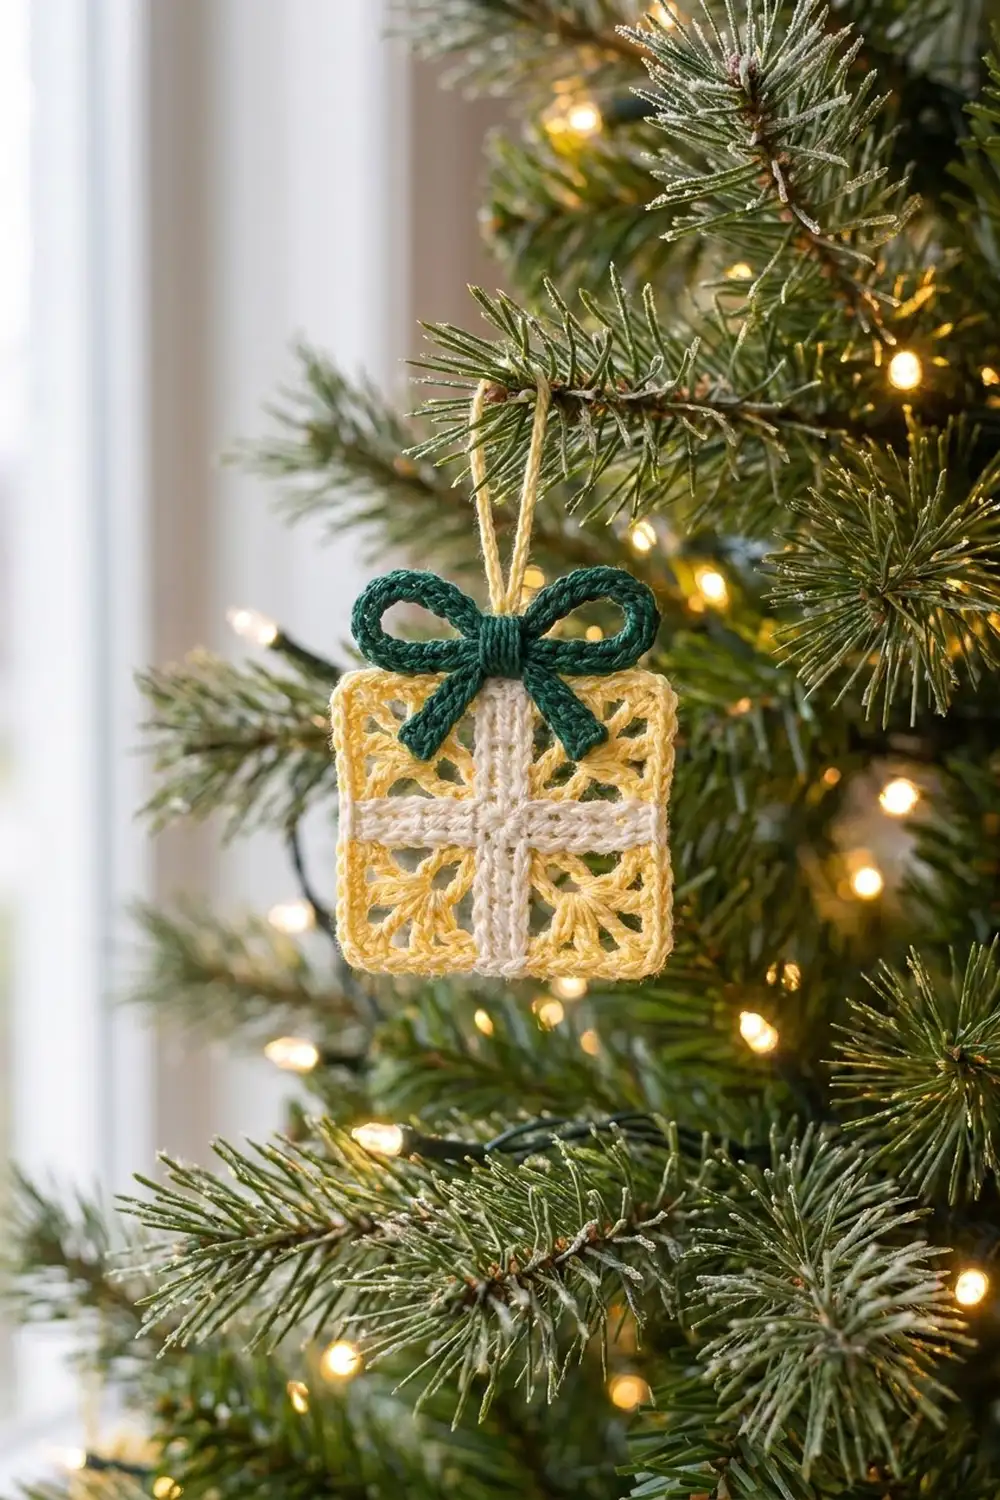
This little gift box ornament looks like a wrapped present. The box is a lacy square in soft butter yellow, a cream ribbon crosses its center, and a forest-green bow sits on top. A yellow hanging loop makes it ready for the tree, a package tie or a garland hook.
The three colors give a warm, vintage look. You can still see through the lace, so the ornament stays light and delicate, while the solid ribbon and the thick bow add contrast and shape.
The pattern uses US crochet terms. The finished box measures 3.25 in (8.3 cm) square. With the bow, the ornament is about 4.25 in (10.8 cm) tall, not counting the hanging loop.
Construction is simple. You work a six-round square motif in yellow, then make two short cream ribbon strips, a green bow cord, a tail cord and a center wrap, plus a yellow hanging cord. Then you sew everything on and block.
Finished Size and Construction
- Finished box size: 3.25 in x 3.25 in (8.3 cm x 8.3 cm)
- Height with bow: about 4.25 in (10.8 cm)
- Skill level: Easy / advanced beginner
- Terminology: US crochet terms
- Yarn weight: Sport weight (#2) mercerized cotton
- Hook: 3.0 mm (US C/2 or D/3)
- Number of pieces: 1 square motif plus small sewn-on parts (2 ribbon strips, bow cord, tail cord, center wrap, hanging cord)
- Layout: Single ornament; no joining of motifs
- Size before border (after Round 5): 3 in (7.6 cm) square
- Border: Round 6, one round of single crochet, about 1/8 in (0.3 cm) deep on each side
Materials
Yarn advice: Use a smooth, mercerized cotton in sport weight. It gives crisp stitch definition, keeps the lace open and holds the bow loops round. Avoid fuzzy or very stretchy acrylic, which blurs the lace and lets the bow go floppy.
- Color A, pale butter yellow (box and hanging loop): 6 g, about 19 m
- Color B, cream (ribbon): 2 g, about 6 m
- Color C, forest green (bow): 3 g, about 9 m
These amounts include a small margin for gauge swatching and weaving in ends. One 50 g ball of each color makes many ornaments.
Tools:
– 3.0 mm crochet hook
– Tapestry needle
– Scissors
– Stitch marker
– Blocking mat and rust-proof pins
– Spray bottle with water
– Optional: light spray starch
Abbreviations (US Terms)
- ch – chain
- sl st – slip stitch
- sc – single crochet
- dc – double crochet
- sp – space
- st(s) – stitch(es)
- MR – magic ring
- rep – repeat
- beg – beginning
Special stitches
- 3-dc cluster (cl): *Yarn over, insert hook in the stitch or space, yarn over and pull up a loop, yarn over and pull through 2 loops. Repeat from * 2 more times in the same place (4 loops on hook). Yarn over and pull through all 4 loops.
- Beg cluster (beg cl): Ch 2, then work the 2-dc version of the cluster in the same place (3 loops on hook before the final pull-through). The ch-2 plus the 2-dc cluster count as 1 cluster.
- Back-bump stitch: Work into the bump on the back of the chain, not into the front V. This gives a neat, rounded cord.
Gauge and Checkpoints
Gauge is not critical for an ornament, but the parts must fit the box. Make the yellow square first, check it, and only then size the ribbon and bow to it.
Single crochet gauge (ribbon and border): 20 sc = 3.25 in (8.3 cm).
Motif checkpoints, measured flat, unblocked:
– After Round 2: 1.5 in (3.8 cm) across
– After Round 3: 2.25 in (5.7 cm) across
– After Round 4: 2.5 in (6.4 cm) across
– After Round 5: 3 in (7.6 cm) square
– After Round 6: 3.25 in (8.3 cm) square
If your motif is too big: go down to a 2.75 mm hook, or tighten your chain spaces. Loose chains are the most common cause.
If your motif is too small: go up to a 3.25 mm hook. Also check that you aren’t pulling your clusters tight.
If you change hooks for the box, use the same hook for the ribbon strips so the 20-stitch strips still match the 3.25 in (8.3 cm) sides.
The Box Motif (Color A, Yellow)
Round 1: MR. Ch 4 (counts as dc + ch 1), [dc in ring, ch 1] 7 times. Join with a sl st to the 3rd ch of the beg ch-4. Pull the ring snug, leaving a small open center.
Count: 8 dc, 8 ch-1 sps.
Round 2: Sl st into the next ch-1 sp. Beg cl in the same sp, ch 3, [cl in next ch-1 sp, ch 3] 7 times. Join with a sl st to the top of the beg cl.
Count: 8 clusters, 8 ch-3 sps. These are the petals around the open center.
Round 3 (squaring round): Sl st into the next ch-3 sp. Ch 3 (counts as dc), (2 dc, ch 2, 3 dc) in the same sp for the first corner, ch 1, 3 dc in the next ch-3 sp, ch 1. (3 dc, ch 2, 3 dc) in the next ch-3 sp, ch 1, 3 dc in the next ch-3 sp, ch 1; rep from * 2 more times. Join to the top of the beg ch-3.
Count: 36 dc (four 6-dc corner groups + four 3-dc side groups), 4 ch-2 corner sps, 8 ch-1 sps.*
Round 4 (lace window round): Sl st in the next 2 dc and into the ch-2 corner sp. Ch 3 (counts as dc), (dc, ch 2, 2 dc) in the same sp. Ch 2, cl in the next ch-1 sp, ch 3, skip the 3-dc side group, cl in the next ch-1 sp, ch 2, (2 dc, ch 2, 2 dc) in the next corner sp. Rep from * 2 more times, then from * to ** once. Join to the top of the beg ch-3.
Count: 16 dc, 8 clusters, 4 ch-2 corner sps, 8 ch-2 sps, 4 ch-3 sps.*
Skipping the dc groups opens the windows, and the clusters fan toward the corners.
Round 5 (solid frame): Sl st in the next dc and into the corner sp. Ch 3 (counts as dc), (dc, ch 2, 2 dc) in the same sp. Dc in the next 2 dc, 2 dc in the ch-2 sp, dc in the top of the cl, 3 dc in the ch-3 sp, dc in the top of the cl, 2 dc in the ch-2 sp, dc in the next 2 dc*, (2 dc, ch 2, 2 dc) in the next corner sp. Rep from * 2 more times, then from * to ** once. Join to the top of the beg ch-3.
Count per side, between corner ch-2 sps: 2 (corner) + 2 + 2 + 1 + 3 + 1 + 2 + 2 + 2 (next corner) = 17 dc.
Round total: 4 x 17 = 68 dc, plus 4 ch-2 corner sps.
Checkpoint: 3 in (7.6 cm) square. Do not fasten off.
Border
Border gauge: Round 6 matches the ribbon gauge, about 20 sc = 3.25 in (8.3 cm).
Round 6 (sc border): Ch 1. Sc in the same st as the join and in the next dc (2 sc), 3 sc in the corner sp. *Sc in each of the next 17 dc, 3 sc in the corner sp; rep from * 2 more times. Sc in each of the remaining 15 dc. Join to the first sc. Fasten off and weave in the ends.
Count: 68 sc worked 1 per existing dc + 12 sc added in the corners (3 per corner) = 80 sc.
Per side, including both corner center stitches: 1 corner center + 1 + 17 + 1 + 1 corner center = 21 sc. Four sides x 21 = 84, minus the 4 shared corner centers = 80. ✓
Why the math works: One sc per dc keeps each side the same length, and the 3 sc in each corner turn it flat without cupping. The border adds about 1/8 in (0.3 cm) on every side, taking the box from 3 in (7.6 cm) to 3.25 in (8.3 cm). The center stitch of each side is stitch 11 of 21, which marks where the ribbon goes.
Checkpoint: 3.25 in (8.3 cm) square.
Ribbon Strips (Color B, Cream)
Make 2 identical strips.
Foundation: Ch 21.
Row 1: Sc in the 2nd ch from the hook and in each ch across. Ch 1, turn. (20 sc)
Row 2: Sc in each sc across. (20 sc) Fasten off, leaving a 10 in (25.4 cm) tail for sewing.
Strip size: 3.25 in (8.3 cm) long x about 0.4 in (1.0 cm) wide. The two rows of sc give the double-column, braided look of a satin ribbon.
Checkpoint: Lay a strip across the motif. Its ends should line up with the outer edge of Round 6. If it’s long, rip back and start with ch 20 (19 sc). If it’s short, start with ch 22 (21 sc).
Attaching the Ribbon
- Place the motif right side up. Mark stitch 11 on the top and bottom sides.
- Lay the first strip vertically, centered on the marked stitches, so it runs edge to edge through the center ring.
- Whipstitch along both long edges, catching the solid stitches of Rounds 5 and 6 and the dc of Rounds 1–4 where the strip crosses them. Across open lace, take the stitch around the nearest strand so the strip stays flat.
- Tack each short end over the border.
- Lay the second strip horizontally across the first, centered on stitch 11 of the left and right sides. Sew it on the same way.
- Add a few stitches through both strips at the crossing.
Bow (Color C, Green)
Bow Loop Cord
Foundation: Ch 37.
Row 1: Sc in the back bump of the 2nd ch from the hook and in the back bump of each ch across. (36 sc) Fasten off, leaving a 6 in (15.2 cm) tail.
Cord length is about 6 in (15.2 cm).
Tail Cord
Foundation: Ch 19.
Row 1: Sc in the back bump of the 2nd ch from the hook and in each back bump across. (18 sc) Fasten off.
Cord length is about 3 in (7.6 cm).
Center Wrap
Foundation: Ch 7.
Row 1: Sc in the 2nd ch from the hook and in each ch across. (6 sc) Fasten off, leaving an 8 in (20.3 cm) tail.
Wrap length is about 1 in (2.5 cm).
Assembling the Bow
- Lay the bow loop cord flat. Fold both ends to the center so they overlap by about 0.25 in (0.6 cm). This makes two loops of about 1.25 in (3.2 cm) each. The bow should be about 3 in (7.6 cm) wide.
- Fold the tail cord in half into a V, with each tail about 1.5 in (3.8 cm) long, and place it behind the center of the loops.
- Wrap the center wrap around the middle of everything, gathering it into a knot about 0.5 in (1.3 cm) wide. Sew the ends of the wrap together at the back, then stitch through all layers to lock them.
- Pinch each loop into a round shape and tack it at the center.
Attaching the Bow
Center the knot over the top border, right above the vertical ribbon. About half of the knot should sit above the box edge. Let the tails angle down over the top of the vertical ribbon, to the left and right of it, about 0.75 in (1.9 cm) onto the box. Sew through the back of the knot into the border. Tack each tail tip down so it doesn’t flip up.
Hanging Loop (Color A, Yellow)
Foundation: Ch 25.
Row 1: Sl st in the back bump of the 2nd ch from the hook and in each back bump across. (24 sl st) Fasten off, leaving a 6 in (15.2 cm) tail.
The cord is about 4 in (10.2 cm) long. Fold it in half to make a loop about 2 in (5.1 cm) tall. Sew both ends to the back of the bow knot and the top border, so the loop rises straight up from behind the bow.
Final Blocking
- Spritz the ornament with water until it is damp, not soaked.
- Pin the box to a 3.25 in (8.3 cm) square on the blocking mat. Pin each corner first, then the middle of each side.
- Open each lace window gently with a fingertip and line up the clusters toward the corners.
- Shape the bow loops into rounds. A small rolled tissue in each loop helps them hold their shape.
- Straighten the ribbon strips so they run square to the edges.
- For a crisper ornament, mist lightly with spray starch.
- Let it dry completely before you unpin it, usually overnight.
Final Quality-Control Checklist
- Box measures 3.25 in (8.3 cm) on all four sides
- Round 5 has 17 dc per side; Round 6 has 80 sc in total
- Corners are sharp and lie flat
- Ribbon strips run edge to edge and cross exactly at the center
- Ribbon ends sit even with the border, not hanging past it
- Bow is centered over the vertical ribbon and about 3 in (7.6 cm) wide
- Both bow loops are round and the same size
- Tails are tacked down and symmetrical
- Hanging loop is centered and firmly attached
- All ends are woven in and hidden on the back
Troubleshooting
Motif cups in the middle: Your chain spaces in Rounds 2 and 4 are too tight. Loosen the chains slightly or go up half a hook size.
Motif ruffles: Your chains are too loose, or you added stitches. Recount Round 5 against 17 dc per side.
Corners are rounded: Make sure you work all 3 sc into the ch-2 corner sp in Round 6, and pin the corners firmly when blocking.
Ribbon puckers the box: The strip is shorter than the side. Make it 1 stitch longer, or sew it with less tension.
Ribbon ripples: The strip is too long. Start with 1 chain fewer.
Bow loops collapse: Starch the loops and block them over tissue, or use a firmer cotton.
Ornament tilts when hung: The hanging loop is off-center. Re-sew it directly behind the bow knot.
Care
Hand wash in cool water with mild soap, press out the water in a towel, and dry flat, reshaping the bow. Store flat or hanging so the loops don’t crush.
Final Notes
The measurement chain is short and easy to track. The motif measures 1.5 in (3.8 cm) after Round 2, 2.25 in (5.7 cm) after Round 3, 2.5 in (6.4 cm) after Round 4 and 3 in (7.6 cm) after Round 5. The 80-stitch border brings it to 3.25 in (8.3 cm). The 20-stitch ribbon strips match that side exactly. The 3 in (7.6 cm) bow and the 2 in (5.1 cm) hanging loop finish the ornament at about 4.25 in (10.8 cm) tall, plus the loop.
Once the first ornament is done and checked, the rest go quickly. Make a few in matching colors for the tree, or tie one onto a real gift as a keepsake tag.
Happy crocheting!