

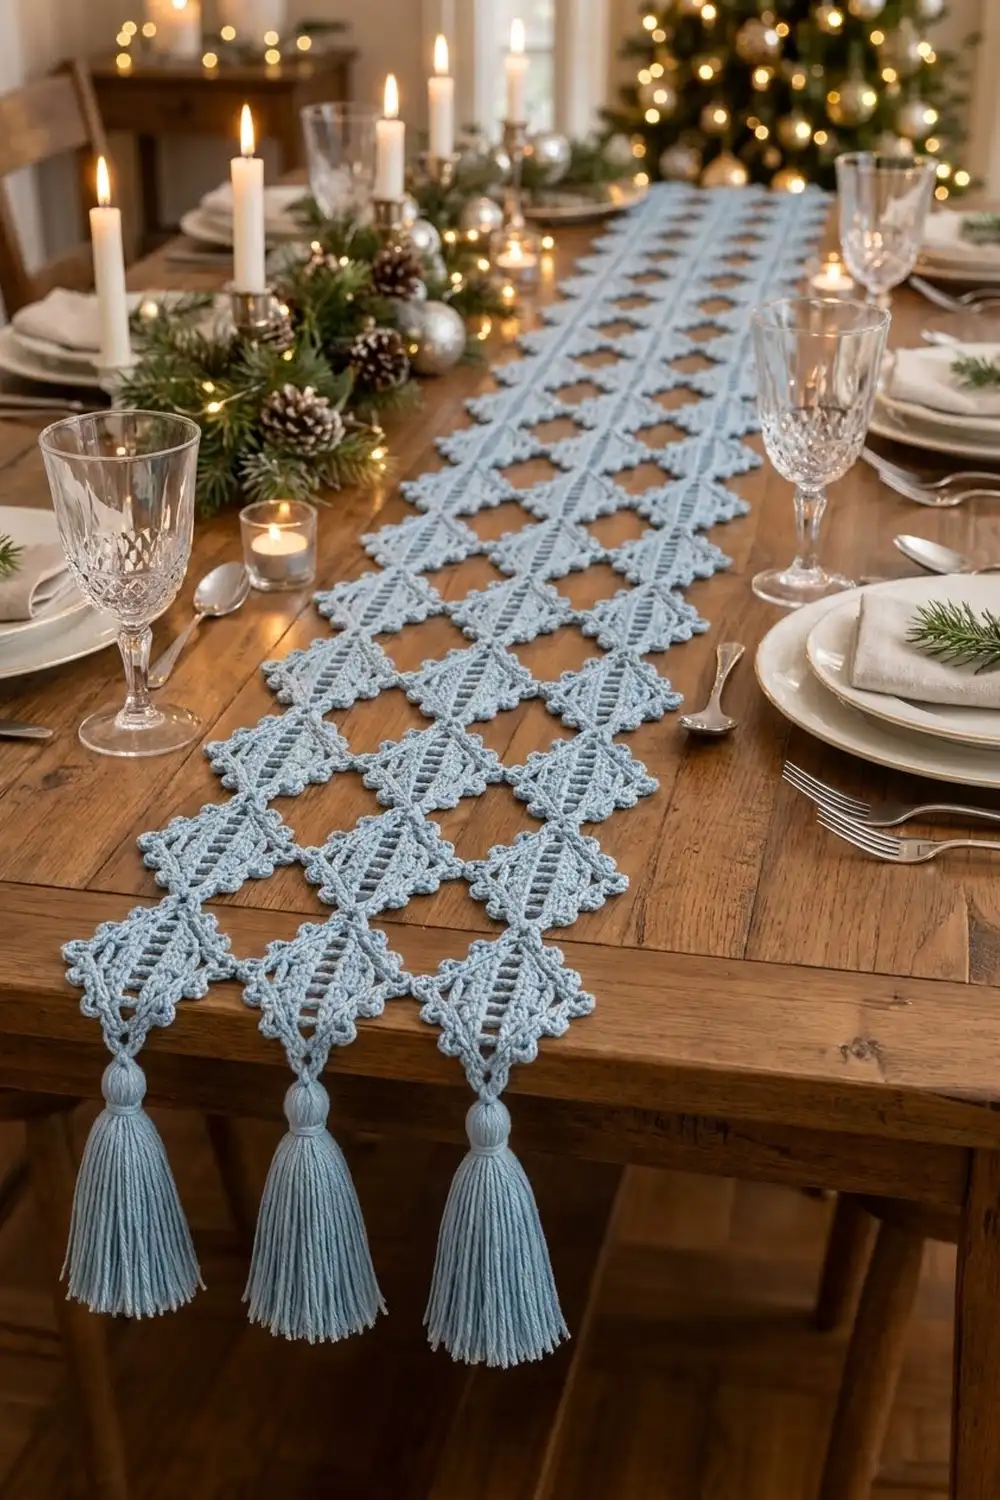
This runner is made from airy diamond motifs. Each one has a ladder-style center strip, open side triangles, and a crisp picot edge. The diamonds touch only at their points, so a pattern of diamond-shaped windows runs the length of the table. Three soft tassels finish each end.
The sample is worked in a single powder-blue cotton. The look is cool and wintry without being fussy, and it works on a holiday table or as everyday decor. Because there is only one color, there are no color changes, and you weave in very few ends per motif.
The pattern uses US crochet terms. The finished runner measures 10.5 in (26.7 cm) wide by 54 in (137.2 cm) long, not counting the tassels. With the 4 in (10.2 cm) tassels at both ends, the total length is 62 in (157.5 cm).
Here is how each motif is built. First you work a short center strip in rows. Then you add three rounds around it: a single crochet outline, the graduated side triangles, and the picot frame. Motifs are joined as you go on the final round, through their corner and point loops. Tassels are added last.
Finished Size and Construction
- Finished size: 10.5 in x 54 in (26.7 cm x 137.2 cm), plus 4 in (10.2 cm) tassels at each end
- Skill level: Intermediate
- Terminology: US
- Yarn weight: DK (weight 3) cotton
- Hook: 4.0 mm (G-6)
- Number of pieces: 36 motifs plus 6 tassels
- Layout: 3 motifs wide x 12 motifs long
- Motif size: 3.5 in (8.9 cm) wide from side loop to side loop, and 4.5 in (11.4 cm) tall from point loop to point loop
- Size before border: 10.5 in x 54 in (26.7 cm x 137.2 cm). No separate border is added.
- Border depth: 0 in. The picot frame round of each motif is the finished edge, about 0.25 in (0.6 cm) deep.
Materials
Choose a smooth mercerized or combed DK cotton. It shows the ladder rungs and picots clearly and blocks to sharp points. Avoid fuzzy or very stretchy yarns, because the open triangles will lose their shape.
- Powder blue: 250 g / about 525 m (DK cotton at roughly 105 m per 50 g)
- Motifs: about 5 g each, so 180 g for 36 motifs
- Tassels: about 6 g each, so 36 g for 6 tassels
These quantities include a margin of about 15% for gauge differences and swatching.
Tools:
– 4.0 mm (G-6) crochet hook
– Tapestry needle
– Scissors
– A piece of cardboard 4.5 in (11.4 cm) tall, for the tassels
– Rust-proof pins and a blocking mat or towel
– Spray bottle or steamer
– Tape measure
Abbreviations (US Terms)
- ch: chain
- sl st: slip stitch
- sc: single crochet
- dc: double crochet
- dtr: double treble crochet (yarn over 3 times, insert hook, pull up a loop, then [yarn over, pull through 2 loops] 4 times)
- sk: skip
- sp: space
- st(s): stitch(es)
- RS: right side
Special stitch – Picot (P): Ch 3, then sl st in the first of those 3 ch.
Corner loop (CL): Ch 5, worked inside a corner group so it sits as a small open ring.
Point loop (PL): (Sc, ch 7, sc) all in the same stitch.
Gauge and Checkpoints
Make one complete motif before you start the runner. Block it lightly, then measure it. Every stage has a checkpoint:
- After the center strip (Row 6): 2.5 in (6.4 cm) tall, not counting the ring and arch, and 0.75 in (1.9 cm) wide
- After Round 2: 3 in (7.6 cm) across, measured between the tops of the two side-corner dtr groups
- After Round 3: 3.5 in (8.9 cm) wide and 4.5 in (11.4 cm) tall, measured loop to loop
If your motif is too big, go down to a 3.75 mm hook. If it is too small, go up to a 4.5 mm hook. Each 0.25 in (0.6 cm) of error in one motif adds 3 in (7.6 cm) over the 12-motif length, so getting the test motif right matters.
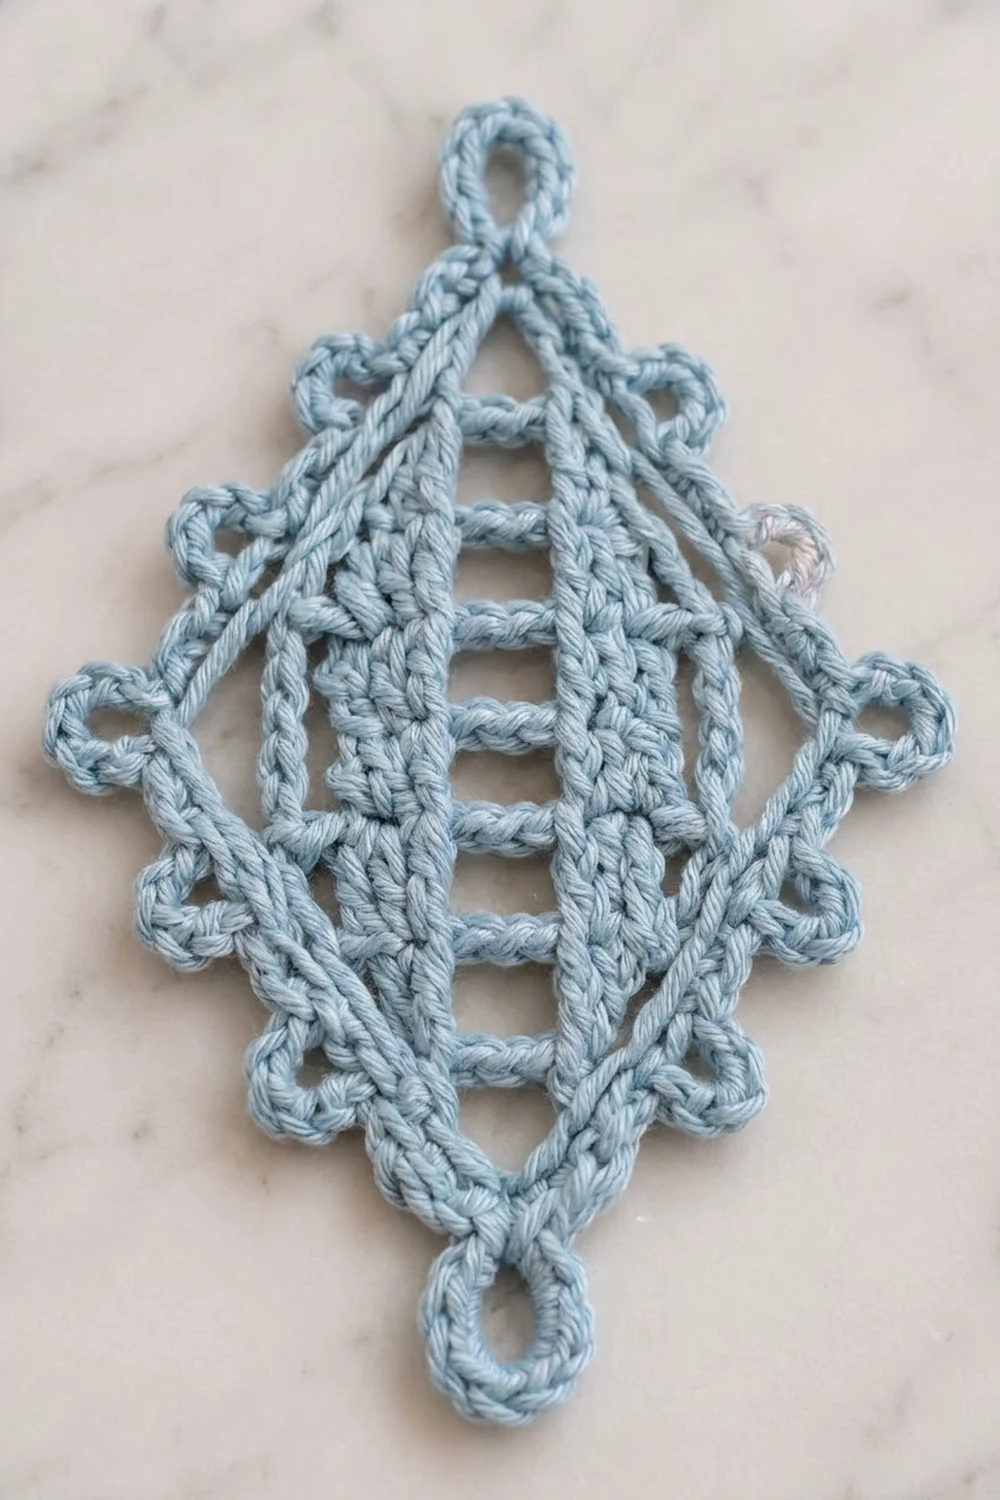
Motif (Make 36)
Center Strip
Foundation: Ch 8, then sl st in the first ch to form a ring. This ring becomes the bottom of the strip.
Row 1: Ch 3 (this counts as a dc), ch 2, then work 1 dc in the ring. You now have 2 rails and 1 rung.
Rows 2–6: Ch 3 (counts as dc), turn, ch 2, then dc in the top of the turning ch of the row below. Each row has 2 rail sts and 1 ch-2 rung.
When Row 6 is done, the strip has 6 rungs, and each rail is a column of 6 stacked sts.
Top arch: Ch 8, then sl st in the top of the st at the opposite corner. Do not fasten off.
Round 1 (Outline)
With RS facing, ch 1. Work 9 sc in the top arch. Then work 12 sc down the next rail (2 sc around each row-end st), 9 sc in the open part of the bottom ring, and 12 sc up the last rail. Sl st to the first sc.
Count: 42 sc (9 top, 12 side, 9 bottom, 12 side).
Round 2 (Side Triangles)
Ch 1.
Top: Sc in the same st and in each of the next 8 sc (9 sc).
Side A: Work across the 12 sc of this side as follows: sc in the next sc, ch 2, sk 1, dc in the next sc, ch 2, sk 1, dtr in the next sc, ch 3, sk 2, dtr in the next sc, ch 2, sk 1, dc in the next sc, ch 2, sk 1, sc in the next sc.
That uses all 12 sc: stitches land on sc 1, 3, 5, 8, 10 and 12. The stitch heights rise from sc to dc to dtr, which pushes the side corner outward into a triangle.
Bottom: Sc in each of the next 9 sc.
Side B: Repeat the Side A sequence. Sl st to the first sc.
Count: 30 sts (9 + 6 + 9 + 6), plus 8 ch-2 spaces and 2 ch-3 corner spaces.
Round 3 (Picot Frame)
Ch 1.
Top: Sc in each of the first 4 sc, work a PL in the next sc, then sc in each of the last 4 sc. That is 10 sc plus 1 point loop.
Side A:
1. Sc in the sc.
2. 2 sc in the ch-2 sp.
3. Sc in the dc, then P.
4. 2 sc in the ch-2 sp.
5. Sc in the dtr, then P.
6. In the ch-3 corner sp, work (2 sc, CL, 2 sc).
7. Sc in the dtr, then P.
8. 2 sc in the ch-2 sp.
9. Sc in the dc, then P.
10. 2 sc in the ch-2 sp.
11. Sc in the sc.
That is 18 sc, 4 picots and 1 corner loop.
Bottom: Work the same as Top (10 sc plus 1 point loop).
Side B: Work the same as Side A (18 sc, 4 picots, 1 corner loop). Sl st to the first sc and fasten off.
Round 3 count: 56 sc (10 + 18 + 10 + 18), plus 8 picots, 2 corner loops and 2 point loops.
Work the Round 3 sections in this order: Top, Side A, Bottom, Side B. With RS facing and working counterclockwise, Side A is the motif’s left side and Side B is its right side. This order matters for joining.
Make All Pieces
- Powder blue: 36 motifs. Complete only the first motif in full. Make the other 35 through Round 2, then work their Round 3 as you join them (see Joining).
- Powder blue: 6 tassels.
Layout grid (M = motif, rows numbered from one end):
Row 1:   M  M  M
Row 2:   M  M  M
Row 3:   M  M  M
 ...    (repeat)
Row 12:  M  M  M
Each motif stands on its point, with its long axis running along the length of the runner.
Joining
Method: Join as you go on Round 3. Only the loops connect, never the sc edges. That is what creates the diamond-shaped gaps.
Work the motifs in order: row by row, and left to right within each row.
- Joining to the left neighbor (Side A corner loop): In place of the CL, ch 2, sl st into the right corner loop of the finished motif on the left, then ch 2. This replaces the ch 5.
- Joining to the motif above (top point loop): In place of the PL, work sc, ch 3, sl st into the bottom point loop of the motif above, ch 3, sc, all in the same st. This replaces the ch 7.
Stitch-to-stitch logic: Each join replaces chains one-for-one, so a joined loop stays the same size as a free loop. Nothing is added or removed, and every motif keeps 56 sc.
Join count:
– Side-to-side joins: 2 per row x 12 rows = 24
– Point-to-point joins: 3 per row boundary x 11 boundaries = 33
– Total: 57 joins
After joining, these loops stay free: 12 outer corner loops along each long edge (24 in all), plus 3 point loops at each end (6 in all) for the tassels.
Tension: Keep each joining sl st snug but not tight. A tight sl st pulls the points together and narrows the gaps between motifs.
Size checkpoint: After Row 3 of the layout, the runner should be 10.5 in (26.7 cm) wide and 13.5 in (34.3 cm) long. Measure it flat without stretching.
Border
This design has no added border round. The Round 3 picot frame of each motif is the finished edge. Its gauge is the motif gauge: 18 sc, 4 picots and 1 corner loop per motif side.
Long edges, per side: 12 motifs x 18 sc = 216 sc, plus 48 picots and 12 free corner loops. The edge zigzags from point to point.
Short ends, per end: 3 motifs x 10 sc on the top (or bottom) section = 30 sc, plus 3 free point loops for the tassels. The upper half of each end motif’s two sides also shows (7 sc and 2 picots per half side).
Why the math works: No stitches are added at the joins, so every edge count is simply the motif’s own count multiplied by the number of motifs. A straight border worked over a zigzag edge would make the corners cup or flare, so leaving the edge as it is keeps the runner flat.
Tassels (make 6):
1. Wrap the yarn 40 times around the 4.5 in (11.4 cm) cardboard.
2. Slide a 10 in (25.4 cm) length of yarn under the wraps at the top and tie it tightly.
3. Cut through the wraps at the bottom.
4. Wrap another strand 6 times around the bundle, 0.5 in (1.3 cm) below the top, to form the neck. Knot it and bury the ends inside the tassel.
5. Trim the tassel to 4 in (10.2 cm).
Use the top tie to attach one tassel to each of the 6 free point loops.
Final Blocking
- Weave in all ends before blocking. Hide them along the rails and inside the sc rounds.
- Soak the runner in cool water for 10 minutes. Press out the water gently; do not wring it.
- Roll the runner in a towel to remove excess moisture.
- Lay it flat and pin it to 10.5 in x 54 in (26.7 cm x 137.2 cm).
- Pin every side corner loop and every point loop so the diamonds stay sharp.
- Open each picot with a pin tip, and straighten each ladder rung.
- Leave the runner pinned until it is completely dry.
- Steam the tassels lightly, comb them straight, and re-trim them evenly to 4 in (10.2 cm).
Final Quality-Control Checklist
- 36 motifs, each with 6 rungs and 56 sc in Round 3
- Each motif has 8 picots, 2 corner loops and 2 point loops
- 57 joins, with none missing or doubled
- 24 free corner loops along the long edges
- 6 tassels, all 4 in (10.2 cm) long
- Runner measures 10.5 in x 54 in (26.7 cm x 137.2 cm)
- Every gap between motifs is an even, open diamond
- No ends visible on the RS
Troubleshooting
- Side triangles curl: Your dtr stitches are too tight. Pull up each loop to its full height.
- Points look rounded: Pin the loops more firmly when blocking, or check that each point loop has the full 7 chains.
- Runner is shorter than planned: The center strip is short. Check Row 6 against 2.5 in (6.4 cm) on new motifs.
- Gaps between motifs are crowded: The joining sl sts are too tight. Loosen them, or rework the join.
- Picots disappear: Make sure each picot sl st goes into the first of the 3 chains, not into the sc.
- Tassels look thin: Add 10 wraps per tassel.
Care
Hand wash in cool water with a mild detergent, and dry flat with the runner pinned to shape. Steam lightly to refresh the points between uses.
Final Notes
Here is the measurement chain from start to finish. The center strip is 2.5 in (6.4 cm) tall. After Round 2 the motif is 3 in (7.6 cm) across, and after Round 3 it is 3.5 in x 4.5 in (8.9 cm x 11.4 cm). Three motifs make the 10.5 in (26.7 cm) width, and twelve make the 54 in (137.2 cm) length. The tassels bring the total length to 62 in (157.5 cm). If each stage matches its checkpoint, the finished runner will block to size with no adjustments.
Happy crocheting!