

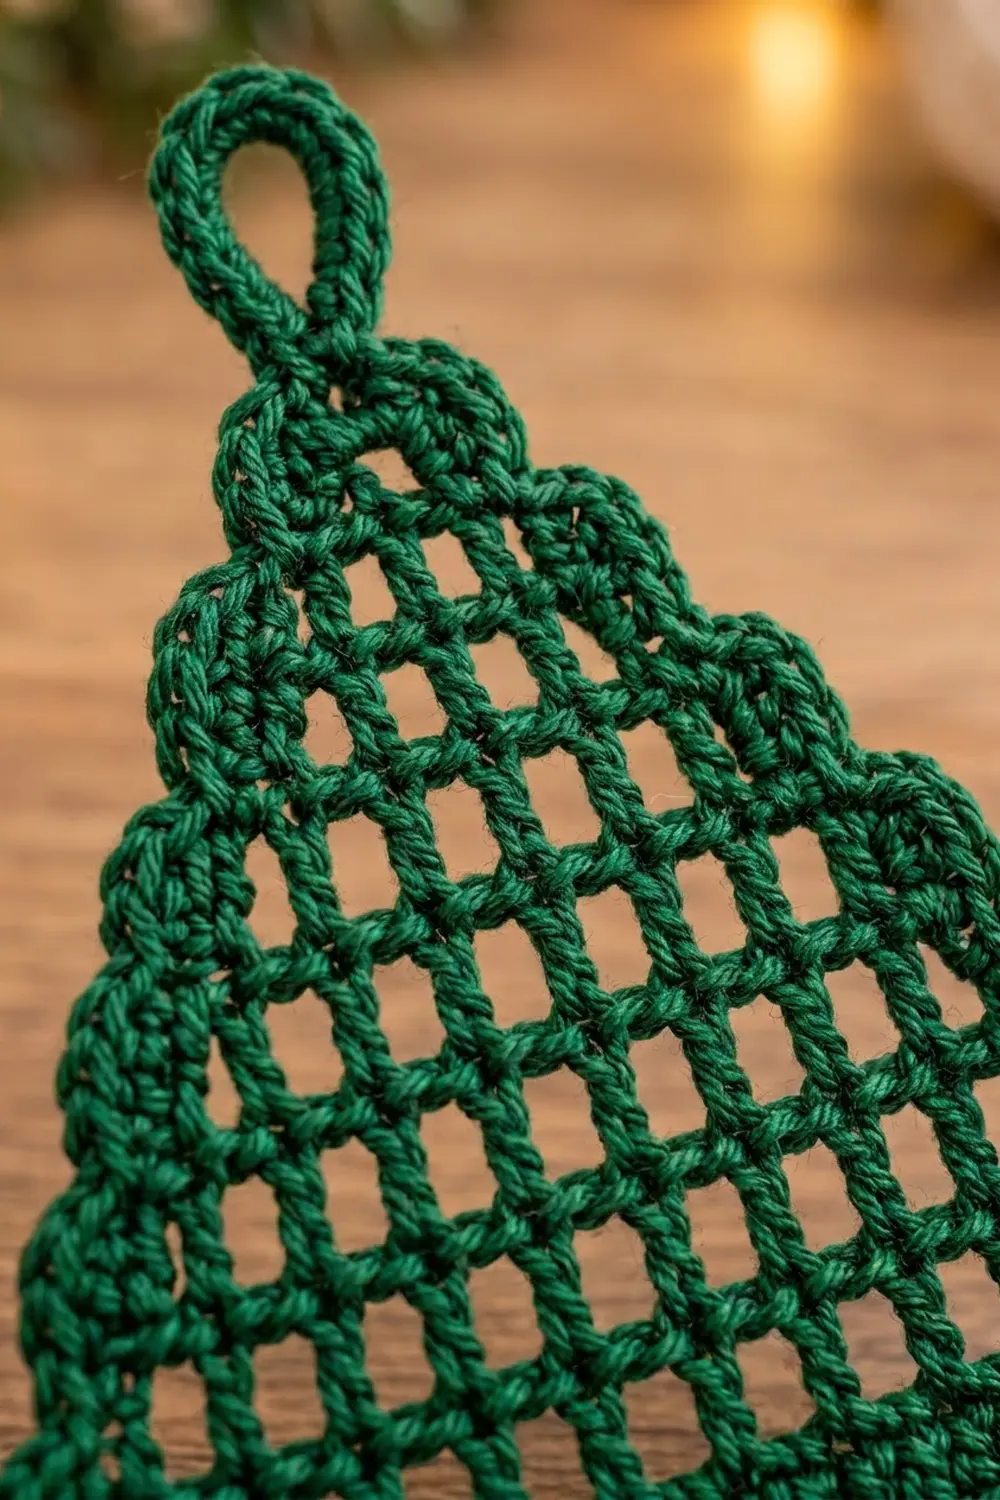
This little tree is one flat ornament worked in filet mesh. Rows of open square windows step inward to a single point. A crisp single crochet outline frames the whole shape, a short solid trunk sits under the center, and a covered loop at the tip lets it hang.
The samples are shown in deep forest green and soft cream, and both use the same instructions. The look is clean and graphic. The mesh lets light and background color show through when the ornament hangs on a tree or a mantel.
The pattern uses US crochet terms. The finished ornament measures 3.3 in (8.4 cm) wide and 4 in (10.2 cm) tall without the loop. With the loop it is 4.75 in (12.1 cm) tall.
Construction is simple. You work the mesh body in rows, starting with the widest row. At the start of each row you skip one square, so the sides step in. Then you work the trunk down from the foundation chain, add one round of border around everything, and finish with the hanging loop.
Finished Size and Construction
- Finished size: 3.3 in (8.4 cm) wide x 4 in (10.2 cm) tall, plus a 0.75 in (1.9 cm) loop
- Skill level: Easy/advanced beginner (you should be comfortable with chains and double crochet)
- Terminology: US crochet terms
- Yarn weight: Sport weight (#2) mercerized cotton
- Hook: 3.0 mm
- Number of pieces: 1 (one ornament, worked in one piece)
- Layout: Not applicable, since there’s nothing to join
- Piece size before border: 3 in (7.6 cm) wide x 3.7 in (9.4 cm) tall (mesh body plus trunk)
- Border depth: 1 round of sc, about 0.15 in (0.4 cm) on every edge
Materials
Choose a smooth, tightly plied mercerized cotton. It makes crisp, square holes and a firm edge that keeps its shape while hanging. Acrylic also works, but the mesh will be softer.
- Color A, Forest Green (green version): 5 g, about 15 m (16.4 yd)
- Color B, Cream (cream version): 5 g, about 15 m (16.4 yd)
Each ornament uses only one color. Make it in green, in cream, or make one of each.
Tools:
- 3.0 mm crochet hook
- Tapestry needle
- Scissors
- Ruler or tape measure
- Blocking mat or folded towel, and rustproof pins
- Spray bottle with water
The quantities include a margin of about 30% for checking gauge and weaving in ends. One ornament uses about 3.5 g.
Abbreviations (US Terms)
- ch: chain
- sl st: slip stitch
- sc: single crochet
- dc: double crochet
- sp: space
- st(s): stitch(es)
- sk: skip
- rep: repeat
- RS: right side
Special stitch: mesh. One mesh is one open square: a dc, a ch 1, and the next dc. Side-by-side meshes share their dc. A row of 9 mesh therefore has 10 dc and 9 ch-1 sps.
Turning chain: In Rows 2-9, the ch 4 counts as 1 dc plus ch 1.
Gauge and Checkpoints
Gauge:
- Mesh: 6 mesh = 2 in (5.1 cm) wide, and 6 mesh rows = 2 in (5.1 cm) tall. Each mesh is about 0.33 in (0.8 cm) square.
- Sc: 7 sts = 1 in (2.5 cm), and 6 rows = 1 in (2.5 cm).
The ornament is small, so your first one is your gauge test. Work Rows 1-3, then measure before going on.
Checkpoints:
- After Row 1: The 9 mesh measure 3 in (7.6 cm) wide.
- After Row 9: The body measures 3 in (7.6 cm) tall, from the foundation to the top of Row 9.
- After the trunk: The trunk measures 1 in (2.5 cm) wide and 0.7 in (1.8 cm) long.
- After the border: The ornament measures 3.3 in (8.4 cm) wide and 4 in (10.2 cm) tall.
If your piece is too big, switch to a 2.75 mm hook. If it is too small, switch to a 3.25 mm hook. If only the height is off, check how high you pull up your dc loops. A difference of 0.125 in (0.3 cm) either way is fine for an ornament.
Tree Body (Filet Mesh)
You work the body flat in rows. From Row 2 on, start each row by slip stitching across the first mesh instead of working it. This removes one mesh per row, alternating sides. Each side steps in once every 2 rows, and the tip comes out centered.
Row 1 (RS): Ch 22. Dc in 6th ch from hook (the 5 skipped chs count as dc, ch 1, and 1 skipped ch). Ch 1, sk next ch, dc in next ch; rep from * 7 more times. Turn. (9 mesh: 10 dc, 9 ch-1 sps)*
Count check: The first dc uses 6 chs, and each of the 8 repeats uses 2 chs: 6 + 16 = 22.
Row 2: Sl st in first ch-1 sp, sl st in next dc. Ch 4 (counts as dc and ch 1), dc in next dc. Ch 1, dc in next dc; rep from * across. Work the last dc into the 4th of the 5 skipped chs of Row 1. Turn. (8 mesh: 9 dc)*
Row 3: Sl st in first ch-1 sp, sl st in next dc. Ch 4, dc in next dc. Ch 1, dc in next dc; rep from * across. Work the last dc into the 3rd ch of the turning ch-4. Turn. (7 mesh: 8 dc)*
Rows 4-9: Rep Row 3. Each row has 1 mesh fewer than the row before.
- Row 4: 6 mesh (7 dc)
- Row 5: 5 mesh (6 dc)
- Row 6: 4 mesh (5 dc)
- Row 7: 3 mesh (4 dc)
- Row 8: 2 mesh (3 dc)
- Row 9: 1 mesh (2 dc: the ch-4 and 1 dc)
Fasten off and weave in ends.
Shape check: Number the Row 1 meshes 1 to 9 from left to right.
- The left edge steps in on Rows 2, 4, 6, and 8.
- The right edge steps in on Rows 3, 5, 7, and 9.
That’s 4 steps per side, so Row 9 sits exactly over mesh 5, the center. Each side has 9 row ends and 4 exposed ledges.
Lay the body flat. It should measure 3 in (7.6 cm) wide and 3 in (7.6 cm) tall.
Trunk
The trunk is worked in solid sc into the free loops of the foundation chain, centered under the body.
Hold the body with RS facing and the foundation chain at the top. Count the 10 dc of Row 1. The trunk covers the middle 3 mesh, from the base of the 4th dc to the base of the 7th dc. That’s 7 foundation chs: 4 dc bases plus the 3 skipped chs between them.
Row 1: Join yarn with a sl st in the free loop at the base of the 4th dc. Ch 1, sc in the same ch, sc in each of next 6 chs. Turn. (7 sc)
Rows 2-4: Ch 1 (does not count as a st), sc in each sc across. Turn. (7 sc)
Fasten off and weave in ends.
Checkpoint: The trunk is 1 in (2.5 cm) wide and 0.7 in (1.8 cm) long. The whole piece now measures 3 in (7.6 cm) wide and 3.7 in (9.4 cm) tall.
Border
Border gauge: 7 sc = 1 in (2.5 cm). One round of sc adds about 0.15 in (0.4 cm) to each edge. That brings the width from 3 in (7.6 cm) to 3.3 in (8.4 cm), and the height from 3.7 in (9.4 cm) to 4 in (10.2 cm).
Placement rules:
- Mesh row ends: 2 sc around the post of the end dc or turning ch.
- Ledges: 2 sc across each exposed step. Work 1 sc in the ch-1 sp (over the sl st) and 1 sc in the top of the outer corner st.
- Trunk row ends: 1 sc per sc row.
- Outer bottom corners: 3 sc in the same st.
Rnd 1 (RS): Hold the ornament with RS facing and the tip at the top. Right-handed crocheters work counterclockwise: across the top first, then down the left side.
- Tip: Join yarn with sc in the ch-1 sp of Row 9. Sc in the top of the left corner st of Row 9. (2 sc)
- Left side, going down:
- 2 sc in each row end of Rows 9 and 8, then 2 sc across the ledge.
- 2 sc in each row end of Rows 7 and 6, then 2 sc across the ledge.
- 2 sc in each row end of Rows 5 and 4, then 2 sc across the ledge.
- 2 sc in each row end of Rows 3 and 2, then 2 sc across the ledge.
- 2 sc in the row end of Row 1.
- (26 sc: 9 row ends x 2 = 18, plus 4 ledges x 2 = 8)
- Bottom left: Working into the free loops of the foundation, 3 sc in the first ch (corner). Sc in each of next 5 chs, stopping at the trunk. (8 sc)
- Trunk:
- 1 sc in each of the 4 row ends on the left side of the trunk.
- Along the last trunk row: 3 sc in the first sc, sc in each of next 5 sc, 3 sc in the last sc.
- 1 sc in each of the 4 row ends on the right side of the trunk.
- (19 sc: 4 + 11 + 4)
- Bottom right: Sc in each of next 5 foundation chs, then 3 sc in the last ch (corner). (8 sc)
- Right side, going up:
- 2 sc in each row end of Rows 1 and 2, then 2 sc across the ledge.
- 2 sc in each row end of Rows 3 and 4, then 2 sc across the ledge.
- 2 sc in each row end of Rows 5 and 6, then 2 sc across the ledge.
- 2 sc in each row end of Rows 7 and 8, then 2 sc across the ledge.
- 2 sc in the row end of Row 9.
- (26 sc)
- Tip: Sc in the top of the right corner st of Row 9 (the 3rd ch of the ch-4). (1 sc)
Sl st to the first sc. (90 sc)
Total check: 2 + 26 + 8 + 19 + 8 + 26 + 1 = 90.
Hanging loop: Ch 14, then sl st in the first sc of Rnd 1 (the sc in the Row 9 ch-1 sp) to make a ring. Work 22 sc over the ch-14 ring, then sl st in that same first sc. Fasten off, leaving a 6 in (15.2 cm) tail. Weave the tail down through the base of the loop to anchor it.
Why the math works:
- Foundation: It has 19 chs that hold sts (10 dc bases plus 9 skipped chs). The trunk uses the middle 7, leaving 6 on each side. Each bottom corner takes 3 sc in the corner ch plus 1 sc in each of the next 5. The right side mirrors the left.
- Long sides: Both have the same 9 row ends and 4 ledges, so each gets 26 sc. The outline stays symmetrical even though the steps alternate sides.
- Trunk bottom: 7 sc plus 2 extra at each corner gives 11.
- Row ends: Two sc cover about 0.29 in (0.7 cm) along each 0.33 in (0.8 cm) row. This keeps the edge slightly firm, so it lies flat instead of rippling.
Final Blocking
- Weave in any remaining ends along the border, not through the open mesh, so they don’t show.
- Spray the ornament until it’s damp all the way through. Or dip it in water and gently squeeze it in a towel.
- Lay it RS up on the blocking mat.
- Pin the two bottom corners 3.3 in (8.4 cm) apart. Pin the tip 4 in (10.2 cm) above the bottom of the trunk.
- Square up each mesh window with a fingertip, then pin each step corner so the tiers are sharp.
- Pin the hanging loop into a neat teardrop shape.
- Let it dry completely, at least 4 hours. For a stiffer ornament, use light spray starch before it dries.
Final Quality-Control Checklist
- The rows have 9, 8, 7, 6, 5, 4, 3, 2, and 1 mesh.
- Each side has exactly 4 steps, and the tip is centered over the trunk.
- The trunk is 7 sc wide, 4 rows long, and centered under the middle 3 mesh.
- Border Rnd 1 has 90 sc, with 26 sc on each long side.
- The ornament measures 3.3 in (8.4 cm) wide x 4 in (10.2 cm) tall, and the loop is 0.75 in (1.9 cm).
- All mesh windows are open and about the same size.
- The ornament lies flat, without ruffling or cupping.
- All ends are woven in and trimmed, and the loop is firmly anchored.
Troubleshooting
The tree leans to one side: A slip stitch decrease was probably skipped or worked at the wrong end. Count the mesh in every row and check that each side has 4 steps.
The tip is off-center over the trunk: Recount the Row 1 dc before joining for the trunk. The trunk must start at the base of the 4th dc.
The mesh windows are rectangles: Your dc are too tall or too short compared to your ch-1. Adjust how high you pull up your loops, then block firmly.
The border ruffles: It’s too loose. Go down 0.25 mm in hook size for the border only.
The border pulls and cups: It’s too tight. Go up 0.25 mm in hook size for the border only.
The loop twists: Make sure the ch-14 isn’t twisted before you sl st it closed.
Care
Hand wash in cool water with mild soap. Press the water out in a towel and dry flat, reshaping the steps and the loop. Re-block if the ornament softens after storage.

Final Notes
Here’s the measurement chain:
- The 9 mesh of Row 1 measure 3 in (7.6 cm) wide.
- Nine rows make the body 3 in (7.6 cm) tall.
- The 4-row, 7-sc trunk adds 0.7 in (1.8 cm), so the piece is 3 x 3.7 in (7.6 x 9.4 cm) before the border.
- The 90-sc border round adds 0.15 in (0.4 cm) to each edge, for a finished size of 3.3 x 4 in (8.4 x 10.2 cm).
- The covered loop adds the last 0.75 in (1.9 cm).
If every checkpoint matches, your ornament will match too. Make it in green, in cream, or in both.
Happy crocheting!