

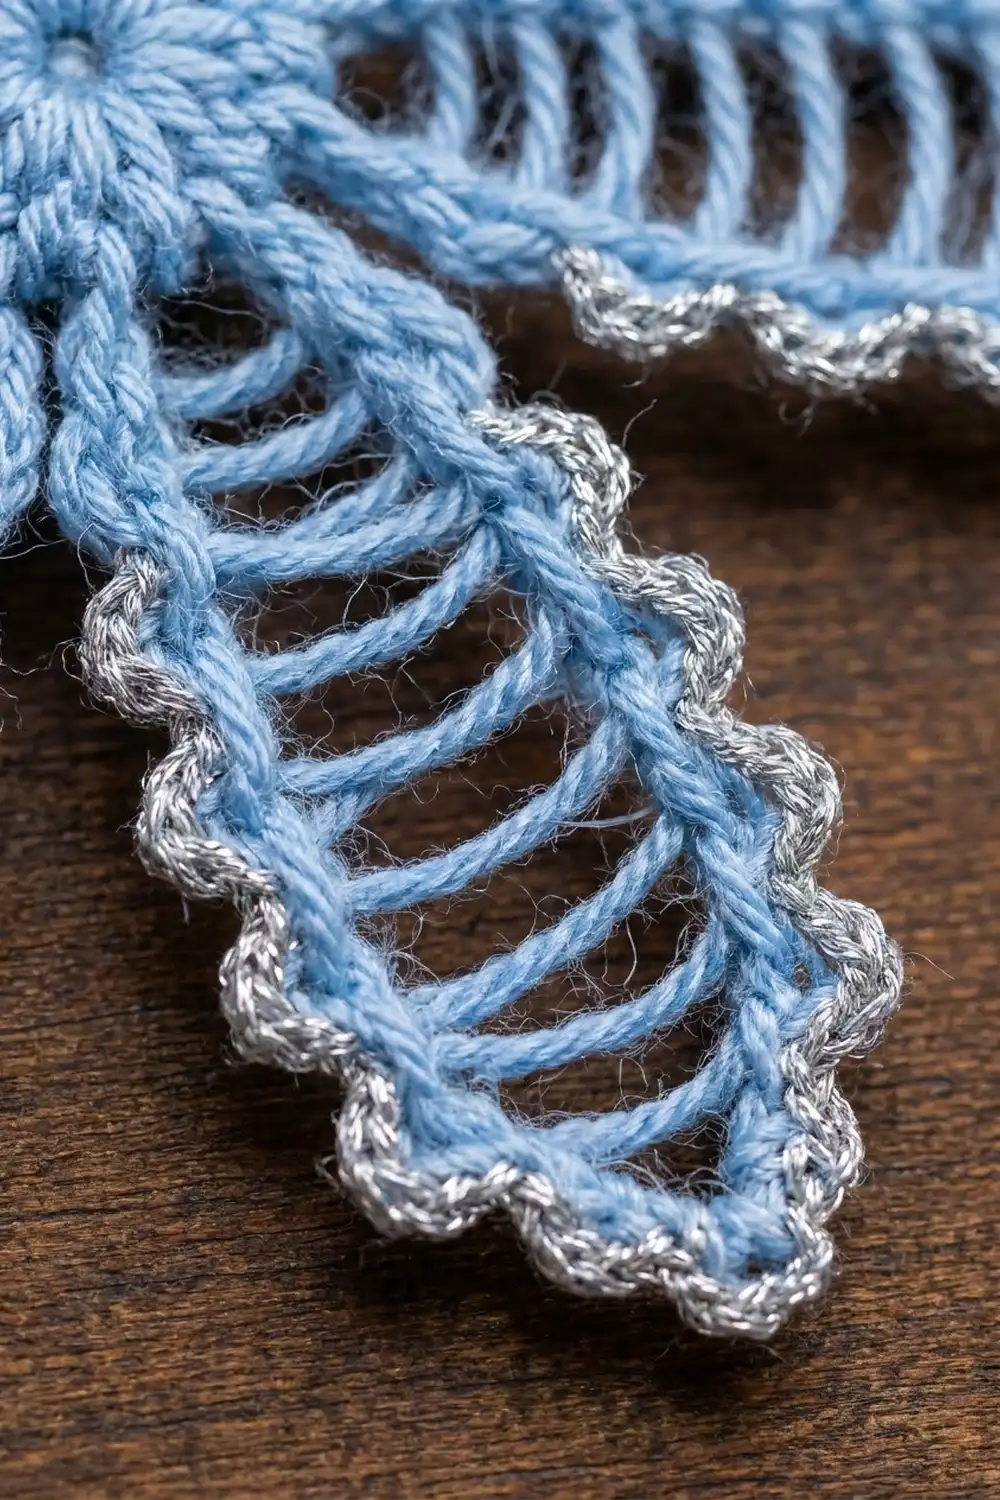
The Frosted Ladder Snowflake is a light, airy ornament made with hairpin lace and finished with a sparkling picot edge. Eight slim petals surround a small, solid center. Each petal shows rows of open loops lined up like the rungs of a ladder.
The main color is a soft powder blue. A silver-gray metallic yarn outlines every petal with tiny picots and forms the hanging loop. The look is classic winter lace: delicate, clean, and easy to see from across the room on a tree.
This pattern uses US crochet terms. The finished snowflake measures 4.75 in (12.1 cm) across from picot tip to picot tip, not counting the hanging loop.
Construction is simple. You crochet a small center in rounds and make eight short hairpin lace strips on a loom. Then you attach each strip to the center and work one blue edging round and one silver picot round around all eight petals. Last, you add a silver hanging loop.
Finished Size and Construction
- Finished size: 4.75 in (12.1 cm) tip to tip
- Skill level: Intermediate (some hairpin lace experience is helpful)
- Terminology: US crochet terms
- Yarn weight: Fingering weight (Super Fine, #1)
- Hook: 2.75 mm (US C-2)
- Number of pieces: 1 finished piece (a center plus 8 hairpin petals, joined as you go)
- Layout: 8 petals spaced evenly around a center disc
- Center size: 0.75 in (1.9 cm) across
- Petal length: 2 in (5.1 cm) from center edge to picot tip
- Size before border: 4.25 in (10.8 cm) tip to tip
- Border depth: 0.25 in (0.6 cm) at each tip (silver picot round)
Materials
For the blue, choose a smooth, tightly plied fingering-weight cotton or cotton blend. Cotton holds the hairpin loops open and takes starch well. For the edging, use a fingering-weight metallic yarn or a cotton with a metallic strand to get the frosted silver outline.
- Blue (main color): 10 g, about 34 m (37 yd)
- Silver-gray metallic (edging and loop): 5 g, about 20 m (22 yd)
These amounts include extra yarn for your test piece and the hanging loop.
Tools:
- 2.75 mm (US C-2) crochet hook
- Hairpin lace loom set to 1 in (2.5 cm) wide
- Tapestry needle
- Scissors
- Stitch markers (2 or 3)
- Blocking mat and rust-proof pins
- Spray starch or fabric stiffener
- Ruler or tape measure
Abbreviations (US Terms)
- ch – chain
- sc – single crochet
- sl st – slip stitch
- st(s) – stitch(es)
- MR – magic ring
- rep – repeat
- RS – right side
Picot: ch 3, sl st in the 3rd ch from the hook (the first ch you made).
Hairpin loop: one loop of yarn wrapped around a prong of the loom. Each petal strip has 12 loops on the left prong and 12 loops on the right prong, held together by a sc spine.
Gauge and Checkpoints
Gauge matters most for the center and the petal strips, because they set the overall size.
Test piece: Make the center (Rounds 1–2) and one complete hairpin strip before making the rest.
- Center gauge: After Round 2, the disc measures 0.75 in (1.9 cm) across.
- Hairpin gauge: On a 1 in (2.5 cm) loom, 8 loops per side measure 1 in (2.5 cm) along the spine. A finished 12-loop strip measures 1.5 in (3.8 cm) long once it is off the loom and relaxed.
Checkpoints:
- Center after Round 2: 0.75 in (1.9 cm).
- Each strip off the loom: 1.5 in (3.8 cm) long and 1 in (2.5 cm) wide.
- After the blue edging round: 4.25 in (10.8 cm) tip to tip.
- After the silver picot round: 4.75 in (12.1 cm) tip to tip.
If too big: go down to a 2.5 mm hook and keep the spine stitches snug. If too small: go up to a 3 mm hook. If only the strip length is off, change the tension of your spine sc instead of the loop count, so each strip keeps 12 loops per side for the edging.
Center
Work with blue. Do not turn between rounds.
Round 1: MR, ch 1, 8 sc in ring. Pull the ring closed and sl st in the first sc to join. (8 sc)
Round 2: Ch 1, 2 sc in each st around. Sl st in the first sc to join. (16 sc)
The center now measures 0.75 in (1.9 cm). Fasten off, leaving a 4 in (10.2 cm) tail. Place a marker in the first st of Round 2.
Hairpin Petal Strips (make 8)
Work with blue on a loom set to 1 in (2.5 cm) wide.
- Make a slip knot and pull the loop out until the knot sits exactly halfway between the prongs. Slide the loop over the left prong.
- Wrap the yarn from front to back around the right prong. Insert the hook through the loop on the left prong, yarn over and pull through. Yarn over and pull through the loop on the hook to secure the center.
- Turn the loom half a turn clockwise so the yarn wraps around the new right prong. To get the hook past the prong, either keep it pointing up through the top of the loop, or take it out to the back and reinsert it.
- Insert the hook under the front strand of the left-hand loop, yarn over and pull up a loop (2 loops on hook), then yarn over and pull through both loops. This sc is one spine stitch.
- Repeat Steps 3–4 until each prong holds 12 loops. (12 loops per side, 24 loops total, 1 spine)
Fasten off, leaving a 6 in (15.2 cm) tail at the spine end. Slide the strip off the loom and keep the loops in order. Count again: 12 on each side.
The start of the strip is the base, which attaches to the center. The tail end is the tip.
Make 8 strips in total. Lay them flat with the loops untwisted and check that each one is 1.5 in (3.8 cm) long.
Attaching the Petals
Work with blue into Round 2 of the center. This round joins all eight strips and keeps the center flat.
Round 3 (join round): Join blue with a sl st in the marked st. Ch 1.
Hold the base of one strip behind the center with the spine pointing outward. Insert the hook through the next center st and then through the base of the spine, and work 1 sc through both layers. Sc in the next center st. Rep from * to * 7 more times. Sl st in the first sc to join. (16 sc; 8 petals attached, 1 petal for every 2 center sts)
Check that the petals sit 45 degrees apart. Fasten off and weave in the tail.
Petal Edging Round (Blue)
This round outlines each petal and gathers the loops into a pointed oval. Keep every loop untwisted so the ladder look stays open.
Join blue at the base of any petal, in the first loop on the left side (Side A).
Round 4: Ch 1. For each petal:
- Side A: Sc in each of the 12 loops, working through each loop from front to back. (12 sc)
- Tip: Work 3 sc into the spine end at the tip of the strip. (3 sc)
- Side B: Sc in each of the 12 loops on the right side, working back toward the center. (12 sc)
- Between petals: Sl st in the next free Round 3 sc between this petal and the next one. (1 sl st)
Rep for all 8 petals. Join with a sl st in the first sc. (27 sc per petal; 216 sc and 8 sl st total)
Use the tip tail to tighten and secure the spine end so the point is firm. The snowflake now measures 4.25 in (10.8 cm) tip to tip. Fasten off blue.
Border (Silver Picot Round)
Border gauge: One picot every 2 sc is about 0.25 in (0.6 cm) apart along the edge. The picot round adds 0.25 in (0.6 cm) to each petal tip.
Each petal from Round 4 has 27 sc: 12 on Side A, 3 at the tip and 12 on Side B. For the border, count them as 13 + 1 + 13. The first 13 sts are Side A plus the first tip st. The 1 is the center tip st. The last 13 sts are the third tip st plus Side B.
Join silver with a sl st in the first sc of Side A on any petal.
Round 5: For each petal:
- Side A (13 sts): Sc in each of the next 3 sts, [picot, sc in each of the next 2 sts] 5 times. (13 sc, 5 picots)
- Tip (1 st): (Sc, picot, sc) in the center tip st. (2 sc, 1 picot)
- Side B (13 sts): [Sc in each of the next 2 sts, picot] 5 times, sc in each of the next 3 sts. (13 sc, 5 picots)
- Between petals: Sl st in the blue sl st between petals. (1 sl st)
Rep for all 8 petals. Join with a sl st in the first sc. (28 sc and 11 picots per petal; 224 sc, 88 picots and 8 sl st total)
Why the math works: 13 + 1 + 13 = 27, so you use every blue edging st exactly once per petal. Each side uses 3 + (5 × 2) = 13 sts. The tip adds 1 extra sc, so each petal has 13 + 2 + 13 = 28 sc. The picots mirror each other on both sides, so the tip picot sits exactly at the point. The 3 plain sc at each base keep picots away from the center, so neighboring petals do not crowd each other.
Hanging loop: Do not fasten off. Sl st along the edge to the center tip st of the petal you want at the top. Ch 20, sl st in the same tip st. Work 24 sc into the ch-20 space, then sl st in the tip st again. (24 sc) The loop stands about 1.5 in (3.8 cm) tall. Fasten off and weave in all ends.
Final Blocking
- Soak the snowflake in cool water and press out the extra water in a towel. Do not wring it.
- Lay it RS up on a blocking mat.
- Pin the center flat first.
- Pin each petal tip outward so the snowflake measures 4.75 in (12.1 cm) tip to tip. Check that opposite tips line up through the center.
- Space the petals evenly at 45 degrees. Straighten each spine so it runs down the middle of its petal.
- Pin the tip picot of each petal and a few side picots so they stand out cleanly.
- Spray with starch or brush on fabric stiffener. Gently straighten the loops so they lie parallel.
- Let the snowflake dry completely, at least 12 hours, before you unpin it.
Final Quality-Control Checklist
- The center is flat and measures 0.75 in (1.9 cm).
- All 8 petals are attached, 2 center sts apart.
- Each strip has 12 loops per side, none twisted.
- Each petal has 27 blue edging sc and 11 silver picots.
- Tip picots sit exactly at the petal points.
- The finished size is 4.75 in (12.1 cm) tip to tip.
- The hanging loop is centered on one petal tip and about 1.5 in (3.8 cm) tall.
- All ends are woven in and trimmed.
Troubleshooting
Loops look twisted: Before you work into them, slide the loops in order onto a knitting needle or long pin. Then work each loop from front to back.
Spine moves off center: You may be turning the loom the wrong way. Always turn in the same direction, and check every few loops that the spine sits in the middle.
Petals curl or cup: The edging is too tight. Loosen your sc in Round 4, or go up half a hook size for that round only.
Edges ruffle: The edging is too loose. Go down half a hook size for Rounds 4–5.
Center puckers: The petal bases are pulling. Make sure each base is caught in only 1 sc in Round 3 and that the strips lie flat behind the center.
Petals are different lengths: Recount the loops. Every strip needs exactly 12 per side, or the picot spacing will not match.
Picots look flat: Pull each picot sl st snug, and pin the picots during blocking.
Care
Hand wash in cool water with mild soap, press dry in a towel, and block again with starch as needed. Store flat in tissue paper so the petals keep their shape.

Final Notes
The measurements are short and easy to check. The center measures 0.75 in (1.9 cm). Each hairpin strip has 12 loops per side and measures 1.5 in (3.8 cm). The blue edging round gives each petal 27 sc and brings the snowflake to 4.25 in (10.8 cm). The silver picot round adds 0.25 in (0.6 cm) at each tip, for a finished size of 4.75 in (12.1 cm).
Once your first snowflake checks out, the rest go quickly. Happy crocheting!