

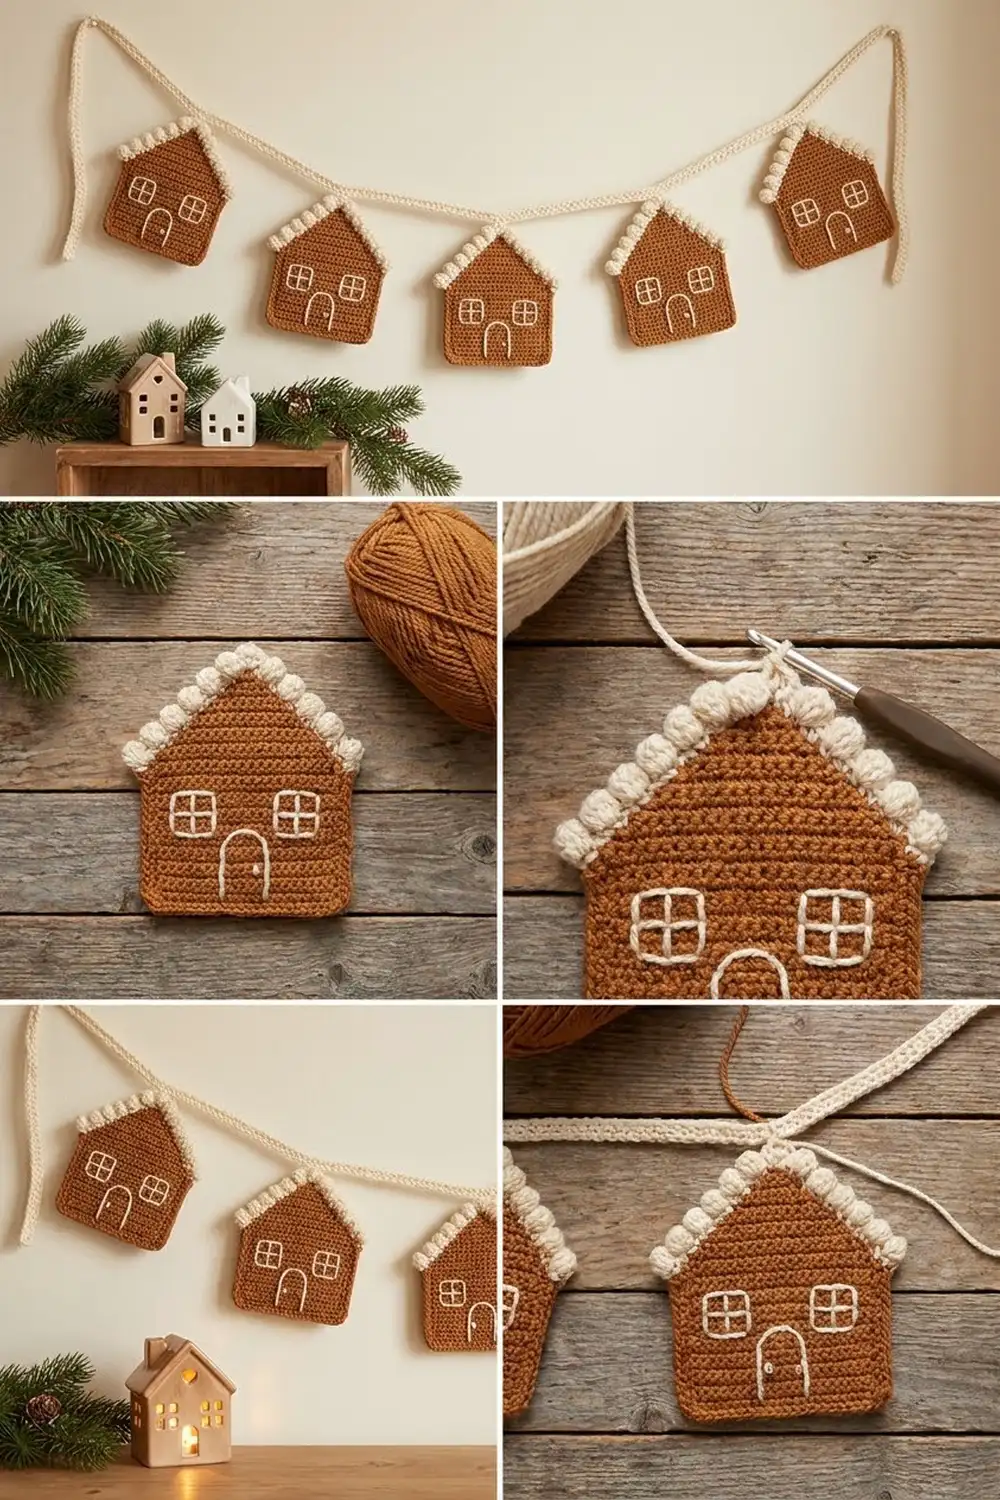
This garland strings five little gingerbread houses along a cream cord. Each house is a flat, warm cinnamon-brown pentagon with a peaked roof. A thick cream “icing” trim with rounded bobbles runs along the roof, and cream embroidery adds two four-pane windows and an arched door with a round knob.
The look is cozy and simple, a bit like a bakery window. Only two colors are used: a medium gingerbread brown for the houses and a soft cream for the icing, the windows, the door, the hanging loops and the cord.
This pattern uses US crochet terms. Each finished house is about 3.5 in (8.9 cm) wide at the eaves and 4.75 in (12.1 cm) tall from the bottom edge to the iced peak. The cord is 40 in (101.6 cm) long, and the five houses take up the center 19.5 in (49.5 cm).
Construction is straightforward. Each house is worked flat in single crochet rows from the bottom up, decreasing to form the roof. A brown edging round neatens the outline, then two cream rows build the bobble roof trim. The windows and door are embroidered in chain stitch. Finally, each house is joined to a crocheted cord with a short cream hanging loop.
Finished Size and Construction
- Finished house size: 3.5 in (8.9 cm) wide at the eaves x 4.75 in (12.1 cm) tall
- Garland length: 40 in (101.6 cm) cord; houses span 19.5 in (49.5 cm)
- Skill level: Easy / Advanced beginner
- Terminology: US crochet terms
- Yarn weight: Worsted (#4), cotton or cotton blend
- Hook: 4.0 mm (G-6)
- Number of pieces: 5 houses + 1 cord
- Layout: 1 row of 5 houses, 4 in (10.2 cm) apart center to center
- House body size (before border): 3 in (7.6 cm) wide x 4 in (10.2 cm) tall
- Border depth: brown edging about 0.125 in (0.3 cm); cream roof trim about 0.5 in (1.3 cm)
Materials
Choose a smooth worsted cotton or cotton blend. Cotton gives crisp stitch definition, holds the pointed roof shape, and makes the cream embroidery stand out clearly. Avoid fuzzy yarns, which blur the windows.
- Gingerbread brown: 40 g, about 73 m (80 yd)
- Cream: 30 g, about 55 m (60 yd)
These quantities include a comfortable margin for gauge swatching and small differences in tension.
Tools:
- 4.0 mm (G-6) crochet hook
- Tapestry needle with a blunt tip
- 5 locking stitch markers
- Scissors
- Ruler or tape measure
- Blocking mat and pins
- Spray bottle with water
Abbreviations (US Terms)
- ch – chain
- sc – single crochet
- sc2tog – single crochet 2 together (decrease)
- dc – double crochet
- sl st – slip stitch
- st(s) – stitch(es)
- sp – space
- RS / WS – right side / wrong side
Special stitch – Bobble (bob): Yarn over, insert hook in st, yarn over and pull up a loop, yarn over and pull through 2 loops. Repeat 2 more times in the same st (4 loops on hook). Yarn over and pull through all 4 loops. Bobbles are worked with the WS facing so they pop out toward the RS.
Gauge and Checkpoints
Gauge: 16 sc x 20 rows = 4 in (10.2 cm) in sc rows, using a 4.0 mm hook.
That equals 4 sc and 5 rows per 1 in (2.5 cm). Every measurement in this pattern depends on it.
Make one complete house first, including the edging and roof trim, before starting the others. Check it at these points:
- After Row 1: 12 sc = 3 in (7.6 cm) wide
- After Row 15: wall section = 3 in (7.6 cm) tall, still 3 in (7.6 cm) wide
- After Row 20: body = 4 in (10.2 cm) tall at the center
- After brown edging: 3.25 in (8.3 cm) wide x 4.25 in (10.8 cm) tall
- After roof trim: 3.5 in (8.9 cm) at the eaves x 4.75 in (12.1 cm) tall
If your house is too big, go down a half size to a 3.75 mm hook. If it is too small, go up to a 4.5 mm hook. Change hooks rather than changing stitch counts, since the roof and trim counts are tied to the 12-stitch width.
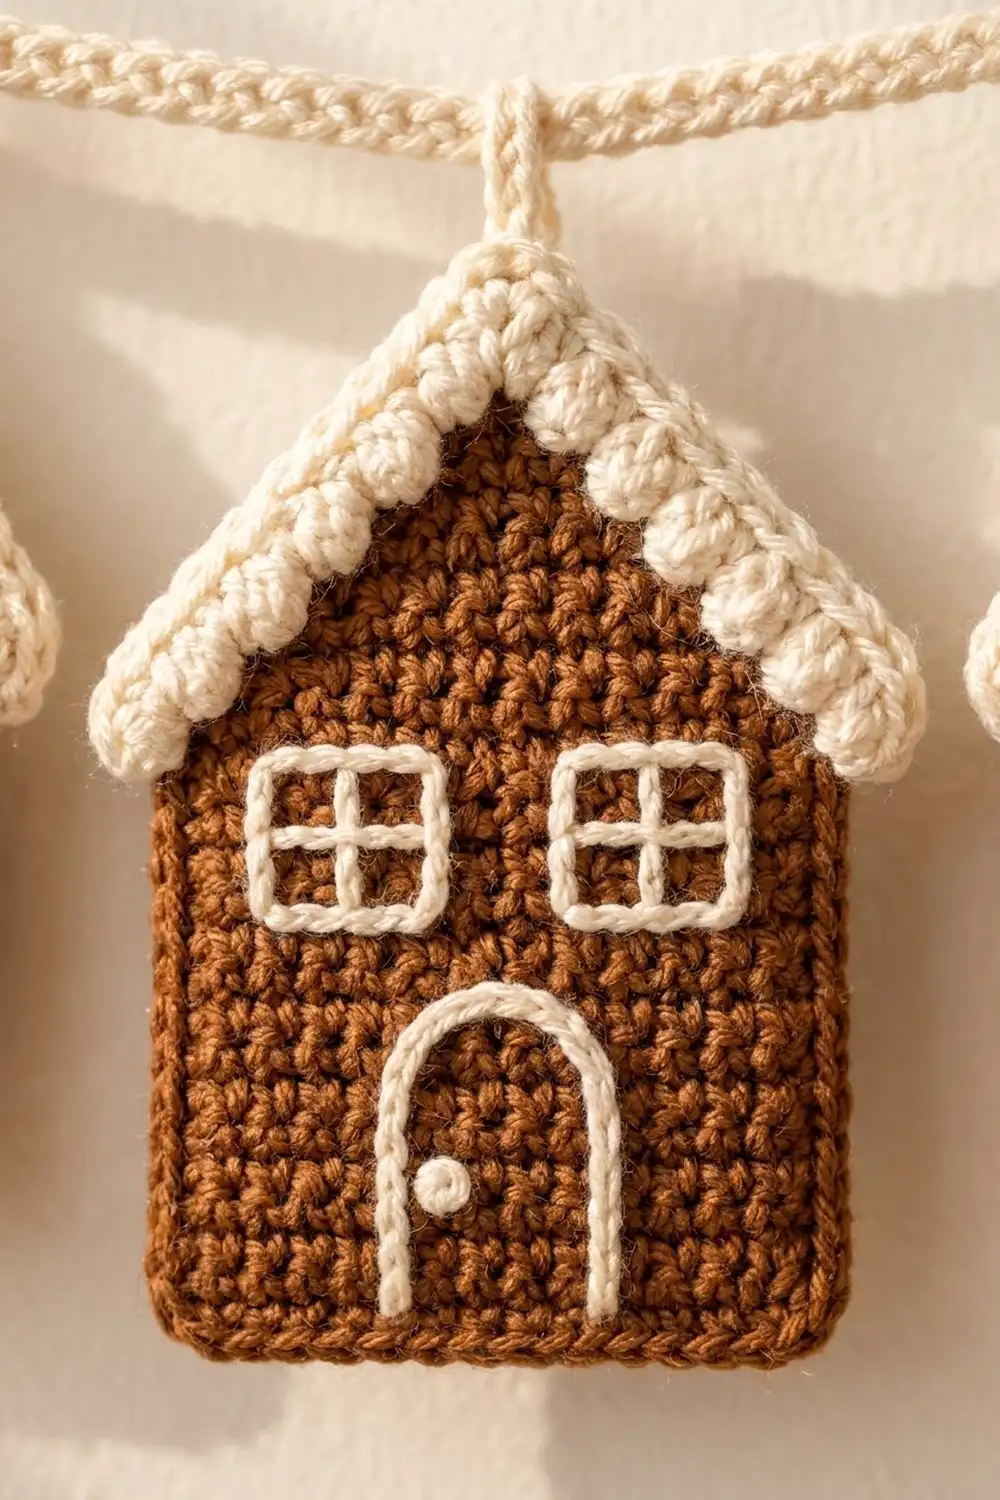
House (Make 5)
Use brown. Ch 13.
Row 1 (RS): Sc in 2nd ch from hook and in each ch across, turn. (12 sc)
Rows 2–15: Ch 1, sc in each st across, turn. (12 sc)
Checkpoint: the wall section is now a 3 in (7.6 cm) square.
Row 16: Ch 1, sc2tog, sc in next 8 sts, sc2tog, turn. (10 sts)
Row 17: Ch 1, sc2tog, sc in next 6 sts, sc2tog, turn. (8 sts)
Row 18: Ch 1, sc2tog, sc in next 4 sts, sc2tog, turn. (6 sts)
Row 19: Ch 1, sc2tog, sc in next 2 sts, sc2tog, turn. (4 sts)
Row 20: Ch 1, sc2tog twice. (2 sts) Fasten off.
The roof now rises 1 in (2.5 cm) over 5 rows and narrows by 1 st at each end of every row. That gives a peak about 1.25 in (3.2 cm) in from each wall, so each roof slope measures about 1.6 in (4.1 cm).
Weave in the tails on the WS before you add the edging.
Embroidered Windows and Door
Do the embroidery before the border so that the stitches sit cleanly inside the brown edging. Work with a single strand of cream and the RS facing, using chain stitch (or surface slip stitch with the hook). Count stitches from the right edge and rows from the bottom.
Windows (make 2): Each window covers 3 sts x 4 rows, about 0.75 in (1.9 cm) wide x 0.8 in (2.0 cm) tall.
- Left window: sts 2–4, Rows 11–14
- Right window: sts 9–11, Rows 11–14
Outline each rectangle. Then add one vertical line through the center st and one horizontal line between Rows 12 and 13 to make four panes.
Door: Centered over sts 5–8 (4 sts, 1 in / 2.5 cm wide), Rows 1–8, about 1.6 in (4.1 cm) tall.
Start at the bottom of st 5. Stitch straight up to Row 6, curve in a smooth arch across Rows 7–8, and come down the side of st 8 to the bottom edge. Leave the bottom of the door open.
Doorknob: Make one French knot (wrap the needle twice) on st 7, Row 4.
Secure all ends on the WS by weaving them behind the brown stitches.
Make All Pieces
- Houses: 5, all brown, each with cream embroidery
- Roof trim: 5, cream, worked onto each house (see Border)
- Cord: 1, cream
Layout, viewed from the front (H = house, — = cord):
[10.5 in tail] H -- H -- H -- H -- H [10.5 in tail]
               ^    ^    ^    ^    ^
          house centers 4 in (10.2 cm) apart
Border
Border gauge: same as the body, 4 sc per 1 in (2.5 cm). Along row ends, work 1 sc per sc row.
Round 1: Brown Edging
With the RS facing, join brown with a standing sc in the first foundation ch at a bottom corner. Work the round as follows:
- Bottom: 2 more sc in the same ch (3 sc in corner), sc in next 10 ch, 3 sc in last ch. (16 sc)
- First wall: 1 sc in each row end of Rows 1–15. (15 sc) The 15th sc is the shoulder st.
- First roof slope: 7 sc evenly along Rows 16–20: 1 sc in each row end, plus 1 extra sc in the row ends of Rows 17 and 19. (7 sc)
- Peak: Sc in first st of Row 20, ch 2, sc in second st. (2 sc + ch-2 sp)
- Second roof slope: 7 sc as on the first slope. (7 sc)
- Second wall: 1 sc in each row end of Rows 15 down to 1. (15 sc)
Sl st to the first sc to join. Total: 62 sc + 1 ch-2 sp. Fasten off.
Check: 16 + 15 + 7 + 1 + 1 + 7 + 15 = 62.
Why the math works: each slope is about 1.6 in (4.1 cm) long. At 4 sc per inch that calls for 6.4 sc, so 7 sc lets the edge lie flat without cupping. The 3-sc bottom corners and the ch-2 peak give each turn enough room to stay sharp.
Roof Trim Row 1 (Cream)
With the RS facing, join cream with a standing sc in the shoulder st at the start of the first roof slope (the 15th wall sc).
Sc in the 7 slope sts and the peak sc (9 sc per side, including the shoulder). Work (sc, ch 2, sc) in the peak ch-2 sp. Then sc in the next peak sc, the 7 slope sts and the other shoulder st (9 sc). Turn.
Total: 20 sc + ch-2 sp (10 sc on each side of the peak sp).
Roof Trim Row 2 (Cream, Bobble Row – WS)
Ch 1. Sc in first 2 sts, [bob in next st, sc in next st] 4 times. (10 sts)
Work (sc, ch 2, sc) in the ch-2 sp.
[Sc in next st, bob in next st] 4 times, sc in last 2 sts. (10 sts)
Total: 22 sts (8 bobbles + 14 sc) + ch-2 sp. Fasten off.
The two plain sc at each shoulder slightly overhang the walls and form the eaves. That brings the width to about 3.5 in (8.9 cm). The bobbles push out to the RS, making the bumpy icing edge.
Joining
The houses hang from one cord by short cream loops. Each loop is crocheted around the cord, so the houses can’t slide.
Cord
With cream, ch 10 and sl st to the first ch to form an end loop for hanging.
Ch about 180 (or until the chain measures 40 in / 101.6 cm), ch 10, and sl st to the 10th ch from the hook to form the second end loop. Turn.
Sl st in the back bump of each ch across the cord. This firms it up and makes it look rounder. Fasten off.
Check the length again and adjust it to 40 in (101.6 cm).
Placing the Houses
Lay the cord flat. Place one marker at the exact center, then one each at 4 in (10.2 cm) and 8 in (20.3 cm) out on both sides. That makes 5 markers, 4 in (10.2 cm) apart.
Hanging Loop Join (Stitch-to-Stitch)
For each house, join cream with a sl st in the peak ch-2 sp of Roof Trim Row 2.
Ch 4, then insert the hook around the cord at a marker from front to back and make a sl st. Ch 4, then sl st into the same peak ch-2 sp. Fasten off and weave in the ends.
Each loop is 8 ch and 2 sl sts, which lets the house hang about 0.5 in (1.3 cm) below the cord. That matches the short loops seen on the finished garland.
Tension advice: keep the loop chains firm and even. Loose chains let the houses tilt or turn around.
Size checkpoint: with the garland hanging, the outer house edges should be about 19.5 in (49.5 cm) apart, with about 10.5 in (26.7 cm) of plain cord on each side. The gaps between the eaves should measure about 0.5 in (1.3 cm).
Final Blocking
- Pin each house RS up on the blocking mat at 3.5 in (8.9 cm) x 4.75 in (12.1 cm).
- Pin the bottom corners square, the walls straight, and the peak to a clear point.
- Don’t pin through the bobbles. Pin just inside the trim so the bobbles stay rounded.
- Spray lightly until damp, not soaked.
- Let the pieces dry completely, usually 6–8 hours.
- Unpin, attach the houses to the cord if you haven’t already, and let the garland hang overnight to settle.
Final Quality-Control Checklist
- Each body has 12 sc in Rows 1–15 and 2 sts in Row 20
- Brown edging has 62 sc + ch-2 peak sp
- Roof Trim Row 2 has 22 sts with 8 bobbles, 4 per side
- The bobbles all face the RS
- Windows: 2 per house, 4 panes each, at the same height
- Door: arched top, centered, with a knob on the right side
- All 5 houses measure within 0.125 in (0.3 cm) of each other
- Houses are 4 in (10.2 cm) apart center to center, and the cord is 40 in (101.6 cm)
- All tails are woven in on the WS
Troubleshooting
The walls ripple along the edging: your row ends are tighter than the gauge. Use a 3.75 mm hook for the edging round only.
The roof slope cups: your tension is loose. Use 6 sc per slope, and then 8 sc per side in Trim Row 1 with 3 bobbles in Row 2.
The bobbles sink to the back: Row 2 has to be worked with the WS facing. Turn after Trim Row 1.
The peak is rounded: make sure the ch-2 spaces are kept in both the edging and the trim, and pin the peak while blocking.
The embroidery puckers: stitch more loosely, and don’t pull the yarn tight across the back.
The houses tilt: center each loop exactly on the peak ch-2 sp, and keep both 4-ch legs equal.
Care
Hand wash in cool water with mild soap, press out the water in a towel, and dry flat, reshaping the peaks. Store the garland flat or loosely coiled so the roof trim keeps its shape.
Final Notes
The measurement chain is simple:
- 16 sc = 4 in (10.2 cm), so 12 sc gives a 3 in (7.6 cm) wall.
- 15 rows make a 3 in (7.6 cm) square, and 5 roof rows add 1 in (2.5 cm) for a 4 in (10.2 cm) body.
- The 62-st brown edging brings the house to 3.25 in x 4.25 in (8.3 cm x 10.8 cm).
- The 22-st bobble trim finishes it at 3.5 in x 4.75 in (8.9 cm x 12.1 cm).
- Five houses spaced 4 in (10.2 cm) apart fill 19.5 in (49.5 cm) of a 40 in (101.6 cm) cord.
Check each stage against these numbers, and every house will match.
Happy crocheting!