

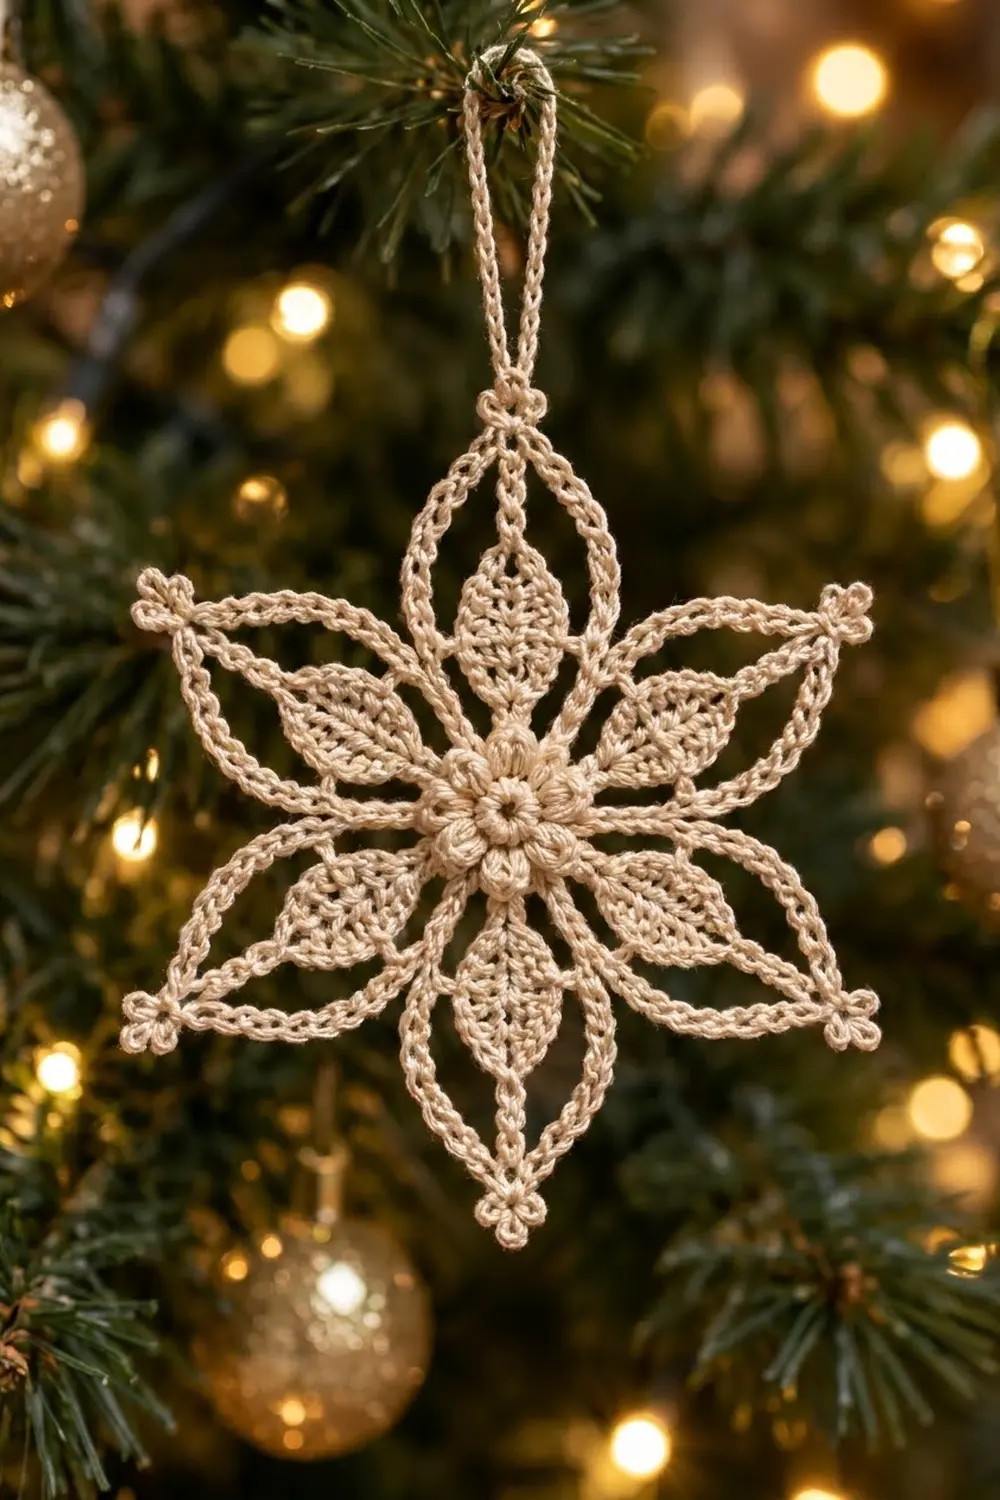
The Frosted Lily Snowflake is a delicate six-point thread ornament with a soft vintage look. A raised ring of puff stitches forms a pearly center. Six solid leaves radiate out from it, and each leaf is framed by a corded teardrop outline that ends in a tiny trefoil of picots.
This sample is worked in a single cream cotton thread, which suits rustic, Scandinavian, or classic gold-and-ivory tree themes. White gives a frosty look, metallic gold thread gives a gilded one, and pale blue gives an icy one.
The pattern uses US crochet terms. The finished snowflake measures 4 in (10.2 cm) from picot tip to opposite picot tip, plus a 1.5 in (3.8 cm) hanging loop.
The whole ornament is crocheted as one piece in the round. You work a puff-stitch center first, then six leaves worked around chain loops, then the corded outline arcs with picot tips, and finally a single crochet cording round that firms up the outline. A chain hanging loop finishes it. There is no sewing or joining.
Finished Size and Construction
- Finished size: 4 in (10.2 cm) tip to tip, without the hanging loop
- Hanging loop: 1.5 in (3.8 cm) tall
- Skill level: Intermediate
- Terminology: US crochet terms
- Yarn weight: Size 10 cotton crochet thread (lace weight, category 0)
- Hook: 1.75 mm (US steel 4)
- Number of pieces: 1 (single motif)
- Layout: Six-point radial snowflake, worked in the round
- Center disk (after Round 3): 0.9 in (2.3 cm) across
- Size before cording round: 4 in (10.2 cm) tip to tip
- Cording round depth: about 0.1 in (0.3 cm) added along each arc
Materials
Thread advice: Choose a mercerized cotton size 10 crochet thread. Mercerized cotton has a crisp twist and a slight sheen, so the stitches look clear and the piece holds its shape after blocking. Avoid fuzzy or very soft acrylic threads, because they blur the leaf texture and won’t stay flat.
Color and quantity:
- Cream (main and only color): 5 g, about 25 m (27 yd)
That amount includes a generous margin for a gauge swatch, tails, and frogging. The ornament itself uses roughly 3 g. One standard ball of size 10 thread makes many snowflakes.
Tools:
- 1.75 mm (US steel 4) crochet hook
- Fine tapestry needle or small-eye needle for weaving in ends
- Small sharp scissors
- Rust-proof pins
- Foam blocking board or folded towel
- Spray bottle with water, or a thread stiffener solution (optional)
- Ruler or flexible tape measure
Abbreviations (US Terms)
- ch – chain
- sl st – slip stitch
- sc – single crochet
- hdc – half double crochet
- dc – double crochet
- st(s) – stitch(es)
- sp – space
- MR – magic ring
- rep – repeat
- yo – yarn over
Special stitches:
- Puff: (Yo, insert hook in the indicated st, yo and pull up a loop to about 0.25 in / 0.6 cm) 3 times, yo, and pull through all 7 loops on the hook.
- Picot trio: (Ch 3, sl st into the indicated chain) 3 times. All three ch-3 loops are anchored in the same chain, so they fan out as a trefoil.
Gauge and Checkpoints
Gauge for thread ornaments is checked by measuring the piece stage by stage, not with a swatch square. Make one complete test snowflake first. After that, the checkpoints below keep each new one consistent.
Base gauge: 10 sc = 1 in (2.5 cm) when worked around a chain, and 10 ch = about 1 in (2.5 cm) when relaxed.
Checkpoints:
- After Round 1: 0.4 in (1.0 cm) across
- After Round 3: 0.9 in (2.3 cm) across
- After Round 4: 2.9 in (7.4 cm) from leaf tip to opposite leaf tip
- After Round 5: 4 in (10.2 cm) from picot trio to opposite picot trio, measured lightly flattened
- After Round 6: still 4 in (10.2 cm). The cording thickens the arcs but adds no length.
If your piece is too big: If Round 3 is wider than 1 in (2.5 cm), switch to a 1.5 mm (US steel 7) hook, or tighten your chains so they don’t sag.
If your piece is too small: If Round 3 is under 0.8 in (2.0 cm), switch to a 2.0 mm hook and pull up the puff loops a little taller.
Pattern
Round 1: Center Ring
Make a MR. Ch 1 (does not count as a st). Work 12 sc into the ring. Pull the tail to close the ring, leaving a small open hole about 0.1 in (0.3 cm) wide. Join with sl st to the first sc. (12 sts)
Round 2: Puff Ring
Ch 2 (does not count as a st). Work a puff in the same st, ch 1. Puff in next st, ch 1. Rep from * 10 more times. Join with sl st to the top of the first puff. (12 puffs and 12 ch-1 sps)
The puffs create the raised, bumpy ring around the center. Keep the puff loops even in height so the ring looks like a string of beads.
Round 3: Conversion Round
Ch 1 (does not count as a st). Sc in top of next puff, sc in next ch-1 sp. Rep from * 11 more times. Join with sl st to the first sc. (12 sc worked 1 per puff + 12 sc added in the ch-1 sps = 24 sts)
Number these sts 1–24 in your mind, with the joining sc as st 1. Leaves will sit on sts 1, 5, 9, 13, 17, and 21. The midpoint sts 3, 7, 11, 15, 19, and 23 will anchor the outlines.
Checkpoint: 0.9 in (2.3 cm) across.
Round 4: Six Leaves
Each leaf is worked around a ch-20 loop. When you pinch the loop flat it is 10 ch long on each side, and you work 10 sts up one side, a tip, and 10 sts down the other side.
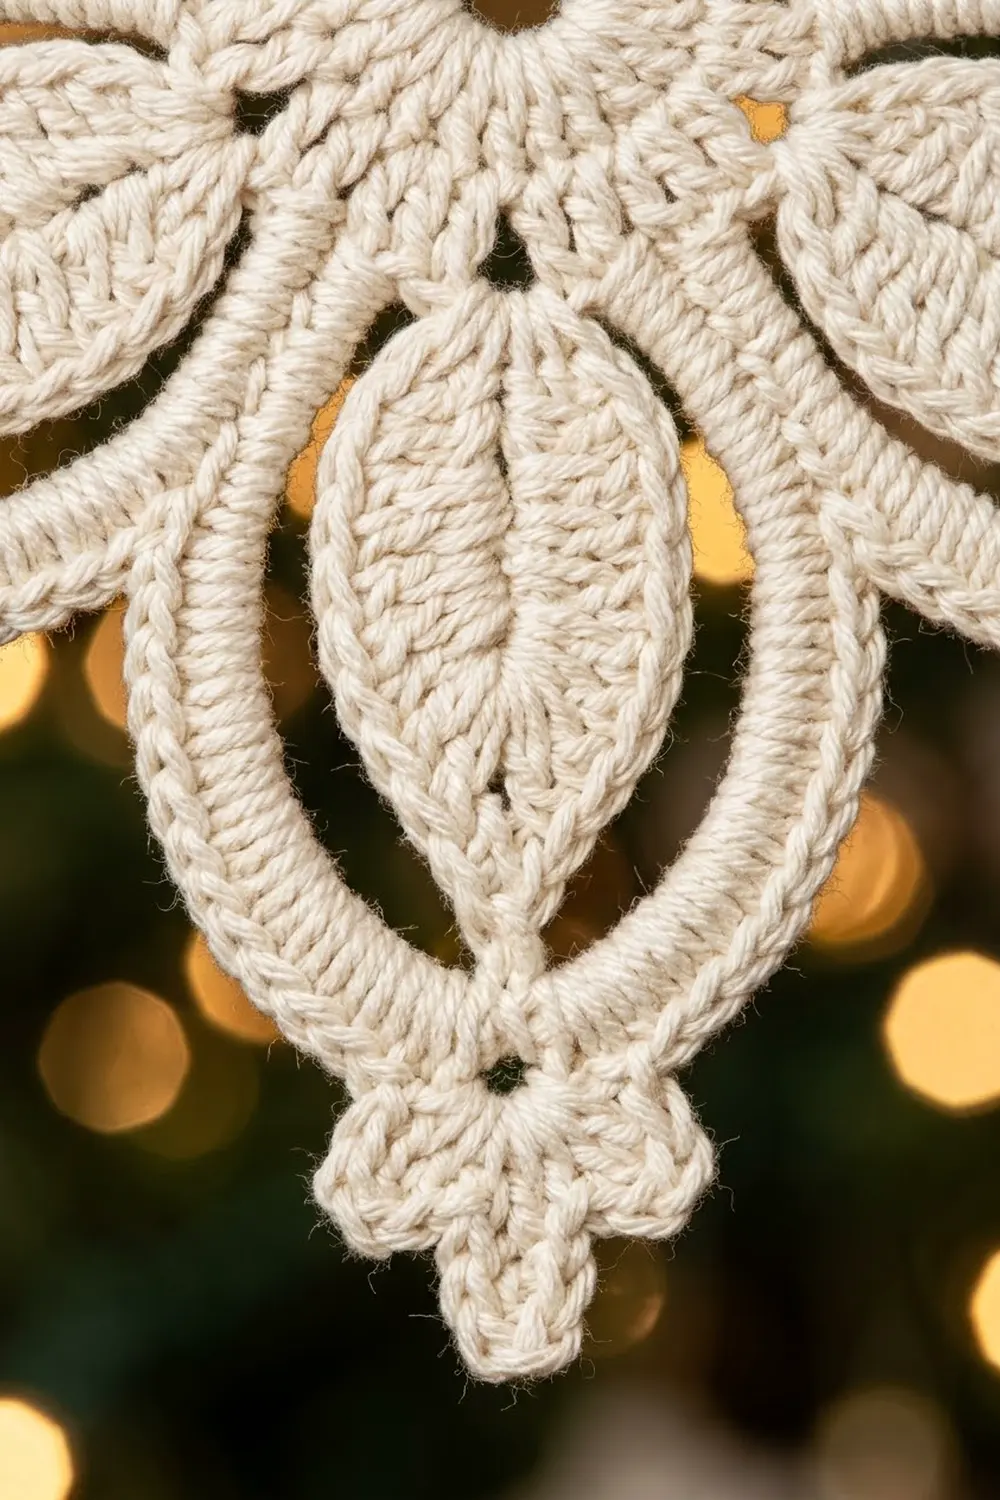
Leaf (worked into the ch-20 loop): 2 sc, 2 hdc, 3 dc, 2 hdc, 1 sc (10 sts up the first side), then (sc, ch 3, sc) at the fold of the loop for the tip, then 1 sc, 2 hdc, 3 dc, 2 hdc, 2 sc (10 sts down the second side). (22 sts and 1 ch-3 tip sp per leaf)
Work all stitches around the chain, not into individual chains. This keeps the leaf flat, solid, and finely textured. Push the stitches together as you go so they fill the loop completely.
Round 4 instructions:
- Leaf 1: Without turning, ch 20, sl st in st 1 (the joining st) to form the loop. Work the leaf around the loop, then sl st in st 1 again. Sl st in each of the next 3 sts (sts 2–4).
- Leaves 2–5: Sl st in next st, ch 20, sl st in the same st, work the leaf, sl st in the same st again, sl st in each of the next 3 sts. Rep from * 3 more times. Leaves land on sts 5, 9, 13, and 17.
- Leaf 6: Sl st in next st (st 21), ch 20, sl st in the same st, work the leaf, sl st in the same st again, sl st in each of the next 2 sts (sts 22 and 23). Do not fasten off.
Count check: 6 leaves × 22 sts = 132 leaf sts, 6 ch-3 tip sps, and all 24 base sts covered by sl sts. Your hook now sits at st 23, the midpoint between Leaf 6 and Leaf 1.
Checkpoint: Each leaf is 1 in (2.5 cm) long. The piece measures 2.9 in (7.4 cm) from leaf tip to opposite leaf tip.
Round 5: Outline Arcs and Picot Tips
Each point gets two ch-16 arcs. One arc runs from a midpoint up to the leaf tip and the other runs back down to the next midpoint. Because each arc is 16 ch while the leaf is only 10 sts long, the arcs bow outward and leave open windows on both sides of the leaf.
Rep 6 times:
- Ch 16, sl st in the ch-3 tip sp of the next leaf.
- Stem: Ch 5. Picot trio into the 5th ch of the stem (the ch nearest your hook). Sl st in each of the remaining 4 stem ch, back toward the leaf, then sl st in the same ch-3 tip sp.
- Ch 16, sl st in the sl st that sits over the next midpoint st (st 3, then 7, 11, 15, 19, and finally 23).
Count check: Each point uses 16 + 5 + 9 (picots) + 16 = 46 ch. The round gives 12 ch-16 arcs and 6 picot trios, with 2 sl sts in each leaf tip sp.
Checkpoint: 4 in (10.2 cm) from picot tip to opposite picot tip.
Round 6: Corded Outline
This round is the “border” of the snowflake. See the Border section below for the full counts and math.
Hanging Loop
Choose the top point. Join thread with sl st to the center picot of its trio, ch 30, and sl st again into the same picot. Fasten off and weave in the ends. Loop height: 1.5 in (3.8 cm).
Border: Corded Outline Round
Border gauge: 18 sc worked around a ch-16 arc. This is about 10 sc per 0.9 in (2.3 cm) along the curve.
Round 6: Continue from st 23. Rep 6 times:
- Work 18 sc around the next ch-16 arc.
- Sc around the leaf-tip ch-3 sp, placing it between the two Round 5 sl sts and under the stem. Do not work over the stem itself.
- Work 18 sc around the next ch-16 arc.
- Sl st in the midpoint sl st.
Counts per point: 18 + 1 + 18 = 37 sc, plus 1 sl st. Round total: 6 × 37 = 222 sc and 6 sl sts. Fasten off and leave an 8 in (20.3 cm) tail.
Why the math works: When sc are worked around a chain, each sc is slightly wider than one relaxed ch. Working 18 sc over 16 ch (a ratio of 1.125) packs the arc firmly enough to look corded, which matches the rope-like outline. That ratio is still too low to make the arc ripple, and it is high enough that the arc won’t cup or pull the leaf tips inward.
The single sc at each tip locks the two arcs and the stem together. All the length was set in Round 5, so the cording thickens the arcs without lengthening the points. That’s why the 4 in (10.2 cm) measurement stays the same.
Final Blocking
- Weave in all ends along the back of the sc stitches, and leave about 0.5 in (1.3 cm) of tail before trimming.
- Soak the snowflake in cool water, or in diluted thread stiffener if you want a crisp ornament. Press out the excess in a towel. Do not wring it.
- Pin it to the blocking board through the center hole, then pin the six picot trios at evenly spaced points, 2 in (5.1 cm) from the center pin.
- Check that opposite tips measure 4 in (10.2 cm) apart and that the angle between neighboring points is even (60 degrees).
- Pin each midpoint gently so the arcs curve out into teardrops.
- Fan out the three picots at each tip with a pin.
- Pin the hanging loop straight up.
- Let it dry completely, usually 6–12 hours, before you unpin it.
Final Quality-Control Checklist
- [ ] Center hole is small and neat, and the puff ring looks even all the way around
- [ ] Round 3 has 24 sc and measures 0.9 in (2.3 cm)
- [ ] There are 6 leaves, each with 22 sts and a ch-3 tip
- [ ] There are 12 outline arcs, each with 18 sc
- [ ] There are 6 picot trios, each with three open, even loops
- [ ] Tip-to-tip measurement is 4 in (10.2 cm) on all three axes
- [ ] Hanging loop is 1.5 in (3.8 cm) and securely attached
- [ ] No tails are visible from the front
Troubleshooting
Puff ring looks flat or uneven: Pull up every puff loop to the same height before the final yo. Count all 7 loops on the hook.
Leaves are lumpy or show gaps: Work every stitch around the chain loop, and slide the stitches together. If gaps remain, your ch-20 loop is too loose. Chain more firmly.
Leaves twist sideways: Make sure the ch-20 loop isn’t twisted before you sl st it closed.
Arcs pucker or pull the leaf tips in: Your Round 5 chains are too tight. Loosen your chain tension, or go up 0.25 mm in hook size for Round 5 only.
Arcs ripple after Round 6: You may be working more than 18 sc per arc. Recount, and crowd the sts less.
Snowflake measures under 4 in (10.2 cm): Check your Round 5 tension first. Then block it a little more firmly, stretching the tips out to the full measurement.
Picots collapse: Make sure all three picots anchor in the same stem ch. Pin them open during blocking.
Care
Hand wash in cool water with mild soap, press it dry in a towel, and re-block it flat. Store it flat between tissue paper so the points and picots stay crisp.
Final Notes
The measurement chain is simple. The center ring is 0.4 in (1.0 cm), the center disk grows to 0.9 in (2.3 cm) after Round 3, the leaves span 2.9 in (7.4 cm) after Round 4, and the outline arcs and picot tips bring the snowflake to 4 in (10.2 cm) after Round 5. The corded Round 6 then firms the outline without changing the size, and the 1.5 in (3.8 cm) loop finishes the ornament.
Once your first snowflake matches these checkpoints, every one after it will match too. It is a lovely, quick project for gift tags, tree ornaments, or a window display.
Happy crocheting!