

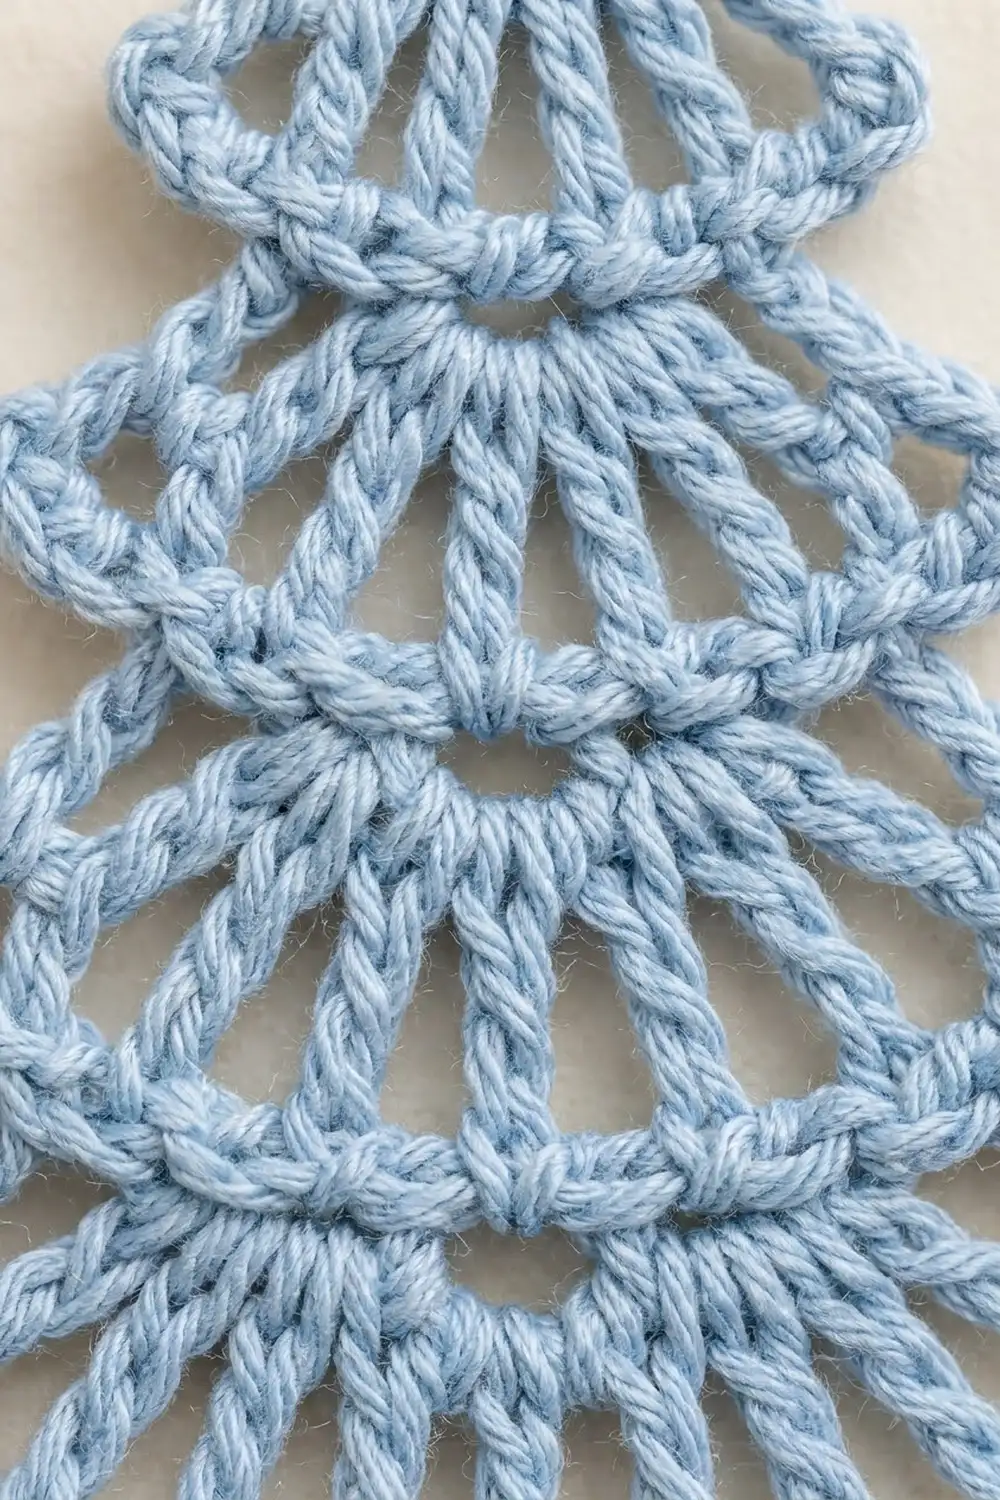
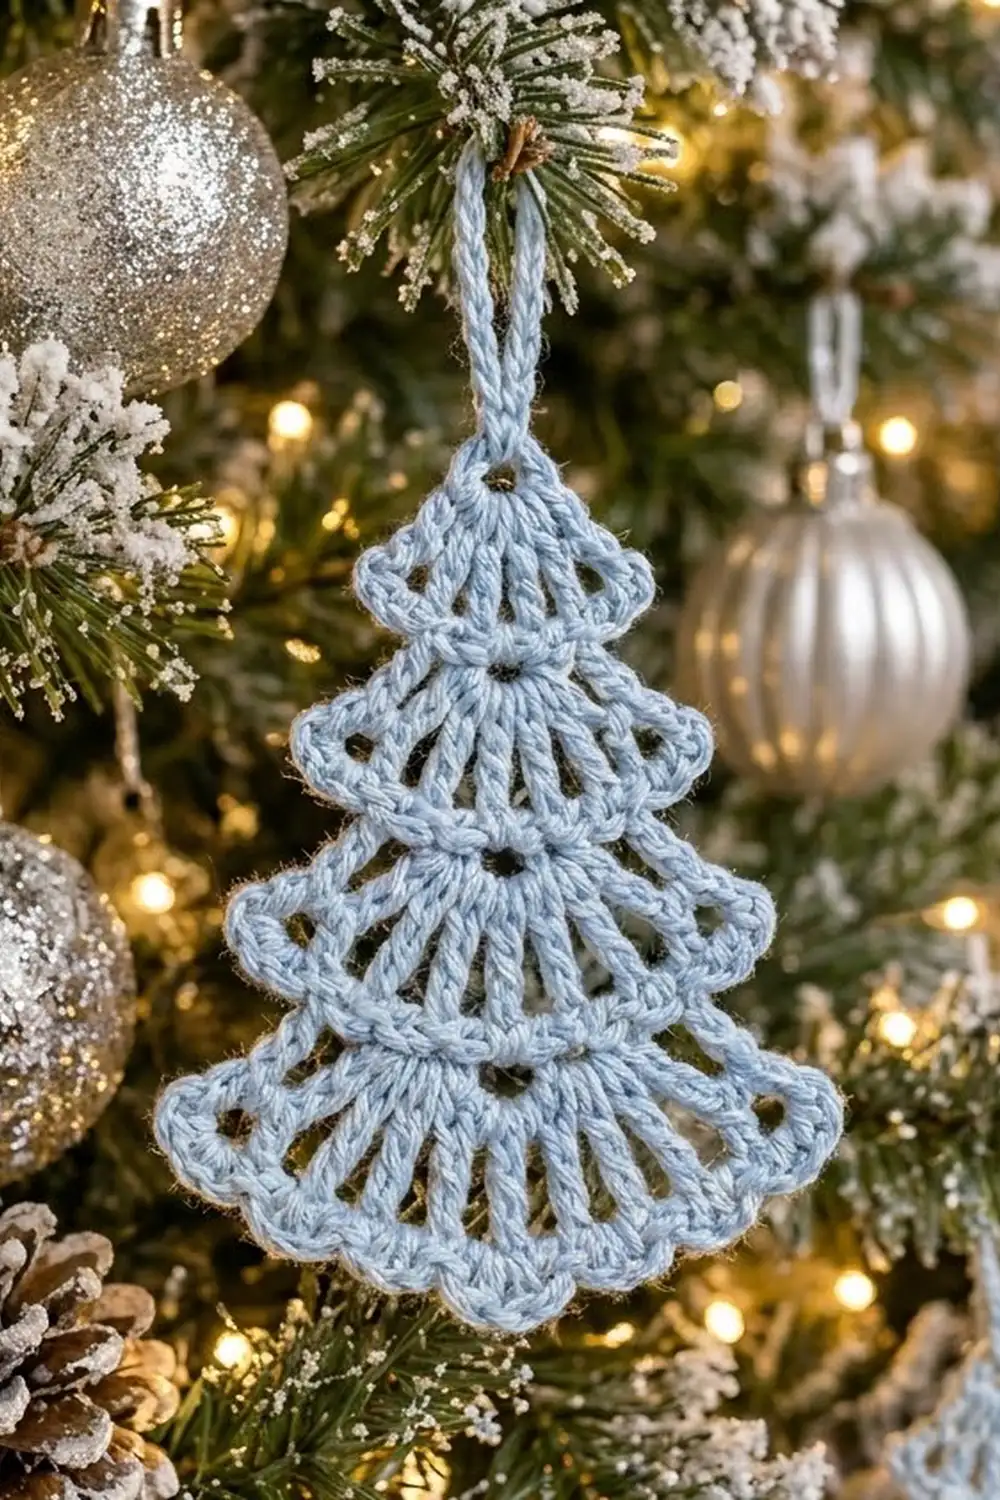
This little lace tree is a quick, delicate ornament made in one soft powder blue. Four open, fan-shaped tiers stack on top of each other. Each tier ends in a firm curved band, and the bottom finishes with a row of small rounded scallops. A chain loop at the top makes it ready to hang.
The look is light and wintry, like frost on a pine branch. Because it uses only one color, it suits a pastel, Scandinavian, or white-and-silver tree. It also works well as a gift tag or package topper.
The pattern uses US crochet terms. The finished ornament is about 3.75 in (9.5 cm) wide and 3.5 in (8.9 cm) tall. With the 1 in (2.5 cm) hanging loop, the total height is 4.5 in (11.4 cm).
You work it as one piece, top to bottom, in turned rows. First you chain the hanging loop and a small ring. Next you work a fan of treble crochet spokes into the ring and cap it with a single crochet band. Each new tier grows straight out of the band above it. A scallop row finishes the bottom edge, and there is nothing to sew together.
Finished Size and Construction
- Finished size: 3.75 in (9.5 cm) wide x 3.5 in (8.9 cm) tall, plus a 1 in (2.5 cm) loop
- Skill level: Easy-intermediate
- Terminology: US crochet terms
- Yarn weight: Sport / light fingering cotton (#2)
- Hook: 2.5 mm (US B/1 or C/2, depending on brand)
- Number of pieces: 1
- Layout: A single tree motif, worked top-down in turned rows
- Piece size before border: 3.5 in (8.9 cm) wide x 3.25 in (8.3 cm) tall, not counting the loop
- Border depth: 0.25 in (0.6 cm), along the bottom edge only
Materials
Yarn: Use a smooth mercerized cotton or cotton blend in sport or light fingering weight. Cotton keeps the lacy spokes crisp and blocks flat. Fuzzy or very soft acrylic will blur the open spaces.
- Powder blue: 8 g (about 26 m)
This amount includes a margin for your gauge test and tails. If you plan to make a set of ornaments, allow 8 g (about 26 m) for each one.
Tools:
- 2.5 mm crochet hook
- Tapestry needle
- Scissors
- Blocking mat or folded towel, and rustproof pins
- Spray starch or fabric stiffener (optional, recommended)
- Ruler or tape measure
Abbreviations (US Terms)
- ch – chain
- sl st – slip stitch
- sc – single crochet
- dc – double crochet
- tr – treble crochet
- sk – skip
- sp – space
- st(s) – stitch(es)
- tch – turning chain
- RS / WS – right side / wrong side
Special stitch – Treble crochet (tr): Yarn over twice. Insert the hook in the stitch or space, yarn over, and pull up a loop (4 loops on hook). [Yarn over and pull through 2 loops] 3 times.
Shell: 5 dc worked into the same stitch.
Turning chain note: At the start of a spoke row, ch 4 counts as 1 tr. At the start of a band or scallop row, ch 1 does not count as a stitch.
Gauge and Checkpoints
Gauge: 14 sc = 2 in (5.1 cm) across, worked flat. One tr row is about 0.6 in (1.5 cm) tall.
Gauge matters less here than for a garment, but it controls the final size and how flat the tiers lie. To check it, work a short strip of 14 sc for a few rows and measure it, then make one practice tier. If Tier 1 lies flat and matches its checkpoint, carry on.
Measure each tier on a flat surface after you finish its band row. Measure the width straight across the widest point. Measure the height from the top of the eyelet ring, leaving out the hanging loop.
| Stage | Width | Height |
|---|---|---|
| After Tier 1 (Row 2) | 1.75 in (4.4 cm) | 1 in (2.5 cm) |
| After Tier 2 (Row 4) | 2.5 in (6.4 cm) | 1.75 in (4.4 cm) |
| After Tier 3 (Row 6) | 3 in (7.6 cm) | 2.5 in (6.4 cm) |
| After Tier 4 (Row 8) | 3.5 in (8.9 cm) | 3.25 in (8.3 cm) |
| After scallops (Row 9) | 3.75 in (9.5 cm) | 3.5 in (8.9 cm) |
Being off by up to 0.125 in (0.3 cm) is fine.
If your tree is too big: Go down to a 2.25 mm hook, or pull the tr loops a little snugger.
If your tree is too small: Go up to a 2.75 mm hook. Also make sure your tr stitches are not squashed: pull each first loop up to full height.
If a tier cups or ruffles: Check the Troubleshooting section before going further.
Pattern
Before You Start
Every spoke row is worked on the RS and every band row on the WS. Each spoke row has a ch-2 space in the exact center. The ch-2 spaces line up from tier to tier and form the column of small eyelets down the middle of the tree. Count your band stitches before each spoke row so the center falls in the right place.
Hanging Loop and Eyelet Ring
Leave a 6 in (15.2 cm) tail.
Ch 12, then sl st in the first ch to form the hanging loop.
Ch 6, then sl st in the 6th ch from the hook to form a small ring. This ring is the eyelet just under the loop. Work every stitch of Row 1 into this ring, letting the stitches fan around its lower half.
Tier 1
Row 1 (RS): Ch 4 (counts as tr), [ch 1, tr in ring] 3 times, ch 2, tr in ring, [ch 1, tr in ring] 3 times.
(8 tr, 7 sp: 6 ch-1 sp and 1 center ch-2 sp)
Spread the spokes evenly so they form a half-circle fan hanging below the loop.
Row 2 (WS, band): Ch 1, turn. Sc in the first tr, sc in the next sp, sc in the next tr across. Work the last sc in the 4th ch of the tch.
(15 sc: 8 over tr + 7 over sp)
The center sc (the 8th) sits right over the ch-2 sp.
Checkpoint: 1.75 in (4.4 cm) wide, 1 in (2.5 cm) tall.
Tier 2
Row 3 (RS, spokes): Ch 4, turn (counts as tr). Ch 1, tr in the first sc (the same sc the tch comes from). [Ch 1, sk next sc, tr in next sc] 3 times. Ch 2, sk next sc (the center sc), tr in next sc. [Ch 1, sk next sc, tr in next sc] 3 times. Ch 1, tr in the same last sc.
(10 tr, 9 sp: 8 ch-1 sp and 1 center ch-2 sp)
The two tr at each end make the tier flare out past the band above it. Skipping the center sc under the ch-2 makes the small center eyelet.
Row 4 (WS, band): Ch 1, turn. Sc in the first tr, sc in the next sp, sc in the next tr across. Work the last sc in the 4th ch of the tch.
(19 sc)
Checkpoint: 2.5 in (6.4 cm) wide, 1.75 in (4.4 cm) tall.
Tier 3
Row 5 (RS, spokes): Ch 4, turn (counts as tr). Ch 1, tr in the first sc. [Ch 1, sk next sc, tr in next sc] 4 times. Ch 2, sk next sc (center), tr in next sc. [Ch 1, sk next sc, tr in next sc] 4 times. Ch 1, tr in the same last sc.
(12 tr, 11 sp)
Row 6 (WS, band): Ch 1, turn. Sc in the first tr, sc in the next sp, sc in the next tr across. Work the last sc in the 4th ch of the tch.
(23 sc)
Checkpoint: 3 in (7.6 cm) wide, 2.5 in (6.4 cm) tall.
Tier 4
Row 7 (RS, spokes): Ch 4, turn (counts as tr). Ch 1, tr in the first sc. [Ch 1, sk next sc, tr in next sc] 5 times. Ch 2, sk next sc (center), tr in next sc. [Ch 1, sk next sc, tr in next sc] 5 times. Ch 1, tr in the same last sc.
(14 tr, 13 sp)
Row 8 (WS, band and trim): Ch 1, turn. Sc in the first tr, then 2 sc in the next ch-1 sp. Sc in the next tr, sc in the next sp; repeat until 1 ch-1 sp is left. Sc in the next tr, 2 sc in the last ch-1 sp, then sc in the 4th ch of the tch.
(29 sc = 27 sc worked 1 per tr and sp + 2 extra sc in the 2 outer spaces)
The 2 extra sc give the bottom tier a little more flare. They also give the scallop row the exact count it needs.
Checkpoint: 3.5 in (8.9 cm) wide, 3.25 in (8.3 cm) tall.
Lay the piece flat and look at the ends of this tier. They should angle outward like the tiers above. Do not fasten off.
Border
Border gauge: Each shell repeat uses 4 band stitches, which is about 0.57 in (1.4 cm) of band at 14 sc per 2 in (5.1 cm). The scallop row adds 0.25 in (0.6 cm) of depth.
The border runs along the bottom edge only. The side edges of the tiers stay as open spokes, just like the sample.
Row 9 (RS, scallops): Ch 1, turn. Sc in the first sc, sk next sc, shell (5 dc) in next sc, sk next sc, sc in next sc 7 times.
(7 shells and 8 sc; all 29 band sts used)
Fasten off, leaving a 6 in (15.2 cm) tail.
Why the math works: Each repeat uses 4 stitches (skip, shell, skip, sc), and the row also needs one starting sc. That means the band count must equal 1 + (4 x a whole number). With 29 sc, 1 + (4 x 7) = 29. The row starts and ends on a sc, and the shells sit symmetrically. The 4th shell lands on sc 15, the exact center of the 29 stitches, right under the eyelet column.
Checkpoint: 3.75 in (9.5 cm) wide, 3.5 in (8.9 cm) tall, plus the 1 in (2.5 cm) loop.
Final Blocking
- Weave in both tails. Run the top tail through the base of the hanging loop to firm it up, and run the bottom tail along the back of the scallop row.
- Soak the ornament in cool water, then press it between towels. Do not wring it.
- Lay it RS up on a blocking mat.
- Pin the top of the eyelet ring and stretch the loop straight up.
- Pin the tip of each shell so the scallops form an even curve 3.75 in (9.5 cm) wide.
- Pin the outer tr at each end of every tier so each tier matches its checkpoint width.
- Use your fingers or a pin to open every ch space and the center eyelets.
- For a crisp hanging ornament, spray lightly with starch or brush on diluted fabric stiffener.
- Leave it pinned until it is completely dry, then unpin.
Final Quality-Control Checklist
- Spoke counts by tier: 8, 10, 12, 14 tr
- Band counts: 15, 19, 23, 29 sc
- 7 shells, with the center shell lined up under the eyelets
- A center ch-2 eyelet in every spoke row, all in one straight vertical line
- Each tier flares wider than the band above it
- Finished size is 3.75 in (9.5 cm) x 3.5 in (8.9 cm), within 0.125 in (0.3 cm)
- Hanging loop is about 1 in (2.5 cm) and firmly anchored
- All tails are hidden and trimmed
Troubleshooting
A tier cups or curls upward: Your band stitches are too tight, or your tr are too short. Loosen the band, or go up one hook size for the band rows only.
A tier ruffles: Your ch-1 spaces are too long. Keep the chains snug and about the same size as your stitches.
The center eyelet is off-center: A bracketed repeat was miscounted. Count the band before each spoke row; the center sc must have the same number of stitches on each side.
The scallop row doesn’t come out even: Row 8 must have exactly 29 sc. Check that you worked 2 sc in both the first and last ch-1 sp.
The spokes lean to one side: You are probably inserting the hook at an angle. Work each tr straight down into the top of the sc, and block with the tier ends pinned symmetrically.
The ring is crowded in Row 1: Push the stitches together along the ring as you go, or make the ring with ch 7 instead of ch 6.
The loop is twisted: Make sure the 12 chains were not twisted before you joined them. Block with the loop pinned straight.
Care
Hand wash in cool water with mild soap and lay flat to dry, re-pinning if needed. Re-starch after washing to restore the crisp shape, and store flat between sheets of tissue.
Final Notes
Here is how the measurements build. A gauge of 14 sc = 2 in (5.1 cm) and a 0.6 in (1.5 cm) tr row give Tier 1 at 1.75 in (4.4 cm) wide. Each band then grows by 4 sc, and the last grows by 6 thanks to the trim. Each tier adds about 0.75 in (1.9 cm) of height, giving widths of 2.5 in (6.4 cm), 3 in (7.6 cm), and 3.5 in (8.9 cm). The 29-stitch base takes exactly 7 shells. That finishes the tree at 3.75 in (9.5 cm) wide and 3.5 in (8.9 cm) tall, plus the 1 in (2.5 cm) loop.
Check every tier against its checkpoint, keep the center eyelets lined up, and block well. You’ll have a frosty little tree ready for the branches in under an hour.
Happy crocheting!