

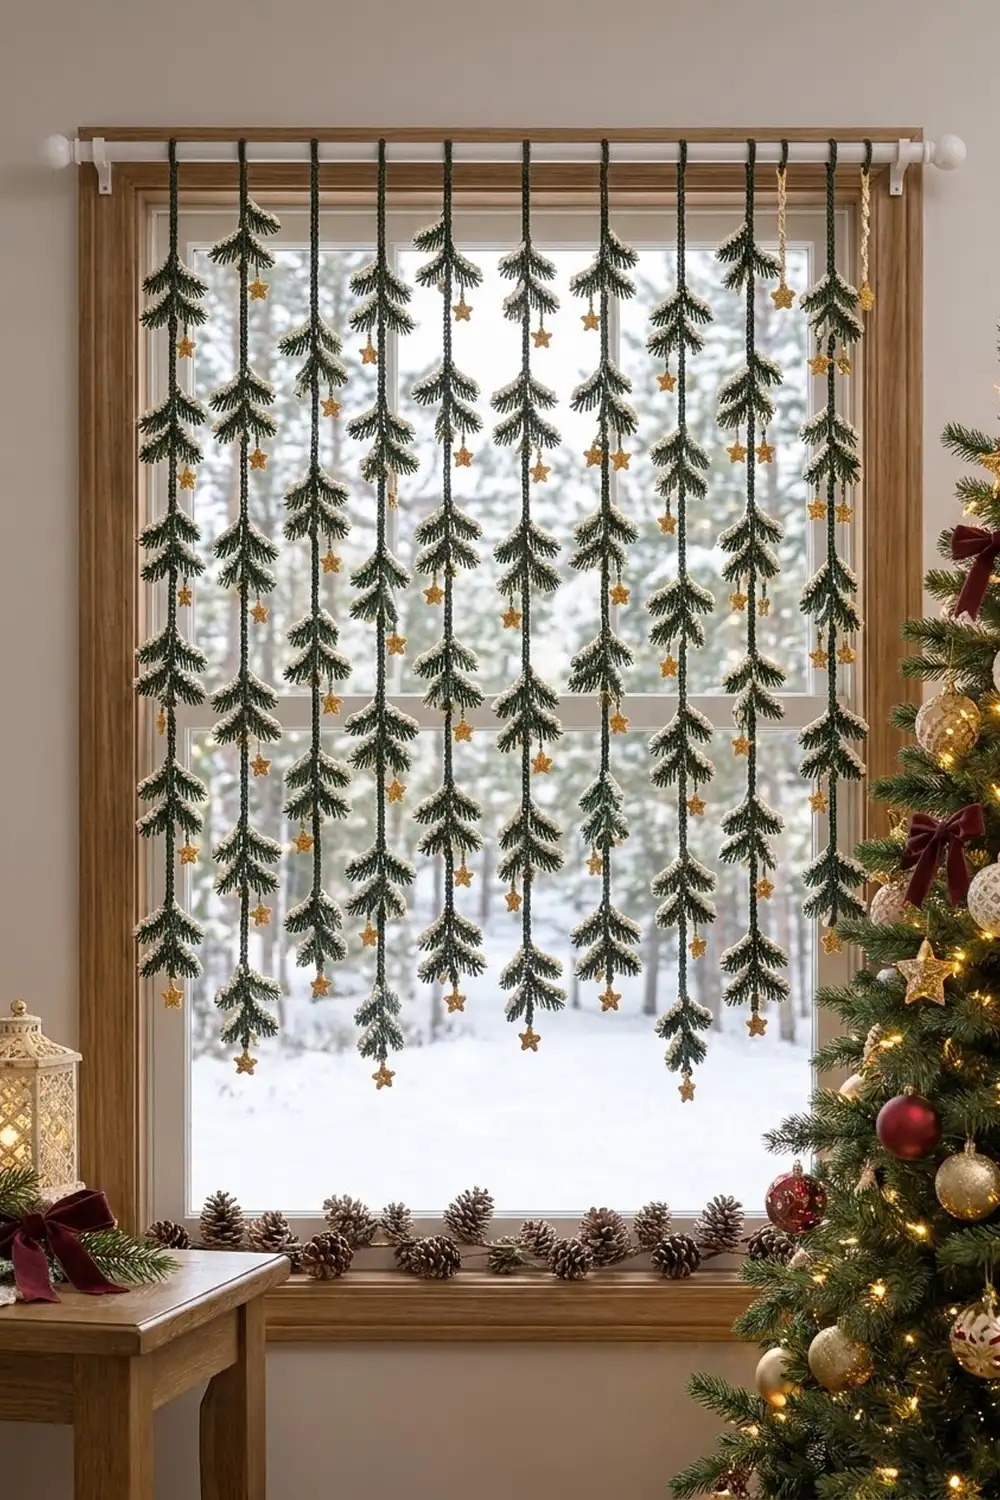
This curtain is made of hanging strands of small snow-topped pine trees. Each strand is a firm dark green cord with seven little trees sewn down its length, and a gold star hangs below each tree. Hang twelve strands from a rod and the window looks like a snowy forest with stars falling through it, and you can still see out.
The palette has three colors: deep forest green for the cords and needles, cream for the snow, and mustard gold for the stars. The style is cozy and Scandinavian. It’s plain enough for a modern room and still clearly Christmas.
This pattern uses US crochet terms. Each strand hangs 60 in (152.4 cm) below the rod. Each tree is about 4 in (10.2 cm) wide and 4.5 in (11.4 cm) tall, and each star is 1.5 in (3.8 cm) across. Twelve strands spaced 3 in (7.6 cm) apart fill 36 in (91.4 cm) of rod.
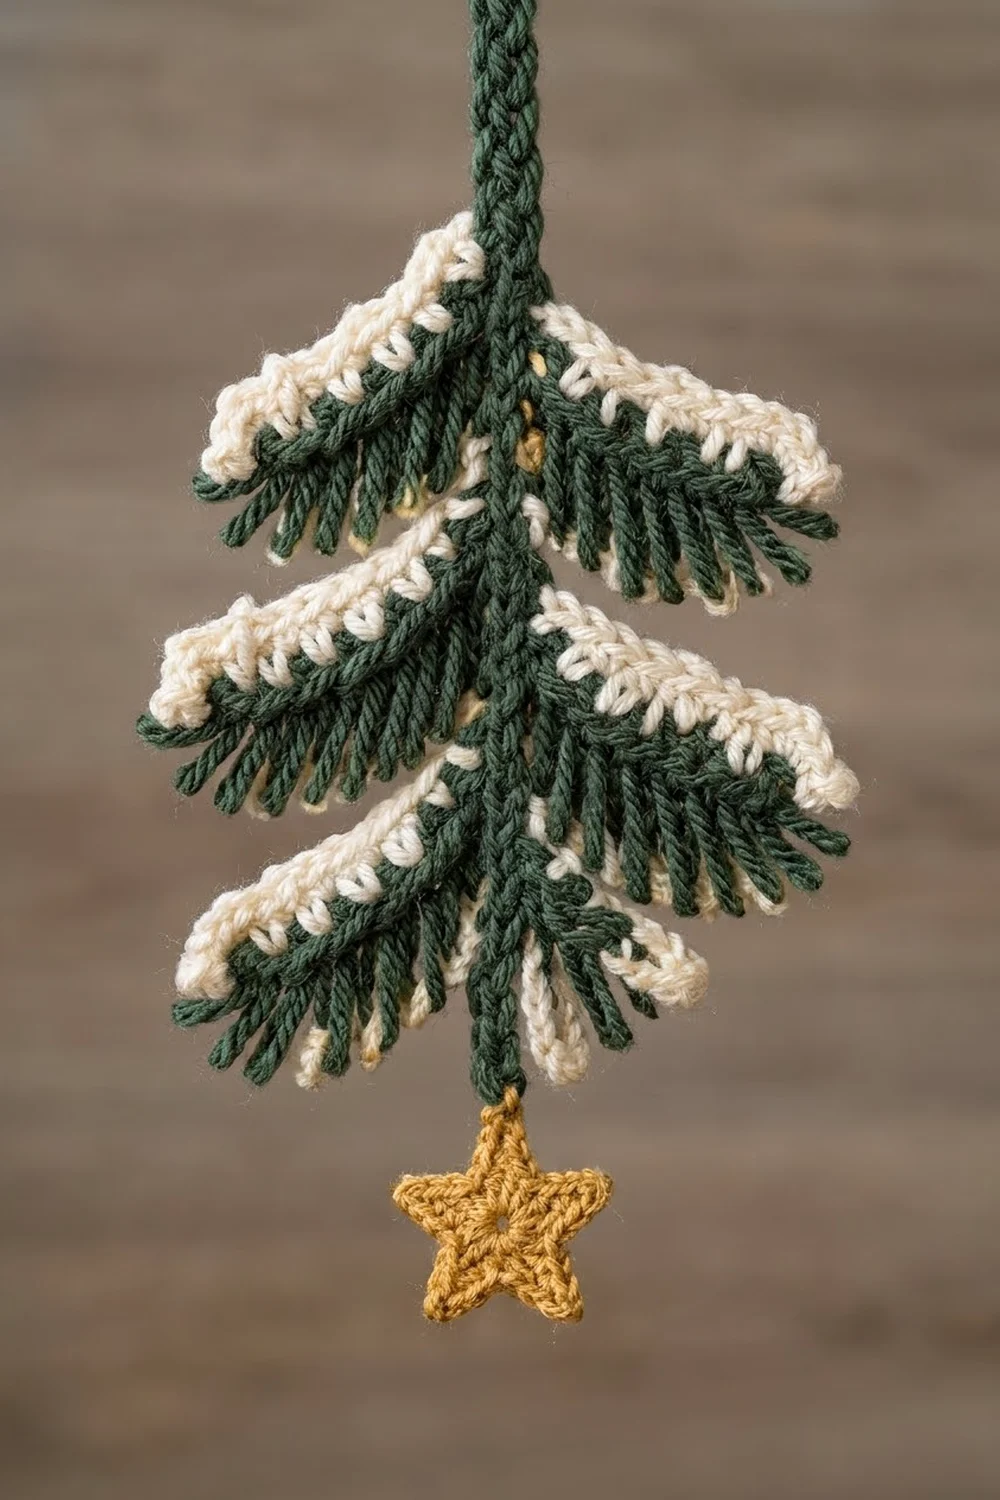
Here’s how it goes together. You make one long slip-stitch cord for each strand. Each tree is three flat tiers plus a tip. A tier is a row of single crochet with a fringe of slip-stitch “needles” along one edge and a cream scalloped snow edge along the other. You fold each tier into a soft V, sew it to the cord, and add a star below.
Finished Size and Construction
- Finished size: 12 strands, each with a 60 in (152.4 cm) drop; curtain width 36 in (91.4 cm)
- Skill level: Easy to intermediate (simple stitches, a lot of repetition)
- Terminology: US crochet terms
- Yarn weight: Worsted (#4)
- Hook: 4.5 mm (US 7)
- Number of pieces: 12 separate strands. Each strand has 1 cord, 7 tips, 21 tiers (7 each of A, B and C) and 7 stars
- Layout: strands hang side by side and are not joined to each other
- Piece size: tree 4 in × 4.5 in (10.2 cm × 11.4 cm); star 1.5 in (3.8 cm)
- Size before border: Tier C strip is 4.75 in (12.1 cm) long, with needles hanging 1 in (2.5 cm)
- Border depth: the snow edging adds 0.5 in (1.3 cm) to each tier
Materials
Choose a smooth worsted cotton or cotton-acrylic blend. It keeps the needle points crisp and stops the cords from stretching under their own weight. Avoid fuzzy yarns, because they blur the needles.
- Forest green: 550 g, about 1,100 m (cords, needles, tips)
- Cream: 200 g, about 400 m (snow edging)
- Mustard gold: 75 g, about 150 m (stars)
Tools:
- 4.5 mm (US 7) crochet hook
- Tapestry needle
- Stitch markers
- Rust-proof pins and a blocking mat
- Measuring tape
- Spray bottle
- Curtain rod, 1.25 in (3.2 cm) diameter or less
All quantities include a margin of about 15% for gauge differences, yarn tails and sewing.
Abbreviations (US Terms)
- ch – chain
- sl st – slip stitch
- sc – single crochet
- hdc – half double crochet
- st(s) – stitch(es)
- Needle – ch 5, then sl st in 2nd ch from hook and in each of the next 3 ch. This gives 4 sl sts back down the chain and makes a stiff spike 1 in (2.5 cm) long.
- Scallop – 3 hdc in the same st
- Back bump – the horizontal bar on the back of a chain
Gauge and Checkpoints
Gauge is 16 sc = 4 in (10.2 cm). For the cord, 4 sl sts worked in back bumps = 1 in (2.5 cm).
Before you start the full curtain, make one complete tree and one star, and check each stage:
- Tier C, Row 1: 19 sc = 4.75 in (12.1 cm).
- Needles: each one is 1 in (2.5 cm) long.
- Snow edging: adds 0.5 in (1.3 cm) of depth.
- Star: 1.5 in (3.8 cm) from point to point.
- Cord test: ch 41 and work 40 sl sts. The test cord should measure 10 in (25.4 cm).
Too big? Go down 0.5 mm, or crochet more firmly. Too small? Go up 0.5 mm. For the cord, keep the same hook and work more or fewer stitches until you reach the target length.
Cord (Make 12)
With green, ch 265.
Row 1: Sl st in the back bump of the 2nd ch from hook and in the back bump of each ch across. (264 sl st)
The cord should measure 66 in (167.6 cm). That’s 60 in (152.4 cm) of drop plus 6 in (15.2 cm) that folds over to make the hanging loop.
Fasten off, leaving a 12 in (30.5 cm) tail at the starting end for sewing the loop. Weave in the other end. If you like, tie a small overhand knot at the bottom end.
Hanging loop: Fold the top 6 in (15.2 cm) of the cord down against itself to make a 3 in (7.6 cm) loop. Use the long tail to whipstitch the end flat to the cord. The loop slides easily over a rod up to 1.25 in (3.2 cm) thick.
For a different window height, add or remove 4 ch for each 1 in (2.5 cm).
Tree Tiers (Green Base)
All three tiers use the same two rows. Only the width changes:
| Tier | Starting ch | Row 1 sc (S) | Needles | Row 1 length |
|---|---|---|---|---|
| A (top) | 12 | 11 | 11 | 2.75 in (7.0 cm) |
| B (middle) | 16 | 15 | 15 | 3.75 in (9.5 cm) |
| C (bottom) | 20 | 19 | 19 | 4.75 in (12.1 cm) |
With green, ch S + 1.
Row 1: Sc in 2nd ch from hook and in each ch across. Turn. (S sc)
Row 2 (needle row): Ch 1. *Sl st in next sc, make a Needle. Repeat from * across. Sl st at the base of the last Needle. (S needles)
Fasten off, leaving a 10 in (25.4 cm) tail for sewing.
The needles hang down from Row 1. Leave the free loops of the starting chain, on the other side of Row 1, for the snow edging.
Checkpoint: Tier A has 11 needles, Tier B has 15 and Tier C has 19. Each strip should lie flat without ruffling.
Tree Tip
With green, ch 5. Sl st in 2nd ch from hook and in each of the next 3 ch. (4 sl st, 1 in / 2.5 cm)
Fasten off, leaving an 8 in (20.3 cm) tail.
Star
With gold, make a magic ring.
Rnd 1: Ch 1, 5 sc in ring. Sl st to first sc. (5 sc) Pull the ring closed.
Rnd 2: *Ch 4, sl st in 2nd ch from hook, sc in next ch, hdc in next ch, sl st in next sc of Rnd 1. Repeat from * 4 more times. (5 points)
Fasten off, leaving an 8 in (20.3 cm) tail at the tip of one point.
Checkpoint: 1.5 in (3.8 cm) across.
Make All Pieces
For the full curtain of 12 strands:
- Green: 12 cords, 84 tips, 84 Tier A, 84 Tier B, 84 Tier C
- Cream: snow edging on all 252 tiers
- Gold: 84 stars
Work in batches, for example all the Tier Cs for two strands at once. Batching keeps your tension steady.
Layout grid (rod seen from the front, one strand every 3 in / 7.6 cm):
Rod: |=================================================|
      S1  S2  S3  S4  S5  S6  S7  S8  S9  S10 S11 S12
      |   |   |   |   |   |   |   |   |   |   |   |
      T   T   T   T   T   T   T   T   T   T   T   T
      *   *   *   *   *   *   *   *   *   *   *   *
      ... (7 trees + 7 stars per strand) ...
T = tree, * = star.
Joining: Assembling Trees on the Cords
Work the snow edging from the Border section below on every tier before you sew. The edging has its own section so all of its math is in one place.
Method: Use each piece’s green tail to tack it to the cord with small stitches through the cord’s sl sts. Every piece sits on the front of the cord.
Tree positions: Measure from the base of the hanging loop. Place the tree tips at 3, 11, 19, 27, 35, 43 and 51 in (7.6, 27.9, 48.3, 68.6, 88.9, 109.2 and 129.5 cm). That puts one tree every 8 in (20.3 cm).
Stitch-to-stitch logic, one tree:
- Tip: Place the tip with its point at the tree mark, pointing up. Tack its lowest 2 sl sts to the cord.
- Tier A: Mark the center sc of Row 1 (sc 6 of 11). Fold the tier at that sc so the arms angle down at about 30 degrees. Place the fold 0.75 in (1.9 cm) below the tree mark, covering the tip’s tacked end. Tack the center sc and the sc on each side of it to the cord (3 sc).
- Tier B: The center is sc 8 of 15. Fold it, place it 1.75 in (4.4 cm) below the tree mark and tack the same 3 sc.
- Tier C: The center is sc 10 of 19. Fold it, place it 2.75 in (7.0 cm) below the tree mark and tack the same 3 sc.
- Star: Sew the tip of one star point to the cord 5.5 in (14.0 cm) below the tree mark so the star hangs free.
Tension: Keep the tacking snug but not tight. Tight sewing gathers the cord and shortens the strand. Leave the arms loose so they can swing.
Size checkpoint: Each tree should measure 4 in (10.2 cm) across Tier C and 4.5 in (11.4 cm) from the tip to the lowest needle. The last star ends about 58 in (147.3 cm) from the loop base, so 2 in (5.1 cm) of plain cord hangs below it. The strand should still measure 60 in (152.4 cm) from the loop base to the end.
Border: Snow Edging (Every Tier)
Border gauge: One Scallop plus one sc covers 2 foundation sts, or 0.5 in (1.3 cm) along the tier. Each Scallop stands 0.5 in (1.3 cm) tall.
Turn the tier so the needles point down. With cream, join in the free loop of the first foundation ch.
Snow Row: Ch 1, sc in same st. *Scallop in next ch, sc in next ch. Repeat from * across, ending with sc in the last ch.
You’re alternating sc and Scallop, one in each foundation st, and the row starts and ends with sc. Fasten off and weave in the ends on the back.
In the table below, each “side” is one arm, on either side of the center Scallop:
| Tier | Foundation sts | Scallops (k) | Left side | Center | Right side | Total sts |
|---|---|---|---|---|---|---|
| A | 11 | 5 | 9 (3 sc + 2 Scallops) | 3 hdc | 9 | 21 |
| B | 15 | 7 | 13 (4 sc + 3 Scallops) | 3 hdc | 13 | 29 |
| C | 19 | 9 | 17 (5 sc + 4 Scallops) | 3 hdc | 17 | 37 |
Why the math works: Every tier has an odd stitch count, S = 2k + 1. The sequence sc, then (Scallop, sc) k times, uses exactly 1 + 2k foundation sts, so nothing is skipped or left over. The total is (k + 1) sc + 3k hdc = 4k + 1 sts, which gives 21, 29 and 37.
The center foundation st is position k + 1. Because k is odd for every tier (5, 7 and 9), k + 1 is always even, and the even positions always hold a Scallop. So a full mound of snow sits right on the fold at the peak of each tier. The two arms mirror each other, and each has (k + 1) ÷ 2 sc and (k − 1) ÷ 2 Scallops.
Final Blocking
- Mist each strand until it is damp but not wet.
- Lay it flat on blocking mats and straighten the cord to 60 in (152.4 cm) without stretching it.
- Fan each tier’s arms down to the 30-degree angle and pin at the arm tips.
- Use your fingers to comb the needles straight so they point down and out.
- Shape each Scallop into a rounded mound.
- Pin each star flat with its points open.
- Let everything dry completely, about 12–24 hours, before you unpin it.
- Hang the strands right away so the cords settle straight.
Final Quality-Control Checklist
- 12 cords, each with a secure 3 in (7.6 cm) hanging loop
- 7 trees per strand, with the tips 8 in (20.3 cm) apart
- Needle counts of 11, 15 and 19 for Tiers A, B and C
- Snow edging totals of 21, 29 and 37 sts, with a center Scallop on every fold
- 7 stars per strand, each with 5 points and 1.5 in (3.8 cm) across
- Every strand drops 60 in (152.4 cm), and all 12 match
- No visible tails, and all tacking hidden behind the tiers
Troubleshooting
Strip curls into a tube: Row 1 is too tight. Loosen your starting chain, or make the chain with a hook one size larger.
Needles twist or splay: Work the sl sts into the back bumps of the Needle chain, and pin the needles straight while blocking.
No Scallop at the fold: Check that the edging starts with sc in the first foundation ch. Starting with a Scallop moves every position over by one.
Strands are uneven lengths: Cords stretch by different amounts. Hang them for a day, then measure and re-tack the loops so all 12 match.
Trees flip backward: Add a fourth tacking stitch at the bottom center of Tier C.
Stars spin: Tack each star through two stitches instead of one.
Care
Spot clean with a damp cloth, or hand wash in cool water and dry flat to re-block. Store the strands loosely coiled in a box so the needles don’t get crushed.
Final Notes
The whole curtain rests on a short chain of measurements. Gauge is 16 sc = 4 in (10.2 cm). At that gauge, Tier C is a 4.75 in (12.1 cm) strip with 1 in (2.5 cm) needles and a 0.5 in (1.3 cm) snow edge. Folded into a V, it becomes a tree 4 in (10.2 cm) wide and 4.5 in (11.4 cm) tall. Seven trees repeat every 8 in (20.3 cm) along a 60 in (152.4 cm) cord, and twelve cords fill 36 in (91.4 cm) of rod.
Check Tier C and the cord first. If those two match, everything else will too.
Happy crocheting!