

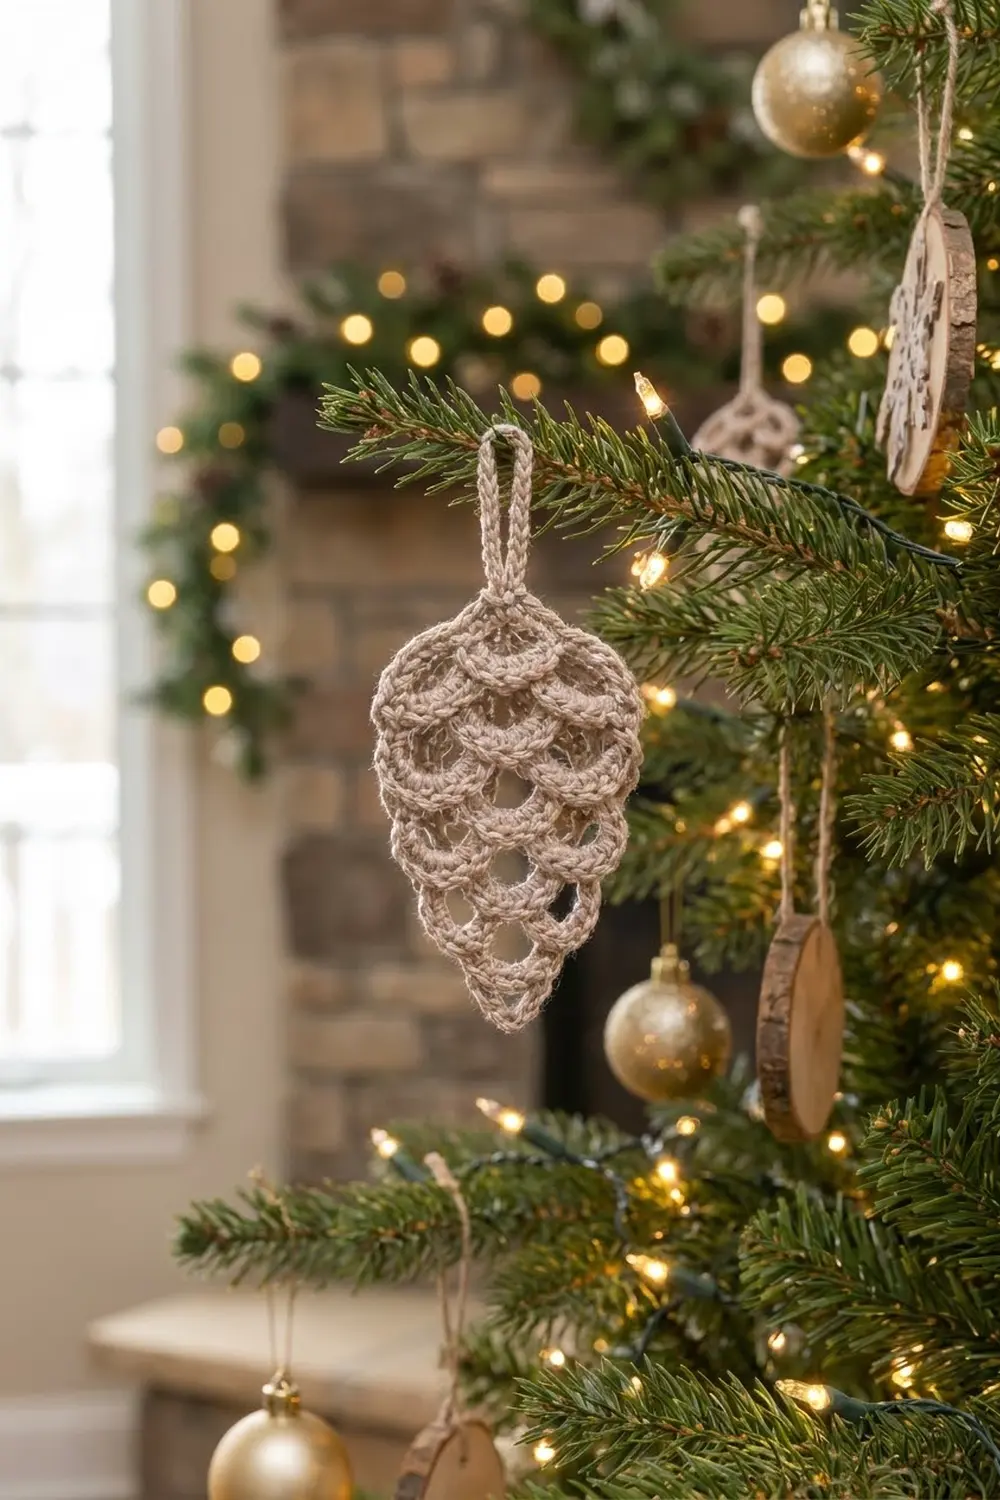
This little pinecone ornament gets its look from rows of open chain arches. Each new arch sits in the middle of the arch below it, so the rows stack like pinecone scales. A corded single-crochet outline frames the shape, and a sturdy covered loop at the top makes it ready to hang.
The ornament is worked in one solid color. A warm oatmeal or light taupe looks soft and frosty against green branches and gold lights. It also works in cream, natural, or pale grey. It’s a quiet, Scandinavian-style piece, so a matching set looks good on a tree, on a gift tag, or hung in a window.
This pattern uses US crochet terms. The finished ornament measures 2.5 in (6.4 cm) wide by 4 in (10.2 cm) tall, not counting the loop. The loop adds about 1.25 in (3.2 cm), for a total hanging length of about 5.25 in (13.3 cm).
You’ll work the body flat in turned rows from the bottom tip up. The rows grow from 1 arch to 4, hold at 4, then shrink back to 1 at the top. After that, one round of single crochet goes around the whole outline, and a covered hanging loop is added at the top point.
Finished Size and Construction
- Finished size: 2.5 in × 4 in (6.4 cm × 10.2 cm), not counting the loop
- Hanging loop: about 1.25 in (3.2 cm) tall
- Skill level: Easy
- Terminology: US crochet terms
- Yarn weight: Light worsted / DK (#3)
- Hook: 3.5 mm (E-4)
- Number of pieces: 1 (single flat piece, nothing to join)
- Layout: one teardrop-shaped ornament, pointed at the bottom
- Body size before border: 2.25 in × 3.75 in (5.7 cm × 9.5 cm)
- Border depth: 0.125 in (0.3 cm) on every edge
- Rows: 10 mesh rows + 1 border round + hanging loop
Materials
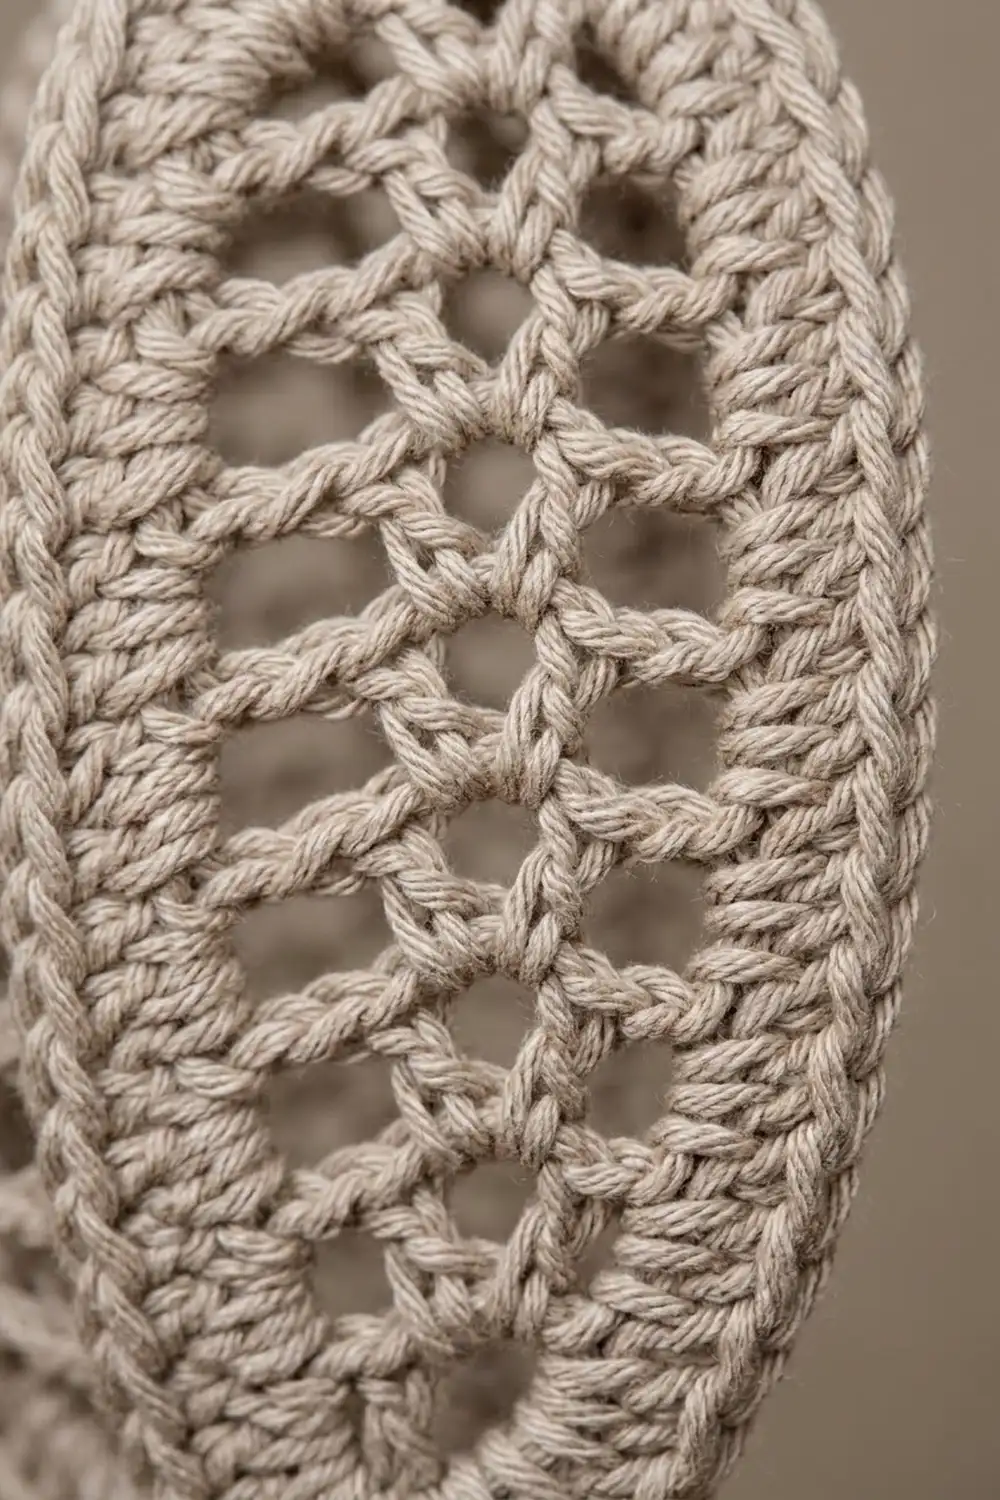
Yarn: Use a smooth light worsted (DK) yarn, ideally cotton or a cotton-acrylic blend. A firm, slightly twisted yarn gives the arches a crisp, rope-like look like the one in the photo. Fuzzy or very soft yarns blur the scale pattern and make the ornament floppy.
- Oatmeal / light taupe: 10 g, about 30 m (33 yd). One ornament uses roughly 6 g. The amount listed includes a margin for your gauge swatch and tails.
Tools:
- 3.5 mm (E-4) crochet hook
- Tapestry needle
- Scissors
- Rust-proof pins and a blocking mat or folded towel
- Spray bottle with water
- Optional: spray starch, for a stiffer ornament
Abbreviations (US Terms)
- ch – chain
- sc – single crochet
- sl st – slip stitch
- st(s) – stitch(es)
- sp – space
- rnd – round
- ch-5 arch – a loop of 5 chains anchored with an sc at each end; each arch forms one “scale”
- Row-end space – the gap at the end of a row, between that row’s edge stitch and the row below
Special technique: centering on an arch. Whenever an instruction says “sc in arch,” insert the hook under the whole ch-5 loop, not into a single chain, and pull the sc to the center of the arch. This centering is what staggers each row over the one below and creates the scale effect.
Gauge and Checkpoints
Gauge isn’t critical for an ornament, but it controls both the size and how open the scales look. Make one ornament first, measure it at each checkpoint, and only then plan a set.
- Chain gauge: 6 ch = 1 in (2.5 cm)
- Sc gauge: 5 sc = 1 in (2.5 cm)
- Mesh row height: 1 row = 0.375 in (1.0 cm)
- Mesh width: 4 arches across = 2.25 in (5.7 cm)
Checkpoints (measure lying flat, unstretched):
- After Row 4: 2.25 in (5.7 cm) wide, 1.5 in (3.8 cm) tall
- After Row 7: still 2.25 in (5.7 cm) wide, 2.625 in (6.7 cm) tall
- After Row 10: 2.25 in × 3.75 in (5.7 cm × 9.5 cm)
- After the border: 2.5 in × 4 in (6.4 cm × 10.2 cm)
If the piece is too big: go down to a 3.25 mm (D-3) hook, or tighten your chains. Loose chains are the most common reason the mesh grows.
If the piece is too small or the arches look closed: go up to a 3.75 mm (F-5) hook. Each arch should show a clear, open hole.
Pattern: Pinecone Body
Rows are turned. The body is a mesh of ch-5 arches, and every row has exactly one more sc anchor than it has arches (arches + 1 = sc).
There are three row types:
- Increase row (adds 1 arch): Ch 1, turn, sc in first sc, ch 5, sc in next arch, repeat from * across, ch 5, sc in last sc.
- Even row (same number of arches): Ch 1, turn, sl st in first sc, sl st in next 2 ch, sc in same arch (this centers the sc on the first arch), ch 5, sc in next arch, repeat from * across, ch 5, sc in last sc.
- Decrease row (removes 1 arch): Ch 1, turn, sl st in first sc, sl st in next 2 ch, sc in same arch, ch 5, sc in next arch, repeat from * across, ending with sc in the last arch. Do not chain to the edge.
Bottom Tip
Row 1: Ch 8. Sc in 2nd ch from hook, ch 5, skip next 5 ch, sc in last ch. (1 arch, 2 sc)
This first arch closes over the foundation chain to form the small teardrop scale at the tip.
Widening Rows
Row 2 (increase): Ch 1, turn, sc in first sc, ch 5, sc in arch, ch 5, sc in last sc. (2 arches, 3 sc)
Row 3 (increase): Ch 1, turn, sc in first sc, ch 5, sc in next arch 2 times, ch 5, sc in last sc. (3 arches, 4 sc)
Row 4 (increase): Ch 1, turn, sc in first sc, ch 5, sc in next arch 3 times, ch 5, sc in last sc. (4 arches, 5 sc)
Checkpoint: 2.25 in (5.7 cm) wide, 1.5 in (3.8 cm) tall. You should now see a neat V-shaped point with clear, staggered arches.
Full-Width Rows
Row 5 (even): Ch 1, turn, sl st in first sc, sl st in next 2 ch, sc in same arch, ch 5, sc in next arch 3 times, ch 5, sc in last sc. (4 arches, 5 sc)
Row 6 (even): Repeat Row 5. (4 arches, 5 sc)
Row 7 (even): Repeat Row 5. (4 arches, 5 sc)
Each even row starts mid-arch on one side and ends at the edge sc on the other. Because you turn every row, the offset switches sides, which keeps the ornament balanced.
Checkpoint: 2.25 in (5.7 cm) wide, 2.625 in (6.7 cm) tall.
Narrowing Rows
Row 8 (decrease): Ch 1, turn, sl st in first sc, sl st in next 2 ch, sc in same arch, ch 5, sc in next arch 3 times. (3 arches, 4 sc)
Row 9 (decrease): Ch 1, turn, sl st in first sc, sl st in next 2 ch, sc in same arch, ch 5, sc in next arch 2 times. (2 arches, 3 sc)
Row 10 (decrease): Ch 1, turn, sl st in first sc, sl st in next 2 ch, sc in same arch, ch 5, sc in next arch. (1 arch, 2 sc)
Checkpoint: 2.25 in × 3.75 in (5.7 cm × 9.5 cm). Do not fasten off.
Arch count check: 1, 2, 3, 4, 4, 4, 4, 3, 2, 1. Each row’s sc count is its arch count + 1: 2, 3, 4, 5, 5, 5, 5, 4, 3, 2.
Border
The border is one round of sc around the outline. It thickens the outer scales into the corded edge seen in the photo and evens out the slight zigzag left by the shaping rows.
Border gauge: 5 sc = 1 in (2.5 cm). The border adds 0.125 in (0.3 cm) to every edge.
Rnd 1: Don’t turn. Ch 1 and rotate the piece so you can work down the side.
- Side A: Work 4 sc in each row-end space from Row 10 down to Row 2. (9 row-end spaces × 4 sc = 36 sc)
- Bottom tip: Work 1 sc in the underside of each of the 5 skipped foundation chains from Row 1. (5 sc)
- Side B: Work 4 sc in each row-end space from Row 2 up to Row 10. (9 × 4 = 36 sc)
- Top: Work 7 sc in the Row 10 arch. (7 sc)
Sl st to the first sc. Total: 36 + 5 + 36 + 7 = 84 sc.
Why the math works: Each row-end space along the sides is the end of a diagonal ch-5 arch, about 0.8 in (2.0 cm) long. Four sc fill that length at sc gauge without crowding it, because using 1 fewer sc than the arch’s 5 chains keeps the edge from ruffling. The bottom tip gets exactly 1 sc per foundation chain, which keeps the point sharp. The top arch gets 7 sc, 2 more than its chain count, because it curves tightly over the point and needs a little extra to lie flat around that curve. Both sides have the same count (36 sc), so the ornament stays symmetrical.
Checkpoint: 2.5 in × 4 in (6.4 cm × 10.2 cm).
Hanging Loop
Count to the 4th sc of the 7 top sc, which is the exact center of the top point. Sl st across to it.
Loop: Ch 15, sl st in the same center sc. This makes a loop about 1.25 in (3.2 cm) tall.
Loop cover: Work 20 sc into the ch-15 loop, then sl st in the center sc at the base. (20 sc)
Twenty sc over 15 chains packs the loop firmly, giving it the thick, braided look in the photo and helping it stand upright. Fasten off, leaving a 6 in (15.2 cm) tail.
Final Blocking
- Weave in both tails through the border sc, not the open mesh, so they stay hidden.
- Lightly mist the ornament with water until it’s damp but not dripping.
- Lay it flat on your blocking mat, right side up.
- Gently pull the widest part (Rows 4–7) out to 2.5 in (6.4 cm).
- Pull the length out to 4 in (10.2 cm), from the bottom tip to the top point, not counting the loop.
- Pin the bottom tip into a clean point and pin the top point in line with it.
- With a finger, open up any arch that has collapsed so each hole is round.
- Pin the loop straight up.
- If you want a stiffer ornament, mist lightly with spray starch.
- Let it dry completely, usually 4–6 hours, before unpinning.
Final Quality-Control Checklist
- Row counts from tip to top read 1, 2, 3, 4, 4, 4, 4, 3, 2, 1 arches
- Each sc sits at the center of its arch, not off to one side
- Every scale shows an open hole
- The border round has exactly 84 sc, with 36 sc on each side
- The bottom tip is a clean point with no gap
- The loop is centered on the top point and stands straight
- Finished size is 2.5 in × 4 in (6.4 cm × 10.2 cm)
- All tails are woven into solid stitches and trimmed
Troubleshooting
The ornament leans to one side. Check that every even row started with the sl st move to the center of the first arch. Leaving out the 2 sl sts shifts the whole row sideways. Blocking also corrects a mild lean.
The arches look flat or closed up. Your chains are too tight. Go up a hook size for the chains only, or chain more loosely.
The border ruffles. Work 3 sc per row-end space instead of 4. This gives 27 sc per side and 82 sc in total.
The border pulls or cups. Your sc are looser than gauge. Go down a hook size for the border round only.
The loop flops over. Add more sc to the loop cover, up to 22, or starch the loop.
The tip is rounded. Pull the first sc of the Row 1 border tip snug, then pin the tip into a sharp point while blocking.
Care
Hand wash in cool water with mild soap, press out the water in a towel, and dry flat, reshaping as above. Store flat or hanging so the scales keep their open shape.
Final Notes
The size of this ornament comes from a simple measurement chain. Each mesh row adds 0.375 in (1.0 cm), so 10 rows give 3.75 in (9.5 cm) of height. Four arches across give 2.25 in (5.7 cm) of width at the widest part. The border adds 0.125 in (0.3 cm) to every edge, bringing the ornament to 2.5 in × 4 in (6.4 cm × 10.2 cm). The covered loop adds about 1.25 in (3.2 cm) on top. If your checkpoints match after Rows 4, 7, and 10, the finished size will match too. Once your first ornament measures correctly, the rest of the set will come out the same size.
Happy crocheting!