

This little tree is made from ten tiny granny squares turned on point, so each one looks like a diamond. They sit in rows of one, two, three and four. Together they make a crisp triangle with straight sloping sides and a zigzag bottom edge.
The colors are cool and wintry: deep teal and soft heather gray for the branches, a tan-brown trunk, and a thin cream outline with a matching hanging loop. The bottom row has three gray diamonds and one teal diamond at the right end. This small off-center accent keeps the design from looking too formal.
The pattern uses US crochet terms. The finished ornament measures about 5.8 in (14.7 cm) wide and 4.25 in (10.8 cm) tall from the top point to the bottom of the trunk. With the loop it is about 5.25 in (13.3 cm) tall.
The tree is built in simple modules. You make ten 3-round motifs, join them into four diagonal strips and join the strips into a triangle. Then you add one round of cream border, work the loop and sew a small ridged trunk to the back.
Finished Size and Construction
- Finished size: about 5.8 in (14.7 cm) wide x 4.25 in (10.8 cm) tall without the loop
- Skill level: Easy to intermediate
- Terminology: US crochet terms
- Yarn weight: Fingering (super fine, #1)
- Hook: 2.25 mm (B-1)
- Number of pieces: 10 motifs and 1 trunk; the loop is worked directly onto the border
- Layout: Motifs set on point in rows of 1, 2, 3 and 4
- Motif size: 1 in (2.5 cm) per side, about 1.4 in (3.6 cm) point to point
- Size before border: 5.6 in (14.2 cm) wide x 3.5 in (8.9 cm) tall; each straight side is 4 in (10.2 cm)
- Border depth: about 0.1 in (0.3 cm), one round of single crochet
Materials
Choose a smooth fingering-weight yarn that shows stitches clearly. Cotton, cotton blends and tightly plied wool all work. Avoid fuzzy or loosely spun yarn, because it will close up the tiny holes in each motif.
- Teal: 5 g, about 20 m (5 motifs)
- Light heather gray: 5 g, about 20 m (5 motifs)
- Tan-brown: 2 g, about 8 m (trunk)
- Cream: 3 g, about 12 m (border and loop)
These amounts include extra for a test motif and longer tails.
Tools:
- 2.25 mm (B-1) crochet hook
- Tapestry needle with a small eye
- Scissors
- Rustproof pins and a foam blocking mat
- Small spray bottle or steam iron
- Ruler or tape measure
Abbreviations (US Terms)
- ch – chain
- sl st – slip stitch
- sc – single crochet
- dc – double crochet
- sp(s) – space(s)
- st(s) – stitch(es)
- BLO – back loop only
- RS – right side
Corner cluster: (3 dc, ch 2, 3 dc) all worked into the same corner ch-2 sp.
Gauge and Checkpoints
Gauge matters more than usual here, because ten motifs multiply every small difference. Make one complete motif first, block it lightly and measure it before you make the rest.
- After Round 1: about 0.5 in (1.3 cm) across
- After Round 2: about 0.85 in (2.2 cm) per side
- After Round 3: 1 in (2.5 cm) per side, with 9 sc along each side
- Edge gauge: 9 sc = 1 in (2.5 cm)
- Trunk: 6 sc and 9 rows = 0.75 in (1.9 cm) wide x 1 in (2.5 cm) tall
If your motif is larger than 1 in (2.5 cm), go down to a 2 mm hook. If it is smaller, go up to a 2.5 mm hook. Keep the stitch counts the same, because the border math depends on 9 sts per motif side.
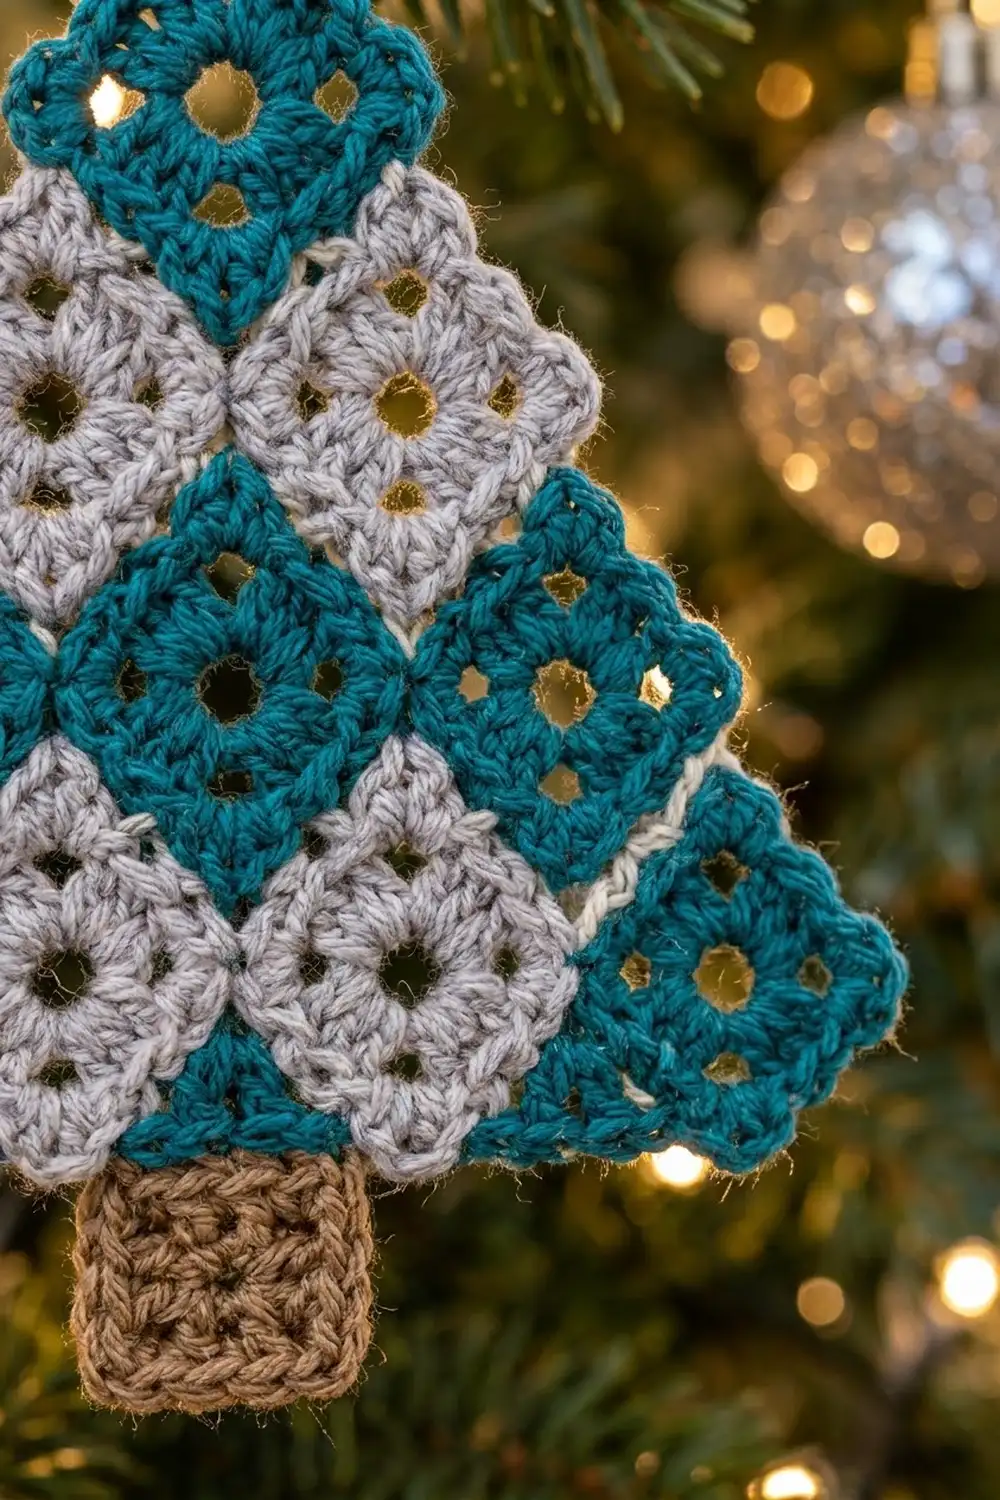
Motif (Make 10)
Each motif is a classic 2-round granny square with a tight single-crochet edge. Keep the RS facing throughout.
Ring: Ch 4, sl st to the first ch to form a ring.
Round 1: Ch 3 (counts as dc), 2 dc in ring, ch 2, [3 dc in ring, ch 2] 3 times, sl st to top of beginning ch-3.
(12 dc, 4 ch-2 sps)
This round makes the open center ring and the four groups of three.
Round 2: Sl st in next 2 dc and into the next ch-2 sp. Work (ch 3, 2 dc, ch 2, 3 dc) in the same sp for the first corner, then ch 1. [Corner cluster in next ch-2 sp, ch 1] 3 times, sl st to top of beginning ch-3.
(24 dc, 4 ch-2 corner sps, 4 ch-1 side sps)
The four ch-1 side sps make the small holes around the center.
Round 3 (trim round): Ch 1, sc in the same st as the join and in each of the next 2 dc. (Sc, ch 1, sc) in corner ch-2 sp, sc in next 3 dc, sc in ch-1 sp, sc in next 3 dc; repeat from * 3 more times, ending the last repeat at . Sl st to first sc.
(28 sc worked 1-per-existing st and side sp + 8 sc added in corners = 36 sc, plus 4 ch-1 corner sps)*
Per-side count: Each side has 9 sc: corner sc + 3 sc + 1 sc + 3 sc + corner sc. These 9 already include both corner sc on that side. The ch-1 corner sps are not counted.
Fasten off. On 2 motifs of each color, leave an 8 in (20.3 cm) tail for seaming. Weave in all other tails.
Make All Pieces
- Teal: 5 motifs
- Light heather gray: 5 motifs
- Tan-brown: 1 trunk (see below)
Layout grid (each motif set on point; T = teal, G = gray):
Row 1:          T
Row 2:        G   G
Row 3:      T   T   T
Row 4:    G   G   G   T
Diagonal strips (running from upper right down to lower left):
- Strip A: Row 1 T, Row 2 left G, Row 3 left T, Row 4 first G (4 motifs; forms the left edge)
- Strip B: Row 2 right G, Row 3 middle T, Row 4 second G (3 motifs)
- Strip C: Row 3 right T, Row 4 third G (2 motifs)
- Strip D: Row 4 right T (1 motif)
Trunk
With tan-brown, ch 7.
Row 1: Sc in 2nd ch from hook and in each ch across, turn. (6 sc)
Rows 2–9: Ch 1 (does not count as a st), sc BLO in each st across, turn. (6 sc)
The BLO rows make the dense ridged texture. The trunk should measure 0.75 in (1.9 cm) wide x 1 in (2.5 cm) tall. Fasten off with a 10 in (25.4 cm) tail for sewing.
Joining
Lay all ten motifs RS up in the layout above. With a tapestry needle and matching or cream yarn, whipstitch through the back loops only. This leaves the front loops as a neat ridge on the RS and keeps every outer edge stitch free for the border.
Stitch-to-stitch logic: Each seam joins one motif side to one motif side: 9 sts to 9 sts, one to one, starting and ending in the ch-1 corner sps. Don’t skip or double up any stitch.
Step 1 – Strips: Join the motifs within each strip along their touching sides. Strip A needs 3 seams, Strip B 2 seams and Strip C 1 seam.
Step 2 – Strips together: Join Strip A to Strip B along 3 motif sides (27 sts to 27 sts). Join Strip C to Strip B along 2 motif sides (18 sts to 18 sts). Join Strip D to Strip C along 1 motif side (9 sts to 9 sts).
That makes 12 seams in total, and every inside edge of the triangle is now closed.
Tension: Pull each whipstitch just snug enough to close the gap. Tight seams make the triangle cup, and loose seams leave gaps at the corners. Wherever four corners meet, take one extra stitch through all four ch-1 sps to anchor them.
Size checkpoint: Before the border, the assembled tree should measure 5.6 in (14.2 cm) across the widest points and 3.5 in (8.9 cm) from the top point to the bottom points. Each straight side should be 4 in (10.2 cm). Each bottom notch should sit about 0.7 in (1.8 cm) above the bottom points.
Border
Border gauge: 9 sc = 1 in (2.5 cm), exactly matching the motif edge.
Outline shape: The tree has 7 outer corners that point outward: the top point, the left and right outer points and the 4 bottom points. It also has 3 inward notches between the bottom-row motifs and 6 side seams (3 on each straight side).
Round 1: With RS facing, join cream with a sl st in the ch-1 sp at the top point. Ch 1, (sc, ch 1, sc) in the same sp.
- Right side: Sc in each of the 36 edge sts down the right side (4 motifs x 9 sts). Skip both ch-1 corner sps at each of the 3 seams.
- Right outer point: (Sc, ch 1, sc) in the ch-1 sp.
- Bottom zigzag: Sc in each of the 72 edge sts along the 8 lower motif sides (8 x 9 sts). Work (sc, ch 1, sc) in the ch-1 sp at each of the 4 bottom points. At each of the 3 notches, skip both ch-1 corner sps and add nothing.
- Left outer point: (Sc, ch 1, sc) in the ch-1 sp.
- Left side: Sc in each of the 36 edge sts up the left side (4 motifs x 9 sts). Skip both ch-1 corner sps at each of the 3 seams.
Sl st to the first sc. Do not fasten off.
(144 sc worked 1-per-existing st + 14 corner sc added = 158 sc, plus 7 ch-1 corner sps)
Why the math works: The border starts from 4 x 9 = 36 sts on each straight side and 8 x 9 = 72 sts along the zigzag, with no stitches added at the seams. Each motif side’s 9 sts already include its own corner sc, so nothing is counted twice. The 2 extra sc at each outward corner turn the 90° point without pulling. Skipping the ch-sps at the notches keeps the inward angles crisp instead of ruffled.
Hanging loop: Sl st into the top ch-1 sp. Ch 16, sl st in the same sp. Ch 1, work 24 sc into the loop, then sl st into the top sp. Fasten off. The loop should stand about 1 in (2.5 cm) tall.
Attach the trunk: Place the trunk behind the center bottom notch, with its top edge about 0.3 in (0.8 cm) below the deepest point of the notch. At that height the notch is about 0.6 in (1.5 cm) wide, so the trunk’s top corners tuck just behind the two middle diamonds. Whipstitch the trunk to the back loops of the border and to the backs of both motifs. About 0.6 in (1.5 cm) of trunk should hang below the bottom points.
Final Blocking
- Weave in all remaining tails along the seams on the wrong side.
- Mist the ornament with water until it is lightly damp, or hold a steam iron just above it without touching.
- Pin the top point and the two outer points to the blocking mat to make a right-angled triangle.
- Pin each straight side to 4.1 in (10.4 cm), which is the 4 in (10.2 cm) motif edge plus the border.
- Pin all 4 bottom points level, about 1.4 in (3.6 cm) apart.
- Pin the trunk straight and square, 0.75 in (1.9 cm) wide.
- Pin the loop upright and let everything dry completely before unpinning.
Final Quality-Control Checklist
- Ten motifs, each with 36 sc and 9 sts per side
- Color order matches the layout grid, with the teal accent at the right end of Row 4
- 12 seams, all closed, with front-loop ridges on the RS
- Border has 158 sc and 7 ch-1 corner sps
- Straight sides measure about 4.1 in (10.4 cm)
- Width is about 5.8 in (14.7 cm), and height is about 4.25 in (10.8 cm) to the bottom of the trunk
- Trunk is centered under the middle notch and stitched securely from the back
- Loop is firm and stands about 1 in (2.5 cm) tall
- All tails are woven in and can’t be seen from the front
Troubleshooting
Motifs are different sizes. Check that every motif has 36 sc. If the counts are right, the difference is tension. Block all the motifs together to 1 in (2.5 cm) before joining.
The center ring closes up. Chain the starting ring more loosely, or work Round 1 into a ch-5 ring.
Seams don’t line up at the corners. Count 9 sts on each side before you stitch, and always start and end in the ch-1 corner sps.
The border ripples along the sides. You have probably worked into the seam ch-1 sps. Pull out the border and skip them.
The bottom points look rounded. Make sure you work (sc, ch 1, sc) in each point sp, then pin the points sharply when blocking.
The ornament curls. The seams are too tight. Block again with steam, or redo the seams with a looser whipstitch.
The trunk droops. Add a second line of stitches across its top edge on the back.
Care
Hand wash in cool water with mild soap, press the water out in a towel and dry flat, pinned to shape. Store flat between sheets of tissue paper so the points and loop keep their shape.
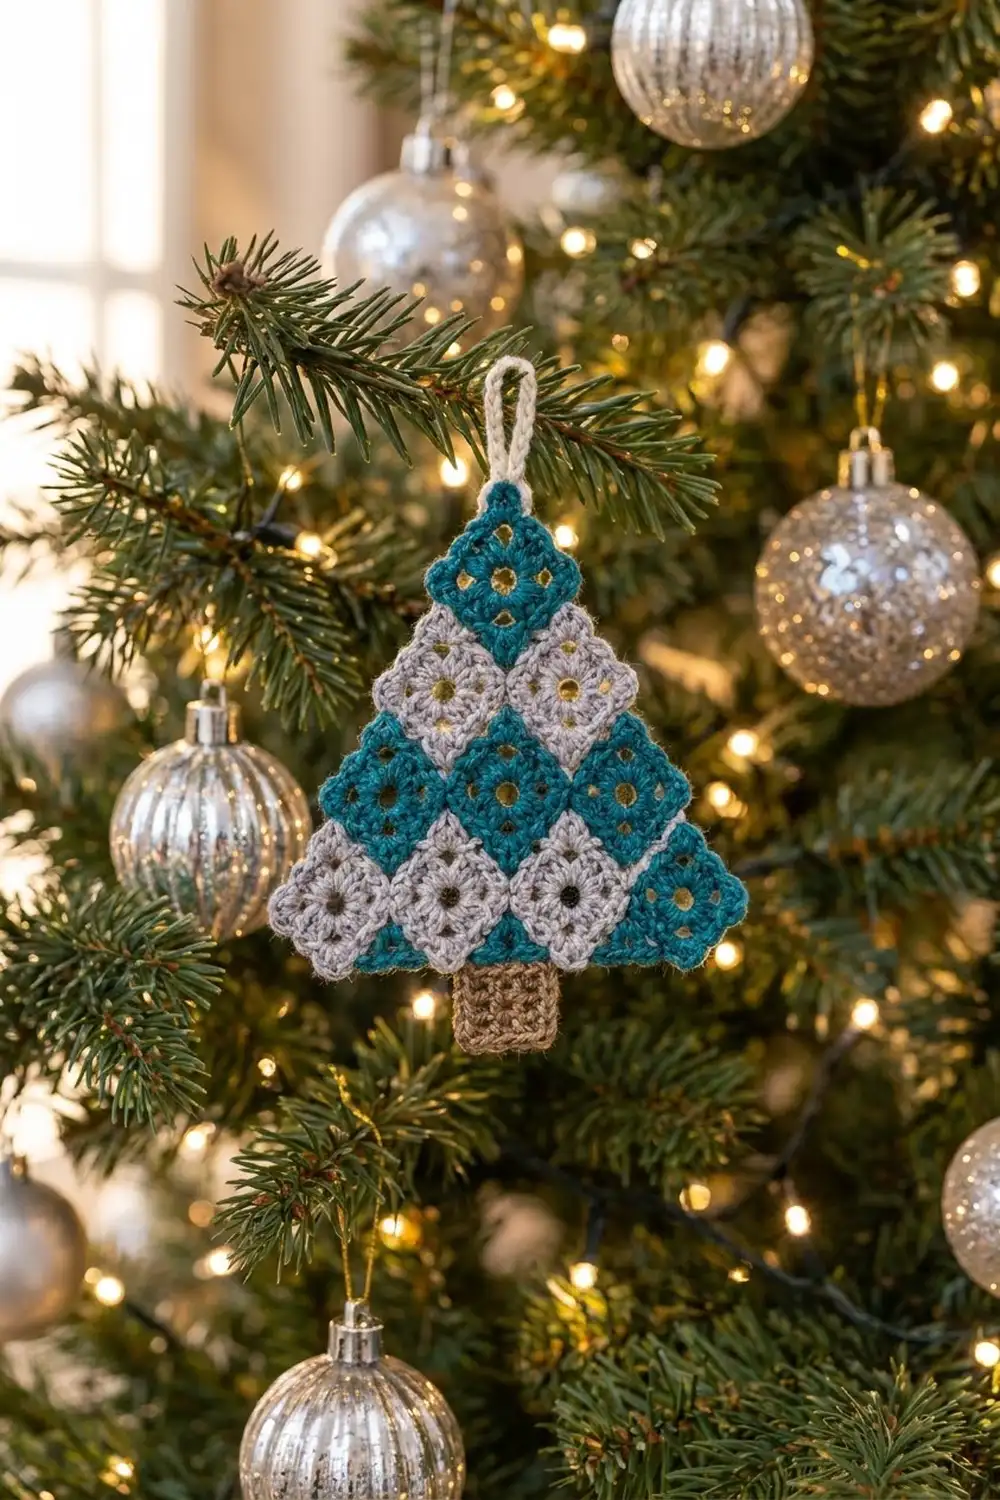
Final Notes
Each measurement builds on the one before. Each motif is 1 in (2.5 cm) per side, with 9 sts per side. Four motifs make a 4 in (10.2 cm) straight side, and the assembled tree measures 5.6 in (14.2 cm) wide x 3.5 in (8.9 cm) tall. The border adds 0.1 in (0.3 cm) all around, so the tree is about 5.8 in (14.7 cm) wide. The trunk brings the height to 4.25 in (10.8 cm), and the loop adds 1 in (2.5 cm) for a total of 5.25 in (13.3 cm). Check your gauge at each stage and the tree will come out crisp and even.
Make one for each branch, or tie one onto a gift as a keepsake tag.
Happy crocheting!