

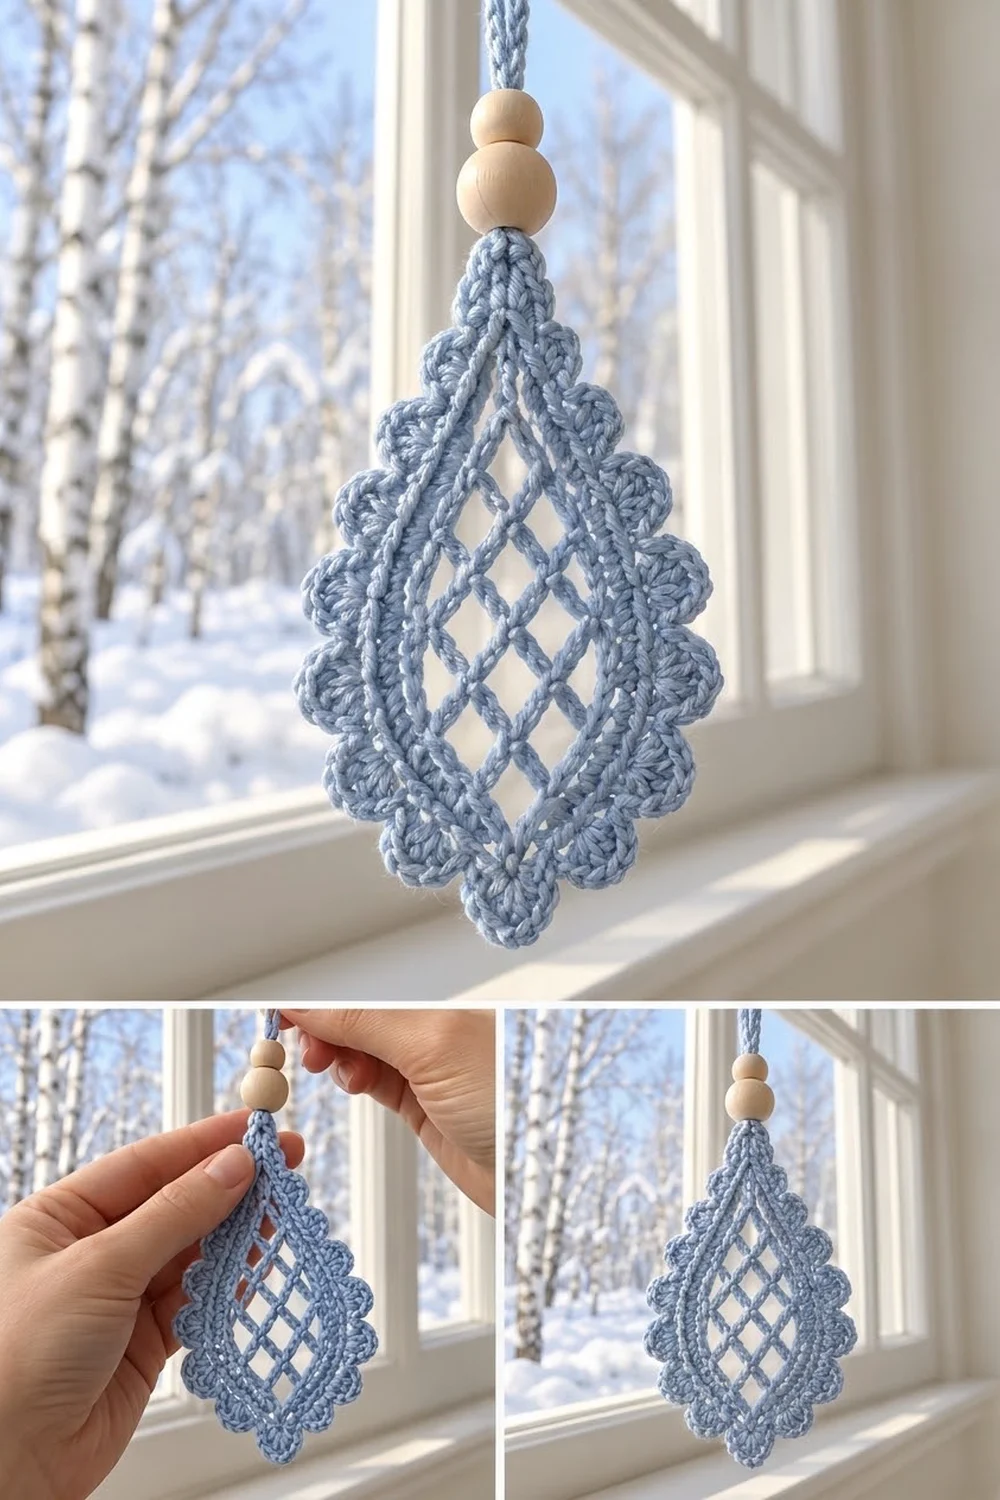
The Frosted Window Teardrop is a small, airy lace ornament made to catch the light in a winter window. It has an open diamond lattice in the center, framed by solid raised bands and finished with soft rounded scallops.
It uses one color only, a light powder blue, and two natural wooden beads on the hanging cord. The look is calm and Scandinavian, so it suits winter decor that doesn’t need to be strictly about Christmas.
The pattern uses US crochet terms. The finished ornament measures 3 in (7.6 cm) wide and 4.25 in (10.8 cm) tall, not counting the cord.
You first crochet the lattice in rows, starting at one tip and ending at the other. Then you work two outline rounds around it to make the teardrop shape, and two border rounds to add the scallops. Last, you crochet a beaded hanging cord at the top point.
Finished Size and Construction
- Finished size: 3 in (7.6 cm) wide × 4.25 in (10.8 cm) tall, without the cord
- Skill level: Intermediate
- Terminology: US crochet terms
- Yarn weight: Fingering (Super Fine #1), mercerized cotton
- Hook: 2.5 mm (US B-1 or C-2)
- Number of pieces: 1 (single ornament)
- Layout: One piece; the lattice center, outline and border are all worked continuously
- Lattice size: 1.75 in (4.4 cm) × 2.75 in (7.0 cm)
- Size before border: 2.4 in (6.1 cm) × 3.6 in (9.1 cm)
- Border depth: about 0.3 in (0.8 cm) at the sides, 0.45 in (1.1 cm) at the bottom scallop, and 0.2 in (0.5 cm) at the top point
Materials
Yarn advice: Use a smooth, tightly plied mercerized cotton in fingering weight. Mercerized cotton shows the lattice clearly, holds its shape after starching and doesn’t get fuzzy in sunlight. Avoid fluffy or brushed yarns, because they blur the chain loops.
- Light powder blue: 10 g, about 35 m (38 yd)
One ornament uses about 7 g (about 25 m). The quantity above includes a margin for your gauge swatch and the cord.
Tools and notions:
- 2.5 mm crochet hook
- 1 natural wooden bead, 12 mm, with a hole of at least 3 mm
- 1 natural wooden bead, 10 mm, with a hole of at least 3 mm
- Tapestry needle
- Scissors
- Stitch markers (2)
- Blocking board or foam mat and rust-proof pins
- Fabric stiffener or spray starch (optional, recommended for hanging)
- Ruler or tape measure
Abbreviations (US Terms)
- ch – chain
- sl st – slip stitch
- sc – single crochet
- dc – double crochet
- sp – space
- sk – skip
- st(s) – stitch(es)
- BLO – back loop only
- RS – right side
Special stitch – Scallop: Work 7 dc in the same stitch.
Ch-5 loop: Ch 5. This makes one open side of a lattice diamond.
Gauge and Checkpoints
Basic gauge: 26 sc and 30 rows = 4 in (10.2 cm). Lace stretches a lot, so treat the measurements below as your real gauge.
Test one ornament first. Measure it at each checkpoint and only make more once the first one matches.
- After Row 9 (lattice): 1.75 in (4.4 cm) wide × 2.75 in (7.0 cm) tall, gently stretched
- After Round 1: 2.0 in (5.1 cm) × 3.0 in (7.6 cm)
- After Round 2: 2.4 in (6.1 cm) × 3.6 in (9.1 cm)
- After Round 3: 2.6 in (6.6 cm) × 3.8 in (9.7 cm)
- After Round 4 (blocked): 3.0 in (7.6 cm) × 4.25 in (10.8 cm)
If it’s too big: Change to a 2.25 mm hook, or keep your chain loops tighter. Loose chains are the most common reason the lattice grows.
If it’s too small: Change to a 2.75 mm hook. Check that the ch-5 loops aren’t pulled tight when you work the sc into them.
A difference of 0.1 in (0.3 cm) is fine. Blocking will even it out.
Part 1: Lattice Center
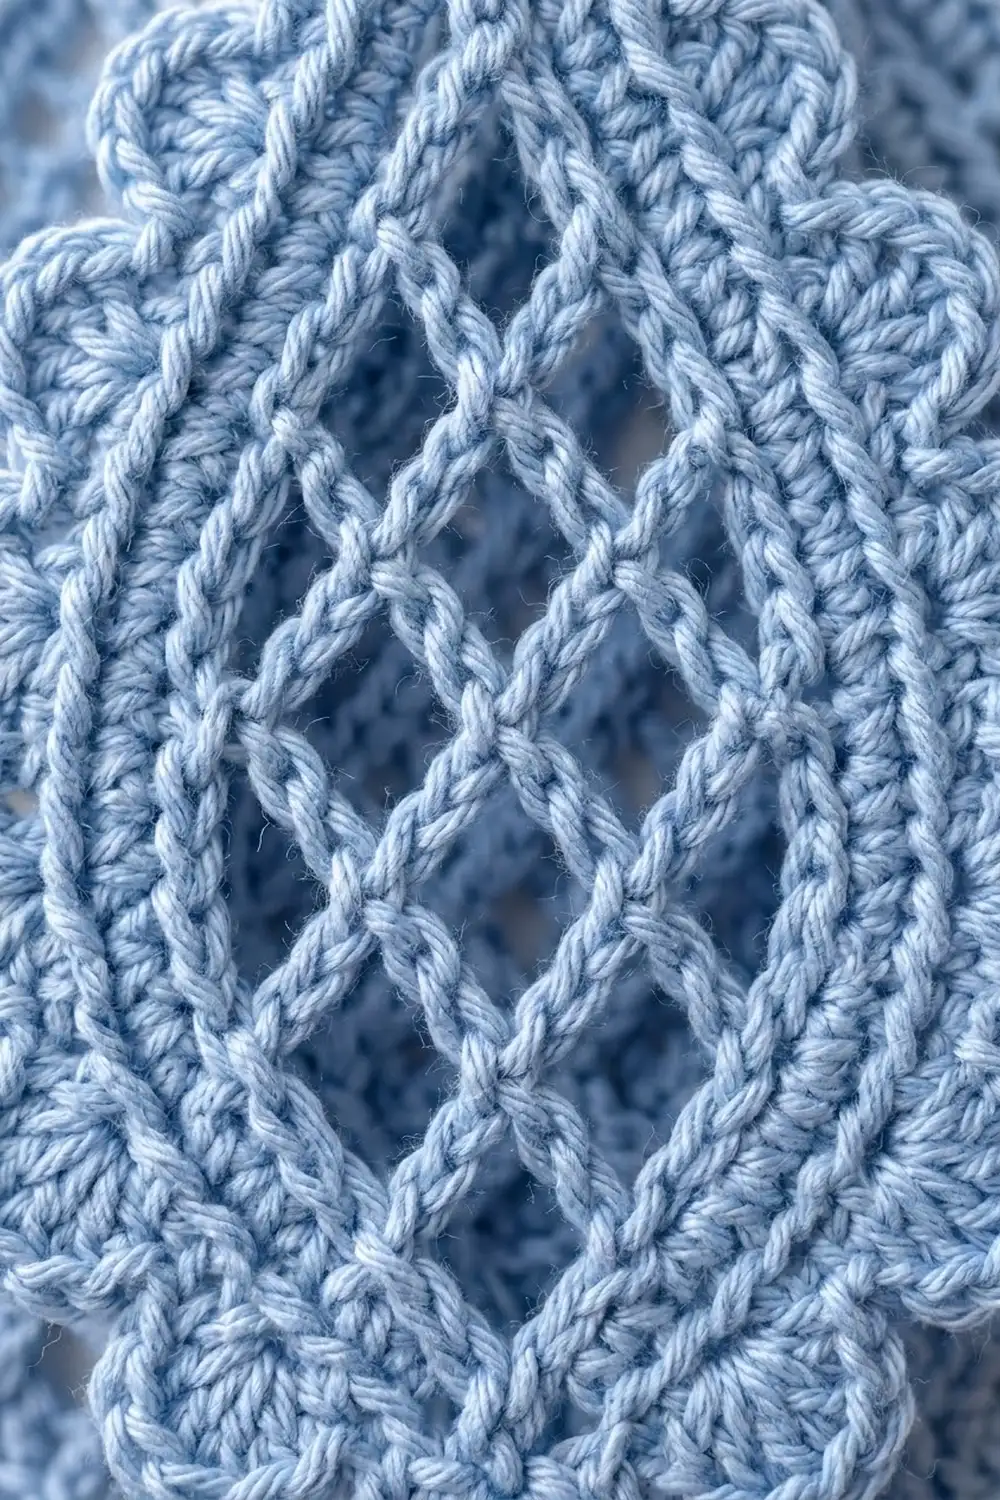
The lattice is worked in rows. Every row turns. Rows 1–5 add one loop at each step, and Rows 6–9 take one loop away at each step, so you get a pointed oval made of diamonds.
Row 1: Ch 2, sc in 2nd ch from hook. Turn. (1 sc, the bottom tip)
Row 2: Ch 1, sc in sc, ch 5, sc in same sc. Turn. (1 ch-5 loop)
Row 3: Ch 1, sc in first sc, ch 5, sc in ch-5 loop, ch 5, sc in last sc. Turn. (2 ch-5 loops)
Row 4: Ch 1, sc in first sc, ch 5, [sc in next ch-5 loop, ch 5] 2 times, sc in last sc. Turn. (3 ch-5 loops)
Row 5: Ch 1, sc in first sc, ch 5, [sc in next ch-5 loop, ch 5] 3 times, sc in last sc. Turn. (4 ch-5 loops, the widest row)
Row 6: Sl st in first 3 ch of the first loop (to its center), ch 1, sc in same loop, [ch 5, sc in next ch-5 loop] 3 times. Turn. (3 ch-5 loops)
Row 7: Sl st to center of first loop, ch 1, sc in same loop, [ch 5, sc in next ch-5 loop] 2 times. Turn. (2 ch-5 loops)
Row 8: Sl st to center of first loop, ch 1, sc in same loop, ch 5, sc in next ch-5 loop. Turn. (1 ch-5 loop)
Row 9: Sl st to center of the loop, ch 1, sc in same loop. Do not fasten off. (1 sc, the top tip)
Checkpoint: The lattice has 4 diamonds across at its widest point and comes to a point at both ends. Stretch it gently. It should measure 1.75 in (4.4 cm) × 2.75 in (7.0 cm).
Part 2: Outline Rounds
The outline rounds turn the symmetrical oval into a teardrop. Extra stitches go only into the lower half, which rounds out the bottom and keeps the top pointed.
Each side edge has 7 edge spaces, one at the end of each of Rows 2–8.
Round 1 (RS): Ch 1, 3 sc in the Row 9 sc (top tip). Working down the first side, 4 sc in each of the 7 edge spaces (28 sc). Work 3 sc in the Row 1 sc (bottom tip). Working up the second side, 4 sc in each of the 7 edge spaces (28 sc). Sl st to first sc.
(62 sc: 3 at the top tip, 28 per side, 3 at the bottom tip)
Place a marker in the center sc of the top tip and another in the center sc of the bottom tip.
Round 2 (BLO): Sl st in the next sc (top tip center). Ch 5 (counts as dc and ch 2), dc in same st, dc in next sc.
First side: dc in next 14 sc, [2 dc in next sc, dc in next sc] 7 times.
Bottom tip: 2 dc in next sc, 3 dc in marked center sc, 2 dc in next sc.
Second side: [dc in next sc, 2 dc in next sc] 7 times, dc in next 14 sc.
Dc in last sc. Sl st to 3rd ch of beginning ch-5.
(81 dc and 1 ch-2 sp: 62 dc worked 1 per stitch + 19 added. The 19 added are 1 at the top, 7 on each side and 4 at the bottom.)
Working in the back loops leaves a raised ridge between the lattice frame and the dc band.
Checkpoint: 2.4 in (6.1 cm) × 3.6 in (9.1 cm). The bottom should look rounded and the top should look sharp.
Border
Border gauge: One scallop repeat (sk 2, 7 dc, sk 2, sc) covers 6 stitches and measures about 0.5 in (1.3 cm) along the edge.
Round 3 (BLO, trim round): Sl st in ch-2 sp, ch 1, sc in same sp. Sc in BLO of each dc around, ending in the beginning ch. Sc in ch-2 sp, ch 2, sl st to first sc.
(83 sc: 81 sc worked 1 per stitch + 2 added sc in the top ch-2 sp, plus a new ch-2 sp at the top point)
This round forms the second ridge.
To keep track, number the Round 3 stitches 1–83, starting with the first sc after the ch-2 sp. Stitch 42 is the bottom center, and it sits directly above the 3-dc center of Round 2.
Round 4 (scallops): Sl st in ch-2 sp, ch 1, 3 sc in ch-2 sp.
Sc in next 9 sts (sts 1–9).
[Sk 2 sts, 7 dc in next st, sk 2 sts, sc in next st] 11 times (sts 10–75).
Sc in next 8 sts (sts 76–83). Sl st to first sc. Fasten off.
(108 sts: 3 tip sc + 9 plain sc on each side + 11 scallops of 7 dc + 10 sc between scallops)
Count per side:
- Top tip: 3 sc
- Right side: 9 plain sc, then 5 scallops
- Bottom: 1 centered scallop on st 42
- Left side: 5 scallops, then 9 plain sc (the last of these 9 is the closing sc of the 11th repeat)
Why the math works: Round 3 has 83 sts. With 9 plain stitches at the start and 8 at the end, 66 stitches are left, and 66 ÷ 6 = 11 repeats exactly.
The scallops are centered on sts 12, 18, 24, 30, 36, 42, 48, 54, 60, 66 and 72. Stitch 42 is the bottom center, and every other scallop has a matching scallop on the opposite side. So the border is perfectly symmetrical: five scallops per side, one at the bottom, and a smooth plain section at the top point where the cord attaches.
Checkpoint: About 3.0 in (7.6 cm) × 4.25 in (10.8 cm) before blocking. It may curl a little at this stage.
Beaded Hanging Cord
- Thread the 10 mm bead and then the 12 mm bead onto the yarn from the ball end. This puts the larger bead closest to the hook.
- With RS facing, join the yarn with a sl st in the center sc of the 3 top tip sc.
- Ch 2. Slide the 12 mm bead up against the hook and ch 1 to lock it in place.
- Slide the 10 mm bead up and ch 1.
- Ch 56. Sl st in the first ch above the 10 mm bead to form a hanging loop.
- Fasten off and weave the tail back through the beads.
The 56-chain loop is about 7 in (17.8 cm) long, so the ornament hangs about 3.5 in (8.9 cm) below its hook or rod. For a longer drop, add 8 ch for every extra 0.5 in (1.3 cm) of hanging length (1 in / 2.5 cm more loop).
Final Blocking
- Weave in all the ends along the solid outline rounds, never through the lattice.
- Soak the ornament in cool water for 10 minutes. Gently press out the water in a towel.
- Pin the top point and the bottom center scallop so the piece is 4.25 in (10.8 cm) tall.
- Pin the widest point so it’s 3.0 in (7.6 cm) across.
- Put a pin in the center of each scallop, pulling it gently outward into a rounded shape.
- Open the lattice so that each diamond is even. You can slide a pin through each diamond to hold it.
- Spray or dab on fabric stiffener if you plan to hang the ornament in a window.
- Leave it to dry completely, at least 12 hours, before taking out the pins.
Final Quality-Control Checklist
- The lattice has 4 diamonds across and comes to a point at both ends
- Round 1 has 62 sc, Round 2 has 81 dc, Round 3 has 83 sc, and Round 4 has 108 sts
- Two clear ridges sit inside the dc band
- There are 11 scallops in total: 5 per side and 1 at the bottom center
- The top point is plain, with no scallops
- The size is 3.0 in (7.6 cm) × 4.25 in (10.8 cm)
- The 12 mm bead sits just above the top tip, with the 10 mm bead above it
- No tails are visible in the lattice
- The ornament hangs straight and doesn’t twist
Troubleshooting
The lattice is lopsided. One edge loop was probably missed or doubled. Count the loops in every row: 1, 2, 3, 4, 3, 2, 1.
Round 1 ruffles. Use 3 sc per edge space instead of 4. Keep 3 sc in each tip. Then adjust Round 2 so it still has 81 dc.
Round 1 cups. Your sc are tight. Go up a hook size for this round only.
The scallops aren’t centered at the bottom. Recount Round 3. It has to have exactly 83 sc, with st 42 above the center of the 3 dc.
The bottom isn’t round enough. Check that the 7 increases on each side of Round 2 are all in the lower half.
The beads slip. Make the locking chain after each bead a little tighter.
The ornament curls. Block it again and use stiffener.
Care
Hand wash in cool water with mild soap and lay flat to dry. If you used starch or stiffener, apply it again after washing.
Final Notes
The measurement chain is simple. First, a 1.75 in (4.4 cm) × 2.75 in (7.0 cm) lattice. Round 1 brings it to 2.0 in (5.1 cm) × 3.0 in (7.6 cm), and Round 2 shapes it into a 2.4 in (6.1 cm) × 3.6 in (9.1 cm) teardrop. Round 3 takes it to 2.6 in (6.6 cm) × 3.8 in (9.7 cm), and the scallop border finishes it at 3.0 in (7.6 cm) × 4.25 in (10.8 cm).
If each checkpoint matches, the stitch counts of 62, 81, 83 and 108 will fall into place, and the scallops will come out centered and symmetrical every time. Make one, check it, then make as many as your window needs.
Happy crocheting!