

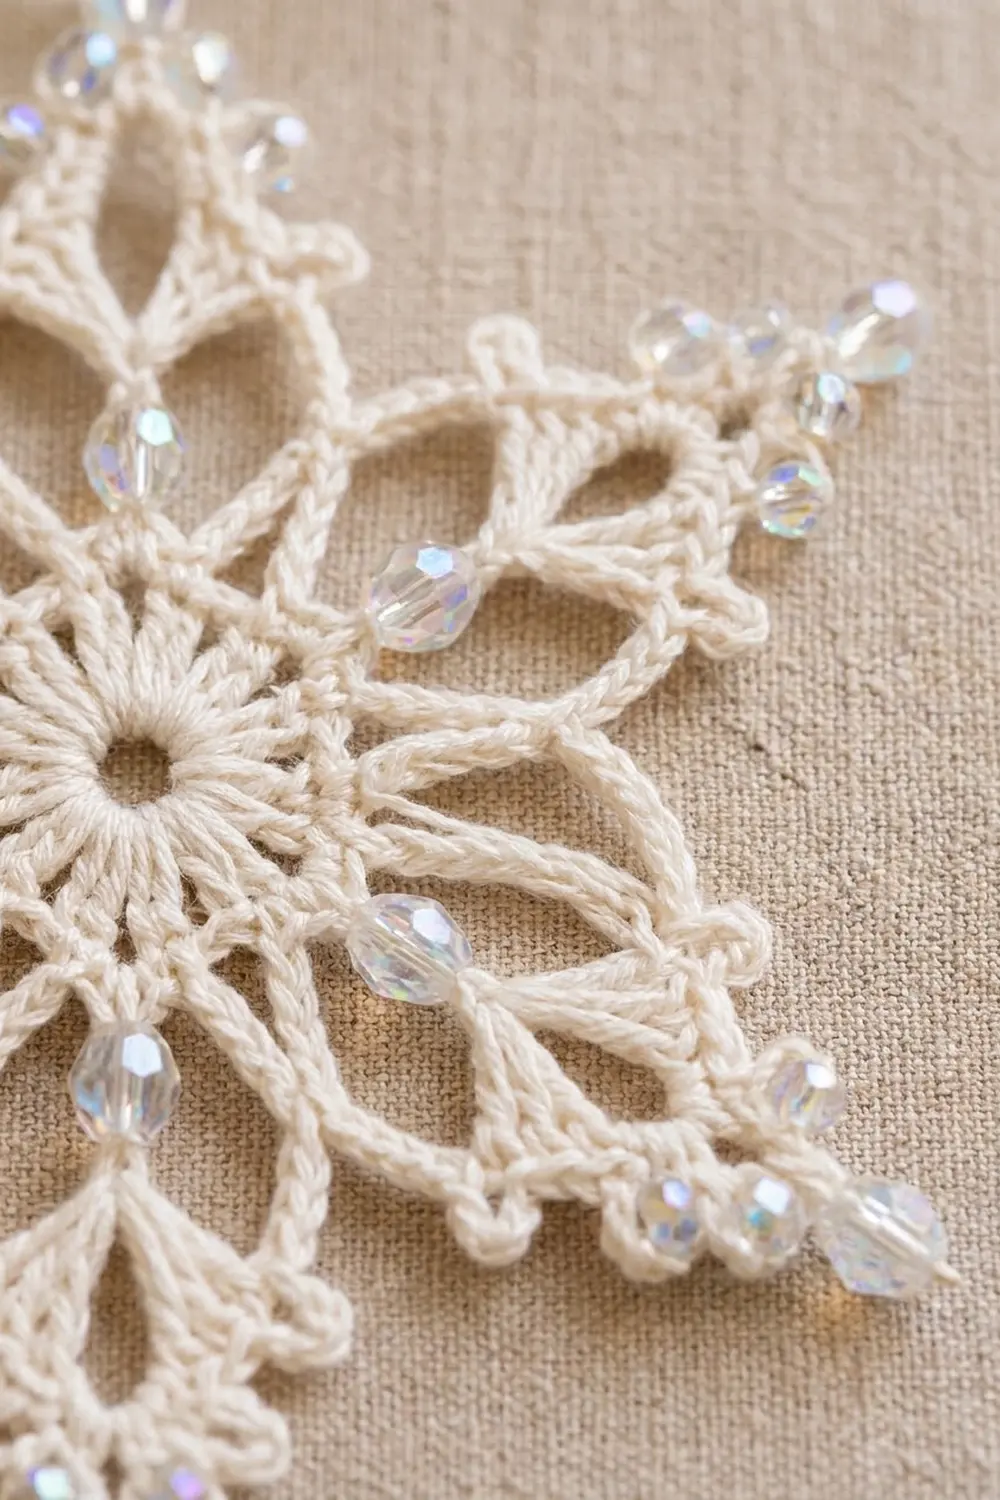
The Frostlight Snowflake is a six-pointed lace motif in soft ivory thread, finished with clear iridescent beads that catch the light at every point. Each arm opens into a slim, airy diamond, and the edges are covered in single crochet, so the outlines look like smooth little cords.
The style is classic winter lace with a bit of sparkle. Beads sit at the petal tips around the center, in each valley between the arms, along the sides of every arm, and in a three-bead cluster at each tip. You will use 54 beads in total.
This pattern uses US crochet terms. The blocked snowflake measures 5.5 in (14.0 cm) from point to point.
You work the motif in the round in one continuous strand of thread. You’ll string all the beads before you start. Rounds 1–3 make the open center ring and six petals. Rounds 4–5 make a corded frame. Rounds 6–7 are the beaded border that shapes the six arms.
Finished Size and Construction
- Finished size: 5.5 in (14.0 cm) point to point, after blocking
- Skill level: Intermediate (thread work and bead placement)
- Terminology: US crochet terms
- Yarn weight: Size 3 cotton crochet thread
- Hook: 2.25 mm (US B-1)
- Number of pieces: 1
- Layout: One single motif, no joining
- Piece size: 5.5 in (14.0 cm) point to point
- Size before border (after Rnd 5): 3 in (7.6 cm) across
- Border depth (Rnds 6–7): about 1.25 in (3.2 cm) from the Rnd 5 edge to the arm tip
Materials
Thread: Use a mercerized size 3 cotton crochet thread. It gives crisp stitch definition and holds its shape after starching. Skip fuzzy or very soft cottons, because they blur the lace.
- Ivory/cream: 8 g, about 30 m (33 yd)
Beads:
- 60 clear AB (iridescent) faceted beads, 4 mm, with holes large enough for size 3 thread
Tools:
- 2.25 mm (US B-1) crochet hook
- Big-eye beading needle or a fine wire threader, for stringing beads
- Tapestry needle
- Scissors
- Blocking board or foam mat, rustproof pins
- Spray starch or fabric stiffener
- Ruler or tape measure
Quantities include a margin. The motif uses about 22 m (24 yd) of thread and exactly 54 beads. The extras cover a gauge swatch, a broken bead, or a reworked round.
Stringing tip: Before you string the beads, test a few on the thread. A bead should slide freely without fraying the thread. If one sticks, set it aside rather than forcing it, because a forced bead can roughen the thread as you push it along.
Abbreviations (US Terms)
- ch – chain
- sl st – slip stitch
- sc – single crochet
- hdc – half double crochet
- dc – double crochet
- sp – space
- st(s) – stitch(es)
- rep – repeat
- RS – right side
Special stitch – bead chain (bch): Slide one pre-strung bead up the thread until it sits snugly against the hook. Yarn over beyond the bead and pull through the loop on the hook. The bead is now locked inside that chain. A bch counts as 1 chain, and you never work into it unless the pattern tells you to.
Before you start: Thread the beading needle and string all 54 beads onto the thread, plus 2–3 spares. Slide them well down the ball. Leave them parked there and bring them up one at a time as you need them.
Gauge and Checkpoints
For lace, it’s easier to check gauge by measuring at set rounds than by counting stitches over a set width. Work Rounds 1–3 as a test piece before you string the full set of beads, or string a few beads just for the test.
- After Rnd 1: center ring about 0.75 in (1.9 cm) across the outer edge
- After Rnd 3: petal flower 2 in (5.1 cm) across, from one petal tip to the opposite petal tip
- After Rnd 5: 3 in (7.6 cm) across, lying flat
- After Rnd 7, unblocked: about 5 in (12.7 cm) point to point
- After blocking: 5.5 in (14.0 cm) point to point
Measure on a flat, hard surface without stretching the piece. Lace relaxes a little after you stop pulling on it, so wait a moment before you read the ruler.
If your Rnd 3 flower is larger than 2 in (5.1 cm), switch to a 2.0 mm hook. If it is smaller, try a 2.5 mm hook. If Rnd 5 ruffles, your chains are too long for your sc tension. Tighten your chains slightly or go down a hook size. If Rnd 5 cups, loosen your chains.
Snowflake Pattern
Work in the round with RS facing throughout. Do not turn.
Center Ring and Petals
Rnd 1: Ch 6, sl st to the first ch to form a ring. Ch 3 (counts as dc), 17 dc in the ring. Join with sl st to the top of the ch-3. (18 dc)
Rnd 2: Ch 1, sc in the same st. Ch 5, skip next 2 sts, sc in next st. Rep from * 4 more times, ch 5, skip last 2 sts. Join with sl st to the first sc. (6 sc, 6 ch-5 sps)
Each repeat uses 3 sts (1 sc + 2 skipped), and 6 × 3 = 18, so the round closes evenly.
Rnd 3 (petals): In next ch-5 sp work (sc, hdc, 3 dc, bch, 3 dc, hdc, sc), sl st in next sc. Rep from * 5 more times. The last sl st goes into the joining sc of Rnd 2. (6 petals; each petal = 10 sts + 1 bch; plus 6 sl sts. Total 60 sts, 6 bch, 6 sl sts. Beads used: 6)
The bead sits at the outer tip of each petal. The sl st between petals forms a small valley.
Checkpoint: 2 in (5.1 cm) across.
Corded Frame
Rnd 4: Ch 1, sc in the same sl st (valley). Ch 6, sc in the bch at the tip of the next petal (insert the hook through the chain behind the bead), ch 6. Sc in next valley sl st, ch 6, sc in the next petal-tip bch, ch 6. Rep from * 4 more times. Join with sl st to the first sc. (12 sc, 12 ch-6 sps)
When you work into a bead chain, tilt the bead toward you with your thumb so you can see the two strands of the chain behind it. Work under both strands so the bead stays centered at the tip.
The ch-6 spaces now alternate valley-to-tip and tip-to-valley.
Rnd 5: Ch 1, 8 sc in each ch-6 sp around. Join with sl st to the first sc. (96 sc)
This is the rope-textured frame. For reference, number each 16-st section 1–16. Sts 1–8 sit in the valley-to-tip space and sts 9–16 in the tip-to-valley space, so st 8 and st 9 flank a petal tip, and st 16 and the next st 1 flank a valley. Your join sits at st 1 of the first section.
Checkpoint: 3 in (7.6 cm) across. This is your size before the border.
Border
The border (Rnds 6–7) builds the six arms and places 48 of the 54 beads.
Border gauge: Before you cover them, each ch-8 arch should stand about 0.6 in (1.5 cm) above the Rnd 5 edge. After Rnd 7 and blocking, each arm should reach 1.25 in (3.2 cm) beyond the frame.
Rnd 6 (arm loops): Sl st in next sc (st 2). Ch 1, sc in the same st. Then work the first section as follows:
- Ch 8, skip next 5 sts (sts 3–7), sc in next st (st 8).
- Ch 6 (tip loop), sc in next st (st 9).
- Ch 8, skip next 5 sts (sts 10–14), sc in next st (st 15).
- Bch, skip next 2 sts (st 16 and st 1 of the next section).
Sc in next st (st 2), ch 8, skip 5, sc in next st (st 8), ch 6, sc in next st (st 9), ch 8, skip 5, sc in next st (st 15), bch, skip next 2 sts. Rep from * 4 more times. The last bch skips st 16 and the st 1 at the start of the round. Join with sl st to the first sc.
(24 sc, 12 ch-8 sps, 6 ch-6 tip sps, 6 bch. Beads used this round: 6; running total: 12)
Why the math works: Each section uses exactly 16 sts: 4 sc worked (sts 2, 8, 9, 15) + 10 skipped under the ch-8 arches (sts 3–7 and 10–14) + 2 skipped under the valley bead (sts 16 and 1). That gives 4 + 10 + 2 = 16, and 6 × 16 = 96, which matches Rnd 5. The ch-6 between two neighboring sts (8 and 9) has nowhere to go but outward, so it pushes up into the arm point. The bead chain bridging 2 skipped sts pulls the valley into a sharp V.
Rnd 7 (beaded covering): Ch 1, sc in the same sc. Then work the first section as follows:
- In next ch-8 sp work (3 sc, bch, 3 sc, bch, 2 sc).
- Sc in next sc.
- In next ch-6 tip sp work (3 sc, ch 1, bch, bch, bch, ch 1, 3 sc).
- Sc in next sc.
- In next ch-8 sp work (2 sc, bch, 3 sc, bch, 3 sc).
- Sc in next sc. Do not work into the valley bch; leave it sitting in the V.
Sc in next sc, then work the section as above. Rep from * 4 more times. Join with sl st to the first sc. Fasten off and weave in the ends.
Counts per section: 1 + 8 + 1 + 6 + 1 + 8 + 1 = 26 sc, plus 7 bch (2 on each side + 3 at the tip) and 2 ch at the tip.
Round total: 156 sc, 42 bch, 12 ch. Beads used: 42.
Bead total check: 6 (Rnd 3) + 6 (Rnd 6) + 42 (Rnd 7) = 54 beads. Per arm that is 9: 1 inner petal bead, 1 valley bead, 4 side beads, and 3 tip beads.
Each ch-8 arch gets 8 sc, so the cord lies flat without pulling. The tip loop has 3 + 3 sc with a 5-chain beaded picot (ch 1, 3 bch, ch 1) in between, which forms the pointed tip with its cluster of 3 beads. The two side groups are mirror images (3-3-2 and 2-3-3), so the side beads sit at matching heights on both edges of the arm.
Unblocked checkpoint: about 5 in (12.7 cm) point to point.
Final Blocking
- Soak the snowflake in cool water for 5 minutes. Press out the water in a towel; do not wring.
- On paper, draw a circle 5.5 in (14.0 cm) across and mark six points 60° apart. Lay the paper under clear plastic on your blocking board.
- Place the center ring on the circle’s center. Pin through the ring to hold it round.
- Pin each arm tip just inside the beaded picot, right on a marked point.
- Pin each valley V so it points straight at the center.
- Pin the tip of each ch-8 arch outward so the arms open into slim diamonds.
- Spray with starch or brush on fabric stiffener, and let it dry completely, at least 6 hours.
- Unpin and measure: 5.5 in (14.0 cm) point to point on all three axes.
Never press a hot iron directly on the beads.
Final Quality-Control Checklist
- Center ring is open and round, about 0.75 in (1.9 cm) across.
- Six petals, each with one bead centered at its tip.
- Rnd 5 has 96 sc, 16 per section, and lies flat.
- Six tip loops, each with a cluster of 3 beads.
- Two beads on each side of every arm, at matching heights.
- One bead sitting in every valley.
- 54 beads used in total.
- All three axes measure 5.5 in (14.0 cm) after blocking.
- Ends woven in securely and trimmed close.
Troubleshooting
Run out of beads on the strand: Fasten off at the end of a round, string more beads, and rejoin with a sl st in the same spot.
Bead slips to the back: Push it to the RS with your fingertip before tightening the next stitch.
Arms curl or twist: Your ch-8 arches are too tight. Rework Rnd 6 with slightly looser chains, then block firmly.
Rnd 5 ruffles: Your chains in Rnd 4 are too loose. Rework Rnd 4 with firmer ch-6 loops.
Valleys are rounded instead of V-shaped: Make sure you skip both st 16 and st 1 under each valley bead in Rnd 6.
Arms are different lengths: Count your Rnd 7 sc in each arch. Every ch-8 arch needs exactly 8 sc, and every tip loop needs 3 sc on each side of the picot.
Bead won’t fit the thread: Use a wire threader, or swap in beads with a larger hole.
Snowflake is too small after blocking: Rework it with a larger hook, or pin it out a little more firmly while it’s damp.
Care
Hand wash in cool water with mild soap, press dry in a towel, and re-block flat with starch. Store it flat, or hang it by a ribbon, away from direct sun.

Final Notes
The measurement chain is short and easy to check: a 0.75 in (1.9 cm) ring, a 2 in (5.1 cm) petal flower after Rnd 3, and a 3 in (7.6 cm) frame after Rnd 5. Then about 5 in (12.7 cm) unblocked after the beaded border, and 5.5 in (14.0 cm) once blocked. If each checkpoint matches, the finished snowflake will match too. Count 96 sc in Rnd 5 and 54 beads in total, and the arms will come out even.
Happy crocheting!