

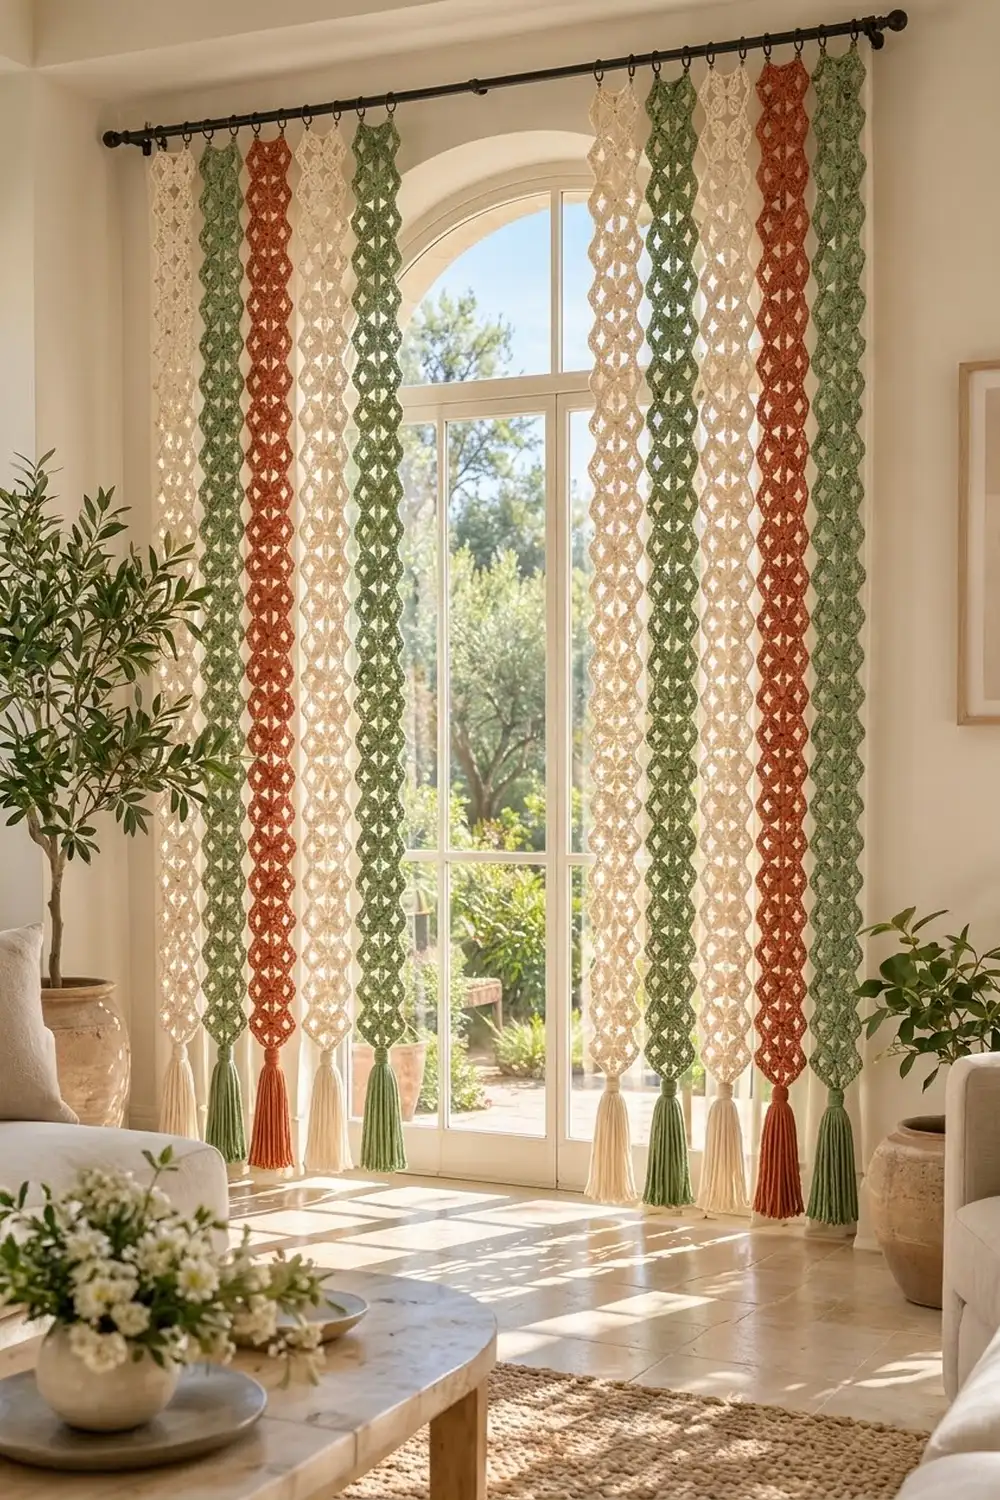
This curtain is made of 10 airy strips. Each strip is a column of small flower squares with a scalloped chain-loop edge and a pointed tip that ends in a full tassel. The strips hang side by side from clip rings, so light, air and people pass between them easily.
The palette is soft and earthy: 4 creamy off-white strips, 4 sage green strips and 2 rust orange strips. The style is relaxed boho with a little garden-cottage charm. It works across a doorway, in front of a window or as a room divider.
This pattern uses US crochet terms. Each finished strip measures 5 in (12.7 cm) wide and 79.5 in (201.9 cm) long from the top edge to the point. The tassel adds another 6 in (15.2 cm), so each strip is 85.5 in (217.2 cm) long in total.
How it’s made: you crochet 22 flower motifs for each strip and join them in a single column with slip stitches. Then you work a triangular tip in rows off the bottom motif and add a two-round border. Finally, you attach a tassel at the point. Each strip is finished on its own, and the strips are only grouped together when you hang them.
Finished Size and Construction
- Finished strip size: 5 in x 79.5 in (12.7 cm x 201.9 cm), plus a 6 in (15.2 cm) tassel
- Curtain width: about 68 in (172.7 cm) with 10 strips spaced 2 in (5.1 cm) apart
- Skill level: Easy intermediate
- Terminology: US
- Yarn weight: Worsted (#4) cotton
- Hook: US H-8 (5.0 mm)
- Number of pieces: 220 motifs, which make 10 strips of 22 motifs each
- Layout: 1 motif wide x 22 motifs long per strip; strips hang separately
- Motif size: 3.5 in (8.9 cm) square, 13 sc per side
- Strip size before border: 3.5 in x 77 in (8.9 cm x 195.6 cm)
- Tip depth: 2 in (5.1 cm)
- Border depth: 0.75 in (1.9 cm) on each long side; 0.25 in (0.6 cm) at the top and at the point
Materials
Choose a smooth, mercerized or combed worsted-weight cotton. Cotton keeps the flower clusters crisp and lets the strips hang straight without stretching much. Avoid very splitty yarn, because you will be working into chain spaces often.
- Cream: 1,200 m (about 660 g), enough for 4 strips
- Sage green: 1,200 m (about 660 g), enough for 4 strips
- Rust orange: 600 m (about 330 g), enough for 2 strips
Each strip uses about 300 m (about 165 g), including its tassel. These quantities already include a margin of roughly 10% for swatching and joining.
Tools:
- US H-8 (5.0 mm) crochet hook
- Tapestry needle
- Sharp scissors
- Stitch markers
- Tape measure
- A stiff card, 6.5 in (16.5 cm) tall, for wrapping tassels
- Blocking mats and rust-proof pins
- 10 curtain clip rings and a curtain rod
Abbreviations (US Terms)
- ch – chain
- sl st – slip stitch
- sc – single crochet
- dc – double crochet
- sc2tog – single crochet 2 together
- sc3tog – single crochet 3 together
- sk – skip
- sp – space
- st(s) – stitch(es)
- RS / WS – right side / wrong side
Special stitches:
- Beginning cluster (beg cl): Ch 2, then work 2 dc in the same st, leaving the last loop of each dc on the hook. Yarn over and pull through all 3 loops.
- Cluster (cl): Work 3 dc in the same st, leaving the last loop of each dc on the hook. Yarn over and pull through all 4 loops.
Gauge and Checkpoints
Make one complete motif before anything else, and block it lightly. All the later measurements depend on this one square.
Gauge: 1 motif = 3.5 in (8.9 cm) square, with 13 sc per side after Round 4.
Check the motif against these measurements as you go:
- After Round 1: 1.25 in (3.2 cm) across
- After Round 2: 2.25 in (5.7 cm) across, point to point
- After Round 3: 3 in (7.6 cm) square
- After Round 4: 3.5 in (8.9 cm) square
If your motif is too big (over 3.75 in / 9.5 cm), go down to a 4.5 mm hook. If it’s too small (under 3.25 in / 8.3 cm), go up to a 5.5 mm hook. A difference of just 0.25 in (0.6 cm) per motif adds up to 5.5 in (14.0 cm) over the 22 motifs in a strip.
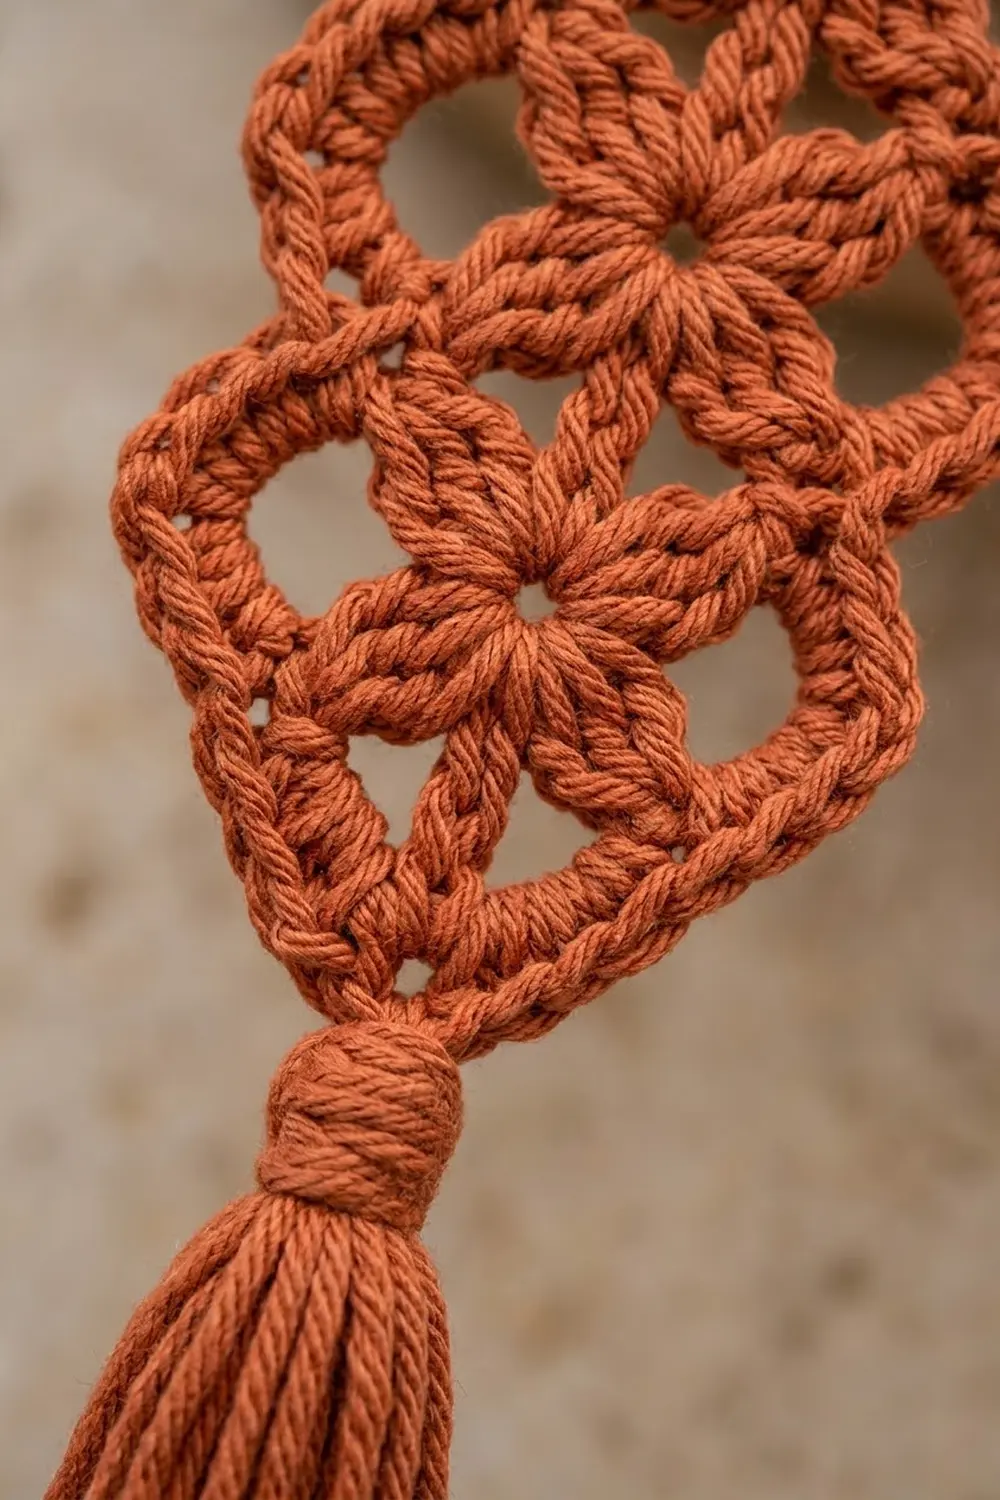
Flower Motif
Make 22 motifs for each strip. Work every round with the RS facing you.
Round 1: Make a magic ring. Ch 3 (this counts as the first dc), then work 15 dc in the ring. Join with a sl st to the top of the ch-3. (16 dc)
Round 2: Work a beg cl in the same st, then ch 3 and sk the next st. Work a cl in the next st, ch 3, sk the next st. Repeat from * to * 6 more times. Join with a sl st to the top of the beg cl. (8 clusters, 8 ch-3 sps)
This round makes the eight-petal flower.
Round 3: Sl st into the first ch-3 sp. Ch 3 (counts as dc), then work (2 dc, ch 3, 3 dc) in the same sp to make the first corner. Ch 2, sc in the next ch-3 sp, ch 2, then work (3 dc, ch 3, 3 dc) in the next ch-3 sp. Repeat from * to * 2 more times. Ch 2, sc in the last ch-3 sp, ch 2. Join with a sl st to the top of the ch-3. (24 dc, 4 sc, 8 ch-2 sps, 4 corner ch-3 sps)
The ch-2 sps leave small open gaps on each side of the flower, which gives the strip its lacy look.
Round 4: Ch 1. Work 1 sc in each dc, 2 sc in each ch-2 sp and 1 sc in each sc. In each corner ch-3 sp, work (sc, ch 2, sc). Join with a sl st to the first sc and fasten off.
Each side has 11 sc between corner spaces (3 + 2 + 1 + 2 + 3). Adding the corner sc at each end gives 13 sc per side. In total: 52 sc + 4 corner ch-2 sps.
The 13-per-side count already includes both corner stitches. Don’t count them a second time.
Make All Pieces
Quantities:
- Cream: 88 motifs (4 strips x 22)
- Sage green: 88 motifs (4 strips x 22)
- Rust orange: 44 motifs (2 strips x 22)
- Total: 220 motifs
Layout on the rod (left to right):
Strip:   1  2  3  4  5  6  7  8  9  10
Color:   C  G  R  C  G  C  G  C  R  G
Motifs:  22 22 22 22 22 22 22 22 22 22

Each strip (1 column):
[M1]   <- top, clipped to ring
[M2]
...
[M22]
 \/    <- pointed tip + tassel
C = cream, G = sage green, R = rust orange
Joining
Join the motifs into a column using a slip-stitch seam on the WS. Join the motifs of one strip only; never join one strip to another.
- Hold 2 motifs with RS together, lining up the bottom edge of the first motif with the top edge of the second.
- Join the yarn through both corner ch-2 sps at one end. Sl st through both layers in each of the 13 matching sc pairs, then sl st through the corner ch-2 sps at the other end.
- Work stitch to stitch: 13 sc on one motif meet 13 sc on the other. Don’t add or skip any stitches.
- Fasten off and join the next motif in the same way.
You will have 21 seams in each strip.
Tension: Keep your sl sts loose, about as wide as a sc. Once the seam is opened flat, it should measure 3.5 in (8.9 cm), the same as the motif. If it puckers, go up one hook size for joining only.
Checkpoint: 4 joined motifs should measure 14 in (35.6 cm). A full strip of 22 motifs should measure 3.5 in x 77 in (8.9 cm x 195.6 cm).
Pointed Tip
Work the tip in rows off the bottom edge of motif 22, with the RS facing you.
Row 1: Join the yarn in the right corner ch-2 sp of the bottom edge. Ch 1, then sc in the same sp. Sc in each of the 13 sc, then sc in the left corner ch-2 sp. (15 sc)
Rows 2–7: Ch 1 and turn. Sc2tog, sc in each st to the last 2 sts, then sc2tog. Each row has 2 fewer sc than the row before. (13, 11, 9, 7, 5, 3 sc)
Row 8: Ch 1, turn, sc3tog. (1 sc) Do not fasten off.
The tip is 8 rows, or 2 in (5.1 cm), deep, with 8 row-ends along each slanted side.
Border
Border gauge: Round 1 sc is worked at the same 13 sc per 3.5 in (8.9 cm) gauge as the motif. Round 2 loops stand 0.5 in (1.3 cm) tall.
Round 1 (all around): Ch 1 and work 3 sc in the single st at the point. Then work along the strip:
- Left slanted edge: 8 sc, 1 in each row-end
- Left long side: 286 sc, 1 in each motif sc (22 x 13). Pass over the joined ch-2 sps at the seams without working into them.
- Top left corner ch-2 sp: 3 sc
- Top edge: 13 sc
- Top right corner ch-2 sp: 3 sc
- Right long side: 286 sc
- Right slanted edge: 8 sc
Join with a sl st to the first sc and fasten off.
Round 1 count: (13 + 572 + 16 + 1 = 602 sc worked 1 per existing stitch or row-end) + (6 sc in the 2 top corner sps) + (2 extra sc at the point) = 610 sc.
Round 2 (long sides only): With the RS facing you, join the yarn in the first of the 286 long-side sc on the right side, just below the top corner group. Ch 1 and sc in the same st. Ch 4, sk 2 sts, sc in the next st. Repeat from * to * 95 times in total. The last sc lands in the 286th st. Fasten off, then repeat on the left long side. (95 ch-4 loops per long side)
Why the math works: The first sc uses 1 st, and each repeat uses 3 sts. 1 + (95 x 3) = 286. No stitches are added at the seams, because each long side is exactly 22 motifs x 13 sc.
The top and the tip stay as plain sc, so the top edge clips neatly and the point stays sharp.
Size check: The finished width is 3.5 in + (2 x 0.75 in) = 5 in (12.7 cm). The length is 0.25 in + 77 in + 2 in + 0.25 in = 79.5 in (201.9 cm).
Tassel
- Wrap yarn 20 times around the 6.5 in (16.5 cm) card, then cut along one edge. This gives you 20 strands, each 13 in (33.0 cm) long.
- Fold the bundle in half. Pull the fold through the center sc at the point with your hook, then pass the ends through the loop to make a lark’s head knot. You now have 40 tassel ends.
- Wrap a 20 in (50.8 cm) length of yarn tightly around the bundle, 1 in (2.5 cm) below the point. Tie it off and bury the ends inside the tassel.
- Trim the tassel evenly to 6 in (15.2 cm) below the point.
Final Blocking
- Weave in all ends before blocking. Hide them inside the sc rounds, not across the open gaps.
- Soak the strip in cool water for 15 minutes, then press out the water in a towel. Don’t wring it.
- Lay it flat on mats and pin the long edges straight at 3.5 in (8.9 cm) between the motif edges.
- Pin out each ch-4 loop into an even scallop so the edge reaches 5 in (12.7 cm) in total.
- Pin the tip into a symmetrical point 2 in (5.1 cm) deep.
- Comb the tassel straight and let it dry hanging down over the mat edge.
- Let the strip dry completely, then check that it measures 79.5 in (201.9 cm) long.
Final Quality-Control Checklist
- Each motif is 3.5 in (8.9 cm) square, with 13 sc per side.
- All 8 petals sit evenly, with no twisted clusters.
- There are 21 seams per strip, lying flat and not puckered.
- The joined strip measures 77 in (195.6 cm) before the border.
- The tip has 8 rows and ends in 1 st.
- Border Round 1 has 610 sc, and Round 2 has 95 loops on each long side.
- Each strip measures 5 in x 79.5 in (12.7 cm x 201.9 cm).
- Tassels are all trimmed to the same 6 in (15.2 cm).
- The 10 strips follow the order C, G, R, C, G, C, G, C, R, G.
Troubleshooting
- The motif cups: Round 2’s ch-3 sps are too tight. Loosen the chains, or work ch 4 instead.
- The motif ruffles: Your dc groups are too loose. Go down a hook size for Round 3.
- The strip is too long: Your seams are stretching it. Re-join them with firmer sl sts, or block it shorter.
- The strips are different lengths: Measure each motif before joining and swap any outliers.
- Round 2 doesn’t end on st 286: Count Round 1 again. Each long side must have exactly 286 sc.
- The point is lopsided: Check that every decrease row starts and ends with a sc2tog.
- The strip curls along the edges: Block it again, pinning every loop.
Care
Hand wash in cool water with a mild detergent and dry flat or hanging. Cotton can shrink slightly in a hot dryer, so avoid high heat.
Final Notes
The measurement chain is simple. Each motif is 3.5 in (8.9 cm) with 13 sc per side. 22 motifs make a 77 in (195.6 cm) column. The tip adds 2 in (5.1 cm), the border brings the strip to 5 in x 79.5 in (12.7 cm x 201.9 cm), and the tassel finishes it at 85.5 in (217.2 cm). Make 10 strips, clip them to the rod 2 in (5.1 cm) apart, and you have a curtain about 68 in (172.7 cm) wide.
Happy crocheting!