

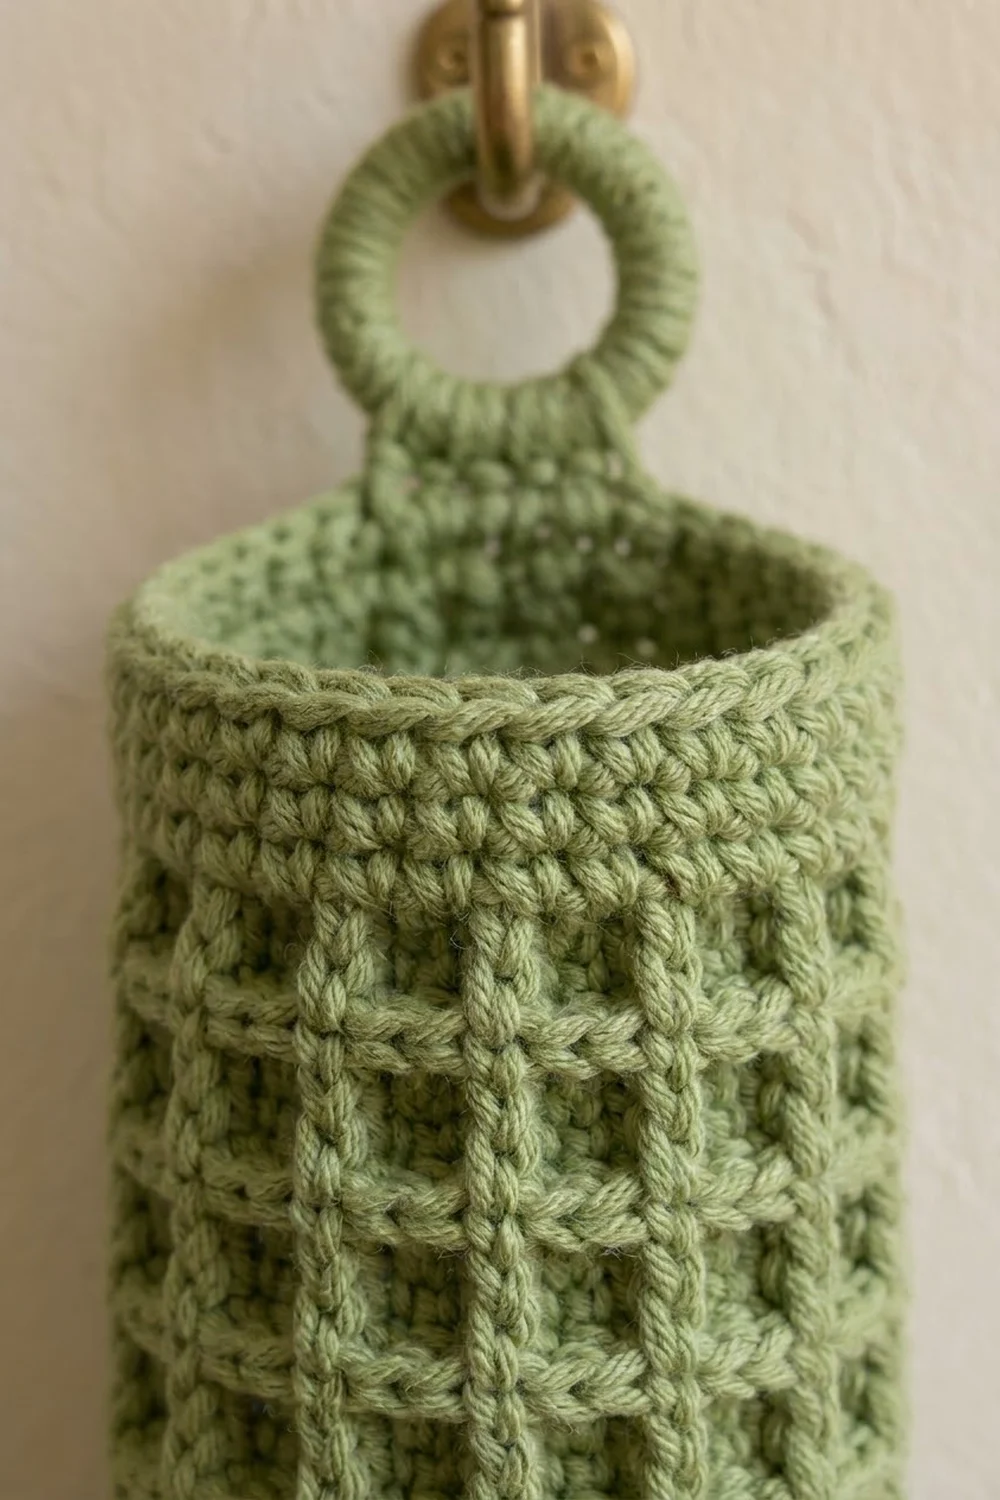
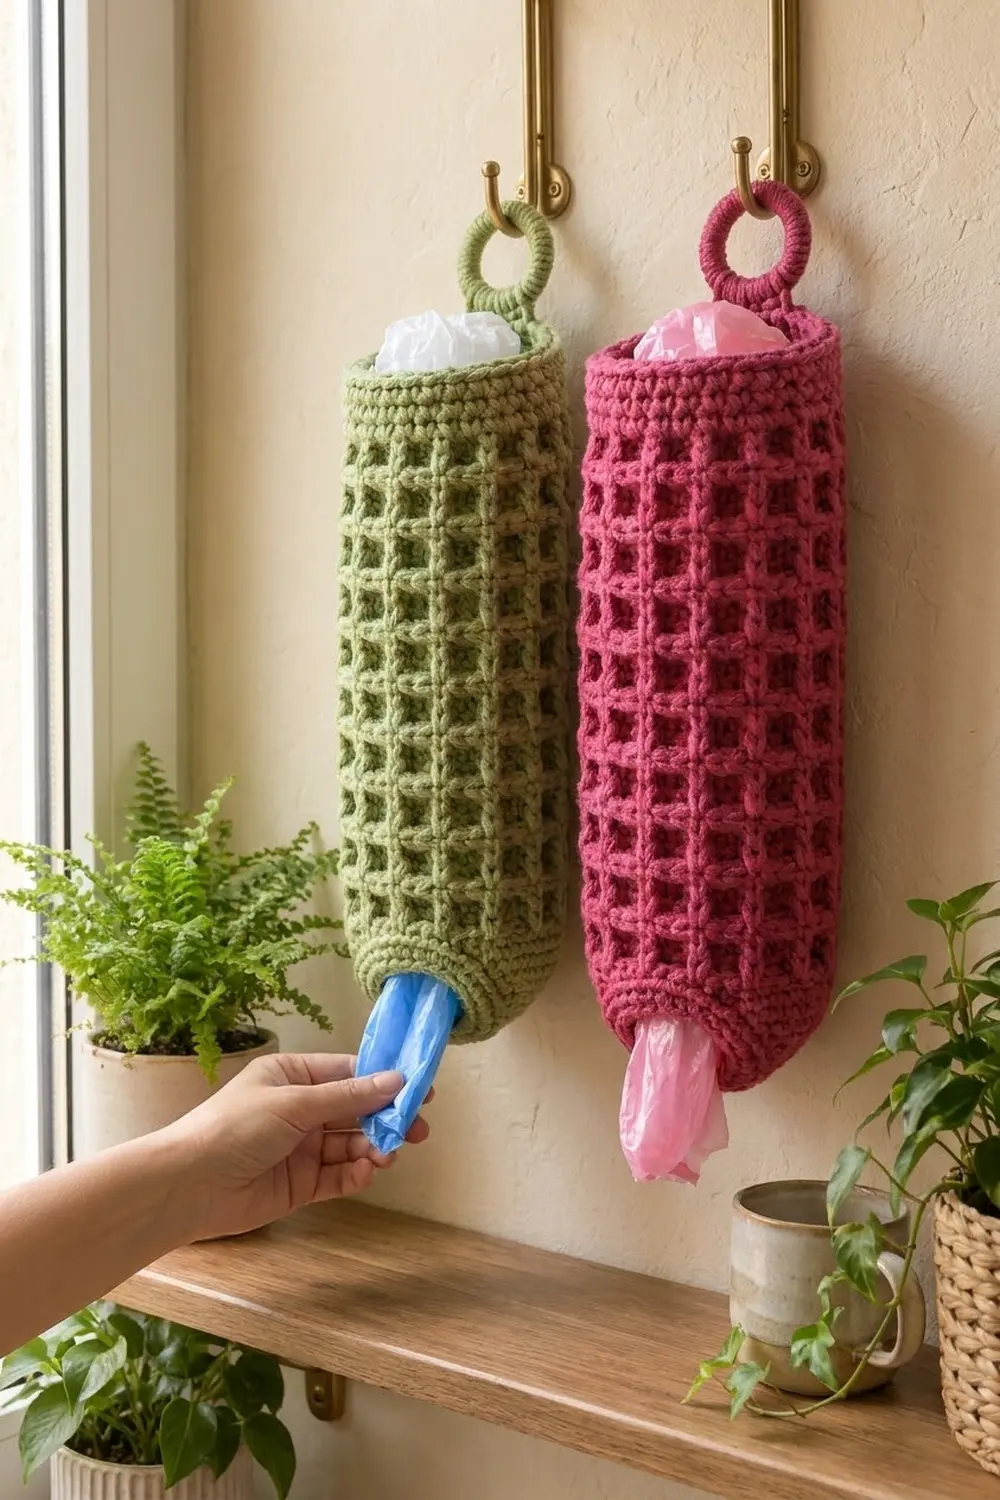
This waffle stitch bag holder is a practical way to keep plastic grocery bags tidy, and it looks good on the wall. It is one tube with a deep, squared waffle texture. Each end has a solid single crochet band, and the bottom opening is slightly narrower than the body. A short tab at the top holds a yarn-covered ring, so the holder hangs from any hook.
The sample is made in soft sage green. A raspberry pink version uses the same pattern with only the color changed. Push bags in through the top and pull them out one at a time through the bottom. The bottom band is narrower than the body, which keeps the bags from falling straight out.
The pattern uses US crochet terms. The body of the finished holder is 15 in (38.1 cm) tall. It is 7.5 in (19.1 cm) wide laid flat, which is 15 in (38.1 cm) around. With the tab and ring, the total hanging length is about 18.5 in (47.0 cm).
You work the holder in joined rounds from the bottom up:
– a single crochet band
– a double crochet increase round
– 24 rounds of waffle stitch
– a decrease into a single crochet top band
Last, you work a short flat tab and fold it around a covered ring.
Finished Size and Construction
- Finished size: body 15 in (38.1 cm) tall and 7.5 in (19.1 cm) wide flat; about 18.5 in (47.0 cm) total with the hanger
- Skill level: Easy to Intermediate (uses front post stitches)
- Terminology: US crochet terms
- Yarn weight: Worsted (#4)
- Hook: 5.0 mm (H-8)
- Number of pieces: 1 seamless tube with an attached tab, plus 1 covered ring
- Layout: Vertical tube that hangs from a ring
- Body circumference: 15 in (38.1 cm), 45 sts
- Bottom and top openings: about 10.3 in (26.2 cm) around, 36 sc
- Size before the top band: 13.5 in (34.3 cm) tall
- Band depth: top 1.5 in (3.8 cm); bottom 1 in (2.5 cm)
Materials
Choose a sturdy worsted weight yarn. Cotton or a cotton blend shows the waffle grid crisply and holds its shape when the holder is stuffed with bags. Acrylic also works, but it stretches more under weight. Waffle stitch uses a lot of yarn, so buy a little more than you think you need.
- Main color (sage green, or raspberry pink for the alternate version): 150 g, about 260 m
- Hanging ring: one 2 in (5.1 cm) metal or wooden ring
- 5.0 mm (H-8) crochet hook
- 1 locking stitch marker
- Tapestry needle
- Scissors
- Measuring tape
The yarn amounts include a margin of about 15%. This covers your gauge check and small differences in tension.
Abbreviations (US Terms)
- ch – chain
- sl st – slip stitch
- sc – single crochet
- dc – double crochet
- sc2tog – single crochet 2 together
- st(s) – stitch(es)
- rnd(s) – round(s)
- rep – repeat
Special stitch: FPdc (front post double crochet). Yarn over. Insert the hook from front to back to front around the post of the stitch below, not into its top loops. Yarn over and pull up a loop. Then (yarn over, pull through 2 loops) twice. The FPdc sits forward on the fabric and forms the raised lines of the grid.
Gauge and Checkpoints
- Waffle gauge: 12 sts and 8 rnds = 4 in (10.2 cm) in waffle stitch
- Sc gauge: 14 sts and 16 rnds = 4 in (10.2 cm) in sc
Check your gauge on the start of the holder itself. Work Rnds 1–9 below, then lay the tube flat and measure it without stretching. It should be 7.5 in (19.1 cm) wide across the waffle section and about 5.1 in (13.0 cm) wide across the sc band. If it matches, keep going. If not, rip back and start again with a different hook.
Height checkpoints, measured from the foundation chain:
– After Rnd 4: 1 in (2.5 cm)
– After Rnd 5: 1.5 in (3.8 cm)
– After Rnd 17: 7.5 in (19.1 cm)
– After Rnd 29: 13.5 in (34.3 cm)
– After Rnd 35: 15 in (38.1 cm)
If your work is too big, try a hook 0.5 mm smaller. If it is too small, try a hook 0.5 mm larger. If the width is right but the height is off, add or remove waffle rounds in pairs (one Rnd A plus one Rnd B) to keep the pattern even. Each pair changes the height by 1 in (2.5 cm).
Pattern Notes
- Work in joined rounds with the right side always facing you. Do not turn.
- The ch 1 or ch 2 at the start of a round never counts as a stitch.
- Join each round with a sl st into the top of the first stitch, not into the starting chain.
- Mark the first stitch of each round and move the marker up as you go.
- The joins form a faint seam line. Keep it at the center back of the holder.
Bottom Band
Foundation: Ch 36. Join with a sl st to the first ch to form a ring. Make sure the chain isn’t twisted.
Rnd 1: Ch 1, sc in each ch around. Join. (36 sc)
Rnds 2–4: Ch 1, sc in each st around. Join. (36 sc)
The bottom band is now 1 in (2.5 cm) deep and about 10.3 in (26.2 cm) around. This narrower opening is what stops the bags from sliding out.
Body
Rnd 5 (increase round): Ch 2, dc in next 3 sts, 2 dc in next st; rep from * 8 more times. Join. (36 dc worked 1 per stitch + 9 extra dc = 45 dc)
The body is now 15 in (38.1 cm) around. Each waffle cell is 3 sts wide, so 45 sts gives 15 complete cells around the tube.
Rnd 6 (Waffle Rnd A): Ch 2, FPdc around next st, dc in next 2 sts; rep from * 14 more times. Join. (45 sts: 15 FPdc, 30 dc)
Rnd 7 (Waffle Rnd B): Ch 2, dc in next st (the top of the FPdc), FPdc around each of next 2 sts; rep from * 14 more times. Join. (45 sts: 15 dc, 30 FPdc)
How the grid forms: Every Rnd A puts a single FPdc in the same column, which makes the vertical raised lines. The FPdc pairs in Rnd B make the horizontal bars between those lines. The plain dc pairs sink back to form the square pockets. Before going on, check that each FPdc in Rnd A sits above the single dc of the round below.
Rnds 8–29: Rep Rnds 6 and 7 eleven more times, so the rounds keep alternating A, B. (45 sts in every round)
Rnd 29 is a Rnd B. You have now worked 24 waffle rounds (12 A and 12 B), and the holder measures 13.5 in (34.3 cm).
Border: Top Band and Bottom Edge
For this tube, the sc bands at the two ends act as the border. The bottom band is already done. This section adds the top band and an optional finish for the bottom edge.
Border gauge: 14 sc and 16 rnds = 4 in (10.2 cm).
Rnd 30 (decrease round): Ch 1, sc in next 3 sts, sc2tog; rep from * 8 more times. Join. (27 sc worked 1 per stitch + 9 sc2tog worked over the other 18 sts = 36 sc)
Laid flat, the band has 18 sc on each side: 18 on the front and 18 on the back.
Rnds 31–35: Ch 1, sc in each st around. Join. (36 sc)
The top band is now 1.5 in (3.8 cm) deep. Don’t fasten off. Go straight on to the hanging tab.
Why the math works: At 3.5 sc per inch, 36 sc measure 10.3 in (26.2 cm) around. Both bands have 36 sts, so the openings match. The waffle body is 15 in (38.1 cm) around, so it bulges gently between the bands and holds the bags loosely. Rnd 5 adds exactly 9 sts and Rnd 30 removes exactly 9. The counts run 36, 45, 36, so the tube is the same shape at both ends and doesn’t flare or pucker.
Optional bottom edge: Turn the holder upside down. Join the yarn in the foundation ch at the seam line. Ch 1, then sl st loosely in each ch around. Join and fasten off. (36 sl st) This gives the bottom opening a smooth, firm edge and covers the loose look of the starting chain.
Hanging Tab
You work the tab flat in rows on the top band, starting from the last join, which sits at the center back.
Row 1: Ch 1, sc in next 8 sts. Turn. (8 sc)
Rows 2–4: Ch 1, sc in each st across. Turn. (8 sc)
Row 5: Ch 1, sc2tog, sc in next 4 sts, sc2tog. Turn. (6 sc)
Row 6: Ch 1, sc in each st across. (6 sc)
Fasten off and leave a 12 in (30.5 cm) tail for sewing. The tab is 1.5 in (3.8 cm) long.
If you want the joining seam at the side instead, count 9 sts over from the seam before Row 1. Join new yarn there and work the tab as written.
Covered Ring
Make a slip knot and put it on the hook. Hold the 2 in (5.1 cm) ring with the working yarn behind it. Insert the hook through the center of the ring, yarn over, and pull up a loop. Yarn over and pull through both loops on the hook. That makes 1 sc around the ring. Rep from * about 40 times, until the ring is completely covered. Push the stitches close together as you go. Join with a sl st to the first sc and fasten off. Weave in the tails.
No metal or wood should show between the stitches. If it does, add a few more sc before joining.
Attaching the Ring
Fold the end of the tab over the bottom of the covered ring, toward the inside of the holder. The fold should line up with Row 4. Using the long tail, whipstitch the edge of Row 6 to the inside of Row 3, going through both layers across all 6 sts. Add 2 extra stitches at each edge to reinforce them.
This seam carries the full weight of the bags, so sew it firmly. The ring should still swing freely inside the fold.
Final Blocking
- Weave all remaining ends in on the inside. Go through 3–4 sts in two directions.
- Mist the holder lightly with water. For cotton, you can soak it instead and squeeze out the water with a towel.
- Stuff the tube loosely with a rolled towel or a bundle of bags so it rounds out.
- Use your fingers to shape the waffle pockets so the raised lines run straight up and straight across.
- Check the size: 15 in (38.1 cm) tall, and 7.5 in (19.1 cm) wide flat across the body.
- Leave the filling in and let the holder dry completely. Hang it by the ring for the last hour so it settles into its hanging shape.
Final Quality-Control Checklist
- 36 sc in each of Rnds 1–4 and Rnds 30–35
- 45 sts in each of Rnds 5–29
- 15 complete waffle cells around, with the vertical lines stacked straight
- 24 waffle rounds, starting with Rnd A and ending with Rnd B
- Both openings about 10.3 in (26.2 cm) around
- Tab centered over the seam, solid, and 1.5 in (3.8 cm) long
- No ring material showing through the covering
- Tab seam holds when you tug it firmly
- All ends woven in on the inside
Troubleshooting
The grid looks flat. Make sure you work around the post, not into the top loops. Keep your yarn overs on the dc a little loose so the pockets can sink back.
The stitch count drifts. Usually the starting ch 2 was counted as a stitch, or the last stitch before the join was skipped. Recount every few rounds.
The lines spiral. You joined into the starting chain instead of the first stitch. Move the marker to the first real stitch and join there.
The seam line slants. This is normal for joined rounds. Keep it at the back, under the tab.
The tube is too narrow. FPdc stitches pull the fabric in. Use a hook one size larger for the body only, and keep the original hook for the sc bands.
Bags fall out the bottom. Work Rnds 1–4 with a hook 0.5 mm smaller to tighten the opening.
The tab stretches. Work the tab with a hook 0.5 mm smaller, or add 2 more 6-st rows before folding it so the tab is doubled at the ring.
Care
Hand wash in cool water and lay flat to dry, reshaping the grid while the holder is damp. Cotton versions can go in the machine on a gentle cycle inside a mesh laundry bag.
Final Notes
The measurements all build on each other:
– The sc gauge makes the 36-stitch bands 10.3 in (26.2 cm) around.
– The waffle gauge makes the 45-stitch body 15 in (38.1 cm) around, or 7.5 in (19.1 cm) flat.
– Twenty-five dc rounds at 0.5 in (1.3 cm) each make 12.5 in (31.8 cm) of body.
– The 1 in (2.5 cm) bottom band and the 1.5 in (3.8 cm) top band bring the height to 15 in (38.1 cm).
– The tab and the 2 in (5.1 cm) ring bring the hanging length to about 18.5 in (47.0 cm).
Hit each checkpoint and your holder will match the sample, in sage, raspberry, or any color you like.
Happy crocheting!