

The Garden Paisley curtain is an airy panel made of joined lace paisleys. Each motif has a cream ring at the base, a fan of sage-green tall stitches, butter-yellow fan lines and a curling tail, all framed by open cream and green chain loops. Hung in a sunny window, it lets light through every gap.
The palette is soft and garden-inspired: sage green, butter yellow and warm cream. The style is lighter than Irish crochet and works up quickly, with all motifs joined as you go. This pattern uses US crochet terms.
One finished panel measures 20 x 74 in (50.8 x 188.0 cm), including a 2 in (5.1 cm) rod-pocket heading. The panels in the photo are a matching pair, so make two.
Construction is simple. Make a ring, work a two-row fan off one side of it, then chain a tail. Next, work a lattice round and an edging round all the way around. Join each new motif to its neighbors during the last round. Work a solid heading across the top, fold it into a rod pocket and block.
Finished Size and Construction
- Finished panel size: 20 x 74 in (50.8 x 188.0 cm)
- Skill level: Intermediate
- Terminology: US crochet terms
- Yarn weight: DK / light (#3) cotton
- Hook: 4.0 mm (G-6)
- Number of pieces: 36 motifs per panel, 72 for a pair
- Layout: 4 columns x 9 motifs per panel
- Motif size: 5 x 8 in (12.7 x 20.3 cm), blocked
- Size before border: 20 x 72 in (50.8 x 182.9 cm)
- Border depth: 2 in (5.1 cm), top edge only; the sides and bottom keep their scallops
Materials
Use a smooth, mercerized DK cotton or cotton blend. It shows the stitches clearly, holds its shape when blocked and doesn’t stretch much when hung. Avoid fuzzy yarns, because they blur the lattice. The amounts below assume about 115 m per 50 g.
Yarn for a pair of panels:
– Cream (A): 350 g / 805 m – rings, lattice and heading
– Sage green (B): 350 g / 805 m – fans and edging round
– Butter yellow (C): 200 g / 460 m – fan lines and tails
The amounts include a margin of about 10% for gauge differences and test pieces. For one panel, halve each amount.
Tools:
– 4.0 mm (G-6) crochet hook
– Tapestry needle
– Locking stitch markers
– Blocking mats and rust-proof pins
– Spray bottle
– Measuring tape
Abbreviations (US Terms)
- ch – chain
- sl st – slip stitch
- sc – single crochet
- dc – double crochet
- tr – treble crochet (yarn over twice)
- sk – skip
- sp – space
- st(s) – stitch(es)
- RS / WS – right side / wrong side
Special stitch – joining loop (JL): Replace a ch 5 with: ch 2, sl st into the matching ch-5 loop of the finished neighbor motif, ch 2. A joining loop keeps the same 5-chain footprint as a normal loop, so stitch counts don’t change.
Gauge and Checkpoints
Make one complete test motif, wet-block it, and measure it before you make the other motifs. Every panel measurement depends on this motif.
- After Rnd 1: the ring is 1.5 in (3.8 cm) across the outside.
- After Row 3: the fan is 3.5 in (8.9 cm) wide at its widest.
- After Row 4: the tail is 3.5 in (8.9 cm) long.
- After Rnd 6, blocked: the motif is 5 x 8 in (12.7 x 20.3 cm).
- Heading gauge: 16 sc = 4 in (10.2 cm) wide; 14 sc rows = 3 in (7.6 cm) tall.
Too big? Go down 0.5 mm. Too small? Go up 0.5 mm. A difference of only 0.25 in (0.6 cm) per motif adds up to 2.25 in (5.7 cm) over a 9-motif column, so it’s worth getting this right.
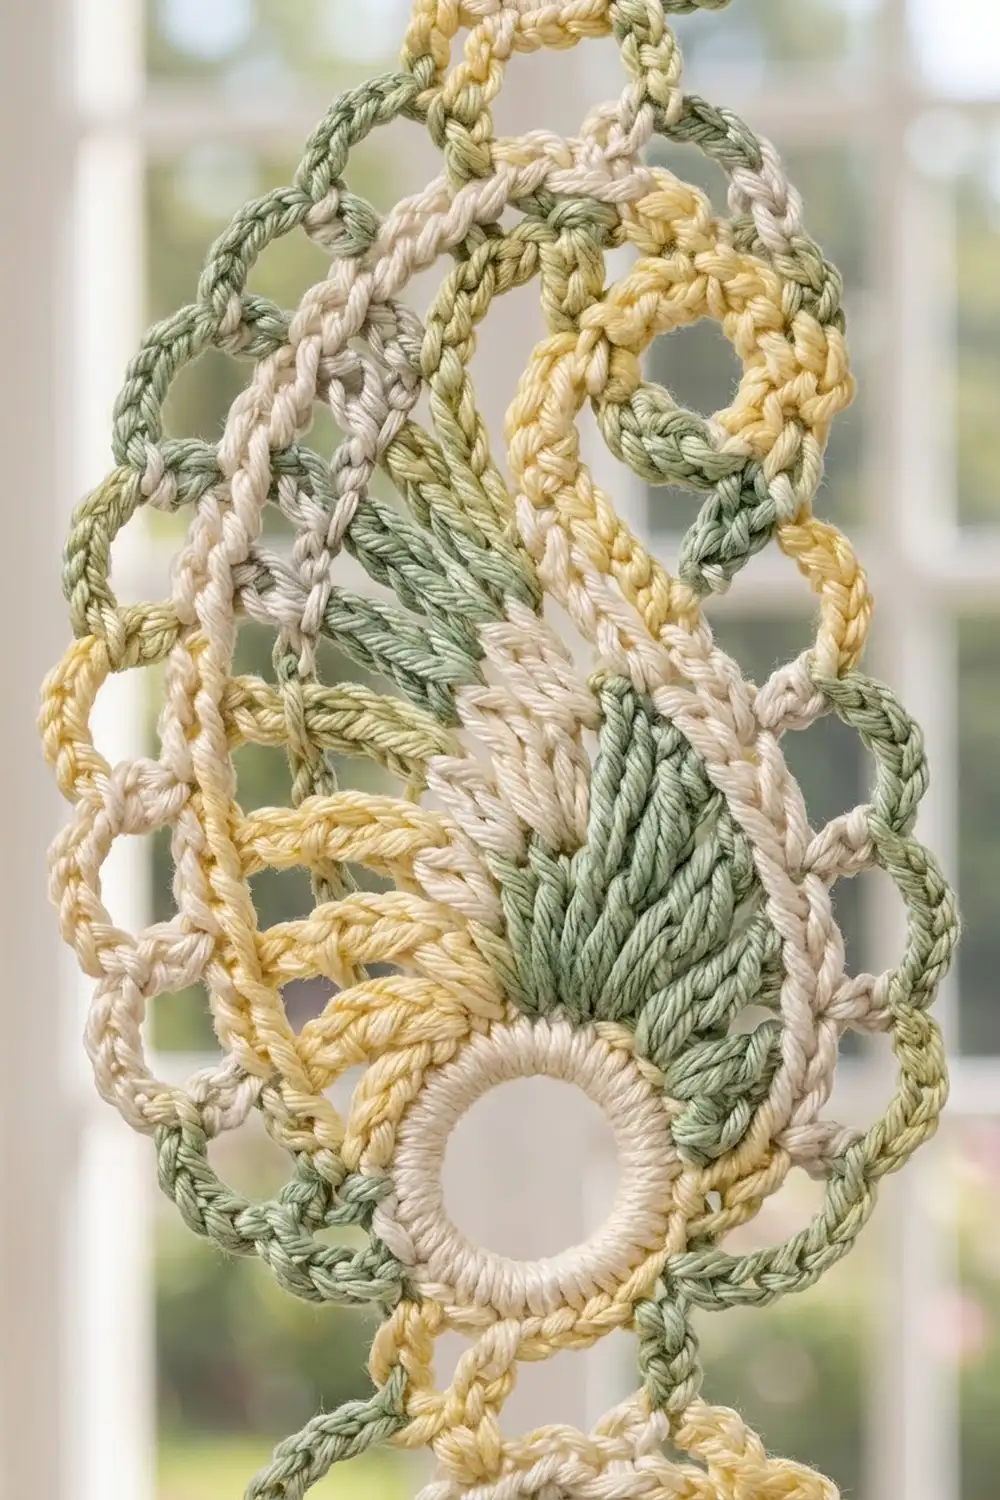
The Paisley Motif
Hold the motif with the ring at the bottom and the tail curling at the top.
Ring (Color A)
Ch 12, sl st to the first ch to form a ring.
Rnd 1: Ch 1, work 24 sc into the ring, sl st to the first sc. (24 sc) Fasten off.
Wrap the stitches tightly so the ring stays firm and round. The 24 sc form the cream ring in the photo.
Fan (Colors B and C)
Row 2 (RS, B): Join B in any sc. Ch 4 (counts as tr), tr in the same sc, then 2 tr in each of the next 8 sc. Turn. (18 tr, worked over 9 sc; 15 ring sc left free) Fasten off B.
These paired trebles spread into the green spikes of the fan.
Row 3 (WS, C): Join C in the first tr. Ch 4 (counts as dc + ch 1), then (dc in the next tr, ch 1) 16 times, and dc in the last tr. (18 dc, 17 ch-1 sps) Do not turn or fasten off.
The spaced dc make the yellow lines on the outside of the fan.
Tail (Color C)
Row 4: Ch 18. Sc in the 2nd ch from the hook and in each ch across, then sl st into the top of the last dc of Row 3. (17 sc) Fasten off.
Number the tail sc from 1 at the base to 17 at the tip. Bend the tail gently toward the fan. Rnd 5 will hold it in its curve.
Rnd 5 – Lattice (Color A)
This round makes 32 loops in 7 sections. Each section is (sc, then chain), so each section’s sc count matches its loop count.
Join A with sc in the first free ring sc after the last sc used in Row 2. Work in this order:
- Ring (5 loops): (Ch 3, sk 2 sc, sc in the next sc) 4 times, ch 3.
- Side A (2 loops): Sc around the post of the beginning ch-4 of Row 2, ch 3. Sc around the beginning ch-4 of Row 3, ch 3.
- Fan top (9 loops): (Sc in the next ch-1 sp, ch 3, sk the next ch-1 sp) 8 times, then sc in the last ch-1 sp and ch 3. This places sc in spaces 1, 3, 5 and so on up to 17.
- Tail outer (6 loops): Working into the free loops of the tail chain, (sc under tail sc 2, 5, 8, 11, 14 and 17, ch 3 after each).
- Tip (2 loops): (Sc, ch 3) twice into the end of the tail.
- Tail inner (6 loops): Working down the tops of the tail sc, (sc in sc 16, 13, 10, 7, 4 and 1, ch 2 after each).
- Side B (2 loops): Sc around the post of the last dc of Row 3, ch 3. Sc around the post of the last tr of Row 2, ch 3. Sl st to the first sc.
Count: 32 sc and 32 loops (5 + 2 + 9 + 6 + 2 + 6 + 2 = 32). That makes 26 ch-3 loops and 6 ch-2 loops. The shorter loops on the inner edge of the tail pull it into the paisley curl. Fasten off.
Rnd 6 – Edging (Color B)
Join B in loop 1. Ch 1, then work (sc in the loop, ch 5) in each loop around. Over the 6 tail-inner loops (loops 25–30), work (sc, ch 3) instead. Sl st to the first sc.
Count: 32 sc, 26 ch-5 loops and 6 ch-3 loops. Fasten off and weave in the ends.
Loop map for Rnd 6:
– Loops 1–5: ring (bottom)
– Loops 6–7: side A (left)
– Loops 8–16: fan top (right)
– Loops 17–22: tail outer
– Loops 23–24: tip (top)
– Loops 25–30: tail inner
– Loops 31–32: side B
Make All Pieces
For one panel, make 36 motifs. For the pair shown, make 72. Every motif uses all three colors:
- Color A: 1 ring and 1 lattice round per motif
- Color B: 1 fan row and 1 edging round per motif
- Color C: 1 fan-line row and 1 tail per motif
Make the first motif (1A) in full. For every other motif, work Rnds 1–5 in full, then join it to its neighbors during Rnd 6.
Layout grid for one panel (Row 1 is the top):
Row 1:  1A  1B  1C  1D
Row 2:  2A  2B  2C  2D
Row 3:  3A  3B  3C  3D
Row 4:  4A  4B  4C  4D
Row 5:  5A  5B  5C  5D
Row 6:  6A  6B  6C  6D
Row 7:  7A  7B  7C  7D
Row 8:  8A  8B  8C  8D
Row 9:  9A  9B  9C  9D
Joining
All joins happen during Rnd 6 using the joining loop (JL).
Vertical joins (within a column): The lower motif’s ring hangs from the upper motif’s tip. When you work Rnd 6 of the lower motif, replace loops 3 and 4 with JLs. Join loop 3 to loop 24 of the motif above, and loop 4 to loop 23. That is 2 joins per vertical seam.
Side joins (between columns): Replace loops 6 and 7 of the new motif with JLs. Join loop 6 to loop 13 of the motif on its left, and loop 7 to loop 12. That is 2 joins per side seam.
Order: Work across each row from left to right, then go down to the next row. A motif can have up to 4 joins: 2 to the motif above and 2 to the motif on its left.
Stitch logic: Each JL takes the place of a ch 5, so all 32 loops stay in their positions. The motif keeps its 5 x 8 in (12.7 x 20.3 cm) footprint. The joins add no width or length.
Tension: Keep the 2 chains on each side of the sl st the same size as the chains in a normal loop. Tight joins pucker the columns, and loose joins let them sag apart.
Checkpoint: Measure the full panel before you start the heading. It should be 20 x 72 in (50.8 x 182.9 cm), because 4 x 5 in = 20 in and 9 x 8 in = 72 in.
Border: Rod-Pocket Heading
Work the heading across the top of motifs 1A–1D only. The sides and bottom stay as open scallops, as in the photo.
Border gauge: 16 sc = 4 in (10.2 cm); 14 rows = 3 in (7.6 cm).
Row 1 (RS, A): Join A in loop 21 of motif 1A. Across each top motif, work (sc in loop 21, ch 4, sc in loop 22, ch 4, sc in loop 23, ch 4, sc in loop 24, ch 4). The final ch 4 of each motif bridges the gap to the next motif. On the last motif, it reaches the panel’s right edge. Turn.
Per motif: 4 sc + 16 ch = 20 sts. Total: 4 motifs x 20 = 80 sts. No extra stitches are added at the seams, because each bridge is already part of a motif’s 20.
Row 2 (conversion row): Ch 1, sc in each sc and in each ch across. Turn. (80 sc = 80 sts worked 1-per-existing-st + 0 extra)
Rows 3–15: Ch 1, sc in each sc across. Turn. (80 sc each row) Fasten off and leave a 60 in (152.4 cm) tail.
Fold: Fold Rows 9–15 to the WS so that Row 15 lies along the top of Row 2, then whipstitch them together. This makes a rod pocket 1.5 in (3.8 cm) deep. Together with the Row 1 zone of 0.5 in (1.3 cm), the heading is 2 in (5.1 cm) deep.
Why the math works: At 4 sc per inch, 80 sc measure 20 in (50.8 cm), the same as the panel. Each motif’s 20 sts match its 5 in (12.7 cm) width. The heading lies flat without ruffling or pulling in. The panel’s final length is 72 + 2 = 74 in (188.0 cm).
Final Blocking
- Weave in all remaining ends along stitches of the same color.
- Soak the panel in cool water for 10 minutes, then press out the water. Don’t wring it.
- Roll it in a towel to remove more water.
- Lay it flat on blocking mats, with the RS up.
- Pin the heading straight at 20 in (50.8 cm) wide.
- Pin each column straight down to 72 in (182.9 cm) below the heading.
- Pin the tip of each motif and open each tail curl with your fingers.
- Pin out the scallops along the sides and bottom.
- Leave it to dry completely before you unpin it.
Final Quality-Control Checklist
- Each ring has 24 sc and lies round.
- Each fan has 18 tr and 18 dc.
- Each tail has 17 sc and curls the same way.
- Each motif has 32 loops in Rnd 6.
- Every vertical and side seam has exactly 2 joins.
- The panel is 20 x 72 in (50.8 x 182.9 cm) before the heading.
- The heading has 80 sc and is 20 in (50.8 cm) wide.
- The finished panel is 20 x 74 in (50.8 x 188.0 cm).
- All ends are hidden and secure.
Troubleshooting
- Fan cups: Your trebles are too short. Pull the first loop up to full height.
- Tail won’t curl: Check that the tail-inner loops are ch 2 in Rnd 5 and ch 3 in Rnd 6.
- Columns twist: Check that each new motif joins loops 3 and 4 to loops 24 and 23 above, not crossed over.
- Heading ruffles: Count Row 2 again. It must be 80 sc.
- Heading pulls in: Go up 0.5 mm for the heading only.
- Panel is too long: Re-block it damp. Cotton relaxes with gravity, so pin it 0.5 in (1.3 cm) short.
Care
Hand wash in cool water with mild detergent and dry flat, reshaping the motifs. Don’t tumble dry, and hang the panel only when it’s fully dry.
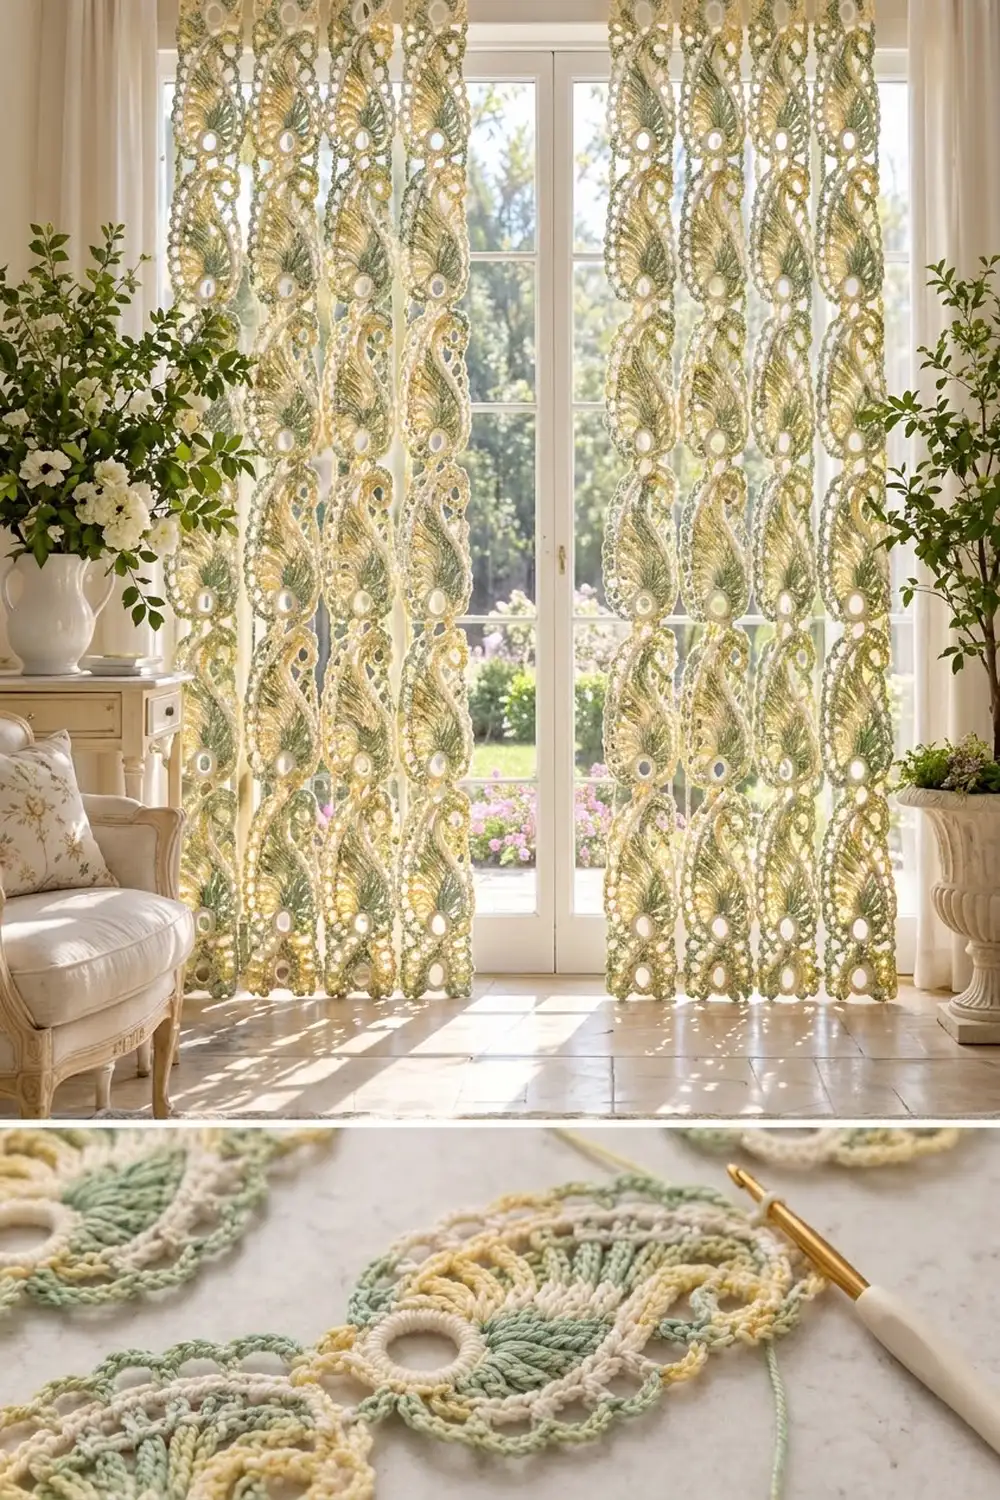
Final Notes
The whole curtain depends on one chain of measurements. A 1.5 in (3.8 cm) ring leads to a 3.5 in (8.9 cm) fan and a 5 x 8 in (12.7 x 20.3 cm) motif. Four columns of nine motifs make 20 x 72 in (50.8 x 182.9 cm). Add the 80-stitch heading and you get a 20 x 74 in (50.8 x 188.0 cm) panel. Check each stage and the next one will measure correctly. For the pair in the photo, make two panels.
Happy crocheting!