

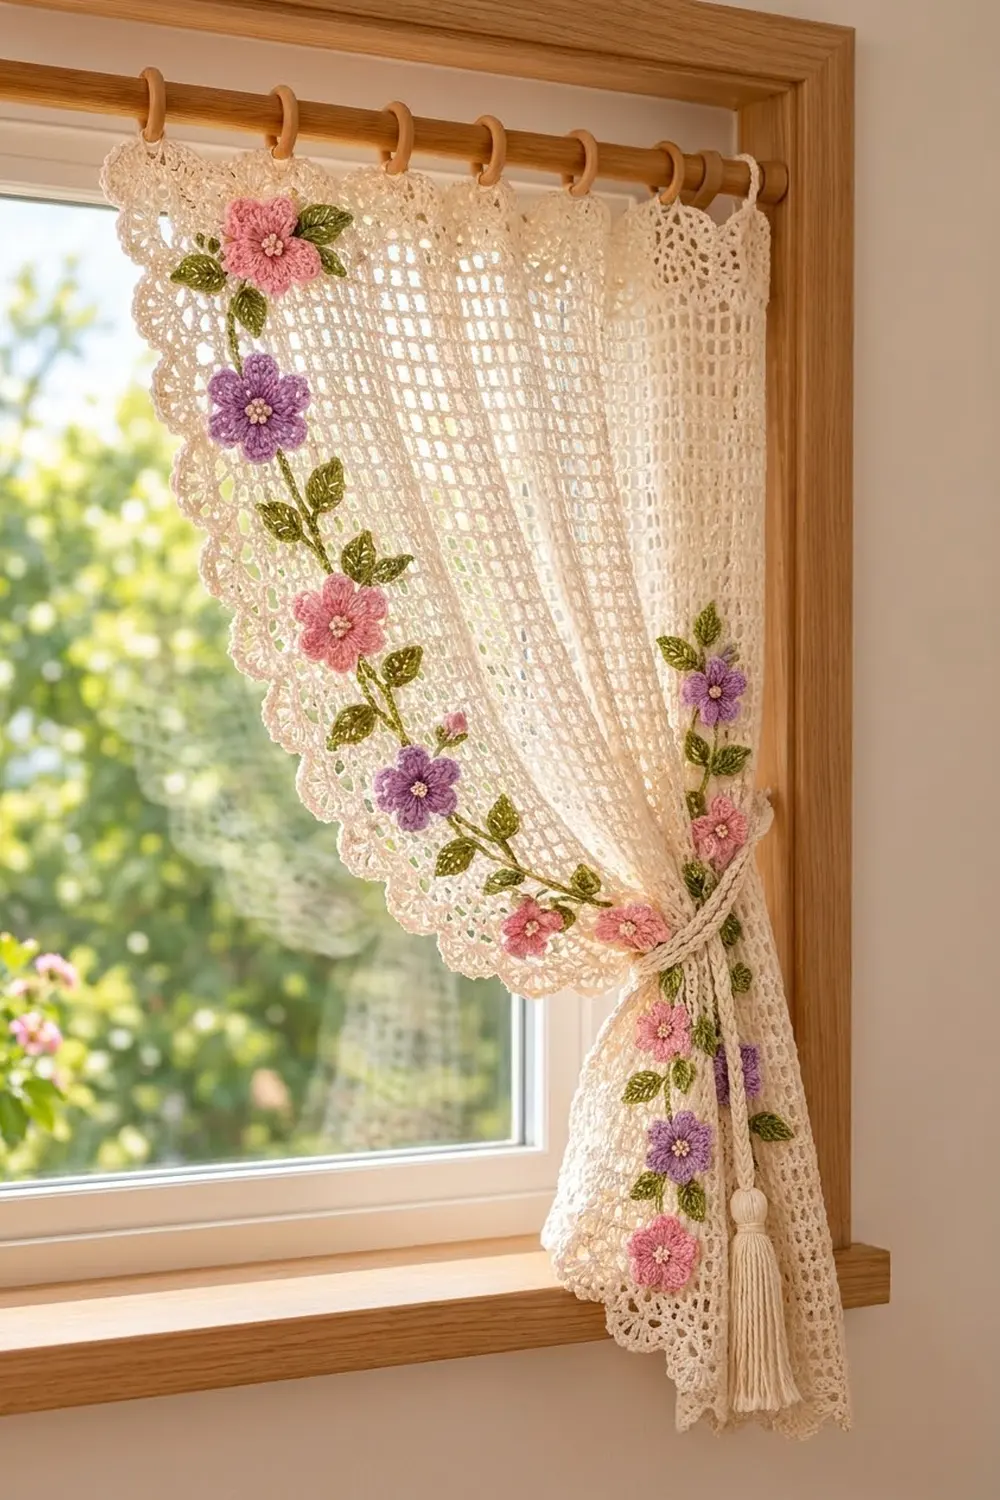
The Garden Trellis Curtain is a light filet mesh panel in soft cream. Pink and lilac flowers climb green vines along its edges, and a lacy scalloped border frames the whole panel. Daylight comes through the open grid and the flowers make the window look like a small garden.
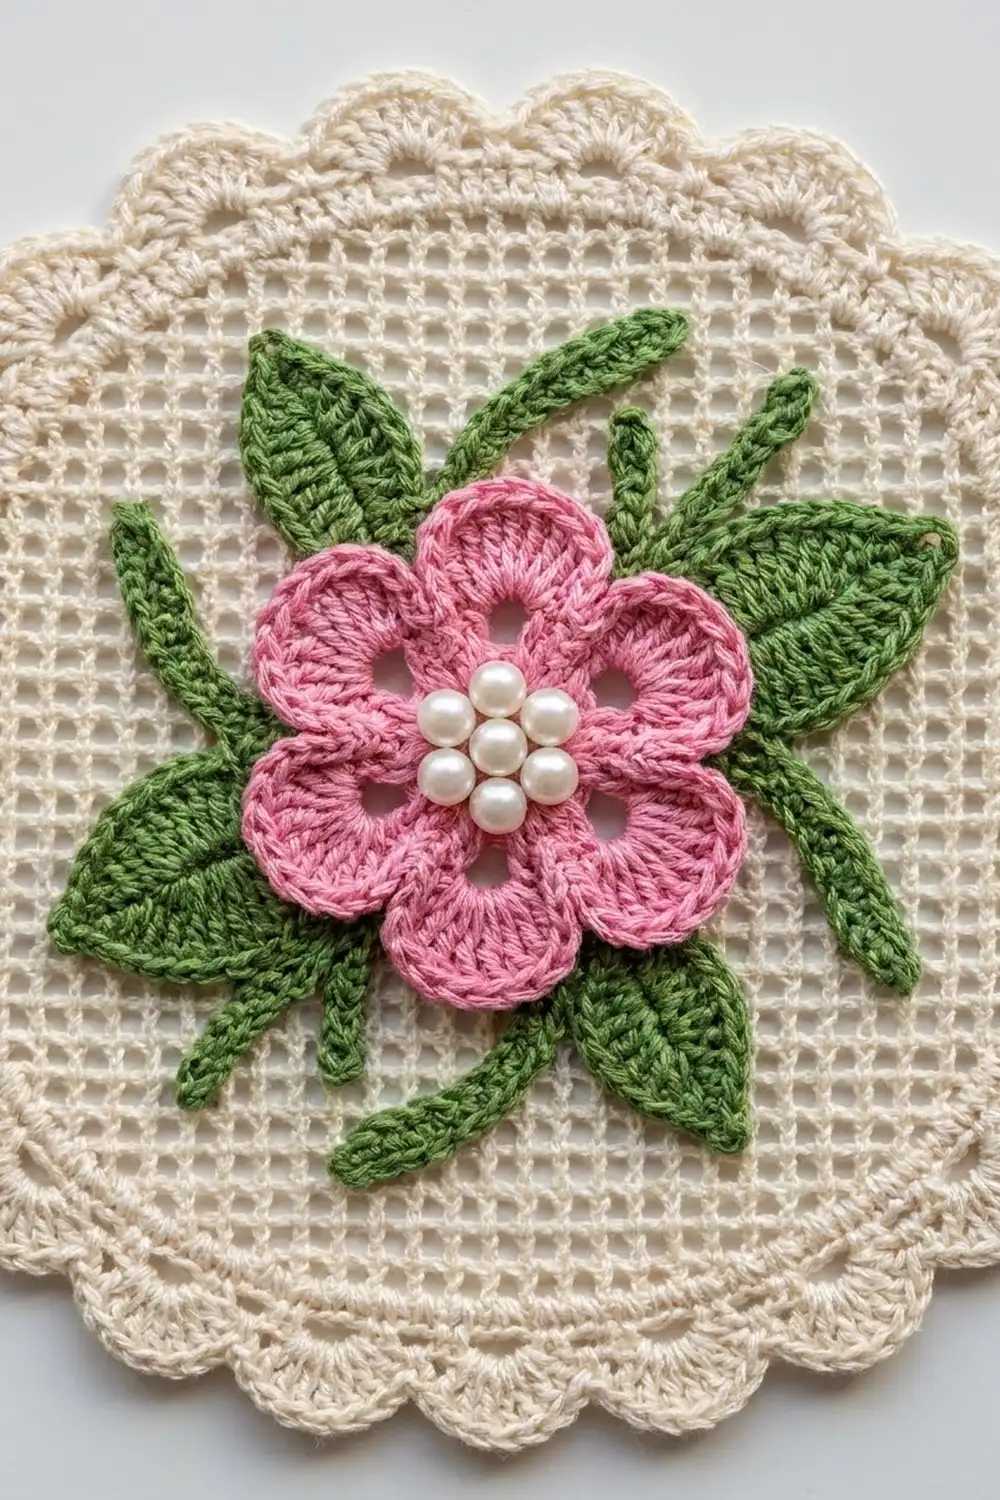
The palette is simple: cream for the mesh, border and tieback, two pastel shades for the flowers and one leafy green. A cluster of pearl beads in each flower center adds a bit of shine. The look is cottage style, romantic but not fussy.
This pattern uses US crochet terms. The finished panel measures 31 x 43 in (78.7 x 109.2 cm) including the border. That fits a small kitchen, bathroom or cottage window.
You crochet the mesh in rows as one piece, then add a three-round border all the way around. The flowers, leaves and vines are made separately and sewn on. A braided cord with a tassel finishes the set.
Finished Size and Construction
- Finished size: 31 x 43 in (78.7 x 109.2 cm)
- Skill level: Intermediate (easy stitches, careful counting)
- Terminology: US
- Yarn weight: DK (#3) cotton
- Hooks: 4 mm (G-6) for the mesh, border and tieback; 3.5 mm (E-4) for the appliqués
- Number of pieces: 1 mesh panel, plus sewn-on appliqués and 1 tieback
- Layout: single rectangle, 42 mesh squares wide x 70 rows tall
- Size before border: 28 x 40 in (71.1 x 101.6 cm)
- Border depth: 1.5 in (3.8 cm) on each edge
- Flower size: 2.5 in (6.4 cm) across
- Leaf size: 1.75 in (4.4 cm) long
Materials
Use a smooth mercerized cotton or cotton blend in DK weight, about 225 m per 100 g. Cotton holds the square mesh shape, blocks well and does not fade quickly in sunlight.
- Cream: 500 g / 1125 m (panel, border, tieback, tassel)
- Pink: 25 g / 56 m (7 flowers)
- Lilac: 25 g / 56 m (7 flowers)
- Green: 50 g / 112 m (28 leaves, 2 vines)
These quantities include a margin of about 10%, so you have room for a gauge swatch and a few redone rows.
Tools:
- 4 mm (G-6) and 3.5 mm (E-4) crochet hooks
- 98 pearl beads, 4 mm (7 per flower), plus a few spares
- Beading needle and cream sewing thread
- Tapestry needle
- Locking stitch markers
- Rust-proof pins, blocking mats and a tape measure
- Scissors
- Stiff card, 4 in (10.2 cm) tall, for the tassel
- 7 curtain clip rings
Abbreviations (US Terms)
- ch – chain
- sl st – slip stitch
- sc – single crochet
- hdc – half double crochet
- dc – double crochet
- sp – space
- MR – magic ring
- st(s) – stitch(es)
Special stitch – Fan: (dc, ch 1) 4 times, dc, all in the same st. That makes 5 dc and 4 ch-1 sps.
Corner fan: (dc, ch 1) 6 times, dc, all in the same sp. That makes 7 dc and 6 ch-1 sps.
Gauge and Checkpoints
Mesh gauge with the 4 mm hook: 6 mesh squares x 7 rows = 4 x 4 in (10.2 x 10.2 cm). Each square is about 0.67 in (1.7 cm) wide.
Test this first. Ch 29 and work Rows 1–2 of the panel pattern for 9 rows (8 squares wide). Block the swatch, then measure the middle 6 squares and 7 rows.
- Too many squares per 4 in: go up half a hook size.
- Too few squares per 4 in: go down half a hook size.
- Width correct but rows too short or too tall: keep the hook. Pull up the dc loop a little more or a little less until 7 rows measure 4 in (10.2 cm).
Checkpoints for the panel (measure flat, unstretched):
- After Row 1: 28 in (71.1 cm) wide
- After Row 14: 8 in (20.3 cm) tall
- After Row 35: 20 in (50.8 cm) tall
- After Row 70: 28 x 40 in (71.1 x 101.6 cm)
If you are off by more than 0.5 in (1.3 cm) at Row 14, fix your gauge now rather than at the end.
Panel (Make 1)
Use the 4 mm hook and cream.
Ch 131.
Row 1: Dc in 8th ch from hook. The skipped chains count as the first dc and ch-2. Ch 2, skip 2 ch, dc in next ch; repeat from * across. Turn.
Count: 43 dc (including the turning chain), 42 ch-2 sps = 42 squares.
Row 2: Ch 5 (counts as dc and ch 2). Skip the first ch-2 sp and dc in the next dc. Ch 2, dc in next dc; repeat across to the turning chain. Ch 2, then dc in the 3rd ch of the beginning chain. Turn.
Count: 43 dc, 42 ch-2 sps.
Rows 3–70: Repeat Row 2. In each row, the last dc goes into the 3rd ch of the turning ch-5.
Count every row: 43 dc, 42 ch-2 sps.
Check the size: 28 x 40 in (71.1 x 101.6 cm). Do not fasten off.
Flowers (Make 7 Pink, 7 Lilac)
Use the 3.5 mm hook.
Rnd 1: MR, ch 1, work 12 sc in the ring. Join with a sl st to the first sc.
Count: 12 sc.
Rnd 2 (petals): In the next sc work (sc, hdc, 2 dc). In the following sc work (2 dc, hdc, sc). Repeat from * 5 more times. Join with a sl st to the first sc.
Count: 48 sts = 6 petals of 8 sts each.
The flower should measure 2.5 in (6.4 cm) across. Fasten off and leave a 12 in (30.5 cm) tail for sewing.
Center: With the beading needle and cream thread, sew one pearl bead at the center of the ring. Sew 6 more beads in a tight circle around it, so there are 7 per flower.
Leaves (Make 28)
Use the 3.5 mm hook and green.
Ch 8.
Round: Sc in 2nd ch from hook, then hdc, dc, dc, hdc and sc in the next 5 ch. Work 3 sc in the last ch. Now work along the other side of the foundation ch: sc, hdc, dc, dc, hdc and sc in the next 6 ch. To make the tip, ch 2 and sl st in the first sc.
Count: 15 sts and a ch-2 tip.
The paired dc in the middle of each side give the leaf its veined shape. It should measure 1.75 in (4.4 cm) long. Fasten off and leave a 10 in (25.4 cm) tail.
Vines (Make 2)
Use the 4 mm hook and green.
Long vine: Ch 150. Sl st in the back bump of each ch.
Count: 150 sl st. Length: 37.5 in (95.3 cm).
Short vine: Ch 70. Sl st in the back bump of each ch.
Count: 70 sl st. Length: 17.5 in (44.5 cm).
Leave long tails on both vines.
Border
Go back to the panel. Keep the cream yarn and the 4 mm hook.
Border gauge: about 4.4–4.5 sc per inch (2.5 cm). On the top and bottom edges you work 3 sc per mesh square, which is 4.5 sc per inch. On the side edges you work 5 sc for every 2 rows, which is 4.4 sc per inch. Both rates match the mesh, so the edges lie flat without ruffling or cupping.
Rnd 1: Ch 1, turn so the Row 70 edge is on top.
- Top edge: Sc in the first dc. Work 2 sc in the next ch-2 sp and 1 sc in the next dc; repeat across. That gives 127 sc. Ch 2 for the corner.
- First side edge: Work 175 sc evenly along the row ends, 5 sc for every 2 rows. Ch 2 for the corner.
- Bottom edge: Work into the foundation ch: 1 sc at the base of each dc and 2 sc in each ch-2 sp. That gives 127 sc. Ch 2 for the corner.
- Second side edge: Work 175 sc along the row ends as before. Ch 2, then join with a sl st to the first sc.
Count: 127 + 175 + 127 + 175 = 604 sc, plus 4 corner ch-2 sps.
Rnd 2 (fans): Sl st into the corner ch-2 sp. Ch 4 (counts as dc and ch 1). Then work (dc, ch 1) 5 times and dc in the same sp to finish the first corner fan.
- Each side: Sc in the first sc of the side. Skip 2 sc, work a Fan in the next sc, skip 2 sc, sc in the next sc; repeat to the last sc of the side.
- Each remaining corner: Work a Corner fan in the ch-2 sp.
Join with a sl st to the 3rd ch of the beginning ch-4.
Count: top and bottom each 21 fans and 22 sc; sides each 29 fans and 30 sc; 4 Corner fans. Total 100 fans, 104 sc, 4 Corner fans.
Rnd 3 (loops): Sl st into the first ch-1 sp.
- Each Fan: sc in the sc before the Fan, then (ch 3, sc in the next ch-1 sp) 4 times, then ch 3. The next sc goes into the sc after the Fan.
- Each Corner fan: (ch 3, sc in the next ch-1 sp) 6 times, then ch 3.
Join with a sl st and fasten off.
Count: 5 ch-3 loops per Fan, 7 per Corner fan = 500 + 28 = 528 loops.
Why the math works: Each fan repeat uses 6 sc, plus 1 sc to close the side. Every side therefore needs a multiple of 6 plus 1:
- Top and bottom: 127 = 6 x 21 + 1
- Sides: 175 = 6 x 29 + 1
The corner ch-2 sps sit outside these counts, so no stitch is counted twice. The border adds about 0.25 in (0.6 cm) for the sc round, 0.75 in (1.9 cm) for the fans and 0.5 in (1.3 cm) for the loops. That is 1.5 in (3.8 cm) per edge, for a finished size of 31 x 43 in (78.7 x 109.2 cm).
Assembly of Appliqués
- Lay the bordered panel flat with the right side up.
- Long vine: Pin it along one long edge, about 2 in (5.1 cm) inside the border. Start 2 in (5.1 cm) below the top edge and run it in gentle S-curves to 2 in (5.1 cm) above the bottom edge.
- Short vine: Pin it along the lower half of the other long edge, 2 in (5.1 cm) inside the border.
- Sew both vines down with the green tails, catching the mesh bars every 0.5 in (1.3 cm).
- Flowers on the long vine: Pin 8 flowers, alternating pink and lilac, about every 4.5 in (11.4 cm).
- Flowers on the short vine: Pin 6 flowers, alternating, about every 3 in (7.6 cm).
- Pin 2 leaves next to each flower, angled outward from the vine. That is 16 leaves on the long vine and 12 on the short vine.
- Sew around the outer edge of each flower and leaf with its tail. Keep the stitches small so they don’t show through the open mesh.
Tieback
Use cream and the 4 mm hook.
- Cords (make 3): Ch 90, then sl st in the back bump of each ch. Each cord is 90 sl st and 22.5 in (57.2 cm) long.
- Hold the 3 cords together and knot them 1 in (2.5 cm) from one end. Braid them firmly, then knot the other end.
- Tassel: Wrap cream yarn 40 times around the 4 in (10.2 cm) card. Tie the wraps together at the top and cut them at the bottom. Wrap the neck 0.5 in (1.3 cm) below the top.
- Sew the tassel to one end of the braid.
Final Blocking
- Soak the panel in lukewarm water for 15 minutes. Squeeze the water out gently without wringing.
- Roll the panel in a towel to remove more water.
- Lay it face down on blocking mats so the appliqués keep their padding.
- Pin the mesh body to 28 x 40 in (71.1 x 101.6 cm). Line the mesh up in straight columns.
- Open each Fan and pin the center loop of each scallop so the edge is 31 x 43 in (78.7 x 109.2 cm).
- Let it dry completely before you unpin it.
- Clip a ring to each corner fan and to top-edge fans 3, 7, 11, 15 and 19. That is 7 rings, evenly spaced and symmetrical.
Final Quality-Control Checklist
- 42 squares across and 70 rows, all square and open
- Mesh measures 28 x 40 in (71.1 x 101.6 cm)
- Rnd 1 counts are 127 / 175 / 127 / 175
- 100 Fans and 4 Corner fans
- Finished size is 31 x 43 in (78.7 x 109.2 cm)
- 14 flowers, each with 7 beads secured
- 28 leaves, flat and pointed
- No sewing stitches show through the mesh
- All yarn ends are woven into solid stitches
Troubleshooting
- Mesh leans diagonally: You missed the last dc in a row. Count 43 dc every row.
- Panel narrows: Your ch-2 sps are too tight. Loosen them or go up a hook size.
- Side border ruffles: You worked too many row-end sc. Work 5 per 2 rows exactly.
- Side border pulls in: Your sc are too tight. Use a larger hook for Rnd 1 only.
- Fan count is off: Recount Rnd 1 on that side. It must be 6 x fans + 1.
- Flowers cup: Your petals are too tight. Block them flat before sewing.
- Beads loosen: Go through each bead twice and knot on the back.
Care
Hand wash cool and dry flat, then re-pin the scallops if needed. Line the panel if it hangs in strong direct sun so the pastel colors fade less.
Final Notes
The measurements build in a chain. Your gauge of 6 squares and 7 rows to 4 in (10.2 cm) gives a 28 x 40 in (71.1 x 101.6 cm) mesh. The border counts of 127 and 175 sc divide evenly into fan repeats. The 1.5 in (3.8 cm) border brings the panel to 31 x 43 in (78.7 x 109.2 cm). Check each link before moving on and the panel will hang straight and square.
Happy crocheting!