

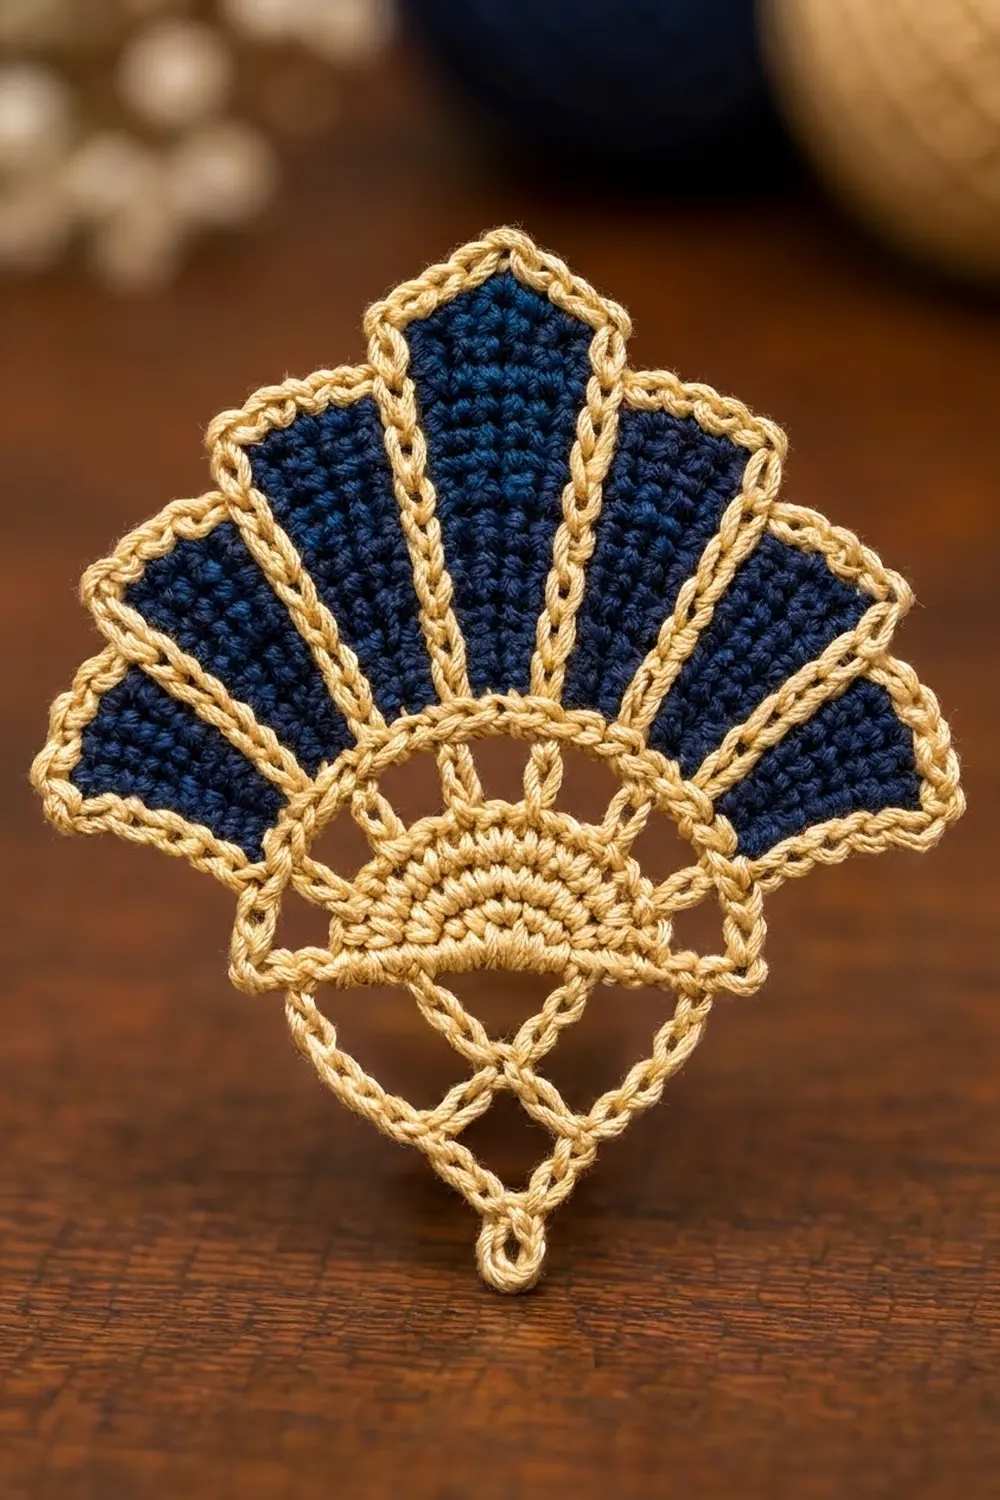
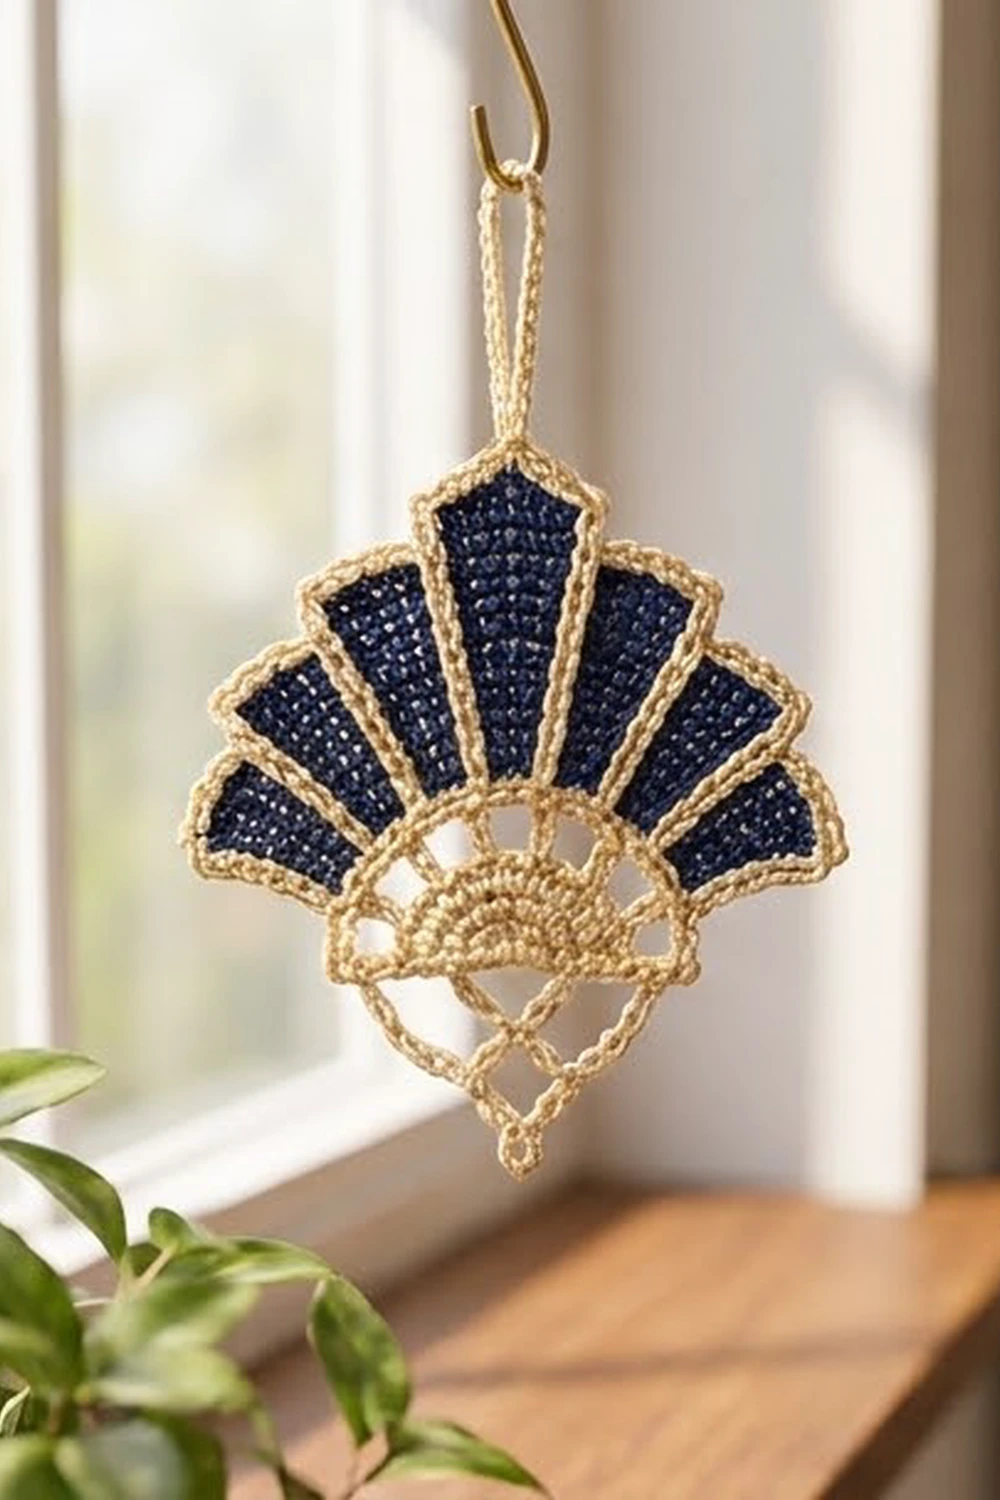
The Gilded Deco Fan is a single crochet motif inspired by 1920s Art Deco design. Seven navy blades fan out from a cream semicircle. Each blade is outlined in cream, so thin gold-toned lines run between the colors, much like the inlay on a vintage mirror.
The palette is just two colors: deep navy and warm cream. The navy blades are dense single crochet. Everything in cream is lighter: dc spokes in the base, chain arcs across the top, and an open lattice point underneath. The contrast between solid fill and open cream lace gives the motif its jewelry-like look.
This pattern uses US crochet terms. The finished motif measures 5.75 in (14.6 cm) wide and 4.5 in (11.4 cm) tall, including the lattice point.
Construction is simple and happens in order. First you work the cream semicircle in turned rows. Next you add the seven navy blades one at a time in short rows. Then you add a chain-loop point below the flat base. Finally, a three-row cream border outlines the blades and links their tips. This pattern is for one motif. Use it as an appliqué, ornament, coaster, or bookmark-style accent.
Finished Size and Construction
- Finished size: 5.75 in (14.6 cm) wide x 4.5 in (11.4 cm) tall
- Skill level: Intermediate
- Terminology: US crochet terms
- Yarn weight: Size 3 cotton crochet thread (lace/fingering range)
- Hook: 2.25 mm (B-1)
- Number of pieces: 1 (single motif)
- Layout: Semicircle base, 7 radiating blades, chain-loop point below
- Piece size before border: 5.25 in (13.3 cm) wide x 4.25 in (10.8 cm) tall
- Border depth: 0.25 in (0.6 cm) at the sides and top
Materials
Use mercerized cotton thread in size 3. It shows crisp stitch definition, blocks flat, and holds the blade shapes well. Avoid fuzzy or very stretchy fibers, because the fine lines between the blades will blur.
- Color A, Cream (light gold): 8 g, about 22 m — semicircle, outlines, border, point
- Color B, Navy: 4 g, about 11 m — seven blades
These quantities include a margin of about 30% for your gauge swatch and joins.
Tools:
- 2.25 mm (B-1) crochet hook
- Tapestry needle with a small eye
- Scissors
- Stitch markers (at least 2)
- Rust-proof pins and a blocking board or foam mat
- Spray bottle with water
- Ruler or tape measure
Abbreviations (US Terms)
- ch – chain
- sl st – slip stitch
- sc – single crochet
- dc – double crochet
- sc2tog – single crochet 2 together
- sp(s) – space(s)
- st(s) – stitch(es)
- RS / WS – right side / wrong side
Special stitch – picot cluster: (sc, ch 3, sc) worked into the same stitch or space.
Note: At the start of a row, ch 3 counts as the first dc. In the spoke row, ch 5 counts as dc + ch 2. A ch 1 never counts as a stitch.
Gauge and Checkpoints
Gauge: 7 sc and 7 sc rows = 1 in (2.5 cm) in Color B with a 2.25 mm hook.
Make one full motif before you commit to a set of colors or a project. A single motif is small enough to work as its own test. Measure at each checkpoint below:
- After Semicircle Row 5: the flat base measures 3 in (7.6 cm) across. The semicircle is 1.5 in (3.8 cm) tall from base to arc.
- After all 7 blades: the fan measures 5.25 in (13.3 cm) wide and 2.75 in (7.0 cm) tall. Each blade is 1.25 in (3.2 cm) long.
- After the point: the point adds 1.5 in (3.8 cm), so total height before the border is 4.25 in (10.8 cm).
- After the border: 5.75 in (14.6 cm) wide x 4.5 in (11.4 cm) tall.
If your motif is too big: go down to a 2 mm hook, or tighten your chains. Loose chains make the arcs sag.
If your motif is too small or the blades cup: go up to a 2.5 mm hook. Cupping blades usually mean your sc rows are too tight for the arc they sit on.
Semicircle Base
Worked in Color A in turned rows.
Row 1 (RS): Make a magic ring. Ch 3 (counts as dc), 7 dc in ring. Pull the ring closed, but leave a small opening at the center. Turn. (8 dc)
Row 2: Ch 3, dc in same st, 2 dc in each st across. Turn. (16 dc)
Row 3: Ch 3, dc in next st, [2 dc in next st, dc in next st] 6 times, dc in last 2 sts. Turn. (22 dc: 16 existing sts + 6 increases)
Row 4 (spoke row): Ch 5 (counts as dc + ch 2), skip next 2 sts, [dc in next st, ch 2, skip next 2 sts] 6 times, dc in last st. Turn. (8 dc spokes, 7 ch-2 sps)
Check: the spokes land on stitches 1, 4, 7, 10, 13, 16, 19, and 22, so you use all 22 stitches exactly.
Row 5: Ch 1, sc in first dc, [3 sc in next ch-2 sp, sc in next dc] 7 times. Fasten off. (29 sc)
Lay the piece RS up with the flat edge at the bottom. Number the Row 5 stitches 1 to 29 from right to left. Place a marker in st 15, which is the exact center.
Navy Blades (Make 7)
Each blade is worked separately on 3 stitches of Row 5. Leave one stitch unworked between blades and at each end.
Blade placement: Blades start on Row 5 sts 2, 6, 10, 14, 18, 22, and 26. Sts 1, 5, 9, 13, 17, 21, 25, and 29 are skipped. That’s 7 x 3 = 21 worked sts plus 8 skipped sts = 29. The center blade sits on sts 14–16, so it is centered on the marked st 15.
Row 1 (RS): With RS facing, join Color B with sl st in the first st of the blade. Ch 1, sc in same st and next 2 sts. Turn. (3 sc)
Row 2: Ch 1, sc in each st across. Turn. (3 sc)
Row 3: Ch 1, 2 sc in first st, sc in next st, 2 sc in last st. Turn. (5 sc)
Rows 4–5: Ch 1, sc in each st across. Turn. (5 sc)
Row 6: Ch 1, 2 sc in first st, sc in next 3 sts, 2 sc in last st. Turn. (7 sc)
Rows 7–8: Ch 1, sc in each st across. Turn. (7 sc)
Row 9: Ch 1, sc2tog, sc in next 3 sts, sc2tog. (5 sc) Fasten off.
The two increase rows make each blade taper outward, and Row 9 rounds the tip. Repeat for all 7 blades, working from right to left. Weave in the navy ends along the backs of the blades now. This keeps them out of the cream outline.
Checkpoint: The fan is 5.25 in (13.3 cm) wide and 2.75 in (7.0 cm) tall. The blades should lie flat with narrow, even gaps between them.
Lattice Point
Worked in Color A along the flat base edge, with RS facing.
Row 1: Join Color A with sc at the right base corner (end of Row 5). Ch 5, sc around the post at the end of Row 3. Ch 5, sc into the magic ring center. Ch 5, sc around the post at the end of Row 3 on the left side. Ch 5, sc at the left base corner. Turn. (5 sc, 4 ch-5 sps)
Row 2: Sl st in first 3 ch, sc in same sp, [ch 5, sc in next ch-5 sp] 3 times. Turn. (3 ch-5 sps)
Row 3: Sl st in first 3 ch, sc in same sp, [ch 5, sc in next ch-5 sp] twice. Turn. (2 ch-5 sps)
Row 4: Sl st in first 3 ch, sc in same sp, ch 5, sc in next ch-5 sp. Turn. (1 ch-5 sp)
Row 5 (tip loop): Sl st in first 3 ch, sc in same sp, ch 6, sl st in the sc just made. Fasten off. (1 ch-6 loop)
Each row loses one loop, so the lattice narrows into a neat V. Checkpoint: The point is 1.5 in (3.8 cm) deep, and the motif is 4.25 in (10.8 cm) tall in total.
Border
The border goes across the fan top, from the right base corner to the left base corner. It is worked in Color A in three rows.
Border gauge: In Row 1, use 1 sc per blade row-end. In Row 3, work 11 sc into each ch-9 arc.
Row 1 (outline), RS: Join Color A with sc in Row 5 st 1. Then work around blade 1:
- 9 sc up the side (1 per row-end)
- across Row 9: sc in first 2 sts, 3 sc in center st, sc in last 2 sts (7 sc)
- 9 sc down the other side
That’s 25 sc for the blade. Next, sc in the skipped Row 5 st before the next blade. Repeat this 25-sc outline for every blade, with 1 sc in each skipped st between blades. End with sc in Row 5 st 29. Turn.
(1 + 7 x 25 + 6 + 1 = 183 sc)
The tip center of blade 1 is st 14. Each later blade’s tip center is 26 sts further along: sts 14, 40, 66, 92, 118, 144, and 170. Mark them.
Row 2 (chain arcs), WS: Ch 1, sc in first st. Ch 9, picot cluster in next marked tip center. [Ch 9, picot cluster in next marked tip] 6 times. Ch 9, sc in last st. Turn.
(16 sc, 8 ch-9 arcs, 7 ch-3 picots)
Row 3 (cover row), RS: Ch 1, sc in first sc. [11 sc in next ch-9 arc, picot cluster in next ch-3 sp] 7 times. 11 sc in last ch-9 arc, sc in last sc. Fasten off.
(1 + 8 x 11 + 7 x 2 + 1 = 104 sc, 7 picots)
Why the math works: Row 1 places one sc per row-end on each blade side, which matches the row height of sc. The 3 sc at each tip turn the curve without pulling. The single sc in each gap holds the two neighboring outlines together, which creates the double cream line between blades. In Row 3, 11 sc in a 9-chain arc is a ratio of about 1.2 to 1. That is enough to cover the chain and keep the arc flat, without ruffling. The border adds 0.25 in (0.6 cm) on each side and on the top. That takes the motif from 5.25 in (13.3 cm) to 5.75 in (14.6 cm) wide and from 4.25 in (10.8 cm) to 4.5 in (11.4 cm) tall.
Final Blocking
- Weave in all remaining cream ends through matching cream stitches.
- Soak the motif in cool water for 10 minutes. Press out the water in a towel. Do not wring it.
- Lay it RS up on the blocking board.
- Pin the base corners 3 in (7.6 cm) apart, and pin the flat base straight.
- Pin each blade tip so the outer edge measures 5.75 in (14.6 cm) wide. Space the picots evenly, about 1 in (2.5 cm) apart along the arc.
- Pin the tip loop so the total height is 4.5 in (11.4 cm), and pull the lattice loops into even diamonds.
- Mist lightly, then let it dry completely, at least 12 hours. For a crisper finish, spray with light starch before it dries.
Final Quality-Control Checklist
- [ ] Semicircle has 8 evenly spaced cream spokes
- [ ] Row 5 has 29 sc, and the center blade sits on sts 14–16
- [ ] All 7 blades have 9 rows and end with 5 sts
- [ ] Border Row 1 has 183 sc, and every gap holds 1 sc
- [ ] Border Row 3 has 104 sc and 7 picots
- [ ] Lattice point narrows 4-3-2-1 to a single tip loop
- [ ] Motif measures 5.75 in (14.6 cm) x 4.5 in (11.4 cm)
- [ ] No navy shows through the cream outline, and all ends are hidden
Troubleshooting
The semicircle curls into a bowl. Your Row 2 or 3 increases are too tight. Use a larger hook for the semicircle only.
The semicircle ruffles. Check the Row 3 count. It should be 22, not 23 or 24.
The blades overlap. The blades are too wide for your tension. Work Row 6 with one increase instead of two, then go down a hook size.
There are wide gaps between the blades. Work Border Row 1 slightly looser so the outlines meet. Blocking also closes small gaps.
The chain arcs pull the tips inward. Your chains are too tight. Add 1 ch to each arc (ch 10), and work 12 sc per arc in Row 3.
The point is lopsided. Make sure the Row 1 anchor sc sit on matching row-ends on both sides.
Care
Hand wash in cool water with mild soap, then reshape and dry flat. Pin the blade tips and the point again if the motif loses its crisp outline.
Final Notes
Here is the measurement chain to follow from start to finish. Gauge is 7 sc = 1 in (2.5 cm). The semicircle base measures 3 in (7.6 cm) across. Each blade is 1.25 in (3.2 cm) long, which brings the fan to 5.25 in (13.3 cm) wide. The point adds 1.5 in (3.8 cm), for a height of 4.25 in (10.8 cm) before the border. The 0.25 in (0.6 cm) border finishes the motif at 5.75 in (14.6 cm) x 4.5 in (11.4 cm).
If each checkpoint matches, the next stage will fit. If it doesn’t, fix it at that stage before moving on. With seven navy blades, cream outlines, and a delicate lattice point, this one motif makes an elegant Art Deco statement on its own.
Happy crocheting!