

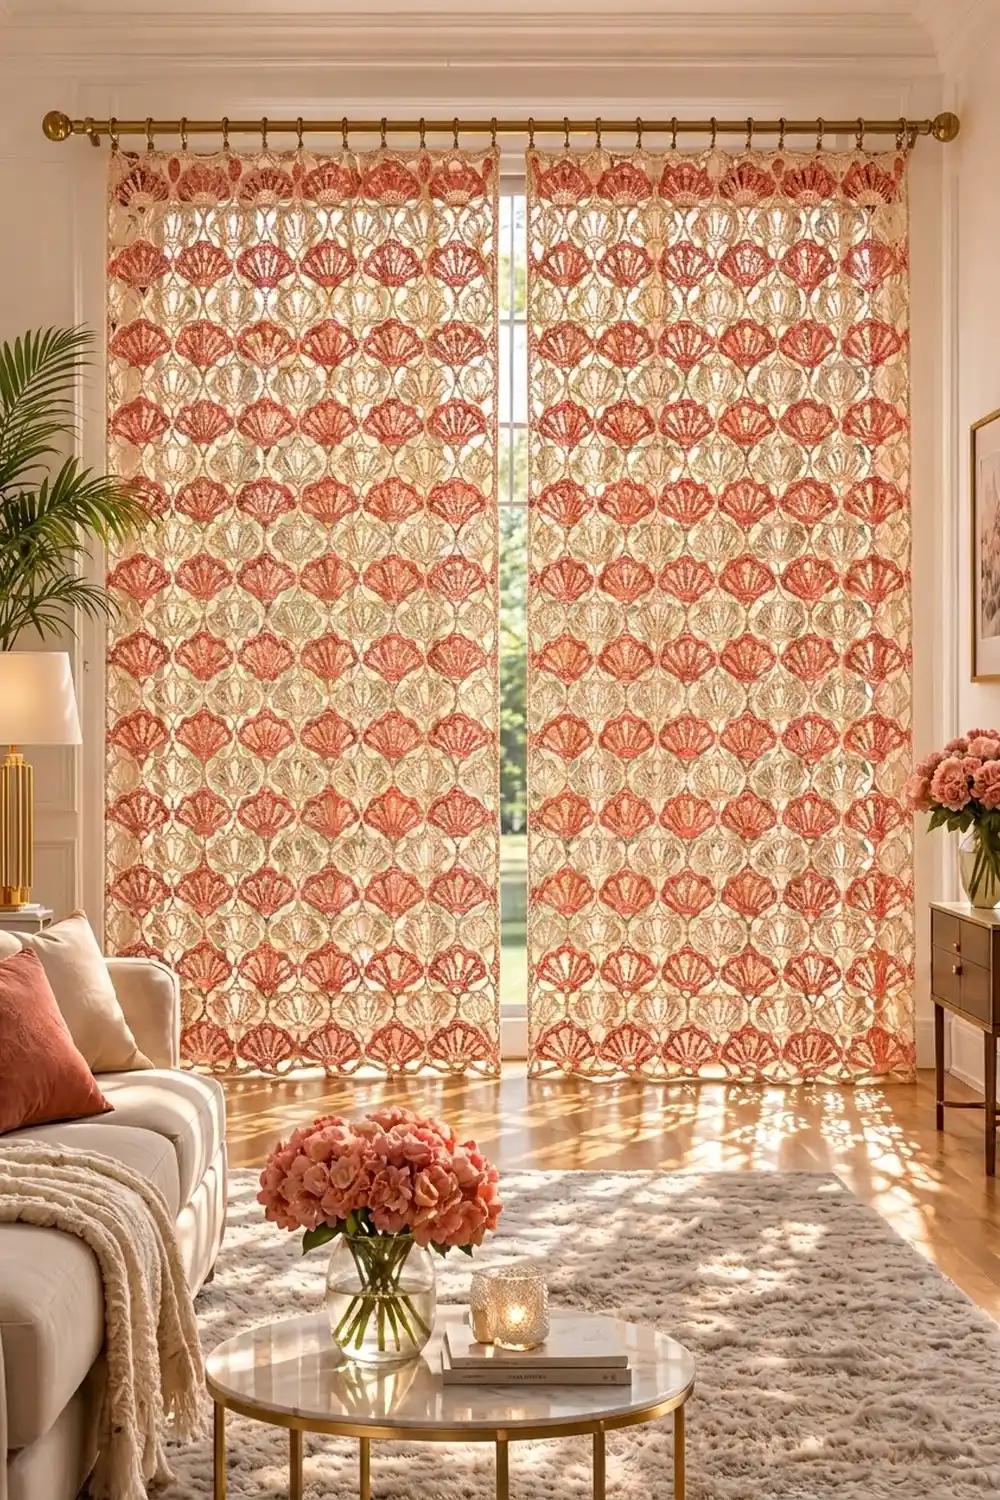
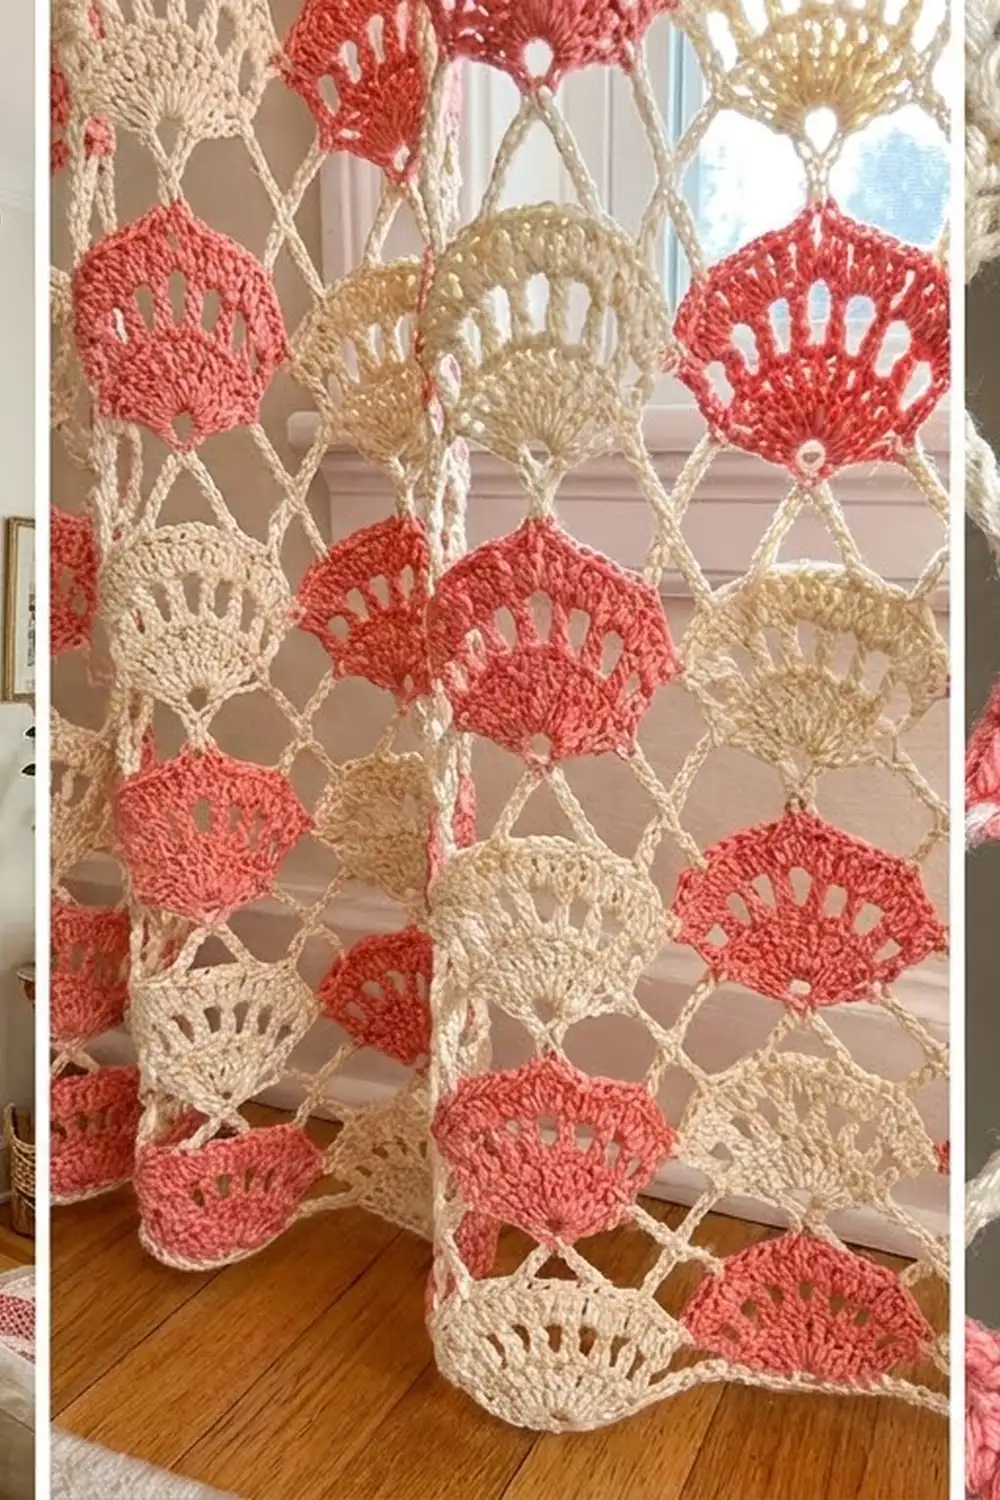
The Coral Tide curtain is a lacy, see-through panel made from small fan-shaped shell motifs. Each shell has a solid half-circle base, six straight spokes, and five open arches across the top. A cream chain lattice joins the shells into a diamond-shaped net that lets light through.
The shells alternate between warm coral and soft cream in a checkerboard. The lattice is cream throughout, so the coral shells seem to float while the cream shells blend into the net. The style is airy and a little vintage.
This pattern uses US crochet terms. One finished panel measures 41 in wide x 81 in long (104.1 cm x 205.7 cm) after blocking. The photo shows a matching pair on one rod, so make two panels to get the same look.
Each shell is worked in five short turned rows. Next, you add a cream frame round that builds the lattice and joins each motif to its neighbors as you go. Two rounds of single crochet finish the edges, and clip rings hang the panel.
Finished Size and Construction
- Finished size (one panel): 41 in x 81 in (104.1 cm x 205.7 cm)
- Skill level: Intermediate
- Terminology: US crochet terms
- Yarn weight: DK (#3) cotton
- Hook: 4.0 mm (G-6)
- Number of pieces: 128 shell motifs per panel (64 coral, 64 cream)
- Layout: 8 motifs across x 16 motifs down, in a checkerboard
- Piece size: 5 in x 5 in (12.7 cm x 12.7 cm), measured from join point to join point
- Size before border: 40 in x 80 in (101.6 cm x 203.2 cm)
- Border depth: 0.5 in (1.3 cm) on each side
Materials
Choose a smooth, mercerized DK cotton. Cotton holds the arches open, hangs straight, and resists fuzzing in sunlight. Avoid splitty yarn, because the lattice needs crisp chains.
Quantities for one panel:
- Color A, coral: 400 g (about 920 m), for 64 shell bodies
- Color B, cream: 700 g (about 1,610 m), for 64 shell bodies, all 128 frame rounds, and the border
These amounts assume DK cotton with about 115 m per 50 g. They include a margin of about 15 percent for swatching and differences in tension. Double everything for a pair of panels.
Tools:
- 4.0 mm (G-6) crochet hook
- Tapestry needle
- Stitch markers
- Rustproof pins and a large blocking surface
- Measuring tape
- Scissors
- 9 curtain clip rings per panel
Abbreviations (US Terms)
- ch – chain
- sl st – slip stitch
- sc – single crochet
- dc – double crochet
- tr – treble crochet
- sk – skip
- sp(s) – space(s)
- st(s) – stitch(es)
- RS – right side
Picot loop: (sc, ch 3, sc) in the same place. The center (2nd) chain of the ch-3 is the join point.
Join point: a single chain that you replace with a sl st into a neighbor’s matching chain when you join as you go.
Gauge and Checkpoints
Make one complete coral shell with its cream frame before you start making the rest. Block it, then check these measurements:
- After Row 2: the half-circle base is 1.75 in (4.4 cm) wide.
- After Row 3: the spoke fan is 3.5 in (8.9 cm) wide and 2.25 in (5.7 cm) tall.
- After Row 5: the shell is 4.25 in (10.8 cm) wide and 3 in (7.6 cm) tall.
- After Round 6, pinned out: 5 in x 5 in (12.7 cm x 12.7 cm) between the corner join points.
- Border gauge: 5 sc = 1 in (2.5 cm) when worked into chain loops.
If your shell is too big, go down 0.5 mm. If it is too small, go up 0.5 mm. Get the shell size right first, because the frame chain lengths are based on a 4.25 in (10.8 cm) shell. If only the frame is off, keep the same hook and change how firmly you make your chains.
Shell Motif
Make 64 shells in Color A and 64 in Color B. The shell body is worked in turned rows.
Row 1: Make a magic ring. Ch 3 (counts as dc), work 7 dc in the ring. Pull the ring snug, but leave the stitches lying in a half circle. Turn. (8 dc)
Row 2: Ch 3 (counts as dc), dc in the same st, then 2 dc in each remaining st across. Turn. (16 dc)
The base is now a solid half disc.
Row 3 (spokes): Ch 4 (counts as tr), ch 3, sk 2 sts, tr in next st; repeat from * 4 more times. Turn. (6 tr, 5 ch-3 sps)*
The tr stitches land in stitches 1, 4, 7, 10, 13, and 16. This puts both edge spokes on the end stitches of the base.
Row 4 (arch chains): Ch 1, sc in the first tr, ch 7, sc in next tr; repeat from * 4 more times. Work the last sc in the top of the turning ch. Turn. (6 sc, 5 ch-7 arches)*
Row 5 (arch edging): Ch 1, sl st in the first sc, 11 sc in next ch-7 arch, sl st in next sc; repeat from * 4 more times. Fasten off. (55 sc, 6 sl st)*
Each arch now has 11 sc, and the 6th sc is its center. The arches stay open above the spokes, which gives the top edge its scalloped shape.
Round 6: Cream Frame and Join-As-You-Go
Work this round in Color B on every shell. Hold the shell RS facing with the arches pointing up, and number the arches 1 to 5 in the order you will work them.
Round 6: Join B with sc in the center sc of arch 1. Ch 4, sc in the center sc of arch 2. Ch 4, work a picot loop in the center sc of arch 3. Ch 4, sc in the center sc of arch 4. Ch 4, sc in the center sc of arch 5.
Ch 9 for the first top corner (the 5th ch is the join point). Sc in the sl st at the top of the end spoke. Ch 11 for the side loop (the 6th ch is the join point). Sc in the end of Row 2.
Ch 23 for the first bottom corner: 10 ch, 1 join-point ch, 12 ch. Work a picot loop at the base, into the magic ring between the 4th and 5th dc of Row 1. Ch 23 for the second bottom corner: 12 ch, 1 join-point ch, 10 ch.
Sc in the other end of Row 2. Ch 11 (the 6th ch is the join point). Sc in the sl st at the top of the other end spoke. Ch 9 (the 5th ch is the join point). Sl st in the first sc. Fasten off.
Frame count: 12 sc and 108 ch.
The short top loops hug the arches, and the long bottom chains meet at the base picot. Together they form the diamond lattice around each shell.
Join points per side. Each side has exactly 3 join points:
- Top: both top corners and the arch 3 picot
- Each side: the top corner, the side loop, and the bottom corner
- Bottom: both bottom corners and the base picot
Joining as you go. Work the first motif’s frame all the way around. On every later motif, when you reach a join point that touches a finished motif, work a sl st into that motif’s matching join-point chain instead of making the chain. The sl st counts as that chain, so the chain counts don’t change.
Match the join points like this:
- Top corners join to the bottom corners of the motif above.
- The arch 3 picot joins to the base picot of the motif above.
- The side corners and side loop join to the matching points of the motif beside it.
Where four motifs meet, sl st into the chain that the first motif made. Keep each sl st loose enough that the chains lie flat, but firm enough that the junction doesn’t gap.
Make All Pieces and Layout
Make 64 coral shells and 64 cream shells, all framed in cream. Join them in 16 rows of 8 using the checkerboard below (A = coral, B = cream). Work across each row, then start the next row below it.
Rows 1, 3, 5, 7, 9, 11, 13, 15:   A B A B A B A B
Rows 2, 4, 6, 8, 10, 12, 14, 16:  B A B A B A B A
Joining checkpoints:
- After Row 1 of motifs: 40 in (101.6 cm) wide, pinned out.
- After 4 rows of motifs: 20 in (50.8 cm) tall.
- After all 16 rows: 40 in x 80 in (101.6 cm x 203.2 cm).
If a row comes out too wide, check that you haven’t added extra chains at the shared corners. Lay the panel flat every few rows so you catch twisted joins early.
Border
Use Color B. The border gauge is 5 sc = 1 in (2.5 cm), so 25 sc per motif side equals exactly 5 in (12.7 cm). Each panel corner gets a ch-2 space, which is not included in the side counts.
Border Round 1: Join B at the top right corner join point. Sc into the outer frame chains as described below. Don’t work into the joined points between motifs.
- Top, per motif: 4 sc in the top half of each top-corner ch-9 (8 sc), 4 sc in each of the four ch-4 loops (16 sc), and 1 sc in the arch 3 picot. 25 sc
- Each side, per motif: 4 sc in the side half of the top-corner ch-9, 11 sc in the ch-11 side loop, and 10 sc in the side half of the bottom-corner ch-23. 25 sc
- Bottom, per motif: 12 sc in the bottom half of each bottom-corner ch-23 (24 sc) and 1 sc in the base picot. 25 sc
- Each panel corner: ch 2.
Round 1 totals:
- Top: 8 motifs x 25 sc = 200 sc
- Bottom: 8 motifs x 25 sc = 200 sc
- Each long side: 16 motifs x 25 sc = 400 sc
Sl st to the first sc. (1,200 sc, 4 corner ch-2 sps)
Border Round 2: Ch 1, sc in each sc around, working (sc, ch 2, sc) in each corner ch-2 sp. Sl st to the first sc. Fasten off.
Each side gains 2 sc at its corners: 202 sc on the top and bottom, and 402 sc on each long side. (1,208 sc, 4 corner ch-2 sps)
Why the math works. Each motif adds exactly 25 sc to each edge it touches. The seams add nothing, because the join points are skipped. At 5 sc per inch, 200 sc measures 40 in (101.6 cm) and 400 sc measures 80 in (203.2 cm). The two border rounds add 0.5 in (1.3 cm) on every side, which brings the panel to 41 in x 81 in (104.1 cm x 205.7 cm).
Hanging: Mark 9 points along the top edge: the 2 corners and the 7 spots above the top junctions between motifs. They will be about 5 in (12.7 cm) apart. Clip a curtain ring at each mark.
Final Blocking
- Weave in the remaining ends along the lattice chains, never through the arches.
- Soak the panel in cool water for 10 minutes. Press the water out gently; don’t wring it.
- Roll the panel in towels to remove more water.
- Lay it flat on a large, clean surface.
- Pin the four corners to 41 in x 81 in (104.1 cm x 205.7 cm).
- Pin every motif junction on a 5 in (12.7 cm) grid.
- Open each shell’s arches with your fingers, and pin the base picots straight down.
- Let it dry completely before you unpin it. If space is tight, block 4 rows of motifs at a time.
Final Quality-Control Checklist
- 128 motifs (64 coral, 64 cream) in a true checkerboard
- Every arch has 11 sc and stays open
- Every frame has 12 sc and 108 ch
- Every join point inside the panel is joined
- Border Round 2 has 202 sc on the top and bottom and 402 sc on each side
- The panel measures 41 in x 81 in (104.1 cm x 205.7 cm)
- 9 rings sit about 5 in (12.7 cm) apart
- No ends show on the front
Troubleshooting
- The shell base cups: don’t pull the magic ring as tight, and check that Row 2 has 16 dc.
- The arches ruffle: work 10 sc per arch, or make the Row 4 chains tighter.
- The lattice sags: your chains are loose. Go down a hook size for Round 6 only.
- A junction gaps: sl st into the first motif’s chain, not into a later sl st.
- The border ripples: recount to 25 sc per motif side, then check your border gauge.
- One side is longer: check that every row has 8 motifs and that no side loop was missed.
Care
Hand wash in cool water with mild soap, then lay flat or hang damp to dry. Avoid hot dryers, which can shrink the cotton and distort the lattice.
Final Notes
The measurements build on each other in a simple chain. A 4.25 in (10.8 cm) shell gets a frame that pins out to a 5 in (12.7 cm) cell. Eight cells across make 40 in (101.6 cm), and sixteen cells down make 80 in (203.2 cm). Working 25 border sc per motif side at 5 sc per inch keeps the edges flat, and the two border rounds bring the panel to 41 in x 81 in (104.1 cm x 205.7 cm).
Measure your first shell carefully, and the other 127 will follow the same sizes.
Happy crocheting!