

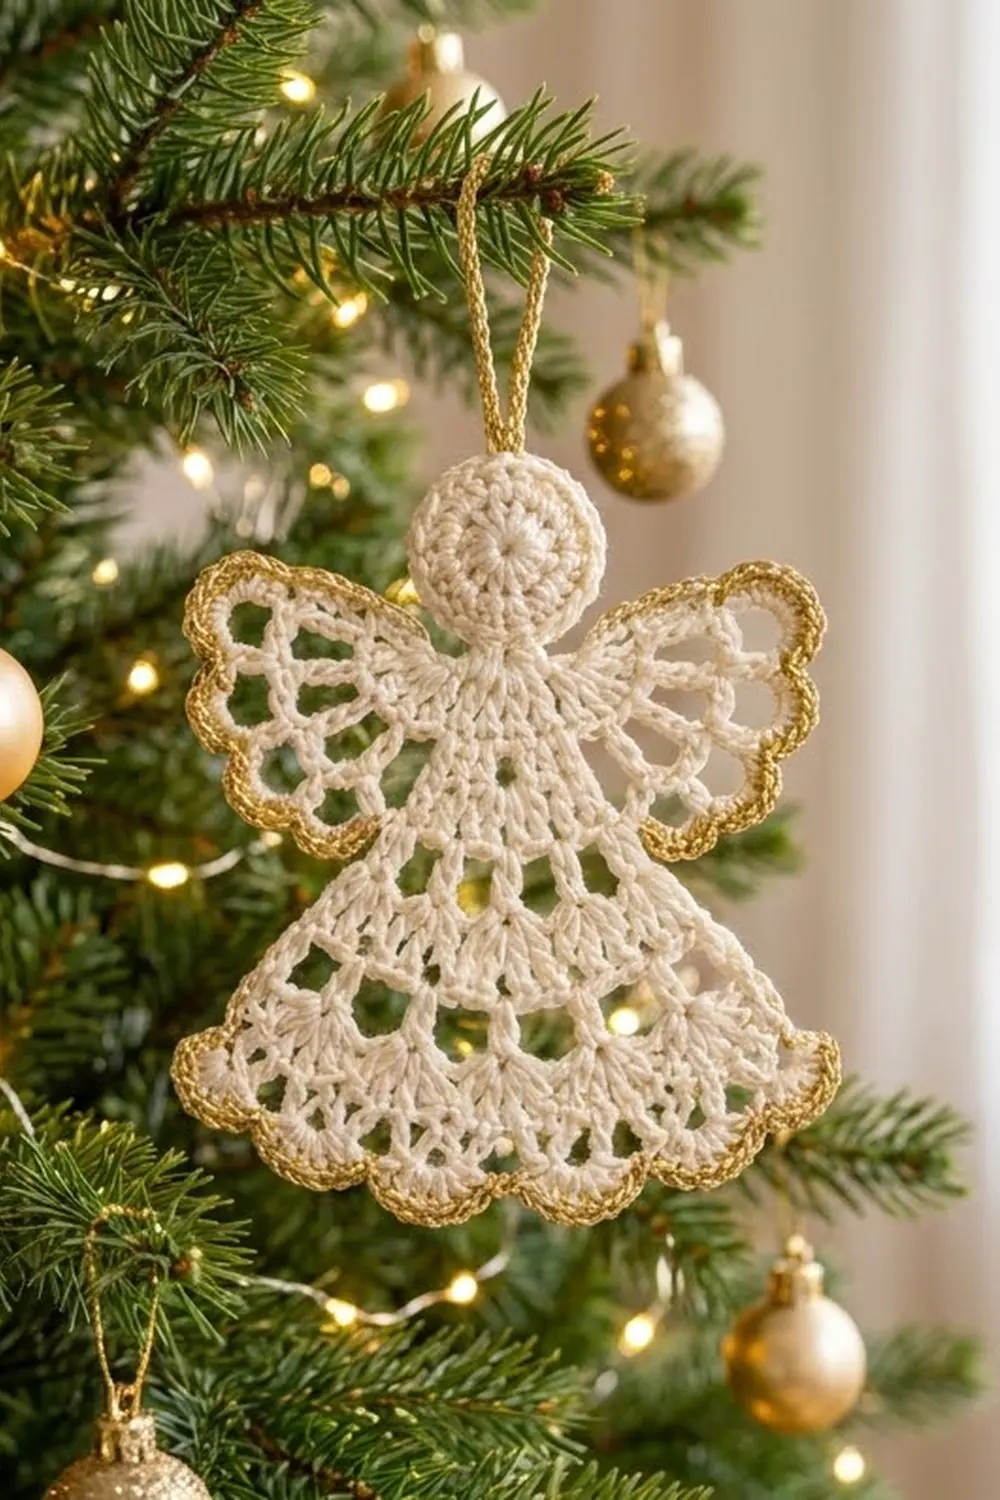
This little angel is a flat, lacy Christmas ornament. She is worked in cream cotton thread and finished with a twisted gold edge and a gold hanging loop. She has a round head, a triangular skirt full of open windows, two fan-shaped wings with scalloped tips and a scalloped hem.
The colors are soft cream for the body and warm metallic gold for the trim. The style is classic heirloom thread crochet, but you only need basic stitches. All instructions use US terms.
The finished angel measures 4 in (10.2 cm) wide across the wings and 3.8 in (9.7 cm) tall from the top of the head to the hem. The gold loop adds 2 in (5.1 cm), so she hangs about 5.8 in (14.7 cm) tall overall.
The angel is made as one piece:
1. Crochet the head in the round.
2. Work the skirt in rows down from the bottom of the head.
3. Work one wing directly onto each side of the upper body.
4. Work a two-row gold border around the wings and hem.
5. Add the hanging loop.
Finished Size and Construction
- Finished size: 4 in (10.2 cm) wide x 3.8 in (9.7 cm) tall, plus a 2 in (5.1 cm) loop
- Skill level: Easy-intermediate (thread work, simple lace)
- Terminology: US crochet terms
- Yarn weight: Size 3 cotton crochet thread (super fine / fingering range)
- Hook: 2.25 mm (US B-1)
- Number of pieces: 1 (the wings are worked directly onto the body; no sewing)
- Layout: Single flat ornament
- Head diameter: 1.25 in (3.2 cm)
- Size before border: 3.6 in (9.1 cm) wide x 3.6 in (9.1 cm) tall
- Border depth: 0.2 in (0.5 cm)
Materials
Choose mercerized cotton thread in size 3. It gives crisp stitches and takes starch well, which helps the wings stay flat. For the gold, use a size 3 metallic or cotton-metallic thread of the same thickness, so the edge lies smoothly.
- Cream (main color): 8 g / 35 m (38 yd)
- Gold (border and loop): 3 g / 12 m (13 yd)
These amounts are for one angel. They include a margin of about 20% for your gauge test, weaving in ends and differences in tension.
Tools:
- 2.25 mm (US B-1) crochet hook
- Tapestry needle with a small eye
- Stitch marker
- Scissors
- Fabric stiffener or spray starch
- Blocking board or foam mat, rust-proof pins and plastic wrap
Abbreviations (US Terms)
- ch – chain
- sl st – slip stitch
- sc – single crochet
- hdc – half double crochet
- dc – double crochet
- rev sc – reverse single crochet (crab stitch)
- sp – space
- sk – skip
- st(s) – stitch(es)
- RS / WS – right side / wrong side
- rep – repeat
Special stitches
- V-stitch (V-st): (dc, ch 2, dc) in the same stitch.
- Small shell: (2 dc, ch 2, 2 dc) in the same space.
- Large shell: (3 dc, ch 2, 3 dc) in the same space.
- Petal: (sc, hdc, 3 dc, hdc, sc) in the same loop.
- Reverse single crochet: If you crochet right-handed, work from left to right. Insert the hook into the next stitch to the right, yarn over, pull up a loop, yarn over and pull through both loops. This makes the twisted, rope-like gold edge.
Gauge and Checkpoints
Thread gauge varies a lot from one crocheter to another. Make the head first and measure it before you continue.
- Gauge: Head Rounds 1–2 = 1 in (2.5 cm) across.
- Head after Round 1: 0.5 in (1.3 cm) across.
- Head after Round 3: 1.25 in (3.2 cm) across.
- Body after Row 3: 1.75 in (4.4 cm) wide.
- Body after Row 5: 2.4 in (6.1 cm) wide.
- Body after Row 7: 3.2 in (8.1 cm) wide at the hem and 2.35 in (6.0 cm) long from neck to hem.
- Before border: 3.6 in (9.1 cm) wide across the wings and 3.6 in (9.1 cm) tall.
If your head is larger than 1 in (2.5 cm) after Round 2, change to a 2.0 mm hook. If it is smaller, change to a 2.5 mm hook. A difference of 0.1 in (0.3 cm) at the head grows to about 0.4 in (1.0 cm) at the hem.
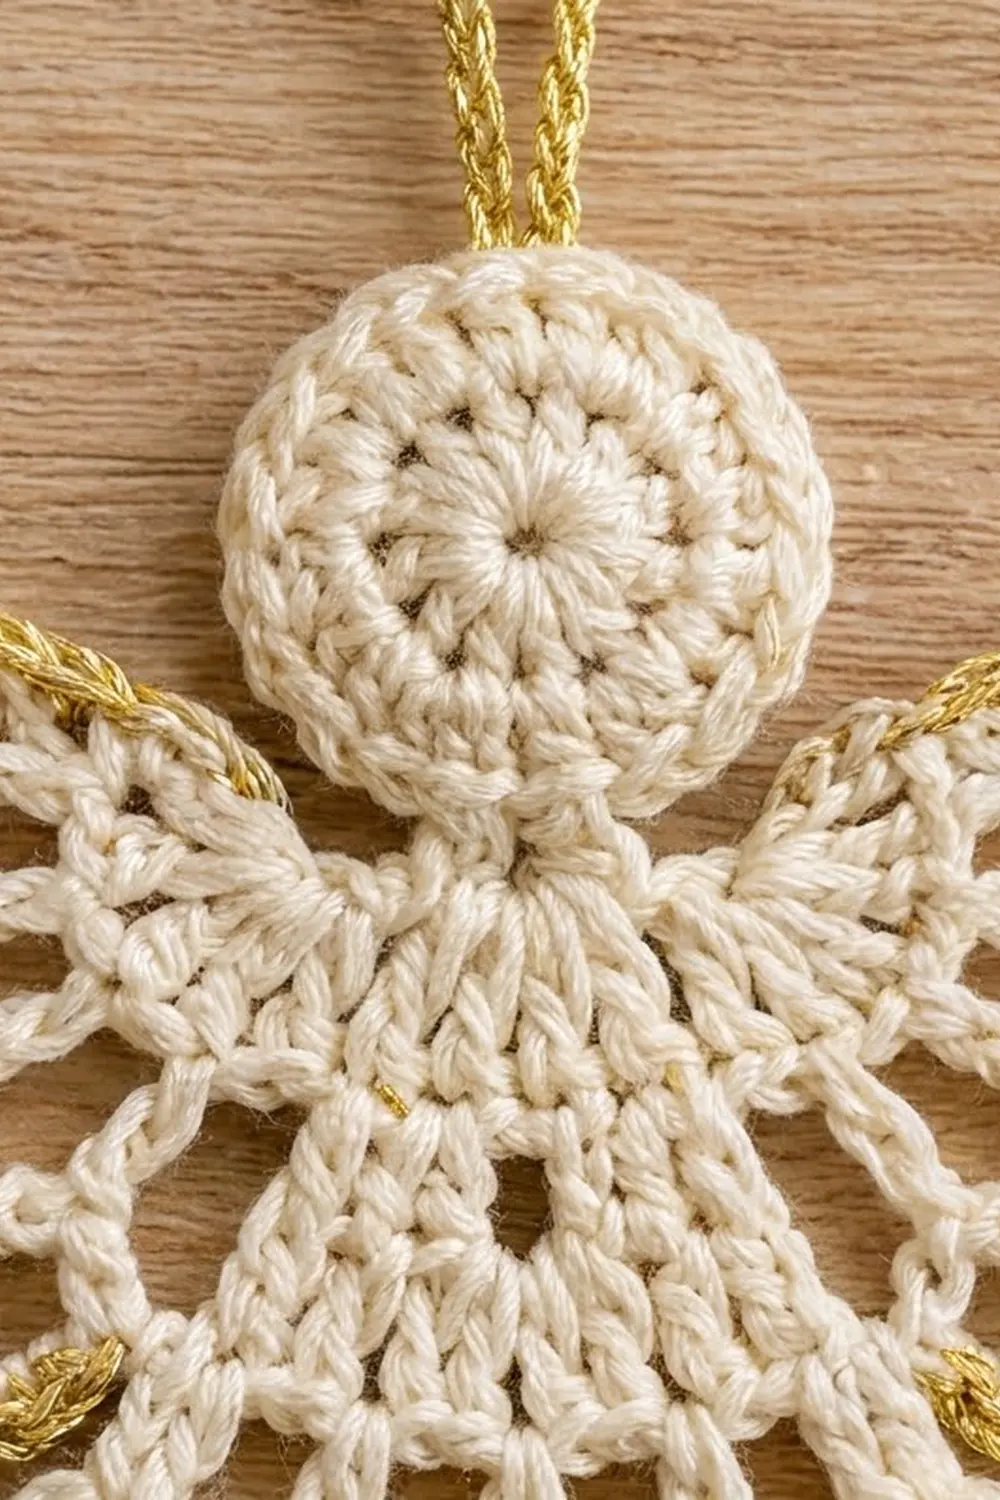
Head
Worked in joined rounds with cream. Do not turn.
Round 1: Make a magic ring. Ch 3 (counts as first dc), then work 11 dc in the ring. Pull the ring closed and sl st to the top of the ch-3. (12 dc)
Round 2: Ch 3 (counts as dc), dc in same st, 2 dc in each st around. Sl st to the top of the ch-3. (24 dc)
Round 3: Ch 1, 2 sc in next st, sc in next st; rep from * 11 more times. Sl st to first sc. (36 sc = 24 worked one-per-stitch + 12 increases)*
Fasten off. Place a marker in any sc. This marked stitch is the bottom center of the head. The neck is 5 sts: the marked st plus 2 sts on each side of it.
Body (Skirt)
Worked in rows with cream, top down from the neck. Turn at the end of each row.
Row 1 (RS): Join cream in the first neck st. Ch 3 (counts as dc), dc in same st, then 2 dc in each of the next 4 neck sts. (10 dc)
Row 2: Ch 4 (counts as dc + ch 1), dc in next dc, ch 1; rep from * 7 more times, dc in last dc. (10 dc, 9 ch-1 sps)* These open spokes make the radiating lines at the top of the skirt.
Row 3: Ch 3 (counts as dc) and dc in same st. Dc in each ch-1 sp and each dc across to the last dc, then 2 dc in the last dc (the top of the turning ch). (21 dc = 19 worked one-per-stitch-or-space + 2 increases)
Row 4: Ch 5 (counts as dc + ch 2) and dc in same st to make the first V-st. Ch 2, sk 3 sts, V-st in next st; rep from * 4 more times. (6 V-sts, 5 ch-2 sps between them)* The V-sts sit on stitches 1, 5, 9, 13, 17 and 21, so the last V-st lands on the last stitch.
Row 5: Sl st into the ch-2 sp of the first V-st. Ch 3 (counts as dc), then (dc, ch 2, 2 dc) in the same sp. Ch 2, sk next ch-2 sp, small shell in next V-st sp; rep from * 4 more times. (6 small shells = 24 dc, 5 ch-2 sps between)*
Row 6: Sl st in next dc and into the shell’s ch-2 sp. Ch 3 (counts as dc), then (2 dc, ch 2, 3 dc) in the same sp. Ch 3, sk next ch-2 sp, large shell in next shell sp; rep from * 4 more times. (6 large shells = 36 dc, 5 ch-3 sps between)*
Row 7 (hem scallops): Sl st in next 2 dc and into the shell’s ch-2 sp. Ch 3 (counts as dc), then 6 dc in the same sp. Sc in next ch-3 sp, 7 dc in next shell sp; rep from * 4 more times. (6 scallops of 7 dc = 42 dc + 5 sc = 47 sts)*
Fasten off. The skirt should be a smooth triangle, 3.2 in (8.1 cm) wide at the hem and 2.35 in (6.0 cm) long. The spaces in Rows 2, 4, 5 and 6 make the lace windows.
Wings
Each wing is worked directly onto the side edge of body Rows 1–3.
Right wing, Row 1: With RS facing, join cream at the bottom of the Row 3 row-end on the right side of the body. Ch 3 (counts as dc) and dc in the same row-end. Work 2 dc in the Row 2 row-end and 2 dc in the Row 1 row-end. (6 dc) Turn.
Row 2: Ch 5 (counts as dc + ch 2), dc in next dc, ch 2; rep from * 3 more times, dc in last dc. (6 dc, 5 ch-2 sps)* Turn. Let the spokes fan outward.
Row 3: Ch 1, sc in first dc, ch 5, sc in next dc; rep from * 4 more times. (6 sc, 5 ch-5 loops)* Turn.
Row 4: Ch 1, work a petal in each ch-5 loop, then sl st in the last sc. (5 petals = 35 sts) Fasten off.
Left wing: With RS facing, join cream at the top of the Row 1 row-end on the left side, just under the head. Work Rows 1–4 as for the right wing, with 2 dc in each of the Row 1, Row 2 and Row 3 row-ends.
Each wing should measure about 1 in (2.5 cm) from its base to its scalloped edge. The angel now measures 3.6 in (9.1 cm) across the wing tips.
Gold Border
The gold border goes around the outer edge only: the wings, the lower skirt sides and the hem. Do not border the head or neck.
Border gauge: One row of sc plus one row of rev sc adds 0.2 in (0.5 cm) at each wing tip and at the hem.
Row 1 (RS): With RS facing, join gold at the top of the right wing, where it meets the body next to the head. Ch 1, then work in this order:
- Right wing, upper row-ends: 2 sc in the Row 2 row-end, then 1 sc in the Row 3 row-end. (3 sc)
- Right wing petals: In each petal, work sc in sc, sc in hdc, sc in next dc, 3 sc in center dc, sc in next dc, sc in hdc, sc in sc. (9 sc per petal x 5 petals = 45 sc = 35 worked one-per-stitch + 10 extra)
- Right wing, lower row-ends: 1 sc in the Row 3 row-end, then 2 sc in the Row 2 row-end. (3 sc)
- Right skirt side: 2 sc in each row-end of body Rows 6, 5 and 4. (6 sc)
- Hem: In each scallop, work sc in each of the first 3 dc, 3 sc in the center dc, then sc in each of the last 3 dc. Work sc in each sc between scallops. (6 scallops x 9 sc = 54 sc, + 5 sc between = 59 sc = 47 worked one-per-stitch + 12 extra)
- Left skirt side: 2 sc in each row-end of body Rows 4, 5 and 6. (6 sc)
- Left wing, lower row-ends: 3 sc, as on the right wing. (3 sc)
- Left wing petals: As for the right wing. (45 sc)
- Left wing, upper row-ends: 3 sc, as on the right wing. (3 sc)
Row 1 total: 3 + 45 + 3 + 6 + 59 + 6 + 3 + 45 + 3 = 173 sc
Row 2 (RS): Do not turn. Ch 1, then work rev sc in each sc back along the edge. (173 rev sc) Fasten off.
Why the math works:
– Every edge stitch gets exactly one sc.
– The center of each petal and each scallop gets 2 extra sc, so the curves stay round without ruffling.
– Row-ends get 2 sc for a dc row and 1 sc for an sc row, which matches their heights.
– Row 2 is worked one-to-one, so it adds texture but no stitches.
Hanging loop: Join gold in the sc at the top of the head, directly opposite the marked neck stitch. Ch 30, then sl st in the same sc. Ch 1, sl st in the back bump of each of the 30 ch, then sl st in the head stitch again. Fasten off. The loop stands 2 in (5.1 cm) tall and looks braided.
Final Blocking
- Weave in all ends on the WS. Run them through solid stitches, not lace spaces.
- Draw a template: a 1.25 in (3.2 cm) circle above a triangle that is 3.2 in (8.1 cm) wide and 2.35 in (6.0 cm) tall. The wing tips should be 3.6 in (9.1 cm) apart. Then add the border, so the outline measures 4 in (10.2 cm) wide and 3.8 in (9.7 cm) tall.
- Cover the template with plastic wrap.
- Soak the angel in stiffener, or wet it and spray it with starch. Squeeze out the extra liquid without wringing.
- Pin the head first, then the center of the neck and the center of the hem.
- Pin the tip of every petal and every scallop. Use a pin to open each lace window.
- Stand the loop upright and let the angel dry completely, usually 12–24 hours.
Final Quality-Control Checklist
- The head is flat and 1.25 in (3.2 cm) across.
- The skirt has 6 even scallops.
- Both wings have 5 petals and match each other.
- Border Row 1 has 173 sc, and the rev sc edge is even.
- The angel measures 4 in (10.2 cm) x 3.8 in (9.7 cm).
- The loop is centered and 2 in (5.1 cm) tall.
- All ends are hidden, and no stiffener is left in the spaces.
Troubleshooting
The head cups or ripples. If it cups, your stitches are too tight, so go up a hook size. If it ripples, your stitches are too loose, so go down a size. Then remake the head.
The skirt curls at the sides. Your turning chains may be too tight. Loosen them so the row-ends match the height of a dc.
The wings flop forward. Check that each wing’s Row 1 has exactly 2 dc per row-end, then stiffen the wings more heavily.
The gold border waves. Recount the skirt sides: each side should have 6 sc only. Work Row 2 with a hook one size smaller.
The border flattens the scallops. Check that each petal and scallop center has 3 sc, and work the rev sc loosely.
Care
Hand wash the angel in cool water with mild soap, then re-block it with fresh stiffener. Store it flat between sheets of tissue paper.
Final Notes
Here is the full measurement chain:
– Head: 1 in (2.5 cm) after Round 2 and 1.25 in (3.2 cm) after Round 3.
– Skirt: 1.75 in (4.4 cm) wide at Row 3, 2.4 in (6.1 cm) at Row 5 and 3.2 in (8.1 cm) at the hem.
– Wings: bring the width to 3.6 in (9.1 cm).
– Border: the 0.2 in (0.5 cm) gold edge brings the angel to 4 in (10.2 cm) x 3.8 in (9.7 cm), with a 2 in (5.1 cm) loop on top.
Check each number as you go, and your angel will be ready for the tree.
Happy crocheting!