

The Ginkgo Twilight Lace Curtain is a sheer, airy panel made from small ginkgo-leaf motifs. In each motif, two lime green fans open upward and two purple fans open downward. A slim stem runs through the center of each motif, and a small teardrop loop hangs below the purple fans. Light chain loops surround every motif and join it to its neighbors.
The palette is a bright lime green with a medium violet purple. Lime makes the upper fans, the top stem, the chain frame and the border. Purple makes the lower fans and the bottom stem with its drop loop. The style is vintage lace with a modern color twist. In a sunny window, the open fans throw lacy shadows on the floor.
This pattern uses US crochet terms. One panel measures 37 in x 73 in (94.0 cm x 185.4 cm) after blocking, border included. Make two panels for a pair.
Construction is join-as-you-go. You work each motif from a center ring: purple stem and fans first, then lime stem and fans, then a lime chain frame round. From the second motif on, you join the frame round to the motifs next to it as you go. A two-round picot border finishes the edge.
Finished Size and Construction
- Finished size: 37 in x 73 in (94.0 cm x 185.4 cm) per panel
- Skill level: Intermediate
- Terminology: US crochet terms
- Yarn weight: Fingering weight (#1 super fine) mercerized cotton
- Hook: 2.5 mm (US B/1)
- Number of pieces: 72 identical motifs, joined as you go
- Layout: 6 motifs across x 12 motifs down
- Motif size: 6 in x 6 in (15.2 cm x 15.2 cm) after the frame round and blocking
- Size before border: 36 in x 72 in (91.4 cm x 182.9 cm)
- Border depth: 0.5 in (1.3 cm) on each side
Materials
Choose a smooth, mercerized cotton. It gives crisp stitch definition, blocks well and won’t fade quickly in sunlight. Avoid stretchy fibers, because long treble spokes can sag in a hanging panel.
- Lime green: 350 g, about 1,190 m (upper fans, top stems, frame rounds, border)
- Purple: 250 g, about 850 m (lower fans, bottom stems, drop loops)
These amounts assume about 170 m per 50 g ball and include a margin of roughly 15% for swatching and differences in tension.
Tools:
- 2.5 mm (US B/1) crochet hook
- Tapestry needle
- Locking stitch markers
- Rust-proof pins and a large blocking surface
- Spray bottle
- Measuring tape
- 7 curtain clip rings per panel
Abbreviations (US Terms)
- ch – chain
- sl st – slip stitch
- sc – single crochet
- tr – treble crochet
- sc2tog – single crochet 2 together
- sp(s) – space(s)
- st(s) – stitch(es)
- RS – right side
Picot: ch 3, sl st in 3rd ch from hook.
Sc2tog across two fans: insert hook in the first picot, yarn over and pull up a loop, insert hook in the second picot, yarn over and pull up a loop, yarn over and pull through all 3 loops on hook.
Gauge and Checkpoints
Make one complete motif, frame round included, before you start the panel. Block it and measure it. Every later measurement depends on this motif.
- Center ring: about 0.4 in (1.0 cm) across.
- Fan, Rows 1–2: from ring to tips of Row 2, about 1.25 in (3.2 cm).
- Finished fan: from ring to picot edge, about 1.75 in (4.4 cm).
- Motif before frame: about 4 in (10.2 cm) wide, fan tip to fan tip, and 4.5 in (11.4 cm) tall, top loop to bottom of drop loop.
- Motif after frame round, blocked: 6 in x 6 in (15.2 cm x 15.2 cm).
- Border gauge: 6 sc = 1 in (2.5 cm) when worked into the chain loops.
If the motif is too big: go down a hook size, or work the frame round chains more tightly.
If the motif is too small: go up a hook size, and check that your trebles are fully extended.
A difference of 0.25 in (0.6 cm) per motif adds up to 1.5 in (3.8 cm) across the width and 3 in (7.6 cm) down the length, so match the gauge before you continue.
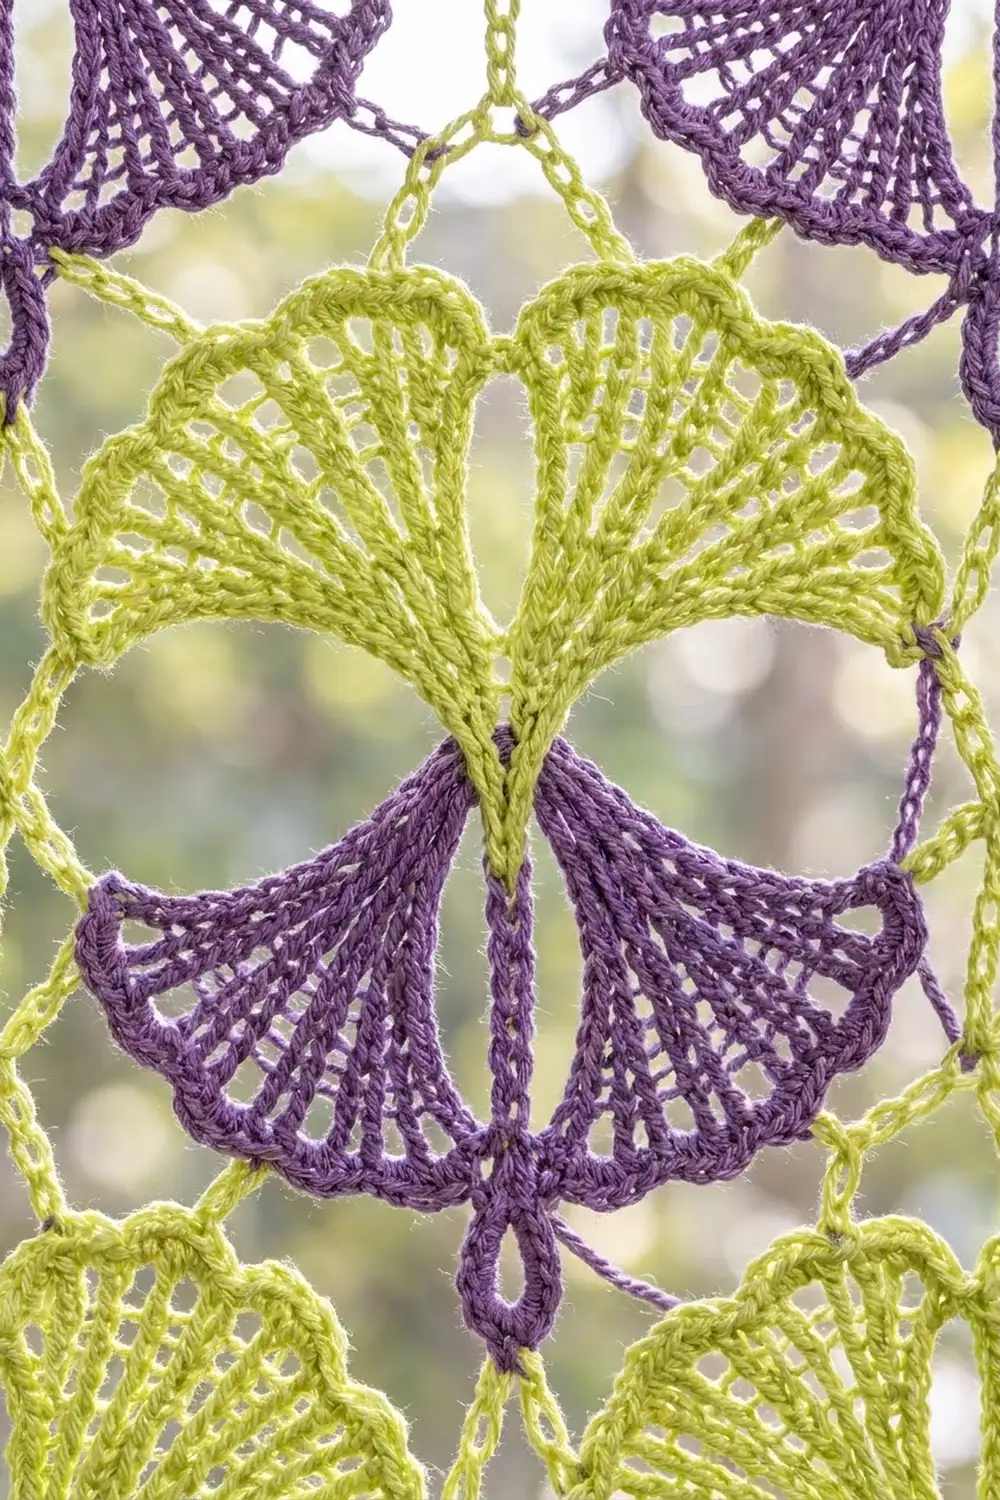
Motif (Make 72)
Center Ring and Purple Stem
With purple, ch 12, sl st in first ch to form a ring.
Stem: ch 22, sl st in 7th ch from hook (this makes the drop loop), sl st in each of next 15 ch back toward the ring, sl st in ring. The stem has 15 sl st and a 6-ch drop loop.
Purple Fan A (Lower Right)
All fans are worked into the ring, beside the stem.
Row 1 (RS): ch 4 (counts as first tr), ch 2, tr in ring 6 times. Turn. (7 tr, 6 ch-2 sps)
Row 2: ch 4 (counts as tr), tr in first tr, ch 3, skip ch-2 sp, 2 tr in next tr 6 times, working the last 2 tr in top of the turning ch. Turn. (14 tr, 6 ch-3 sps)
Row 3: ch 1, sc in each of first 2 tr, 4 sc in next ch-3 sp, sc in each of next 2 tr 6 times. Turn. (38 sc: 14 sc in tr + 24 sc in sps)
Row 4: ch 1, sc in each of first 2 sc, picot, sc in each of next 3 sc 12 times. Do not turn. (38 sc, 12 picots)
You finish on the stem side of the fan, because Row 1 started there.
Return to ring: sl st in the end of Row 3, 2 sl st in the end of Row 2, 2 sl st down the side of the first spoke, sl st in ring.
Purple Fan B (Lower Left)
Sl st in ring past the stem. Repeat Rows 1–4 so that Fan B mirrors Fan A, then return to the ring the same way. Fasten off purple.
Checkpoint: The two purple fans open downward with the stem between them. Measured fan tip to fan tip, they are about 4 in (10.2 cm) wide.
Lime Stem and Fans
With RS facing, join lime with a sl st in the ring directly opposite the purple stem.
Top stem: ch 20, sl st in 4th ch from hook (this makes the top loop), sl st in each of next 16 ch, sl st in ring. (16 sl st, small top loop)
Lime Fan C (upper right) and Lime Fan D (upper left): Work as for Purple Fans A and B, into the upper half of the ring, one fan on each side of the top stem. Fasten off lime and weave in all ends.
Checkpoint: Four fans of 38 sc and 12 picots each. The fan tips meet at each side, at about the level of the ring. The motif measures about 4 in x 4.5 in (10.2 cm x 11.4 cm).
Frame Round (Lime)
Number the picots on each fan starting from the stem side: picot 1 is next to the stem, and picot 12 is at the outer side tip.
Join lime with sc in the top loop.
Right half: ch 5, sc in picot 2 of Fan C, ch 5, sc in picot 4, ch 5, sc in picot 6, ch 7 (corner), sc in picot 7, ch 5, sc in picot 9, ch 5, sc in picot 11, ch 5, sc2tog across picot 12 of Fan C and picot 12 of Fan A, ch 5, sc in picot 11 of Fan A, ch 5, sc in picot 9, ch 5, sc in picot 7, ch 7 (corner), sc in picot 6, ch 5, sc in picot 4, ch 5, sc in picot 2, ch 5, sc in drop loop.
Left half: Work the same sequence on Fans B and D, from picot 2 of Fan B up to picot 2 of Fan D. Finish with ch 5 and sl st in first sc. Fasten off.
Frame count: 28 anchor sts (24 sc in picots, 2 sc2tog, 1 sc in top loop, 1 sc in drop loop), 24 ch-5 loops and 4 ch-7 corner loops.
Each side of the frame has 6 ch-5 loops between two corner loops. The 4 sides match, which turns the round motif into a square for joining.
Checkpoint: Pin the motif to 6 in x 6 in (15.2 cm x 15.2 cm), with the corner loops at the 4 corners.
Make All Pieces
Each motif uses both colors: purple for the ring, bottom stem and Fans A–B, and lime for the top stem, Fans C–D and the frame round.
- Purple halves: 72
- Lime halves: 72
- Lime frame rounds: 72 (1 worked plain, 71 joined as you go)
Layout (6 across x 12 down, M = motif):
Rows 1–12, each: M M M M M M
Every motif points the same way: lime fans up, purple drop loop down.
Joining
Method: Join as you go during the frame round. Make the first motif with a plain frame. For each later motif, work the frame round as written until you reach a side that touches a finished motif.
Side loops: Replace each ch 5 with: ch 2, sl st in the matching ch-5 loop of the finished motif, ch 2.
Corner loops: Replace ch 7 with: ch 3, sl st in the matching ch-7 corner loop, ch 3. Where 4 motifs meet, sl st into the same point as the earlier corner join, so all 4 corners connect at one point.
Stitch-to-stitch logic: Each side has exactly 6 ch-5 loops, so the loops match 1 to 1. Loop 1 joins to loop 1, and so on through loop 6, with nothing left over or skipped. Working across a row, join each motif on its left side. From Row 2 on, also join on the top side.
Tension: Keep the joining chains the same length as your normal ch-5. If you pull the sl st tight, the lattice puckers. If you leave it loose, the motifs sag.
Size checkpoint: Row 1 of 6 motifs measures 36 in (91.4 cm) wide when laid flat. The full grid measures 36 in x 72 in (91.4 cm x 182.9 cm).
Border
Border gauge: 6 sc = 1 in (2.5 cm). That gives 36 sc per motif side, which matches the 6 in (15.2 cm) motif.
Along the edge, each corner loop that was joined to a neighbor shows only one 3-ch half on the outside. At the 4 outer corners of the panel, the ch-7 corner loops are unjoined.
Round 1: With RS facing, join lime in any outer corner ch-7 loop. Ch 1. Work the corner as (3 sc, ch 2, 3 sc) in that loop. For each motif along the edge, work 3 sc in the outer half-corner, 5 sc in each of the 6 ch-5 loops, and 3 sc in the next half-corner. At each panel corner, work ch 2 between the two groups of 3 sc. Sl st in first sc.
- Per motif side: 3 + 30 + 3 = 36 sc
- Short sides: 6 motifs x 36 = 216 sc each
- Long sides: 12 motifs x 36 = 432 sc each
- Total: 1,296 sc and 4 corner ch-2 sps
Round 2 (picot edge): Ch 1. Along each side, sc in each of next 3 sc, picot across. In each corner ch-2 sp, work (sc, picot, sc). Sl st in first sc. Fasten off.
- Short sides: 216 sc, 72 picots
- Long sides: 432 sc, 144 picots
- Total: 1,296 sc worked 1 per existing st + 8 corner sc = 1,304 sc; 432 side picots + 4 corner picots = 436 picots
Why the math works: Each motif side is 6 in (15.2 cm), and the border gauge gives 36 sc in 6 in, so Round 1 lies flat without ruffling or pulling in. Both 216 and 432 divide evenly by 3, so the picot repeat fits every side exactly. The 2 rounds add 0.5 in (1.3 cm) on each side, so the panel grows from 36 in x 72 in to 37 in x 73 in (94.0 cm x 185.4 cm).
Final Blocking
- Weave in all remaining ends and trim them close.
- Soak the panel in cool water for 15 minutes. Press the water out gently. Don’t wring.
- Roll the panel in towels to remove extra water.
- Lay it flat and pin the 4 outer corners to 37 in x 73 in (94.0 cm x 185.4 cm).
- Pin every motif join point along the edges, 6 in (15.2 cm) apart.
- Open each fan so the spokes spread evenly. Pin the drop loops straight down.
- Spray lightly and let the panel dry completely before unpinning.
Final Quality-Control Checklist
- All 72 motifs have lime fans pointing up.
- Each fan has 12 picots, and the spokes are even.
- Each frame side has 6 loops, all joined 1 to 1.
- All 4-way corners meet at one point.
- Size before border: 36 in x 72 in (91.4 cm x 182.9 cm).
- Border Round 1: 216 / 432 / 216 / 432 sc.
- Finished panel: 37 in x 73 in (94.0 cm x 185.4 cm).
- All ends are secure. Clip the 7 rings to the top border at each join point and at both corners, 6 in (15.2 cm) apart.
Troubleshooting
- Fans cup: Your Row 3 sc are too tight. Loosen them, or work that row with a 2.75 mm hook.
- Fans ruffle: Check that you have 4 sc, not 5, in each ch-3 sp.
- Motif is not square: Recount the frame loops. You need 6 per side, and the ch-7 loops must sit between picots 6 and 7.
- The lattice puckers: Your joining sl st are too tight. Rework them more loosely.
- The border waves: You have more than 6 sc per inch. Go down a hook size for the border only.
- The drop loop twists: Make sure the stem ch are not twisted before you sl st back up.
Care
Hand wash in cool water and dry flat. Reshape the panel while damp, and steam lightly if the fans need flattening again.

Final Notes
The measurement chain stays simple. A 4 in x 4.5 in (10.2 cm x 11.4 cm) motif becomes a 6 in (15.2 cm) square after the frame round. Seventy-two motifs make a 36 in x 72 in (91.4 cm x 182.9 cm) grid, and the border brings the panel to 37 in x 73 in (94.0 cm x 185.4 cm). If you check your first motif early and keep your joins even, every count falls into place.
Happy crocheting!