

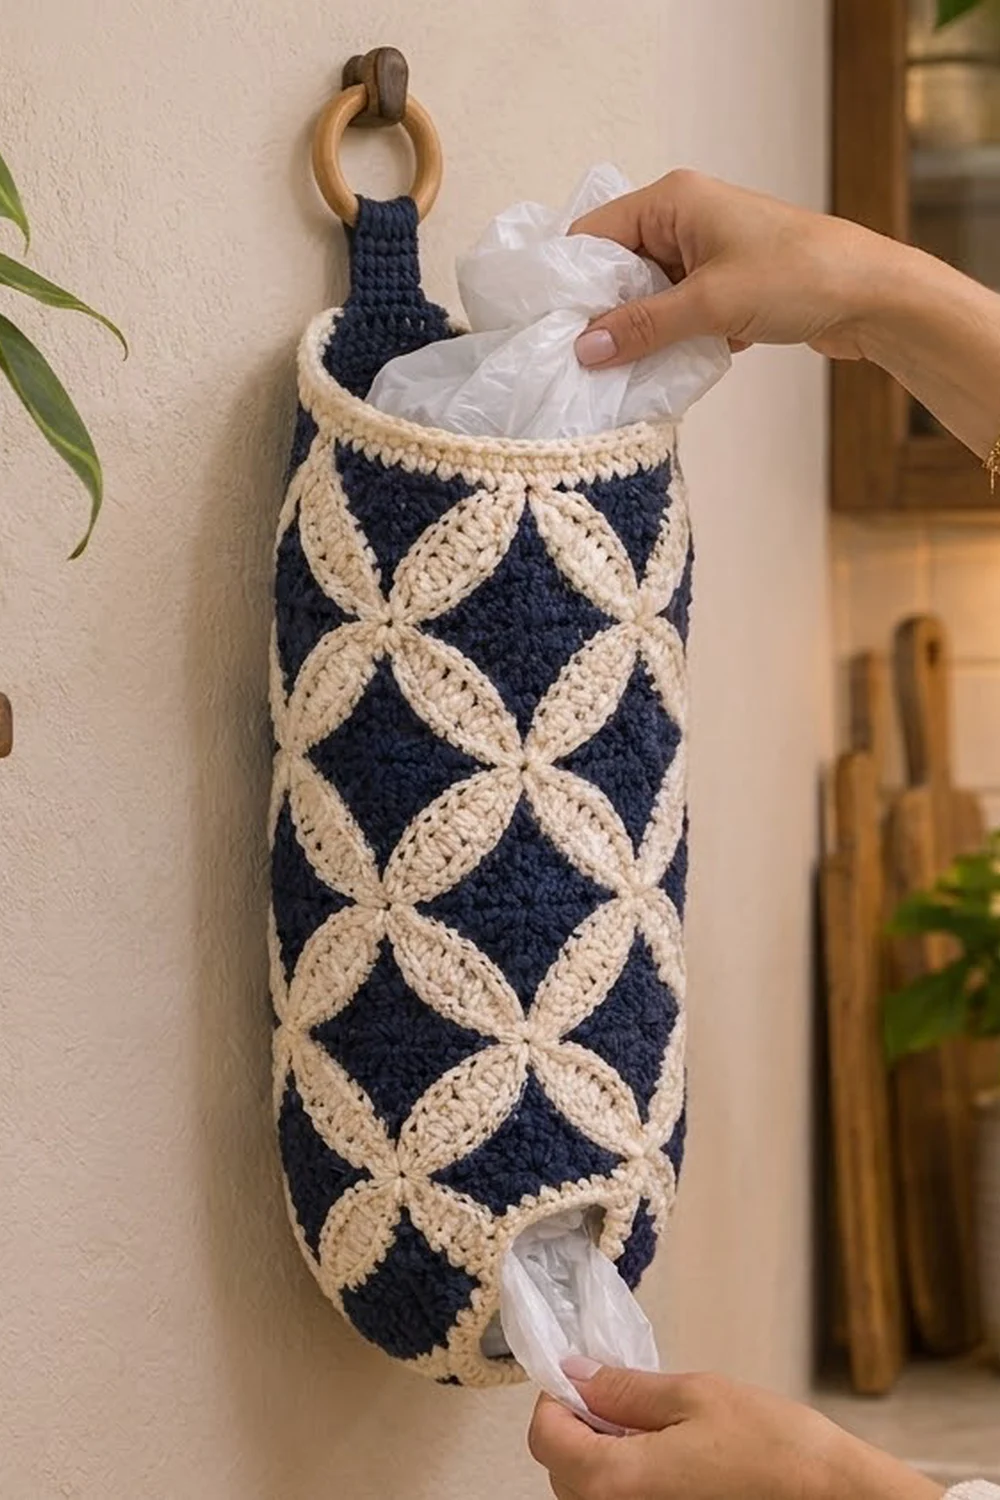
This bag holder brings a classic quilting motif to the kitchen wall. Cream petals cross over a navy background in an orange peel lattice, so the whole tube is covered in small navy diamonds framed by soft cream curves. It looks tailored and calm, and it keeps a loose pile of grocery bags tidy.
The colors are deep navy and natural cream. It is worked in tapestry crochet, which means single crochet with the unused color carried inside the stitches. That makes a firm, dense fabric that holds its shape on a hook. This pattern uses US crochet terms throughout.
The finished holder measures 6 in (15.2 cm) wide laid flat and 17.75 in (45.1 cm) tall, not counting the hanging tab. With the tab and ring it hangs about 20.25 in (51.4 cm) long.
Construction is simple and seamless. You start at the small bottom opening, shape a rounded base in navy, work the colorwork body in a spiral, and finish with a cream rim. Then you add a navy tab, fold it over a wooden ring, and work a reverse single crochet edging around the bottom hole.
Finished Size and Construction
- Finished size: 6 in (15.2 cm) wide flat × 17.75 in (45.1 cm) tall, plus a tab about 2.5 in (6.4 cm) tall
- Skill level: Intermediate (you should be comfortable with tapestry crochet color changes)
- Terminology: US crochet terms
- Yarn weight: Worsted (#4)
- Hook: 4.0 mm (US G-6)
- Number of pieces: 1 seamless tube with the tab worked on
- Layout: One tube; the motif repeats 4 times around and 5 times up
- Motif repeat size: 12 sts × 12 rnds = 3 in × 3 in (7.6 cm × 7.6 cm)
- Size before border: 6 in (15.2 cm) wide × 16.75 in (42.5 cm) tall (base plus body)
- Border depth: Top rim 1 in (2.5 cm). The bottom edging sits on the hole and adds no measurable length.
Materials
Use a smooth worsted-weight cotton or cotton blend. Cotton gives crisp color lines and a firm fabric that won’t sag under a full load of bags. Avoid fuzzy or heavily textured yarn, because it blurs the petal edges.
- Navy (main color, N): 85 g / 160 m
- Cream (contrast color, C): 75 g / 140 m
These amounts are based on a yarn with about 100 g per 190 m. They include a margin of about 15% for your gauge swatch and small differences in tension.
Tools:
- 4.0 mm (US G-6) crochet hook
- 1 wooden ring, 2 in (5.1 cm) outer diameter
- Locking stitch marker
- Tapestry needle
- Scissors
- Measuring tape
- Rolled hand towel or a cardboard tube for blocking
Abbreviations (US Terms)
- ch – chain
- sl st – slip stitch
- sc – single crochet
- inc – 2 sc in the same stitch
- rnd(s) – round(s)
- st(s) – stitch(es)
- N / C – navy / cream
- rev sc – reverse single crochet (crab stitch)
Tapestry sc color change: Work the last sc before a color change until 2 loops are left on the hook. Yarn over with the new color and pull it through both loops. Keep carrying the unused color along the top of the round below, and work every sc over it so it stays hidden inside.
Reverse single crochet: Working from left to right (right-handers), insert the hook into the next stitch to the right, pull up a loop, yarn over, and pull through both loops.
Gauge and Checkpoints
Gauge: 16 sts and 16 rnds = 4 in (10.2 cm) in tapestry sc, worked in the round.
Before you start the holder, test with a swatch. Ch 48, join into a ring without twisting, and work 12 rnds of the color grid below. Flatten it and measure across. It should be 6 in (15.2 cm) wide and 3 in (7.6 cm) tall.
Checkpoints:
- After Rnd 1, the opening measures about 6 in (15.2 cm) around, or about 1.9 in (4.8 cm) across.
- After Rnd 7, the base measures 6 in (15.2 cm) wide flat and about 1.75 in (4.4 cm) tall.
- After each 12-rnd repeat, the body grows by 3 in (7.6 cm).
- After Rnd 67, the piece is 16.75 in (42.5 cm) tall.
- After the rim, the piece is 17.75 in (42.5 + 2.5 = 45.1 cm) tall.
If your fabric is too big (wider than 6 in / 15.2 cm), go down a hook size. If it is too small, go up a hook size. Width matters more than height here. Don’t change the stitch count, because the 48-stitch round holds exactly 4 motif repeats.

Pattern
Base (Rnds 1–7)
The base starts at the dispensing hole and widens so the bottom is rounded instead of flat. Increasing every other round makes a gentle dome.
Rnd 1 (C): Ch 24 and sl st into the first ch to form a ring, taking care not to twist. Ch 1, sc in each ch around, then sl st to the first sc. (24 sts)
Join N in the last st of Rnd 1 using the tapestry color change. From here, work in a continuous spiral without joining. Place the marker in the first st of each round and move it up as you go. Carry C inside all the N stitches in the base so it is ready for the body.
Rnd 2 (N): Sc 2, inc; repeat from * 8 times. (32 sts)*
Rnd 3 (N): Sc in each st around. (32 sts)
Rnd 4 (N): Sc 3, inc; repeat from * 8 times. (40 sts)*
Rnd 5 (N): Sc in each st around. (40 sts)
Rnd 6 (N): Sc 4, inc; repeat from * 8 times. (48 sts)*
Rnd 7 (N): Sc in each st around. (48 sts)
Checkpoint: 48 sts, 6 in (15.2 cm) flat. The base curves inward toward the cream-edged hole.
The marker now sits at the center back of the holder. Keep it there, because the color jog and the tab will both sit on that side.
Body: Orange Peel Colorwork (Rnds 8–67)
Every body rnd has 48 sts: the 12-st grid worked 4 times around. Read each grid row from right to left in the direction you are crocheting. Always carry the unused color.
Color grid (12 sts per repeat):
- Grid Row 1: 4 N, 4 C, 4 N
- Grid Row 2: 2 N, 8 C, 2 N
- Grid Row 3: 1 N, 4 C, 2 N, 4 C, 1 N
- Grid Row 4: 1 N, 4 C, 2 N, 4 C, 1 N
- Grid Row 5: 3 C, 6 N, 3 C
- Grid Row 6: 2 C, 8 N, 2 C
- Grid Row 7: 2 C, 8 N, 2 C
- Grid Row 8: 3 C, 6 N, 3 C
- Grid Row 9: 1 N, 4 C, 2 N, 4 C, 1 N
- Grid Row 10: 1 N, 4 C, 2 N, 4 C, 1 N
- Grid Row 11: 2 N, 8 C, 2 N
- Grid Row 12: 4 N, 4 C, 4 N
Each row adds up to 12 sts. For example, Row 3 is 1 + 4 + 2 + 4 + 1 = 12.
How the motif forms: Rows 5–8 build a full navy diamond in the center of each repeat. It is 8 sts wide at the middle and narrows to a 2-st point in Rows 3–4 and 9–10. The navy at the edges of Rows 12 and 1 meets the next repeats sideways and vertically, making a second diamond that is offset between the first ones. The cream blocks between them form the diagonal petals. Where four petals meet, you get the cream X junctions.
Rnds 8–19: Work Grid Rows 1–12, each one 4 times around. (48 sts each rnd)
Rnds 20–67: Repeat Grid Rows 1–12 four more times. (48 sts each rnd)
That is 5 vertical repeats in total, or 60 rnds.
Checkpoint: The body is 15 in (38.1 cm) tall. The whole piece is 16.75 in (42.5 cm) and still 6 in (15.2 cm) wide flat. Navy diamonds should stack in straight vertical columns, with 2 full diamonds and 2 half diamonds showing across the front.
Cut N, leaving a 6 in (15.2 cm) tail to weave in. Keep C attached.
Border
Border gauge: Same as the body, 16 sts = 4 in (10.2 cm). The rim uses the same stitch count as the body, so it stays straight and doesn’t flare or pull in.
Top Rim (Rnds 68–71, C)
Rnds 68–70: With C only, sc in each st around. (48 sts each rnd)
Rnd 71: Sl st to the next st to even out the spiral step. Ch 1 and rev sc in each st around, then sl st to the first rev sc. (48 rev sc) Fasten off and weave in the end.
Why the math works: All four rim rnds have the same 48 sts as Rnd 67. That keeps the opening exactly 12 in (30.5 cm) around, or 6 in (15.2 cm) flat. The rev sc round gives the rolled, rope-like top edge without changing the width.
Checkpoint: The rim is 1 in (2.5 cm) deep and the piece is 17.75 in (45.1 cm) tall.
Hanging Tab (N)
Lay the holder flat with the marker side (back) facing you. Count 3 sts to the right of the marker along the top of Rnd 70, working just below the rev sc. Join N there.
Row 1: Ch 1, sc in the same st and in the next 5 sts. (6 sts)
Rows 2–16: Ch 1, turn, sc in each st across. (6 sts each row)
The tab is 1.5 in (3.8 cm) wide and 4 in (10.2 cm) long. Thread it through the wooden ring from front to back. Fold the last 6 rows (1.5 in / 3.8 cm) down behind the tab and whipstitch the end to the tab’s back. About 2.5 in (6.4 cm) of tab stays visible above the rim. Weave in the ends.
Bottom Hole Edging (C)
Turn the holder upside down. Join C in the free loop of any foundation ch from Rnd 1.
Edging rnd: Ch 1 and rev sc in each free loop of the foundation ch around, then sl st to the first st. (24 rev sc) Fasten off.
Why the math works: The foundation ring has 24 chains, so 24 rev sc fit one per loop. The edging keeps the hole at about 1.9 in (4.8 cm) across: big enough to pull one bag out, small enough to hold the rest in.
Final Blocking
- Weave in all remaining ends on the inside, running them through the stitches of the same color.
- Roll a hand towel into a tube about 12 in (30.5 cm) around, or use a cardboard tube padded with a towel, and slide it into the holder.
- Mist the outside lightly with water until it is damp but not soaked.
- Gently ease the fabric so the diamond columns run straight up and down. Line up the color jog with the tab at center back.
- Shape the base into a smooth dome over the end of the towel, and roll the cream rim outward slightly.
- Check the width again: 6 in (15.2 cm) flat. Check the height: 17.75 in (45.1 cm) to the rim.
- Let it dry completely on its side before you remove the towel.
Final Quality-Control Checklist
- [ ] Every body rnd has 48 sts, and every repeat has 12 sts.
- [ ] The opening is 6 in (15.2 cm) wide flat.
- [ ] Total height to the rim is 17.75 in (45.1 cm).
- [ ] There are 5 full vertical repeats, with straight navy diamond columns.
- [ ] No carried strands show on the right side.
- [ ] The top rim has 4 cream rnds finished in rev sc.
- [ ] The tab is centered at the back, 6 sts wide, and securely sewn around the ring.
- [ ] The bottom hole is edged with 24 rev sc and about 1.9 in (4.8 cm) across.
- [ ] All ends are woven in on the inside.
Troubleshooting
The diamonds lean sideways. Single crochet spirals naturally. Work into both loops, keep the same hand position all the way through, and straighten the columns when you block.
The carried yarn shows through. Hold the carried strand snugly along the top of the previous round and work each sc firmly over it. Going down a hook size can also help.
The fabric puckers. The carried strand is too tight. Every few stitches, stretch your work gently along the hook.
The base is flat instead of rounded. Check that the plain rounds (3, 5 and 7) were worked without increases.
The bottom hole is too large. Work the edging as sc2tog around, 12 sts, before the rev sc round.
There is a step at the rim. Use the sl st at the start of Rnd 71 to smooth it out, and keep the join at center back under the tab.
Care
Hand wash in cool water with mild soap, press out the water in a towel, and dry flat over a rolled towel to keep the shape. Don’t tumble dry, because cotton colorwork can shrink unevenly.
Final Notes
The measurement chain is short and easy to check. A 24-stitch cream ring opens to a 1.9 in (4.8 cm) hole. Six navy base rounds grow it to 48 stitches and 6 in (15.2 cm) flat. Five 12-round motif repeats add 15 in (38.1 cm), bringing the piece to 16.75 in (42.5 cm). The cream rim adds 1 in (2.5 cm) for a finished height of 17.75 in (45.1 cm). Finally, the 6-stitch tab and wooden ring add about 2.5 in (6.4 cm) above the rim.
Check your gauge once and count to 48 every round, and the orange peel lattice will line up on its own. Happy crocheting!