

The Gloria Lace Angel is a light, airy Christmas ornament with a lot of detail. It has a firm little stuffed head and an open-work body made of chain lace. Five spokes of linked twin chains form the bell-shaped skirt, a row of interlocking rings trims the hem, and each wing has three outlined petals with smaller loops nested inside.
The whole angel is worked in one cream cotton thread, so it has the classic look of a vintage lace tree ornament. Once blocked and lightly stiffened, it hangs flat and holds its shape on the tree.
This pattern uses US crochet terms. The finished angel is about 4 in (10.2 cm) across the wings and 3.5 in (8.9 cm) tall, plus a 1.5 in (3.8 cm) hanging loop.
You work it as one piece. Start with the head in rounds, then the neck and collar. The skirt spokes and the hem hang from the collar, and the ring border goes along the hem. The wings are worked onto the sides of the collar, and the hanging loop is worked last, from the top of the head.
Finished Size and Construction
- Finished size: 4 in (10.2 cm) wide × 3.5 in (8.9 cm) tall, not counting the loop
- Hanging loop: 1.5 in (3.8 cm) tall
- Skill level: Intermediate
- Terminology: US
- Yarn weight: Size 3 crochet thread (light fingering) in cotton
- Hook: 2.25 mm (US B-1)
- Number of pieces: 1 (no assembly)
- Layout: A single ornament. The head, skirt, wings and loop all grow out of the same collar.
- Piece size: 4 in (10.2 cm) × 3.5 in (8.9 cm)
- Size before border: 3 in (7.6 cm) tall, hem 3.75 in (9.5 cm) wide
- Border depth: 0.5 in (1.3 cm)
Materials
Yarn: Use a mercerized cotton thread in size 3 or a light fingering weight. Mercerized cotton gives crisp stitch definition and takes stiffener well. Avoid acrylic, because it won’t hold a blocked shape.
- Cream / ivory: 6 g, about 22 m
The quantity includes a margin of about 20% for swatching and weaving in ends. A single angel uses roughly 5 g.
Tools:
– 2.25 mm (US B-1) crochet hook
– A pinch of polyester fiberfill
– Tapestry needle
– 2 stitch markers (plus 5 more for the spokes)
– Blocking board or foam and rustproof pins
– Fabric stiffener or a sugar-water or starch solution
– Small scissors
Abbreviations (US Terms)
- ch – chain
- sl st – slip stitch
- sc – single crochet
- inc – 2 sc in the same stitch
- dec – single crochet 2 together (invisible decrease recommended)
- st(s) – stitch(es)
- sp – space
- MR – magic ring
Special stitch: twin-chain spoke (N eyes)
1. Ch 5 × N. This is the foundation strand.
2. Work ch 6, skip the next 4 foundation ch, sl st in the next foundation ch N times. The last sl st lands in the top foundation ch.
3. Sl st into the collar stitch you started from.
Each eye pairs 5 foundation ch with 6 return ch. The extra chain lets the return strand bow outward, which opens the eye. The sl sts form the small knots between the eyes.
Gauge and Checkpoints
Gauge: 10 sc and 10 rounds = 1 in (2.5 cm), and 10 ch = 1 in (2.5 cm).
Gauge matters here because the spokes, hem and wings are all measured in chains. Before you start, make a chain of 20 and measure it. It should be 2 in (5.1 cm).
Checkpoints:
– After Round 11 (head closed): the stuffed head is 0.75 in (1.9 cm) across.
– After Round 13 (collar): the head plus neck and collar is 1 in (2.5 cm) tall. The neck and collar add 0.25 in (0.6 cm).
– After the center spoke: it hangs 2 in (5.1 cm) below the collar. The outer spokes are 2.5 in (6.4 cm) long.
– After the hem row: the hem is 3.75 in (9.5 cm) wide, and the angel is 3 in (7.6 cm) tall.
– After the border: the angel is 3.5 in (8.9 cm) tall.
– After the wings: the wingspan is 4 in (10.2 cm), with each wing reaching 1.75 in (4.4 cm) beyond the collar.
If your chains are too long (20 ch is more than 2 in / 5.1 cm), go down to a 2 mm hook. If they are too short, go up to a 2.5 mm hook. Keep your chain tension the same as your sc tension. Loose chains make floppy spokes.
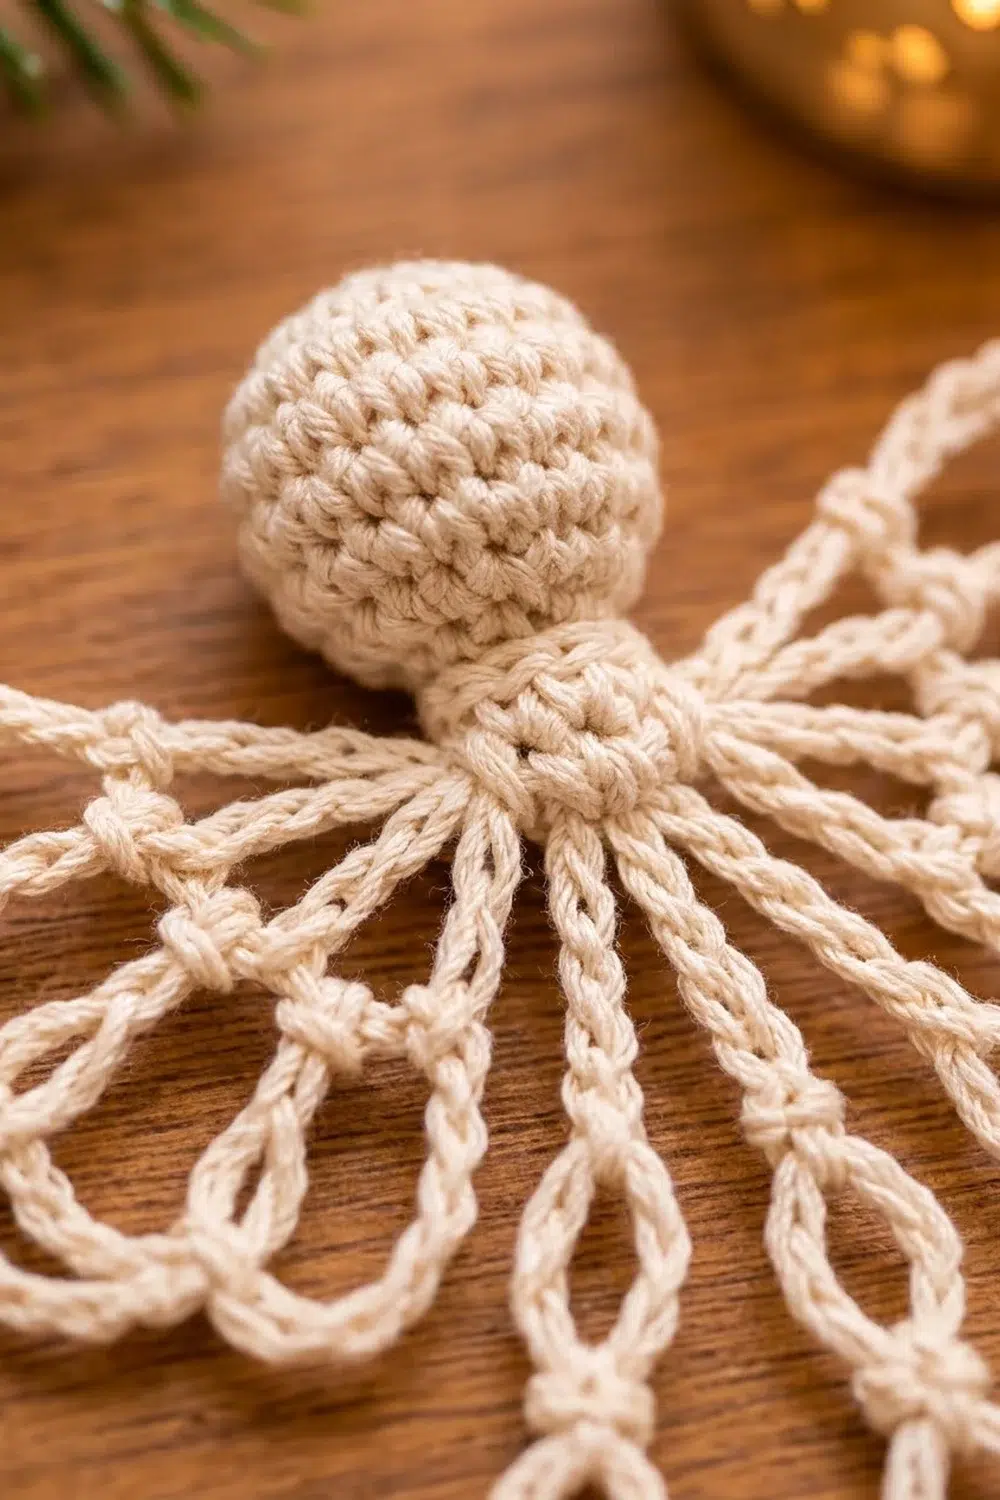
Head
Work in continuous rounds and move the marker up each round.
- Round 1: 6 sc in MR. (6)
- Round 2: inc in each st around. (12)
- Round 3: (sc, inc) 6 times. (18)
- Round 4: (2 sc, inc) 6 times. (24)
- Rounds 5–8: sc in each st around. (24) That’s 4 rounds.
- Round 9: (2 sc, dec) 6 times. (18)
- Round 10: (sc, dec) 6 times. (12)
Stuff the head firmly with fiberfill. It should feel round, not soft.
- Round 11: dec 6 times. (6)
Checkpoint: the head is 0.75 in (1.9 cm) across.
Neck and Collar
- Round 12 (neck): sc in each st around. (6)
- Round 13 (collar): inc in each st around. (12) Sl st to the first st and fasten off.
The collar lies flat like a small disk under the neck, about 0.5 in (1.3 cm) across.
Marking the collar: Turn the head so the MR is centered at the back of the head. Mark the 5 front stitches of the collar as S1 to S5, from left to right as you look at the front. Going around the collar:
– the 3 stitches beyond S5 belong to the right wing,
– the next 1 stitch is the back stitch and stays unworked,
– the next 3 stitches belong to the left wing, and these lead back to S1.
That’s 5 + 3 + 1 + 3 = 12 stitches. On each wing, call the stitch closest to the back stitch W1 (the top), the middle one W2, and the one next to the skirt W3 (the bottom).
Skirt Spokes
Every spoke uses the twin-chain spoke technique. Let the spokes hang straight down from the collar as you work.
- Spoke 1 (S1, outer): Join with a sl st in S1. Work a twin-chain spoke with 5 eyes: ch 25 foundation, then 5 return groups of ch 6. Sl st in S1, then sl st in S2.
- Spoke 2 (S2, inner): Work a twin-chain spoke with 4 eyes: ch 20 foundation, then 4 return groups. Sl st in S2, then sl st in S3.
- Spoke 3 (S3, center): Work a 4-eye spoke the same way. Sl st in S3, then sl st in S4.
- Spoke 4 (S4, inner): Work a 4-eye spoke the same way. Sl st in S4, then sl st in S5.
- Spoke 5 (S5, outer): Work a 5-eye spoke as for Spoke 1. Sl st in S5 and fasten off.
The tip of each spoke is its bottom foundation ch, the point where you started the return strand.
Counts: each outer spoke has 25 foundation ch, 30 return ch and 6 sl sts. Each inner and center spoke has 20 foundation ch, 24 return ch and 5 sl sts.
Checkpoint: the center spoke is 2 in (5.1 cm) long and the outer spokes are 2.5 in (6.4 cm). The longer outer spokes slant outward, which gives the skirt its bell shape.
Hem Row
With the front facing you, join with an sc in the tip of Spoke 1.
- Hem Row: ch 8, sc in the tip of the next spoke 4 times.
Count: 5 sc + 4 ch-8 sections = 37 sts. Fasten off, leaving a 4 in (10.2 cm) tail to weave in later.
Check that the four ch-8 sections lie evenly with no twists. The hem should be 3.75 in (9.5 cm) wide, curving gently downward at the center. The angel now measures 3 in (7.6 cm) from the top of the head to the hem.
Border (Interlocking Rings)
Border gauge: 10 sc = 1 in (2.5 cm). One ring repeat in Row 2 covers 4 sts, or 0.4 in (1.0 cm).
With the front facing, join at the first sc of the Hem Row, which is the tip of Spoke 1.
- Row 1: ch 1, sc in each sc and in each ch across. That’s 1 sc per existing st + 0 added = 37 sc. Turn.
- Row 2: ch 1, sc in the first sc, ch 7, skip 3 sc, sc in the next sc 9 times. That’s 9 ch-7 rings and 10 sc, using 1 + (9 × 4) = 37 sts. Turn.
- Row 3: ch 1, sc in the first sc, ch 3, sc in the 4th ch of the first ring, ch 7, sc in the 4th ch of the next ring 8 times, ch 3, sc in the last sc. That’s 8 ch-7 rings, 2 ch-3 half rings, and 11 sc: 1 at each end and 9 at the ring centers. Fasten off.
Each Row 3 ring hangs from the centers of two Row 2 rings, so the rings overlap and read as a chain of linked circles.
Why the math works:
– Row 2 needs a multiple of 4 plus 1. 37 = (4 × 9) + 1, so the rings start and end exactly at the outer spoke tips.
– The spoke tips fall on Row 1 stitches 1, 10, 19, 28 and 37. The 5th ring covers stitches 17–21, so it sits centered under the center spoke at stitch 19. That keeps the border symmetrical.
– Row 3 adds no new stitches. It only bridges the 9 ring centers, which gives 8 full rings, plus 2 half rings at the ends to square off the edges.
Checkpoint: the border is 0.5 in (1.3 cm) deep, and the angel is 3.5 in (8.9 cm) tall.
Wings (Make 2)
Work the left wing in the left wing stitches and the right wing in the right wing stitches. The steps are the same for both.
Row 1 (inner loops):
1. Join with a sl st in W1. Ch 19, sl st in W1.
2. Sl st in W2. Ch 15, sl st in W2.
3. Sl st in W3. Ch 11, sl st in W3.
That gives 3 inner loops.
Row 2 (outer petals): Each outer loop shares its base stitch with an inner loop and goes around it.
1. Ch 23, sl st in W3.
2. Sl st back into W2. Ch 29, sl st in W2.
3. Sl st back into W1. Ch 35, sl st in W1.
That gives 3 outer loops of 23, 29 and 35 ch.
Row 3 (outline): This is a conversion round: 1 sc per existing ch + 0 added.
1. Sc in each ch of the ch-35 loop (35 sc). Sl st in W1, then sl st in W2.
2. Sc in each ch of the ch-29 loop (29 sc). Sl st in W2, then sl st in W3.
3. Sc in each ch of the ch-23 loop (23 sc). Sl st in W3.
That’s 87 sc per wing. Fasten off.
The sc outline gives the petals their corded edge, and the plain inner loops stay delicate inside them. Checkpoint: the top petal reaches 1.75 in (4.4 cm) beyond the collar, so the wingspan is 4 in (10.2 cm).
Hanging Loop
Join with a sl st at the center top of the head, in the MR.
- Ch 30, sl st in the same spot.
- Sc in each ch around the loop (30 sc). Sl st to the base.
Fasten off and weave in the end through the head. The loop stands 1.5 in (3.8 cm) tall.
Final Blocking
- Weave in all the ends along chains, so they disappear into the cord.
- Soak the angel in stiffener, or a sugar-water or starch solution. Squeeze out the excess gently and don’t wring it.
- Lay it face up on the blocking board. Pin the head and the collar first.
- Pin the center spoke straight down to 2 in (5.1 cm). Fan the inner and outer spokes out evenly, and open each eye with a pin.
- Pin the hem to a 3.75 in (9.5 cm) gentle curve. Pin each border ring into a round shape.
- Pin each wing petal into a rounded teardrop shape so the tips sit 4 in (10.2 cm) apart. Center the inner loops inside the petals.
- Pin the hanging loop upright and let it dry completely, which takes 12–24 hours. Unpin only when the piece is stiff.
Final Quality-Control Checklist
- The head is round, firmly stuffed and 0.75 in (1.9 cm) across, with no fiberfill showing.
- All 5 spokes hang from S1 to S5 with open, evenly sized eyes.
- The outer spokes have 5 eyes and the others have 4.
- The hem has 37 sts with 4 equal ch-8 sections.
- The border has 9 rings in Row 2 and 8 rings plus 2 half rings in Row 3, centered under the center spoke.
- Each wing has 3 outlined petals (87 sc) with an inner loop inside each one.
- The angel measures 4 in (10.2 cm) × 3.5 in (8.9 cm), and the loop is 1.5 in (3.8 cm).
- No visible ends, and the piece hangs straight.
Troubleshooting
- The eyes in the spokes stay closed. Your return chains are too tight. Work them looser, or use ch 7 instead of 6 for each return group.
- The skirt hangs crooked. Count the eyes again, since one spoke may have an extra or missing eye. Re-pin while the piece is damp.
- The hem ruffles. Your chains are looser than your sc. Use ch 7 between the spokes and adjust the border to 33 sts (8 rings).
- The wings droop. Use more stiffener, and pin the petals tip-up while they dry.
- The head is lumpy. Add stuffing in small pinches and use invisible decreases.
- The border rings twist. Make sure each Row 3 sc goes into the 4th ch of the ring, not into the ring space.
Care
Hand wash in cool water with a mild soap and lay flat to dry. Re-block and re-stiffen after washing so the angel keeps its shape.

Final Notes
The measurements build on each other through the pattern:
- The head is 0.75 in (1.9 cm), and the neck and collar add 0.25 in (0.6 cm).
- The 2 in (5.1 cm) center spoke brings the angel to 3 in (7.6 cm) tall, across a 3.75 in (9.5 cm) hem.
- The 0.5 in (1.3 cm) ring border finishes the height at 3.5 in (8.9 cm).
- The wings give a 4 in (10.2 cm) span, and the loop adds 1.5 in (3.8 cm) on top.
If you check each of these measurements as you go, the finished angel will come out at the right size.
Happy crocheting!