

The Rosewood Lantern is a lace ball ornament made from six slim, leaf-shaped panels. Each panel is a column of stacked fans. The fans start small at the tip, open up through the middle and narrow again, so the finished ball looks like a little paper lantern made of thread.
Three panels are dusty pink and three are deep burgundy. They alternate around a cream ball, and pink seams make a fine raised line between every panel. The cream core shows through the openwork, which makes the colors look richer on the tree.
The finished ornament is 3 in (7.6 cm) in diameter, plus a 1.5 in (3.8 cm) hanging loop. The pattern uses US crochet terms throughout.
Construction is simple. Crochet six flat panels in rows and outline each one in sc. Seam five joins flat, slip the ball inside and close the sixth seam. Then close the top and bottom with small caps and add the loop.
Finished Size and Construction
- Finished size: 3 in (7.6 cm) diameter; the loop adds 1.5 in (3.8 cm)
- Skill level: Intermediate (shells, working into row-ends, seaming)
- Terminology: US crochet terms
- Yarn weight: Super Fine (#1) cotton, 4-ply / light fingering
- Hook: 2.5 mm
- Number of pieces: 6 panels (3 pink, 3 burgundy)
- Layout: 6 vertical panels around the ball, alternating pink and burgundy
- Piece size: 1.6 in (4.1 cm) wide x 4.75 in (12.1 cm) long after outlining
- Size before border: joined cover, 9.6 in (24.4 cm) around the middle, open at the top and bottom
- Border depth: about 0.5 in (1.3 cm) for the top cap; about 0.25 in (0.6 cm) for the bottom cap
Materials
Choose a smooth mercerized cotton. It gives crisp fans and holds a sharp point at the tips. Avoid fuzzy or very stretchy yarns, because the lace will blur and the cover will sag on the ball.
- Color A, dusty pink: 15 g, about 51 m (based on about 170 m per 50 g ball)
- Color B, burgundy: 10 g, about 34 m
- Ball: one 3 in (7.6 cm) foam or fabric-covered ball in cream or ivory
- 2.5 mm crochet hook
- Tapestry needle
- Scissors
- 6 locking stitch markers
- Spray bottle and rust-proof pins for blocking
- Ruler or tape measure
The quantities above include a margin of about 25 percent for swatching and weaving in ends. Pink is used for three panels plus all the seams, both caps and the loop, so you need more pink than burgundy.
Abbreviations (US Terms)
- ch – chain
- sl st – slip stitch
- sc – single crochet
- sc2tog – single crochet 2 together
- dc – double crochet
- sp – space
- tch – turning chain
- RS / WS – right side / wrong side
Special stitch – Shell: Work the stated number of dc into the same stitch. In a 7-dc shell the center dc is the 4th dc. In a 9-dc shell the center dc is the 5th dc.
Turning chain: At the start of every row, ch 3 counts as the first dc. The last stitch of every row is worked into the top of the previous row’s tch.
Gauge and Checkpoints
Gauge matters because the panels have to fit the ball. Each panel’s length should equal half the ball’s circumference, and six panel widths should equal the full circumference.
Make one panel first and measure it before you make the other five.
- Checkpoint 1, after Row 7: the panel is about 1.4 in (3.6 cm) wide across the widest fan.
- Checkpoint 2, after Row 11: the panel is about 4.4 in (11.2 cm) long from the tip to the top edge.
- Checkpoint 3, after the outline: the panel is 1.6 in (4.1 cm) wide x 4.75 in (12.1 cm) long.
If the panel is too big: Switch to a 2.25 mm hook or tighten your chains. If it is too small: Switch to a 2.75 mm hook. You can also keep your fabric and change the ball instead. The ball’s diameter should be about the panel length divided by 1.57.
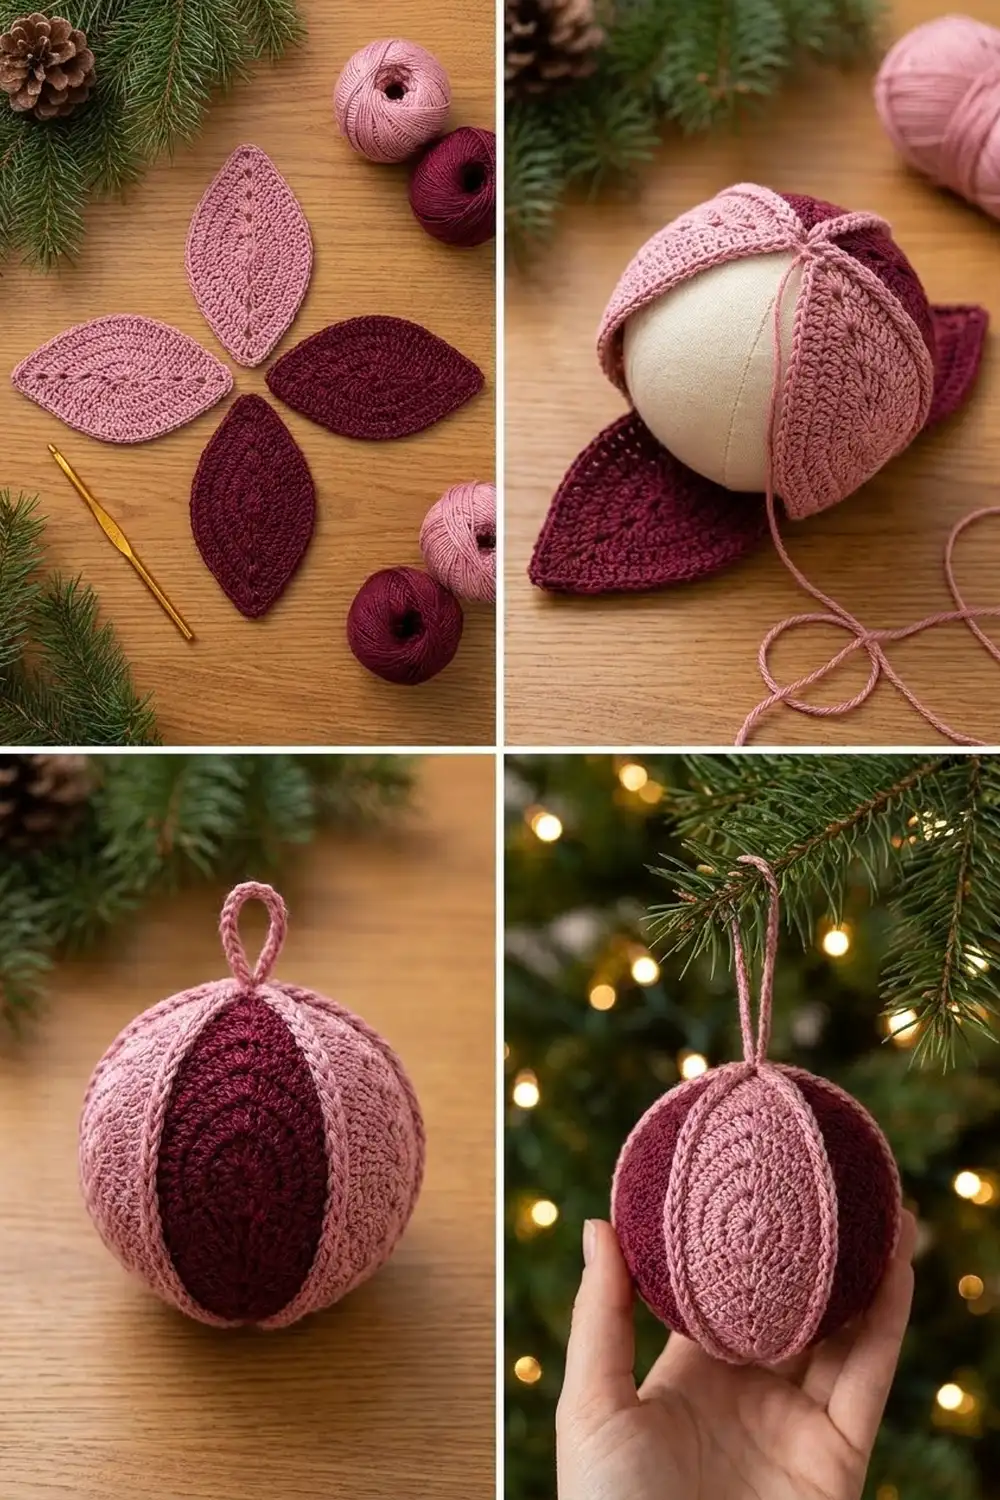
Panel Pattern (Make 6)
Work flat in rows, starting at the bottom tip and ending at the top edge. Turn at the end of every row.
Row 1 (RS): Ch 4, 4 dc in 4th ch from hook. Turn. (5 dc. The skipped ch counts as the first dc. This is the first small fan.)
Row 2: Ch 3, ch 2, sc in center (3rd) dc, ch 2, dc in top of tch. Turn. (2 dc, 1 sc, 2 ch-2 sp)
Row 3: Ch 3, ch 1, 7-dc shell in the sc, ch 1, dc in top of tch. Turn. (9 dc: 7 in the shell + 2 edge dc; 2 ch-1 sp)
Row 4: Ch 3, ch 3, sc in center (4th) dc of shell, ch 3, dc in top of tch. Turn. (2 dc, 1 sc, 2 ch-3 sp)
Row 5: Ch 3, ch 2, 9-dc shell in the sc, ch 2, dc in top of tch. Turn. (11 dc: 9 in the shell + 2 edge dc; 2 ch-2 sp)
Row 6: Ch 3, ch 4, sc in center (5th) dc of shell, ch 4, dc in top of tch. Turn. (2 dc, 1 sc, 2 ch-4 sp)
Row 7: Ch 3, ch 2, 9-dc shell in the sc, ch 2, dc in top of tch. Turn. (11 dc; 2 ch-2 sp. This is the widest row. Check Checkpoint 1.)
Row 8: Ch 3, ch 3, sc in center (5th) dc of shell, ch 3, dc in top of tch. Turn. (2 dc, 1 sc, 2 ch-3 sp)
Row 9: Ch 3, ch 1, 7-dc shell in the sc, ch 1, dc in top of tch. Turn. (9 dc; 2 ch-1 sp)
Row 10: Ch 3, ch 2, sc in center (4th) dc of shell, ch 2, dc in top of tch. Turn. (2 dc, 1 sc, 2 ch-2 sp)
Row 11: Ch 3, 3 dc in the sc, dc in top of tch. (5 dc. This is the small top fan. Check Checkpoint 2.)
The arch rows make the open windows between the fans. The ch-3 and the last dc of every row stack up into solid dc columns along both sides. There are six fans in total, at 5, 7, 9, 9, 7 and 5 dc wide, so the panel gets wider toward the middle and narrower toward both ends.
Outline Round: Ch 1, turn. Sc in each of the 5 dc across Row 11 (5 sc). Work down the first side with 2 sc around each row-end post, from Row 11 to Row 1 (22 sc). Work (sc, ch 2, sc) in the bottom foundation ch for the tip (2 sc, 1 ch-2 sp). Work 2 sc in each row-end up the second side (22 sc). Sl st to first sc. Fasten off, leaving a 6 in (15.2 cm) tail.
Outline total: 51 sc and 1 ch-2 tip (5 top + 22 side + 2 tip + 22 side = 51). In this pattern, the 22 side stitches do not include the 5 top sc or the 2 tip sc. Those are counted separately.
Make All Pieces
- Color A, pink: 3 panels
- Color B, burgundy: 3 panels
Lay the panels out in order before joining, with the top edges up:
 [A1] [B1] [A2] [B2] [A3] [B3]
   ^    ^    ^    ^    ^    ^
  top edges (5 sc each) all pointing up
  seam 6 joins B3 back to A1 around the ball
Weave in all ends except the outline tail on each panel. You can hide that tail under a seam later.
Tip: Work all six panels from the same dye lot of each color, and in one or two sittings if you can. Panels made on different days often come out at slightly different tension.
Joining
Use pink for every seam, including the seams between pink and burgundy panels, so the ridge line looks the same all the way around.
Method: Hold two neighboring panels with WS together and the top edges lined up. With pink, sl st through both loops of both layers in each matching pair of side sc. Each seam is 22 sl st, joining the 22 side sc of one panel to the 22 side sc of the next. Do not seam the 5 top sc or the bottom tip. They stay free for the caps.
Both panels have exactly 22 side stitches, so the seam joins them stitch to stitch with no easing. Holding the WS together puts a raised pink chain on the RS. This makes the fine line you see between the colors.
Tension: Work the sl st at the same tension as your sc. Tight sl st will pucker the seam and pull the ornament into a lemon shape. If needed, use a 2.75 mm hook for the seams only.
Order: Join A1–B1, B1–A2, A2–B2, B2–A3 and A3–B3 while the panels are flat. Slip the ball inside, then work seam 6 (B3–A1) around the ball. This seam is slower because you are holding the ball, so place markers at stitches 1, 11 and 22 to keep the pairs lined up.
Size checkpoint: Around the middle, the cover measures 6 x 1.6 in = 9.6 in (24.4 cm). A 3 in (7.6 cm) ball is about 9.42 in (23.9 cm) around, so the cover has less than 0.2 in (0.5 cm) of ease. It should fit snugly on the ball without stretching the fans.
Border: Top Cap, Bottom Cap and Hanging Loop
Border gauge: 1 sc per top-edge stitch, so the 5 top sc of each panel give 5 border stitches. Each round of sc is about 0.13 in (0.3 cm) tall.
Top Cap, Rnd 1: With pink, join with a sl st in the first top sc of any panel. Ch 1, sc in each of the 5 top sc of every panel around. Sl st to first sc. (6 panels x 5 sc = 30 sc)
Rnd 2: Ch 1, [sc 3, sc2tog] 6 times. Sl st to first sc. (6 x 3 sc + 6 sc2tog = 24 sts; one decrease falls on each panel)
Rnd 3: Ch 1, [sc2tog] 12 times. Sl st to first sc. (12 sts)
Rnd 4: Ch 1, [sc2tog] 6 times. Sl st to first sc. (6 sts) Do not fasten off.
Hanging Loop: Ch 30. Sl st into the same st at the base to make a loop. Sl st in each of the 30 ch around the loop to make a firm cord, then sl st into the base again. Fasten off. Run the tail through the 6 sts of Rnd 4 and pull tight to close the center. The 30-ch loop is about 3 in (7.6 cm) around, so it hangs 1.5 in (3.8 cm) long.
Bottom Cap, Rnd 1: Turn the ornament over. With pink, join in any ch-2 tip. Ch 1, 2 sc in each of the 6 ch-2 tips. Sl st to first sc. (6 tips x 2 sc = 12 sc)
Rnd 2: Ch 1, [sc2tog] 6 times. Sl st to first sc. (6 sts) Fasten off, pull the center closed and weave in the end.
Why the math works: The top edge of the joined cover has 30 stitches spread over about 2.7 in (6.9 cm). The cap curves over the top of the ball, so each round has fewer stitches: 30 to 24 to 12 to 6. The decreases are spread evenly, with the same number on every panel, so the seams stay straight and meet in the center. At the bottom the pointed tips already meet, so you only need 12 stitches and one decrease round to close it.
Final Blocking
- Block the panels before joining. Pin each one flat to 1.6 in (4.1 cm) x 4.75 in (12.1 cm).
- Open each fan with your fingertips and pin the bottom tip to a sharp point.
- Mist the panels with water until they are damp, not soaked. Let them dry completely.
- After assembly, lightly mist the finished ornament while it is on the ball.
- Straighten the seams from top to bottom and smooth each fan so it sits evenly on the curve.
- Hang the ornament by its loop and let it dry on the ball.
Final Quality-Control Checklist
- Each panel has 6 fans: 5, 7, 9, 9, 7 and 5 dc.
- Each outline has 51 sc: 5 top, 22 per side and 2 at the tip.
- Every panel measures 1.6 in (4.1 cm) x 4.75 in (12.1 cm).
- The colors alternate pink, burgundy, pink, burgundy, pink, burgundy.
- All 6 seams are pink, 22 sl st each, and raised on the RS.
- The top cap counts are 30, 24, 12 and 6 sts.
- The bottom cap counts are 12 and 6 sts.
- The loop hangs 1.5 in (3.8 cm) and the ornament hangs straight.
Troubleshooting
Fans ruffle or cup: The shells are too loose compared with the arches. Go down 0.25 mm in hook size, or tighten the chains between the fans.
Side edges look ragged: Keep the ch-3 snug so it is the same height as the dc at the end of the row.
Seams don’t line up: Recount the outline. Both sides must have exactly 22 sc. Use markers at stitches 1, 11 and 22.
Cover is loose on the ball: Use a slightly larger ball, or work the seam sl st more tightly.
Cover won’t close over the ball: Use a ball 0.25 in (0.6 cm) smaller, or block the panels again slightly longer.
Top cap puckers: Check that each Rnd 2 decrease is on a different panel.
Ornament tilts: Move the loop to the exact center of Rnd 4.
Care
Spot clean with a damp cloth and cool water. Store the ornament wrapped in tissue so the fans don’t get crushed.

Final Notes
Here are the key measurements in order. Eleven rows make a 4.4 in (11.2 cm) panel. The outline brings it to 1.6 in x 4.75 in (4.1 cm x 12.1 cm). Six panels measure 9.6 in (24.4 cm) around, which fits snugly on a 3 in (7.6 cm) ball. Each seam joins 22 stitches to 22, the top cap closes 30 stitches down to 6, and the bottom cap closes 12 down to 6.
Check your first panel carefully, and the other five will be easy. Happy crocheting!