

This little tree is a cone of open diamond lattice that slips over a battery tea light, with a golden star perched on top. When the light is on, it shines through every diamond, and the tree becomes a warm lantern on a shelf, mantel, or holiday table.
The tree is worked in a soft moss green, and the star is a bright golden yellow. The style is simple and rustic, and it looks especially good on natural wood, linen, and cream knits. The lattice is made of chain arches anchored by small “knots,” which gives the crossings their thick, braided look.
This pattern uses US crochet terms. The finished cone measures 3.4 in (8.6 cm) across the base and 5.6 in (14.2 cm) tall. With the star, the tree stands about 6.8 in (17.3 cm) tall.
Construction is simple. You chain a ring, work one round of single crochet, and then build the lattice upward. The lattice gets smaller as the arches get shorter, then the number of arches is halved. You close the top tightly, add a solid band to the bottom edge, block the cone over a form, and sew on the star.
Finished Size and Construction
- Finished size: 3.4 in (8.6 cm) base diameter × 5.6 in (14.2 cm) cone height; 6.8 in (17.3 cm) tall including star
- Skill level: Easy–Intermediate
- Terminology: US crochet terms
- Yarn weight: Worsted (#4), cotton or cotton blend
- Hook: 4.0 mm (US G-6)
- Number of pieces: 1 cone + 1 star topper (sewn on)
- Layout: Single standing cone; no motifs to join
- Cone circumference at base: 10.7 in (27.2 cm), 48 stitches
- Size before border: 5.2 in (13.2 cm) tall
- Border depth: 0.4 in (1.0 cm); the full solid base band, including Rnd 1, is 0.6 in (1.5 cm)
- Star size: 1.5 in (3.8 cm) point to point
Materials
Choose a smooth worsted-weight cotton or cotton blend. Cotton holds the cone shape after blocking and shows the lattice clearly. Avoid fuzzy or very stretchy acrylics, because the arches will sag and blur the diamonds.
- Green (tree): 30 g, about 55 m
- Golden yellow (star): 5 g, about 9 m
These quantities include a margin of about 25% for your gauge swatch and tails.
Tools:
– 4.0 mm (US G-6) crochet hook
– Tapestry needle
– Scissors
– 4 stitch markers
– Cone form for blocking: a rolled cardstock cone 3.4 in (8.6 cm) across the base and 5.6 in (14.2 cm) tall, or a craft foam cone of similar size
– Spray starch or fabric stiffener
– Battery LED tea light, about 1.6 in (4.1 cm) across
Safety note: Use only battery LED lights. Never put this cover over a real flame.
Abbreviations (US Terms)
- ch – chain
- sl st – slip stitch
- sc – single crochet
- hdc – half double crochet
- sc2tog – single crochet 2 together
- sp – space
- sk – skip
- st(s) – stitch(es)
- rnd – round
Special stitches:
- Knot: (sc, ch 1, sc) worked around the indicated chain arch. This makes each lattice crossing.
- Knot-dec: sc around the current arch, ch 1, sc around the next arch. This joins 2 arches into one crossing and reduces the arch count by 1.
Gauge and Checkpoints
Gauge: 18 sc and 20 rnds = 4 in (10.2 cm) in sc worked in the round.
Since this is a single small piece, you can treat Rnd 1 as your test piece. Chain the foundation, work Rnd 1, and check the size before starting the lattice.
Checkpoints:
- After Rnd 1: The ring measures 10.7 in (27.2 cm) around, or 5.3 in (13.5 cm) when laid flat. It should slide easily over your tea light.
- After Rnd 4: The piece is about 1.8 in (4.6 cm) tall, measured from the foundation.
- After Rnd 8: The piece is about 3.8 in (9.7 cm) tall.
- After Rnd 13: The piece is about 5.2 in (13.2 cm) tall, before the border.
If Rnd 1 is too big by more than 0.5 in (1.3 cm) flat, go down to a 3.75 mm hook. If it is too small, go up to a 4.5 mm hook. Do not change the stitch count. The 48 stitches are needed for the 8 lattice repeats.
If your height runs short but your circumference is right, your chains are tight. Loosen your chain tension a little rather than adding rounds.
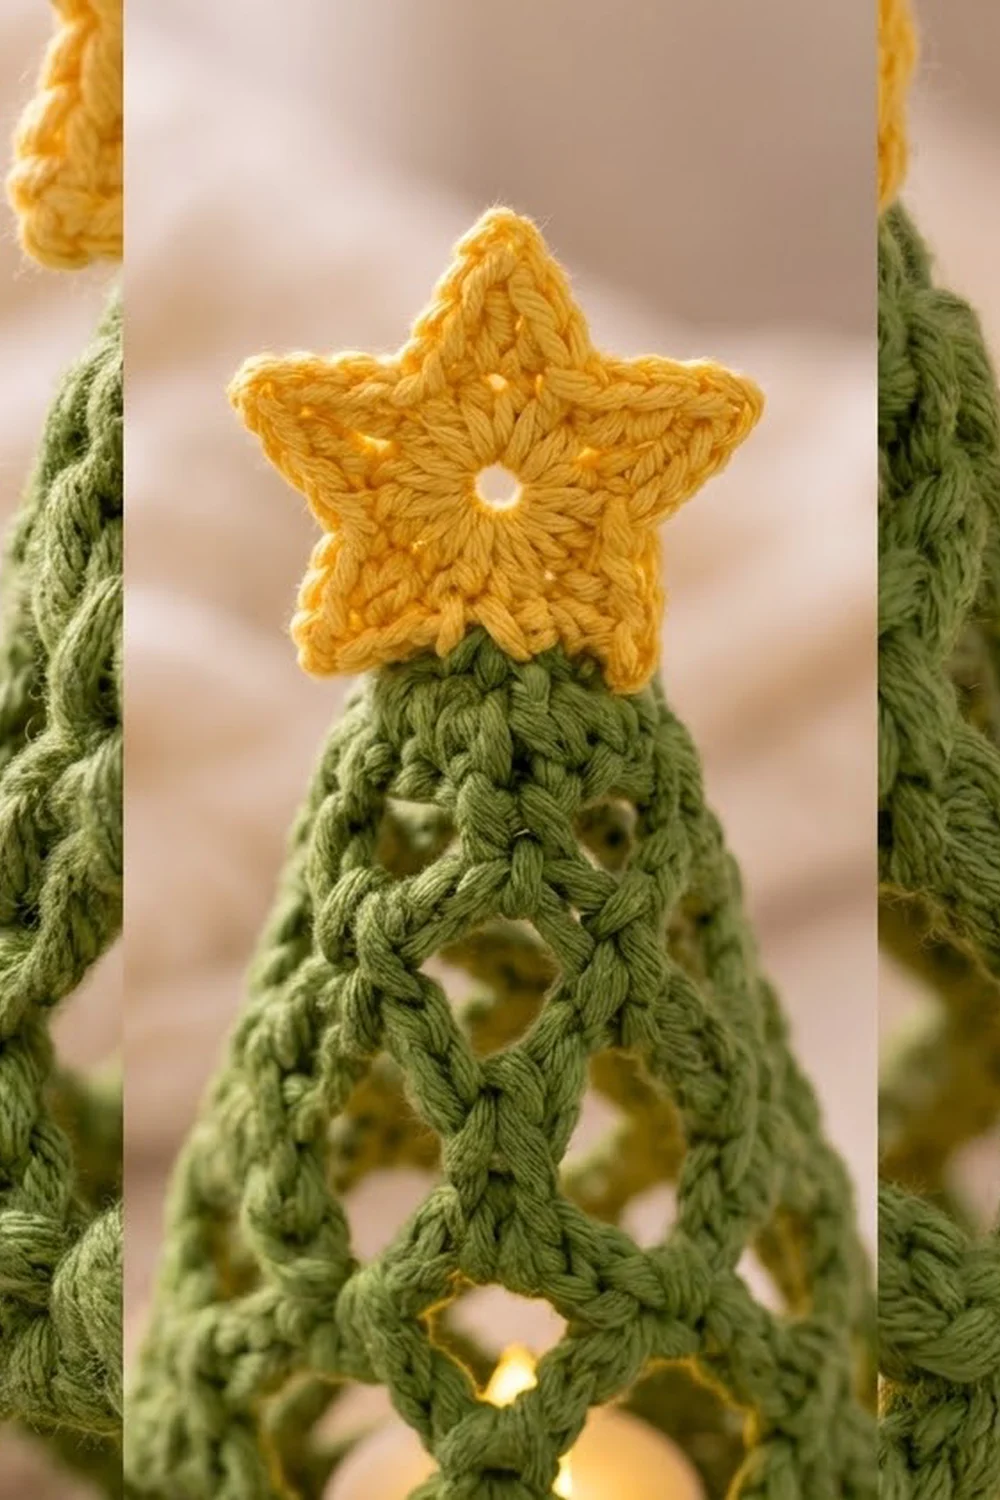
The Tree Cone
Work in joined rounds with the right side always facing you. Do not turn.
Foundation: With green, ch 48. Sl st to the first ch to form a ring, taking care not to twist the chain.
Rnd 1: Ch 1, sc in each ch around. Join with sl st to the first sc. (48 sc)
Place a marker every 12 sts. This splits the ring into 4 equal quarters, and the markers help you keep the arches evenly spaced.
Rnd 2 (arch set-up): Ch 1, sc in the first sc, ch 5, sk 5 sc, sc in next sc; repeat from * 6 more times, ch 5, sk last 5 sc, and join with sl st to the first sc. (8 sc, 8 ch-5 arches)*
Check: 8 repeats × 6 sts (1 sc + 5 skipped) = 48. Each quarter holds exactly 2 arches.
Rnd 3: Sl st in each of the next 3 ch to reach the center of the first arch. Ch 1, work a knot around the same arch, ch 5, knot in next ch-5 arch, ch 5; repeat from * 6 more times. Join with sl st to the first sc. (8 knots, 8 ch-5 arches)*
The knots sit in the middle of the arches below, so the new arches cross over the old anchor points. This is what forms the diamonds.
Rnd 4: Sl st in the next ch-1 sp, sl st in the next sc, and sl st in the next 3 ch. Ch 1, knot around the same arch, ch 5, knot in next ch-5 arch, ch 5; repeat from * 6 more times. Join. (8 knots, 8 ch-5 arches)*
Rnd 5: Sl st in the next ch-1 sp, the next sc, and the next 3 ch. Ch 1, knot around the same arch, ch 4, knot in next ch-5 arch, ch 4; repeat from * 6 more times. Join. (8 knots, 8 ch-4 arches)*
Rnd 6: Sl st in the next ch-1 sp, the next sc, and the next 2 ch. Ch 1, knot around the same arch, ch 4, knot in next ch-4 arch, ch 4; repeat from * 6 more times. Join. (8 knots, 8 ch-4 arches)*
Rnd 7: Sl st in the next ch-1 sp, the next sc, and the next 2 ch. Ch 1, knot around the same arch, ch 3, knot in next ch-4 arch, ch 3; repeat from * 6 more times. Join. (8 knots, 8 ch-3 arches)*
Rnd 8: Sl st in the next ch-1 sp, the next sc, and the next 2 ch. Ch 1, knot around the same arch, ch 3, knot in next ch-3 arch, ch 3; repeat from * 6 more times. Join. (8 knots, 8 ch-3 arches)*
Checkpoint: about 3.8 in (9.7 cm) tall. The shorter arches should already be pulling the cone inward.
Rnd 9: Sl st in the next ch-1 sp, the next sc, and the next ch. Ch 1, knot around the same arch, ch 2, knot in next ch-3 arch, ch 2; repeat from * 6 more times. Join. (8 knots, 8 ch-2 arches)*
Rnd 10 (decrease): Sl st in the next ch-1 sp, the next sc, and the next ch. Ch 1, knot-dec over the current arch and the next arch, ch 2, knot-dec over the next 2 arches, ch 2; repeat from * 2 more times. Join. (4 knot-decs, 4 ch-2 sps)*
Check: 4 knot-decs × 2 arches each = all 8 arches used.
Rnd 11: Sl st in the next ch-1 sp, the next sc, and the next ch. Ch 1, knot in the same ch-2 sp, ch 1, knot in next ch-2 sp, ch 1; repeat from * 2 more times. Join. (4 knots, 4 ch-1 sps)*
Rnd 12 (conversion round): Ch 1. Sc in each sc, sc in each knot’s ch-1 sp, and sc in each ch-1 sp between knots. Join.
(8 sc worked into the 8 knot sc + 8 sc worked into the 8 ch-1 sps = 16 sc)
Rnd 13: Ch 1, sc2tog 8 times. Join. (8 sc)
Fasten off, leaving an 8 in (20.3 cm) tail. Thread the tail through the front loop of all 8 sts, pull tight to close the top, and secure on the inside.
The Star Topper
With golden yellow, make a magic ring.
Rnd 1: Ch 1, 10 sc in the ring. Pull the ring partly closed, leaving a small center hole. Join with sl st to the first sc. (10 sc)
Rnd 2: Ch 4, sl st in 2nd ch from hook, sc in next ch, hdc in next ch, sk 1 sc, sl st in next sc; repeat from * 4 more times. (5 points)*
Check: 5 points × 2 sc each = 10 sc. Fasten off, leaving a 10 in (25.4 cm) tail.
Attach: Stand the star upright on the closed top of the cone, with 2 points straddling the tip. Whipstitch the area between those lower points to the 8-sc top ring, sewing through both layers. Make 3–4 passes so the star stays upright. Weave in the ends.
Border
The border adds a solid, firm band to the bottom edge so the cone stands level.
Border gauge: Same as the main gauge, 18 sc and 20 rnds = 4 in (10.2 cm).
Turn the cone upside down. With green, join to any free loop on the underside of the foundation chain.
Rnd B1: Ch 1, sc in each free loop of the foundation chain. Join. (48 sc; 12 sc per marked quarter)
Rnd B2: Ch 1, sc in each sc around. Join. (48 sc; 12 sc per marked quarter)
Fasten off and weave in the end.
Why the math works: The base ring has 48 sts, and so does each border round. Because you work one stitch into each stitch, there is no increase or decrease, so the edge stays at 10.7 in (27.2 cm) around and does not flare or ruffle. A round piece has no corners, so no corner stitches are added. The 4 quarters of 12 sts simply line up with the 2 arches per quarter from Rnd 2. Two rounds at 5 rnds per inch add 0.4 in (1.0 cm), bringing the cone from 5.2 in (13.2 cm) to 5.6 in (14.2 cm).
Final Blocking
- Make a cardstock cone 3.4 in (8.6 cm) across the base and 5.6 in (14.2 cm) tall, and tape the seam. Wrap it in plastic wrap.
- Dampen the crocheted cone lightly with water, or block it before attaching the star if you prefer.
- Slide the cone onto the form, with the base band sitting flush with the bottom edge.
- Nudge each knot so the crossings sit in neat vertical columns and the diamonds look even all the way around.
- Spray the cone generously with starch or stiffener.
- Let it dry completely, at least 12 hours, then remove the form.
- If the star curls, pin it flat and give it a light spray of starch.
Final Quality-Control Checklist
- The base measures 3.4 in (8.6 cm) across and stands level.
- The cone height is 5.6 in (14.2 cm).
- There are 8 even diamond columns around the cone.
- The arches get shorter smoothly: ch-5, ch-4, ch-3, then ch-2.
- The top is fully closed with no gap.
- The star stands upright and is centered on the tip.
- All ends are woven in on the inside.
- The cover slides easily over the tea light.
Troubleshooting
The cone is too wide at the top. Your chains are loose. Re-work Rnds 5–9 with one fewer chain per arch, or use a hook one size smaller for those rounds.
The diamonds lean or spiral. You may be starting each round in the wrong arch. Always sl st to the center of the first arch, then knot there.
The base flares. You have extra stitches in the border. Recount to 48 per round.
The base pulls in. Your border tension is tight. Re-work it with a hook one size larger.
The star flops over. Add more sewing passes through both lower points, and starch the star.
The arches sag after washing. Re-block over the form and starch again.
Care
Hand wash in cool water, press out the water gently, and re-block over the cone form to dry. Re-starch as needed to restore the shape.

Final Notes
The measurement chain is simple. Start with 48 sts measuring 10.7 in (27.2 cm) around. Build 8 lattice repeats that shorten from ch-5 to ch-2, which brings the cone to 3.8 in (9.7 cm) tall by Rnd 8 and 5.2 in (13.2 cm) by Rnd 13. Add a 0.4 in (1.0 cm) border for a final 5.6 in (14.2 cm) cone. The 1.5 in (3.8 cm) star brings the tree to about 6.8 in (17.3 cm) tall. Check each stage, and your tree will glow just like the one in the photo.
Happy crocheting!