
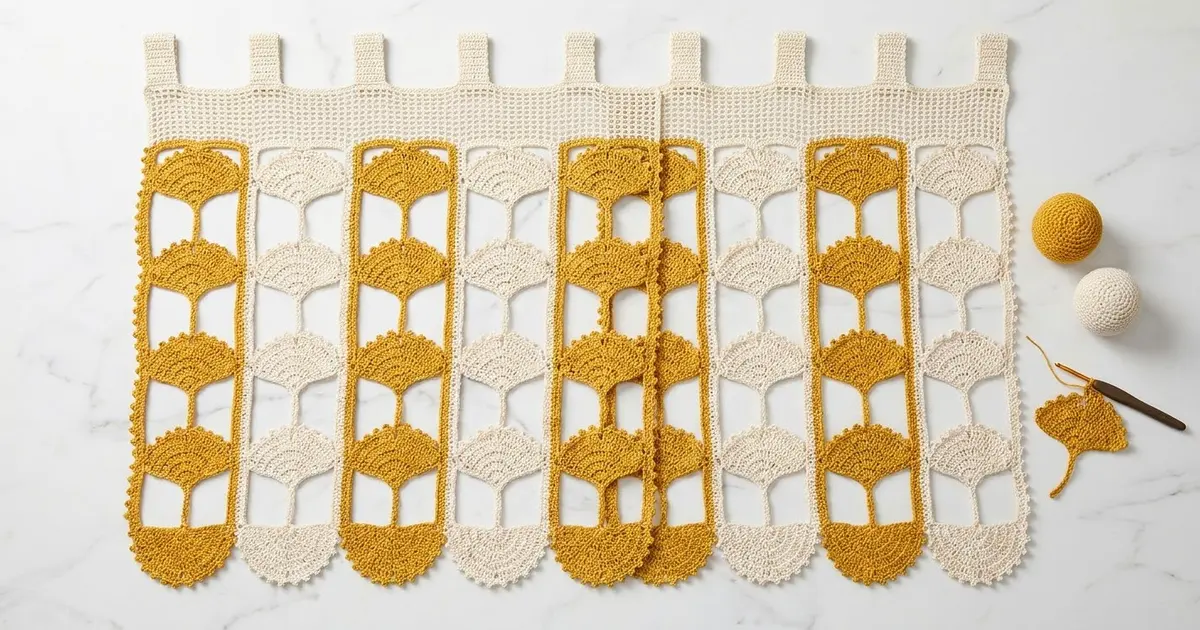
This curtain is made of tall lace strips. Each strip is a column of ginkgo leaf fans set inside an open frame. The strips alternate warm mustard and soft cream, and a cream mesh header with tabs holds the whole panel on a curtain rod. Light passes through the open spokes of every leaf, so the curtain softens the window without blocking it.
The style is botanical with a hint of Art Deco: radiating spokes, a scalloped two-lobed leaf edge, slim side rails dotted with tiny clover picots, and a fine filet header. The pattern uses US crochet terms throughout.
The finished panel measures 43.4 in (110.2 cm) wide by 57.25 in (145.4 cm) long, not counting the hanging tabs. Each leaf is about 5.5 in (14.0 cm) wide.
Here is how it comes together. You make 12 ginkgo motifs per strip, linking each new leaf’s stem to the leaf below as you go. Then you crochet a two-round frame around the column. Finally, you join seven framed strips side by side, add the header, tabs and a picot bottom edge, and block.
Finished Size and Construction
- Finished size: 43.4 in x 57.25 in (110.2 cm x 145.4 cm), excluding tabs
- Skill level: Intermediate
- Terminology: US crochet terms
- Yarn weight: DK (CYC 3) cotton
- Hook: 3.5 mm (US E-4)
- Number of pieces: 7 strips, each holding 12 ginkgo motifs (84 motifs total)
- Layout: 7 strips side by side, 1 row high
- Piece size: each strip 6.2 in x 54 in (15.7 cm x 137.2 cm)
- Size before border: 43.4 in x 54 in (110.2 cm x 137.2 cm)
- Border depth: header 3 in (7.6 cm); bottom picot edge 0.25 in (0.6 cm)
Materials
Choose a smooth mercerized cotton or cotton blend in DK weight, about 110 m per 50 g. Cotton shows the spokes and picots crisply and holds its shape after blocking. Avoid fuzzy yarns, which blur the open lace.
- Color M (mustard): 200 g / 440 m, for 4 strips
- Color C (cream): 250 g / 550 m, for 3 strips plus the joining, header, tabs and bottom edge
These quantities include a margin of about 10 to 15 percent.
Tools:
– 3.5 mm (US E-4) crochet hook
– Tapestry needle
– Stitch markers
– Rustproof pins and a large blocking surface
– Measuring tape
Abbreviations (US Terms)
- ch – chain
- sl st – slip stitch
- sc – single crochet
- dc – double crochet
- tr – treble crochet
- trtr – triple treble: yo 4 times, insert hook, yo and pull up a loop, [yo, pull through 2 loops] 5 times
- sk – skip
- st(s) – stitch(es)
- sp – space
- RS / WS – right side / wrong side
Special stitches:
- Clover: ch 1 (base ch), [ch 3, sl st in base ch] 3 times. With the rail passing through, the three petals look like a small four-part flower. The base ch counts as 1 st. The petals don’t count.
- Drop: ch 3, sl st in the stated st, sl st in each of the 3 ch back up. A drop isn’t counted as a st of the bar it hangs from.
- Picot: ch 3, sl st in 3rd ch from hook.
Gauge and Checkpoints
Gauge: 20 dc and 10 rows = 4 in (10.2 cm). One st is about 0.2 in (0.5 cm) wide, and 1 ch measures about the same when lightly stretched.
Make one complete motif before anything else. It’s the best test of your tension.
Checkpoints:
– Single motif, blocked: 5.5 in (14.0 cm) tip to tip, and 3.4 in (8.6 cm) from the bottom of the ring to the top of the rim
– Stem: 1 in (2.5 cm)
– Motif repeat (tip of one leaf to tip of the next): 4.4 in (11.2 cm)
– Strip after Frame Round 2: 6.2 in x 54 in (15.7 cm x 137.2 cm)
– Joined panel: 43.4 in x 54 in (110.2 cm x 137.2 cm)
– After header: 43.4 in x 57 in (110.2 cm x 144.8 cm)
If your motif is too big, try a 3.25 mm hook. If it’s too small, try a 3.75 mm hook. Change hooks before you make more motifs, not halfway through a strip.
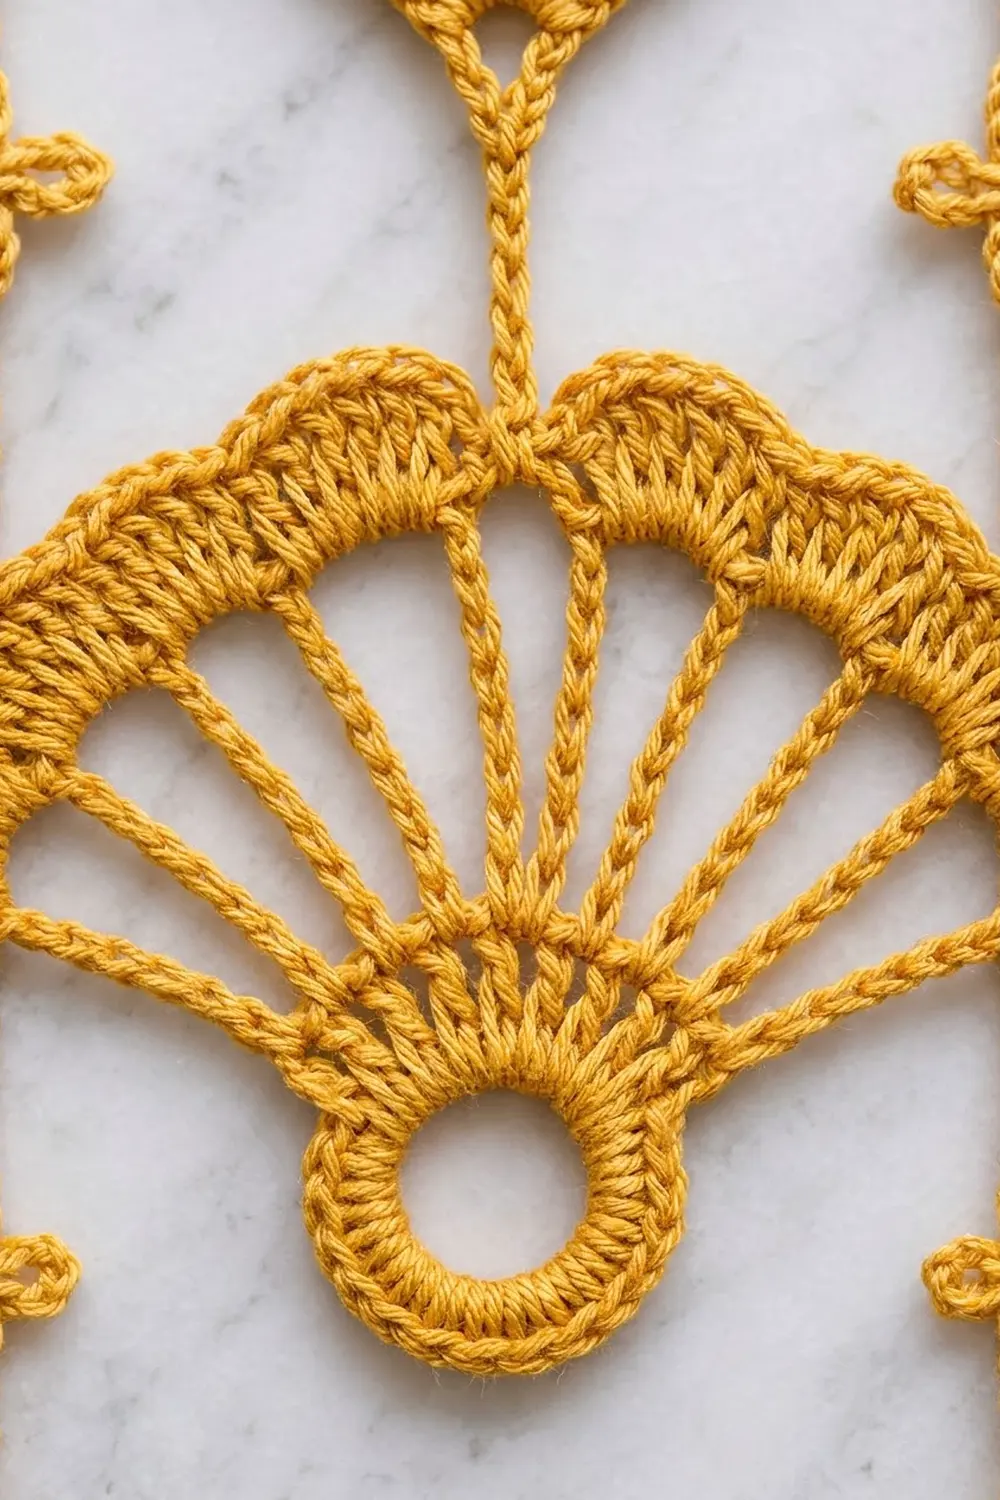
Ginkgo Motif (make 12 per strip)
Work in the strip’s color.
Ring: Ch 6, sl st in first ch to form a ring.
Round 1: Ch 1, 16 sc in ring, sl st in first sc. (16 sc)
Number the ring sc 1 to 16. Sc 1–9 hold the spokes. Sc 10–16 form the bottom of the ring, and sc 13 is the bottom center.
Row 2 (spokes): Ch 6 (counts as first trtr), ch 2, [trtr in next sc, ch 2] 7 times, trtr in next sc. (9 trtr, 8 ch-2 sps; 25 sts)
Row 3: Turn, ch 1, sc in first trtr, [3 sc in next ch-2 sp, sc in next trtr] 8 times. (33 sc)
Row 4 (scalloped rim): Turn, ch 1, sc in first sc. Work [sk 1, 5 dc in next sc, sk 1, sc in next sc] 4 times, but make the last sc of this group a sl st. That sl st sits in st 17, the center. Then work [sk 1, 5 dc in next sc, sk 1, sc in next sc] 4 times. (8 shells = 40 dc, plus 8 sc and 1 sl st = 49 sts)
The center sl st pulls in to form the ginkgo notch, so the rim reads as two lobes of four shells each. The first and last sc of Row 4 are the leaf tips. Fasten off.
Stem, Motif 1 (bottom leaf): Join yarn in sc 13 of Round 1. Ch 6, sl st in 2nd ch from hook and in each of next 4 ch, sl st in sc 13. Fasten off. The ch at the free end is the stem tip.
Stem, Motifs 2–12: Work the motif through Row 4 and fasten off. Join yarn in sc 13. Ch 5, sl st in the center notch sl st of the previous motif, sl st in each of the 5 ch back up, sl st in sc 13. Fasten off.
Keep every motif RS up with its stem pointing down. You now have a column of 12 leaves, each hanging from the leaf above by its stem. Weave in ends.
Strip Frame
Work in the strip’s color. Lay the column flat, RS up, with Motif 1 at the bottom.
Frame Round 1:
1. Join yarn with sc in the right tip of Motif 1.
2. Right rail: [ch 10, clover, ch 10, sc in right tip of next motif up] 11 times. You’re now at the right tip of Motif 12.
3. Ch 8 (7 rail ch + 1 corner ch).
4. Top bar: ch 14, drop into the center notch of Motif 12, ch 13, ch 1 more (corner ch).
5. Left rail: ch 7, sc in left tip of Motif 12, [ch 10, clover, ch 10, sc in left tip of next motif down] 11 times.
6. Ch 17 (16 rail ch + 1 corner ch).
7. Bottom bar: ch 13, sc in stem tip of Motif 1, ch 13, ch 1 more (corner ch).
8. Ch 16, sl st in first sc.
Round 1 count:
– Each long side has 266 sts between corners: 16 + 12 tip sc + (11 x 21) + 7 = 266. Each 21-st segment is 10 ch + 1 clover base ch + 10 ch.
– Each short side has 27 sts between corners: 14 + 13 at the top, and 13 + 1 sc + 13 at the bottom.
– Add the 4 corner ch: (2 x 266) + (2 x 27) + 4 = 590 sts.
Frame Round 2: Ch 1, sc in each st around. At each clover, sc into the base ch and leave the petals free. At the drop, sc into the bar ch it hangs from. Work 3 sc in each corner ch. Sl st in first sc. (598 sc)
Per-side count (including both corner center sc): 270 sc on each long side and 31 sc on each short side. Check: (2 x 270) + (2 x 31) − 4 shared corners = 598.
The drop and the stem tip both land on st 16 of 31, the exact center of the short sides. Fasten off and weave in ends.
Checkpoint: 6.2 in x 54 in (15.7 cm x 137.2 cm). The rails should lie straight, and the leaves should lie flat without puckering.
Make All Pieces
- Color M: 4 strips (48 motifs)
- Color C: 3 strips (36 motifs)
Layout (left to right):
| M | C | M | C | M | C | M |
The mustard strips sit at both outer edges.
Joining
Use Color C. Hold two neighboring strips WS together, with the long edges aligned and the corners matched.
Sl st through both strips, 1 sl st per pair of stitches, from corner center to corner center: 270 sl st per seam. Don’t skip or double any stitch. The sc counts already match exactly, so the seam stays straight.
Keep the sl sts loose, about as long as the rail sc. If the seam comes out shorter than the strip, go up one hook size for joining only.
Checkpoint: 43.4 in x 54 in (110.2 cm x 137.2 cm).
Border
The border has two parts: a header across the top and a picot row along the bottom. The long side rails are already finished edges, so they need no border.
Border gauge: the same as the main gauge, 5 sts per 1 in (2.5 cm). Mesh rows are about 0.4 in (1.0 cm) tall.
Header (Color C, worked in rows)
Row 1 (RS): Join C in the top right corner. Ch 1, sc in each st across the top edges. (7 x 31 = 217 sc) Don’t add any sts at the seams.
Row 2 (mini fans): Ch 1, turn, sc in first sc, [sk 2, 5 dc in next sc, sk 2, sc in next sc] 36 times. (36 fans; 1 + (36 x 6) = 217 sts used)
Row 3: Ch 4 (counts as tr), turn, [ch 2, sc in 3rd dc of next fan, ch 2, tr in next sc] 36 times. (37 tr + 36 sc + 144 ch = 217 sts)
Row 4 (mesh): Ch 4 (counts as dc + ch 1), turn, sk next st, dc in next st, [ch 1, sk 1, dc in next st] across, treating the chains as sts. (109 dc + 108 ch = 217 sts)
Rows 5–7: Ch 4 (counts as dc + ch 1), turn, sk ch-1 sp, dc in next dc, [ch 1, sk ch-1 sp, dc in next dc] across. (217 sts each)
Row 8: Ch 1, turn, sc in each dc and each ch-1 sp across. (217 sc)
Checkpoint: The header is 3 in (7.6 cm) deep, and the panel is 43.4 in x 57 in (110.2 cm x 144.8 cm).
Tabs (make 8)
Mark the tab positions on Row 8: sts 1–7, 31–37, 61–67, 91–97, 121–127, 151–157, 181–187 and 211–217. Each tab starts 30 sts after the one before. That gives 8 tabs of 7 sts and 7 gaps of 23 sts: 56 + 161 = 217.
Each tab:
– Row 1: Join C in the first marked st, ch 1, sc in each of the 7 marked sts.
– Rows 2–18: Ch 1, turn, 7 sc.
The tab is about 3.3 in (8.4 cm) long. Fold it to the WS and sew the last row to the WS of Header Row 8. Each loop fits a rod up to 1 in (2.5 cm) thick.
Bottom Picot Edge (Color C)
With RS facing, join in the bottom right corner. Ch 1, sc in first st, [picot, sc in next 2 sts] 108 times. (217 sc, 108 picots)
Why the Math Works
Every strip edge contributes 31 sts, so 7 strips give 217. That odd total fits every border row:
– Mesh: a dc on every odd st
– Fan row: 1 + (36 x 6)
– Tab spacing: (8 x 7) + (7 x 23)
– Picot row: 1 + (108 x 2)
No stitches have to be fudged at a seam or a corner.
Final Blocking
- Weave in all ends securely.
- Soak the curtain in cool water for 15 minutes, then press out the water gently. Don’t wring it.
- Roll it in towels to remove excess moisture.
- Lay it flat on the blocking surface, RS up.
- Pin the corners to 43.4 in x 57.25 in (110.2 cm x 145.4 cm), excluding the tabs.
- Pin each side rail straight at the leaf tips, every 4.4 in (11.2 cm).
- Open each leaf: spread the spokes evenly and pin the two rim lobes so the center notch shows.
- Pin the header mesh square and shape each clover petal.
- Let it dry completely, about 24 hours.
Final Quality-Control Checklist
- [ ] Every strip has 12 motifs, each with 9 spokes and 8 shells
- [ ] Each leaf shows its center notch
- [ ] All stems connect leaf to leaf and point down
- [ ] Each strip measures 6.2 in x 54 in (15.7 cm x 137.2 cm)
- [ ] The colors alternate M, C, M, C, M, C, M
- [ ] The seams are flat, with 270 sl st each
- [ ] Header Row 1 has 217 sc
- [ ] The 8 tabs are evenly spaced and securely sewn
- [ ] The finished panel is 43.4 in x 57.25 in (110.2 cm x 145.4 cm)
Troubleshooting
The spokes are wobbly or uneven. Pull each yo snug on the trtr, and keep the loops the same height.
The fan cups instead of lying flat. Row 3 is too tight. Work it more loosely, or use a hook 0.25 mm larger for Rows 3–4 only.
The rails bow inward. The rail chains are too tight. Chain more loosely, or block the rails firmly along a straight edge.
The strip is shorter than 54 in (137.2 cm). Check that each rail segment has exactly 10 + 1 + 10 sts and that each stem is 5 ch long.
The seams pucker. The joining sl sts are too tight. Use a larger hook for joining.
The header flares. Recount Row 1. It must have exactly 217 sc.
Care
Hand wash in cool water with mild soap and dry flat, re-pinning if needed. Don’t hang the curtain while it’s wet, because the weight can stretch the rails.
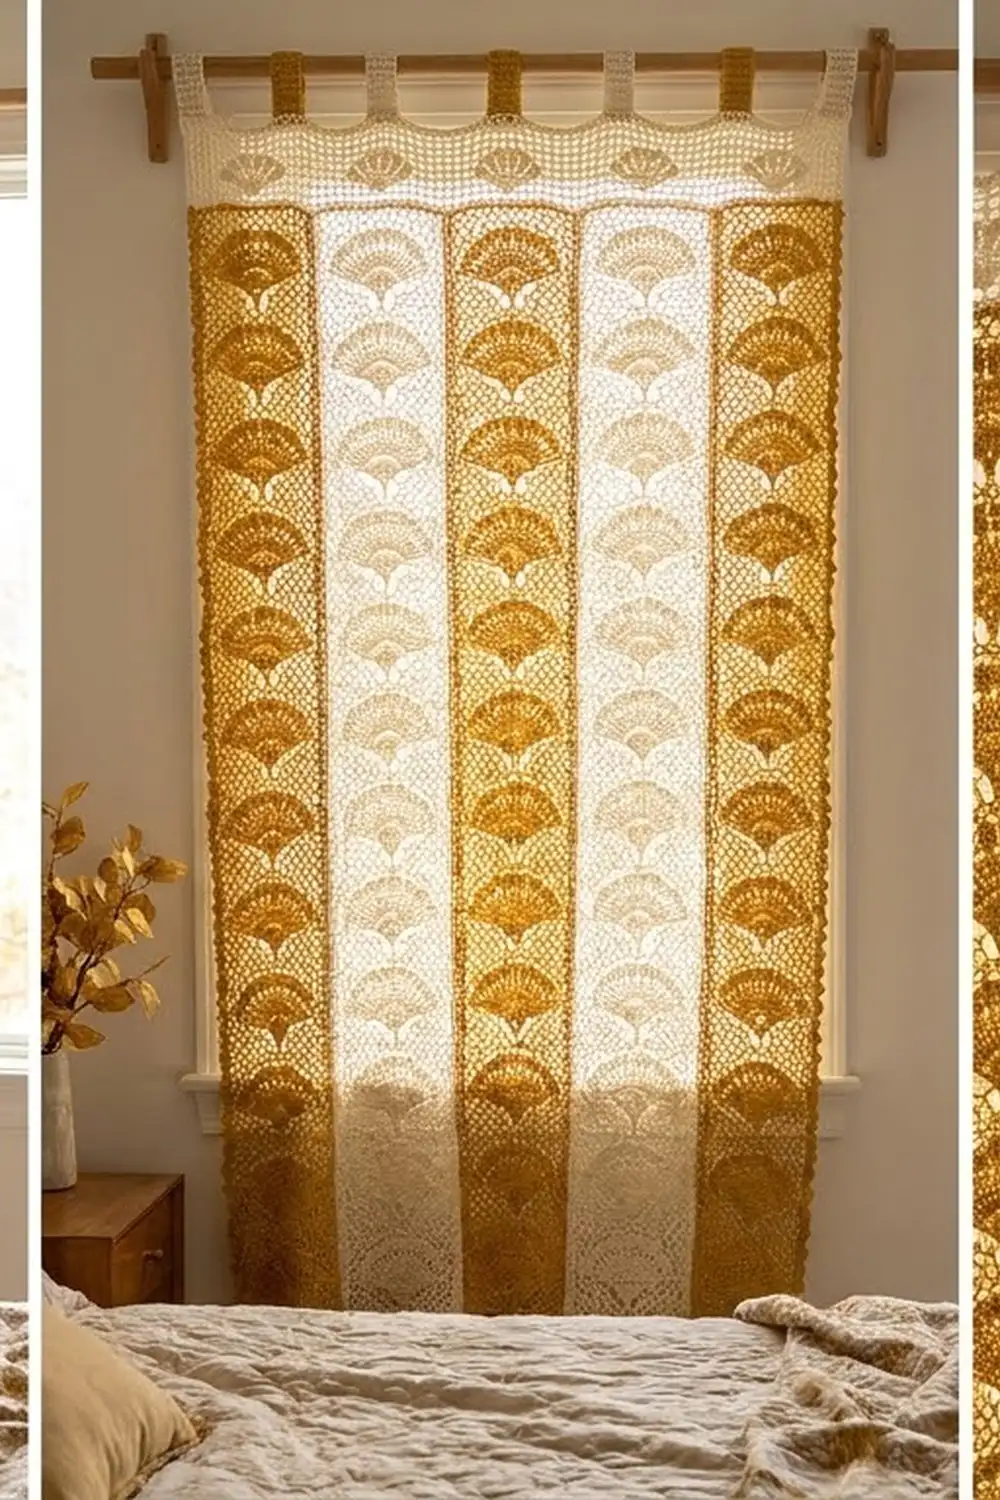
Final Notes
Each stage has a measurement you can check before moving on:
1. One motif should be 5.5 in (14.0 cm) wide.
2. Twelve linked motifs in a frame make a 6.2 in x 54 in (15.7 cm x 137.2 cm) strip.
3. Seven joined strips measure 43.4 in x 54 in (110.2 cm x 137.2 cm).
4. The header and picot edge bring the panel to 43.4 in x 57.25 in (110.2 cm x 145.4 cm).
If each stage matches, the finished curtain will hang straight.
Happy crocheting!