

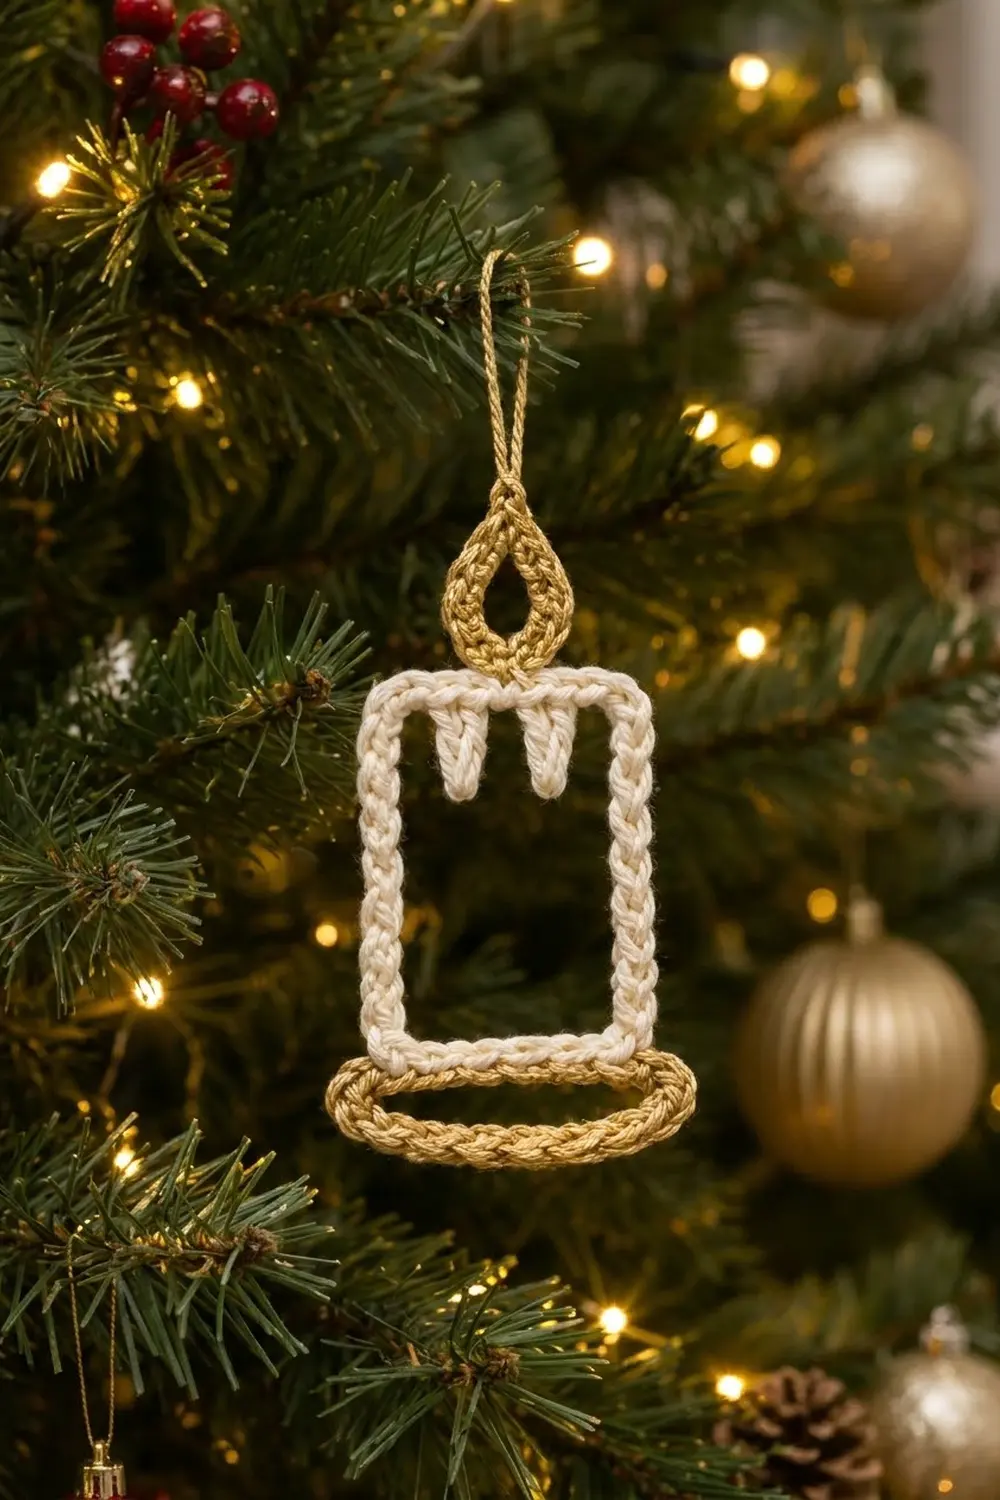
This little candle ornament is all outline and light. A cream rectangle forms the candle, two pointed drips hang just inside the top edge, a gold teardrop flame rises from the center, and a flat gold oval base holds everything together. Hung on the tree, the open shape lets the twinkle lights show through.
The palette is just two colors: soft cream for the wax and metallic gold for the flame and base. The style is minimal and graphic, more line drawing than solid shape. That makes it quick to stitch and easy to read from across a room.
This pattern uses US crochet terms. The finished ornament measures about 3.5 in (8.9 cm) wide and 5.75 in (14.6 cm) tall, plus a 2.5 in (6.4 cm) hanging loop.
Construction is simple. You crochet a chain ring and work single crochet around it to make the rectangular frame. Then you add the drips to the inner edge, work the base onto the bottom edge as you go, and add the flame and hanging loop at the top. A slip-stitch border round finishes the cream frame.
Finished Size and Construction
- Finished size: 3.5 in (8.9 cm) wide × 5.75 in (14.6 cm) tall, excluding the hanging loop
- Skill level: Easy / advanced beginner
- Terminology: US crochet terms
- Yarn weight: Sport weight (#2) cotton, mercerized preferred
- Hook: 3.0 mm (US C/2 or D/3)
- Number of pieces: 1 (the base and flame are worked directly onto the frame)
- Layout: One upright motif: candle frame, flame on top, oval base below
- Piece size: Frame 2.6 in (6.6 cm) × 4.1 in (10.4 cm) after the border; base 3.5 in (8.9 cm) × 0.75 in (1.9 cm); flame 1 in (2.5 cm) tall
- Size before border: Frame 2.5 in (6.4 cm) × 4 in (10.2 cm)
- Border depth: about 1/16 in (0.2 cm) per edge
Materials
Use a smooth, tightly plied sport-weight cotton. Mercerized cotton gives the crisp, cord-like stitch definition this outline design needs, and it holds its shape well after blocking. For the gold, use a metallic sport-weight yarn or a cotton blend with a metallic strand. Avoid fuzzy or very stretchy yarns, because they blur the outline.
- Cream: 5 g (about 16 m)
- Metallic gold: 4 g (about 12 m)
Both amounts include a margin for gauge swatching and weaving in ends.
Tools:
– 3.0 mm crochet hook
– 4 locking stitch markers
– Tapestry needle
– Scissors
– Foam blocking mat and rust-proof pins
– Spray bottle, plus optional fabric stiffener or spray starch
Abbreviations (US Terms)
- ch – chain
- sl st – slip stitch
- sc – single crochet
- hdc – half double crochet
- dc – double crochet
- st(s) – stitch(es)
- BLO – back loop only
- FLO – front loop only
- Rnd – round
Special stitch – sc-join: Insert the hook into the next base chain, then into the front loop of the matching frame stitch. Yarn over and pull up a loop through both, then yarn over and pull through both loops on the hook. This joins the base to the frame while you make it.
Gauge and Checkpoints
Gauge: 6 sc = 1 in (2.5 cm), and 12 sc = 2 in (5.1 cm), worked over a foundation chain.
Your first frame is your test piece. Make Rnds 1–2 and measure before you add any gold.
- Checkpoint 1 (Rnd 1): Before joining, the 66-chain strip measures about 11 in (27.9 cm).
- Checkpoint 2 (Rnd 2): Laid flat, the frame measures 2.5 in (6.4 cm) wide × 4 in (10.2 cm) tall.
- Checkpoint 3 (drips): Each drip hangs about 1 in (2.5 cm) below the top bar.
- Checkpoint 4 (base): The flattened oval measures 3.5 in (8.9 cm) wide and extends about 0.5 in (1.3 cm) past the frame on each side.
- Checkpoint 5 (border): The frame measures 2.6 in (6.6 cm) × 4.1 in (10.4 cm).
If the frame is too big: Go down to a 2.75 mm hook and remake it.
If the frame is too small: Go up to a 3.25 mm hook.
Don’t change the stitch counts. The drips, flame and base are placed by stitch number, so the counts have to stay the same.
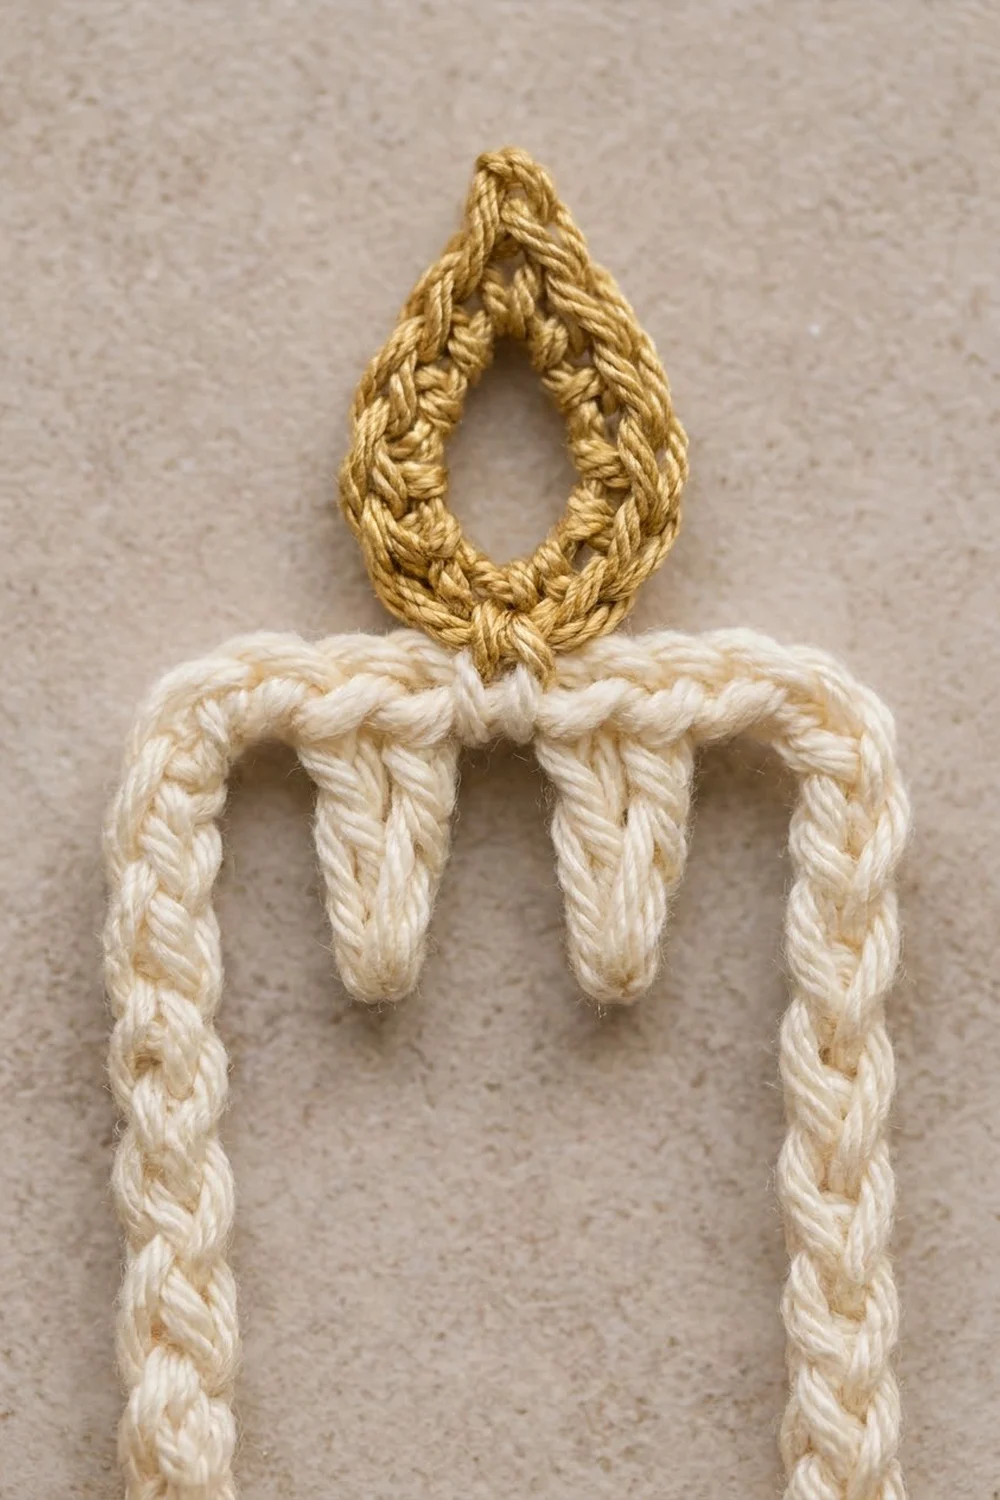
Part 1: Candle Frame (Cream)
Rnd 1: With cream, ch 66. Without twisting the chain, sl st into the first ch to form a ring. Number the chains as follows and place markers on the four corner chains:
– Ch 1 = corner A
– Ch 2–12 = bottom (11 ch)
– Ch 13 = corner B
– Ch 14–33 = right side (20 ch)
– Ch 34 = corner C
– Ch 35–45 = top (11 ch)
– Ch 46 = corner D
– Ch 47–66 = left side (20 ch)
Check: 4 corners + 11 + 20 + 11 + 20 = 66 ch.
Rnd 2: Ch 1. Work 3 sc in ch 1, sc in ch 2–12, 3 sc in ch 13, sc in ch 14–33, 3 sc in ch 34, sc in ch 35–45, 3 sc in ch 46, sc in ch 47–66. Sl st to the first sc. (74 sc)
This is a conversion round. It has 62 sc worked one per chain along the sides, plus 12 sc in the four 3-sc corner groups (4 corner chains × 3 sc).
The center sc of each 3-sc group is the corner stitch. Move the markers onto those four center stitches. With corners included, each side has:
– Bottom and top: corner + 1 + 11 + 1 + corner = 15 sts
– Each long side: corner + 1 + 20 + 1 + corner = 24 sts
Check: (2 × 15) + (2 × 24) − 4 shared corners = 74.
Fasten off and leave a 4 in (10.2 cm) tail. Number the top-side stitches 1–15 from either corner. Every placement below is symmetrical, so it doesn’t matter which corner you start from.
Part 2: Wax Drips (Cream)
The drips hang into the open center from the inner edge of the top bar. That inner edge is the foundation-chain side of Rnd 2.
- Join cream with a sl st under both inner strands at the base of top st 5.
- Drip: Ch 7. Working back down the chain: sl st in 2nd ch from hook, sc in each of the next 2 ch, hdc in each of the next 2 ch, dc in the last ch. Sl st again at the base of top st 5. (6 sts per drip)
- Sl st along the inner edge at the base of top sts 6–11. (6 sl sts)
- Work a second drip at the base of top st 11, the same as step 2.
Fasten off.
Because the stitches get taller from the sl st up to the dc, each drip is narrow at the bottom and wide at the top, like real wax. The drips at sts 5 and 11 leave 3 sts outside each drip and 5 sts between them, so they sit evenly on the 15-st top bar.
Part 3: Oval Base (Gold)
The base is a chain ring with one round of sc, flattened into an oval. It joins to the front loops of the frame’s bottom stitches as you work it. Keep the back loops free for the border.
Rnd 1: With gold, ch 42. Without twisting, sl st into the first ch to form a ring.
Lay the ring flat so ch 1–21 form the upper edge and ch 22–42 form the lower edge. Ch 1 should sit at the left end of the upper edge. Hold the frame right side facing, with its bottom side (sts 1–15) resting on the upper edge.
Rnd 2: Ch 1. Work as follows, then sl st to the first sc. (42 sts)
– Sc in ch 1–3 (3 sc)
– Sc-join in ch 4–18, matching frame bottom sts 1–15 in order (15 sts)
– Sc in ch 19–42 (24 sc)
Check: 3 + 15 + 24 = 42. The upper edge has 3 free sts + 15 joined + 3 free = 21 sts, and the lower edge has 21 sts.
At 6 sts per inch, 21 sts gives a width of 3.5 in (8.9 cm). The frame bottom is 2.5 in (6.4 cm) wide, so the base sticks out 0.5 in (1.3 cm) on each side. Fasten off.
Part 4: Flame and Hanging Loop (Gold)
- Join gold with a sl st in the FLO of top st 7.
- Ch 12, then sl st in the FLO of top st 9. This arches the chain over st 8.
- Working back along the chain, sc in ch 12, 11, 10, 9, 8 and 7. (6 sc)
- Tip: Ch 1.
- Hanging loop: Ch 30, then sl st into the ch-1 tip.
- Sc in ch 6, 5, 4, 3, 2 and 1. (6 sc)
- Sl st in the FLO of top st 7.
Flame total: 12 sc, plus the ch-1 tip and the 30-ch loop.
The ch-1 at the tip makes the point. The two anchors 2 sts apart give the narrow, rounded base of the teardrop. The center of the flame stays open. Fasten off.
Border: Braided Slip-Stitch Edge (Cream)
Border gauge: 1 sl st per frame st. This adds about 1/16 in (0.2 cm) per edge.
Rnd 3: Join cream with a sl st in the BLO of corner A. Sl st in the BLO of every frame st all the way around, working behind the base and flame. Join to the first sl st.
– Bottom: 15 sl sts
– Right side: 24 sl sts
– Top: 15 sl sts
– Left side: 24 sl sts
Total: 74 sl sts. That is (2 × 15) + (2 × 24) − 4 shared corners = 74.
Why the math works: Rnd 2 already turned each corner with a 3-sc group. The border only needs 1 sl st per stitch, with no extra stitches at the corners. Adding more would make the corners ruffle.
The base and flame used only front loops, so every back loop is still free. The border runs cleanly behind both.
After the border, the frame measures 2.6 in (6.6 cm) × 4.1 in (10.4 cm). Fasten off and weave in all ends along the matching color.
Final Blocking
- Spray the ornament until it’s damp, or soak it and press it in a towel.
- Lay it right side up on the blocking mat.
- Pin the four frame corners into a true rectangle, 2.6 in (6.6 cm) × 4.1 in (10.4 cm).
- Pin each drip straight down, pointing at the base.
- Pin the flame into a teardrop: rounded near the candle and pointed at the tip, about 1 in (2.5 cm) tall.
- Pin the base into a smooth oval, 3.5 in (8.9 cm) × 0.75 in (1.9 cm).
- If you like, brush on diluted fabric stiffener or spray starch for a firmer ornament.
- Let it dry completely before unpinning. This usually takes 6–12 hours.
Final Quality-Control Checklist
- Rnd 2 has 74 sc, with 15 sts on the top and bottom and 24 on each long side
- The corners are crisp right angles
- Both drips are the same length and sit at top sts 5 and 11
- The base has 42 sts, is centered under the frame and extends evenly on both sides
- The flame is centered over top st 8 and its tip points straight up
- The hanging loop comes from the flame tip and isn’t twisted
- The border has 74 sl sts and lies flat
- All ends are woven in and hidden
Troubleshooting
The frame is curving or wavy. The foundation chain is too tight compared with your sc. Remake Rnd 1 with a hook one size larger and keep the 3.0 mm hook for Rnd 2.
The corners are rounded. Make sure each 3-sc group goes into the single marked corner chain, then pin the corners firmly when blocking.
The drips curl sideways. Your sl sts were too tight. Re-block the drips with a pin at each tip.
The base is off-center. Count again: there should be 3 free sts at each end of the upper edge.
The flame leans. Check that the anchors are exactly at sts 7 and 9.
The border puckers. Loosen your sl sts and keep them exactly 1 per stitch.
Care
Hand wash in cool water with mild soap, press out the water in a towel, and dry flat with the ornament pinned to shape. Store it flat in a box with tissue paper so the flame and loop don’t get crushed.
Final Notes
The whole ornament comes down to one chain of measurements. Sixty-six chains become a 74-stitch frame measuring 2.5 in (6.4 cm) × 4 in (10.2 cm). Two six-stitch drips hang at top stitches 5 and 11. A 42-stitch gold oval joins to the 15 bottom stitches and reaches 3.5 in (8.9 cm) wide. A 12-sc flame rises over stitch 8 and carries the hanging loop. A 74-stitch slip-stitch border finishes the frame at 2.6 in (6.6 cm) × 4.1 in (10.4 cm). If you hit each checkpoint, the ornament will turn out right.
Happy crocheting!