

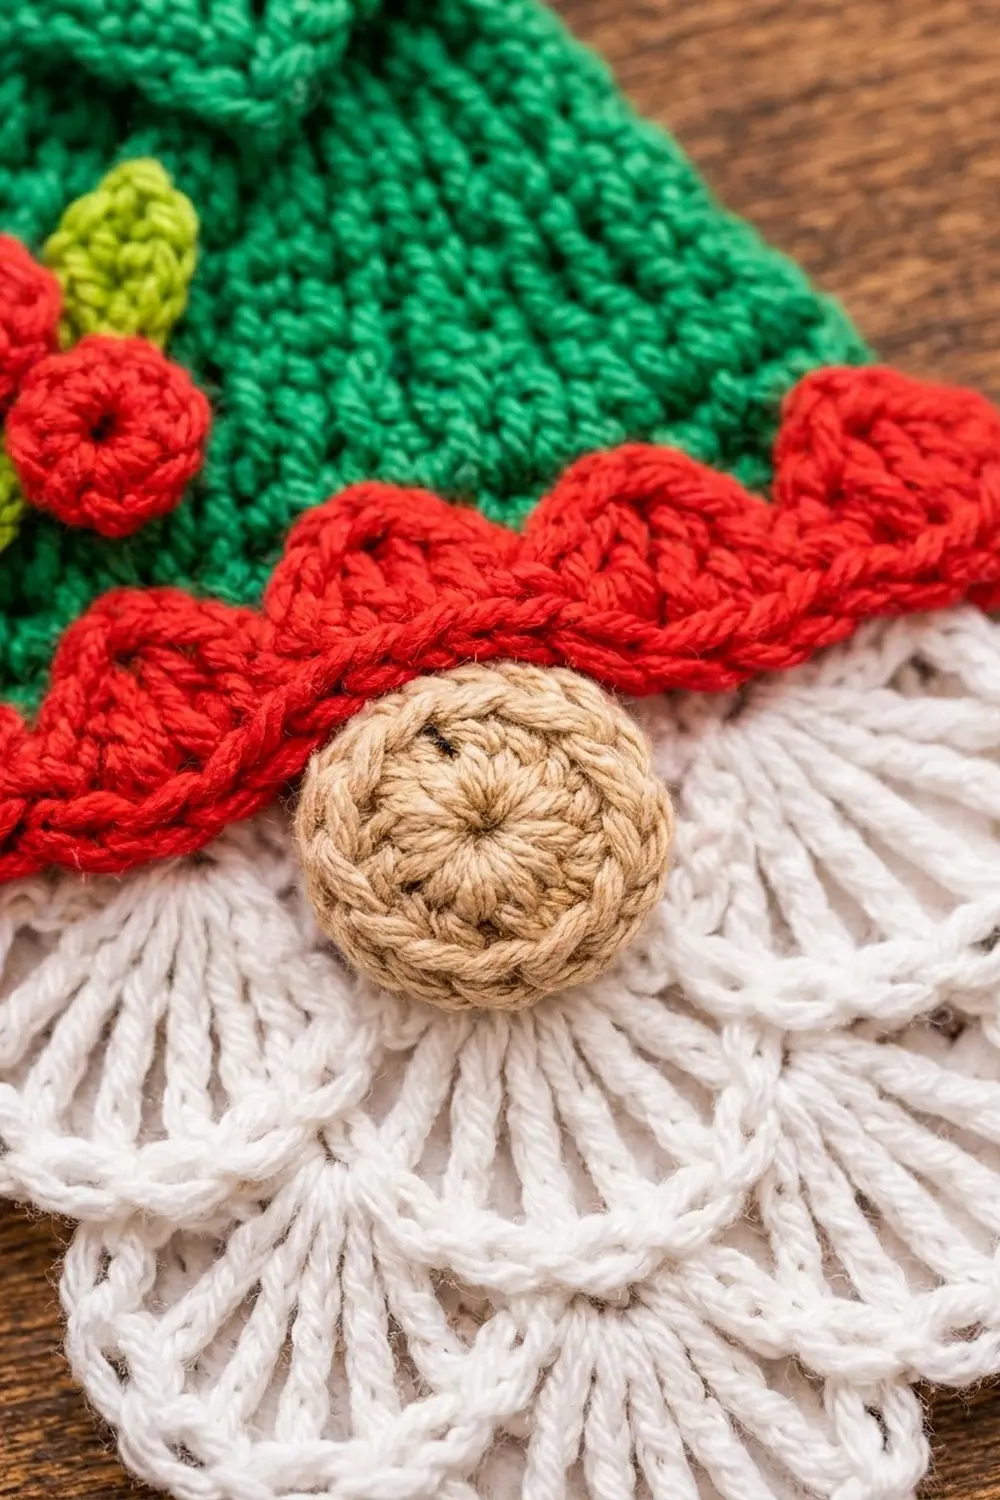
This little gnome is a quick, cheerful tree ornament. It has a tall knit-look green hat, a scalloped red brim, a lacy white beard made of fan shells, and a round tan nose. A small holly sprig of three red berries and two bright leaves sits on the hat.
The colors are classic Christmas: deep green, true red, white, tan and a lime-green accent. The style is cozy and textured. The hat looks knitted, and the beard is airy and lace-like, which looks lovely against tree lights.
The pattern uses US crochet terms. The finished ornament measures about 3.5 in (8.9 cm) wide and 4.2 in (10.7 cm) tall, not counting the hanging loop.
Construction is simple. You crochet a red brim band in rows. Next you work the green hat upward from the brim, and then the white beard downward from the brim’s foundation chain. A red scallop trim goes onto the brim’s front loops. Last, you sew on the nose, berries and leaves and add a chain loop.
Finished Size and Construction
- Finished size: 3.5 in (8.9 cm) wide × 4.2 in (10.7 cm) tall, excluding the loop
- Skill level: Easy-intermediate
- Terminology: US crochet terms
- Yarn weight: DK / light worsted (#3), cotton or cotton blend
- Hook: 3.5 mm (E-4)
- Number of pieces: 1 main body, plus 1 nose, 3 berries and 2 leaves (sewn-on appliqués)
- Layout: Single ornament; no joining
- Piece size: Brim 3.4 in (8.6 cm) wide; hat 1.8 in (4.6 cm) tall; beard 2.0 in (5.1 cm) deep
- Size before border: 3.5 in (8.9 cm) × 4.2 in (10.7 cm)
- Border depth: The scallop trim is 0.3 in (0.8 cm) deep. It lies on the surface and does not change the outer size.
Materials
Choose a smooth, mercerized or soft cotton DK yarn. Cotton shows the shells and the V-stitches clearly, and it holds its shape on the tree. Avoid fuzzy yarns, because the beard lace will blur.
- Green (hat): 8 g, about 19 m
- White (beard and loop): 8 g, about 19 m
- Red (brim, trim and berries): 4 g, about 10 m
- Tan (nose): 2 g, about 5 m
- Lime green (leaves): 2 g, about 5 m
Yardage assumes about 2.4 m per gram. All quantities include a margin for a gauge swatch and weaving in ends.
Tools:
– 3.5 mm (E-4) crochet hook
– Tapestry needle
– Scissors
– Stitch markers (2)
– Rust-proof pins and a foam blocking mat
– Spray bottle
Abbreviations (US Terms)
- ch – chain
- sl st – slip stitch
- sc – single crochet
- hdc – half double crochet
- dc – double crochet
- sc2tog – single crochet 2 together
- sc3tog – single crochet 3 together
- BLO / FLO – back loop only / front loop only
- sp – space
- RS / WS – right side / wrong side
Special stitches:
- Waistcoat stitch (wsc): Instead of working under the top loops, put the hook through the center of the next sc, between its two vertical legs. Yarn over, pull up a loop, yarn over, and pull through both loops. Rows of wsc stack into V-columns that look like knitting.
- wsc2tog: Put the hook between the legs of the next stitch, yarn over and pull up a loop. Put the hook between the legs of the following stitch, yarn over and pull up a loop. Yarn over and pull through all 3 loops.
- Shell: 7 dc in the same stitch.
Gauge and Checkpoints
Gauge: 10 sc and 11 rows = 2 in (5.1 cm) in sc rows.
Gauge matters here, because every part grows from the 17-stitch brim. Make one test brim before you start: ch 18, then work 2 rows of 17 sc. It should measure 3.4 in (8.6 cm) wide.
Checkpoints:
1. Brim (2 rows): 3.4 in (8.6 cm) wide × 0.4 in (1.0 cm) tall.
2. Hat Row 10: The hat body measures 1.8 in (4.6 cm) from the brim. The top edge is 1.8 in (4.6 cm) wide.
3. Beard Row 2 (first tier): 3.5 in (8.9 cm) wide and about 0.7 in (1.8 cm) deep.
4. Finished beard: 2.0 in (5.1 cm) deep. The total height is 4.2 in (10.7 cm).
If your brim is too wide (more than 3.6 in / 9.1 cm), go down to a 3.25 mm hook. If it is too narrow (less than 3.2 in / 8.1 cm), go up to a 3.75 mm hook. Do not change the stitch counts, because the shell math depends on 17 stitches.
Brim (Red)
With red, ch 18.
Row 1 (RS): Sc in the 2nd ch from the hook and in each ch across, turn. (17 sc)
Row 2 (WS): Ch 1 (does not count as a stitch here or later), sc in each st across, turn. (17 sc)
Fasten off red. Mark Row 2’s last stitch so you know where the hat starts.
Hat (Green)
The hat is worked upward from the brim. RS rows are odd-numbered and WS rows are even-numbered. From Row 3 on, the RS rows use waistcoat stitch so the V-columns face the front.
Row 1 (RS): With the RS facing, join green in the first st of brim Row 2. Ch 1. Working in the BLO: sc2tog, sc in each of the next 13 sts, sc2tog, turn. (15 sc)
This row leaves the 17 front loops of brim Row 2 free on the RS for the trim later.
Row 2 (WS): Ch 1, sc in each st across, turn. (15 sc)
Row 3 (RS): Ch 1, wsc2tog, wsc in each of the next 11 sts, wsc2tog, turn. (13 sts)
Row 4: Ch 1, sc across, turn. (13 sc)
Row 5: Ch 1, wsc2tog, wsc in each of the next 9 sts, wsc2tog, turn. (11 sts)
Row 6: Ch 1, sc across, turn. (11 sc)
Row 7: Ch 1, wsc2tog, wsc in each of the next 7 sts, wsc2tog, turn. (9 sts)
Row 8: Ch 1, sc across, turn. (9 sc)
Row 9: Ch 1, wsc in each st across, turn. (9 sts)
Row 10: Ch 1, sc across, turn. (9 sc)
Checkpoint: The hat body is 1.8 in (4.6 cm) tall. It is 3.0 in (7.6 cm) wide at Row 1 and 1.8 in (4.6 cm) wide at Row 10.
Hat Tip Flap
Row 11 (RS): Ch 1, wsc2tog, wsc in each of the next 5 sts, wsc2tog, turn. (7 sts)
Row 12: Ch 1, sc2tog, sc in each of the next 3 sts, sc2tog, turn. (5 sc)
Row 13: Ch 1, wsc2tog, wsc in the next st, wsc2tog, turn. (3 sts)
Row 14: Ch 1, sc3tog. (1 st)
Fasten off and leave an 8 in (20.3 cm) tail.
The flap is a small triangle about 0.7 in (1.8 cm) tall, with a base 1.4 in (3.6 cm) wide. Fold it forward along the top of Row 10 so its point faces down at the center front, landing at about Row 7. Use the tail to tack the point and the two folded corners in place.
Beard (White)
The beard is worked downward into the free loops on the underside of the brim’s foundation chain. There are 17 loops.
Row 1 (RS): Turn the piece upside down with the RS facing. Join white in the first free loop. Ch 1, sc in the same loop. Skip 1 loop, shell in the next loop, skip 1 loop, sc in the next loop 4 times, turn. (4 shells, 5 sc: 28 dc + 5 sc)
Check the math: 1 sc + (4 loops × 4 repeats) = 17 loops.
Row 2 (WS, arc row): Ch 1, sc in the first sc. Ch 2, sc in the 2nd dc of the shell, ch 2, sc in the 4th (center) dc, ch 2, sc in the 6th dc, ch 2, sc in the next sc 4 times, turn. (17 sc, 16 ch-2 sps)
The sc that sit between two shells are the junction sc. The chain arcs make the lacy outline around each fan.
Row 3 (RS, tier 2): Sl st in the next ch-2 sp, in the next sc, in the next ch-2 sp and in the center sc. Ch 1, sc in the same center sc. Skip the next ch-2 sp, sc and ch-2 sp. Shell in the junction sc. Skip the next ch-2 sp, sc and ch-2 sp. Sc in the center sc of the next shell 3 times, turn. (3 shells, 4 sc: 21 dc + 4 sc)
Row 4 (arc row): Ch 1, sc in the first sc. Ch 2, sc in the 2nd dc, ch 2, sc in the 4th dc, ch 2, sc in the 6th dc, ch 2, sc in the next sc 3 times, turn. (13 sc, 12 ch-2 sps)
Row 5 (tier 3): Sl st in the next ch-2 sp, sc, ch-2 sp and center sc. Ch 1, sc in the same st. Skip 3 elements (ch-2 sp, sc, ch-2 sp), shell in the junction sc, skip 3 elements, sc in the next center sc 2 times, turn. (2 shells, 3 sc: 14 dc + 3 sc)
Row 6 (arc row): Ch 1, sc in the first sc. Ch 2, sc in the 2nd dc, ch 2, sc in the 4th dc, ch 2, sc in the 6th dc, ch 2, sc in the next sc 2 times. (9 sc, 8 ch-2 sps)
Fasten off.
Checkpoint: The beard tapers 4–3–2 to a central point. It measures 3.5 in (8.9 cm) at its widest and 2.0 in (5.1 cm) deep.
Appliqués
Nose (tan): Make a magic ring.
– Rnd 1: 6 sc in the ring and pull it closed. (6 sc)
– Rnd 2: 2 sc in each st, then sl st to the first sc. (12 sc)
Fasten off with a 10 in (25.4 cm) tail. The nose is about 0.8 in (2.0 cm) across.
Berries (red, make 3): Make a magic ring, work 5 sc in it, and pull the ring tight so the berry cups. Fasten off with a 6 in (15.2 cm) tail. Each berry is about 0.35 in (0.9 cm) across.
Leaves (lime green, make 2): Ch 7. Starting in the 2nd ch from the hook, work sl st, sc, hdc, dc, hdc, sc. In the last ch, work (sc, ch 1, sc) to make the tip. Then work along the other side of the chain: sc, hdc, dc, hdc, sc, sl st. Fasten off. Each leaf is about 1 in (2.5 cm) long.
Border: Brim Scallop Trim and Hat Edging
Border gauge: Each scallop covers 2 brim stitches, or 0.4 in (1.0 cm). It stands 0.3 in (0.8 cm) tall.
Trim (red): With the RS facing and the hat pointing up, join red in the first free front loop of brim Row 2. Sl st in the same loop. 3 dc in the next front loop, sl st in the next front loop 8 times. Fasten off. (8 scallops: 24 dc + 9 sl st)
Why the math works: The brim has 17 front loops. 1 starting sl st + (2 loops × 8 scallops) = 17. The trim ends exactly at the last loop, so both ends match. The scallops fold up over the hat’s first rows. This makes the bumpy, puffy brim without changing the width.
Hat side edging (green): With the RS facing, join green at the right end of hat Row 1. Work 1 sl st in each row end up to Row 10, for 10 sl st. Fasten off. Repeat up the left side for 10 sl st. Use exactly one sl st per row so the sides stay straight and do not ruffle.
Hanging loop (white): Join white at the center of the Row 10 fold. Ch 30, then sl st back into the same spot. This makes a loop about 2 in (5.1 cm) tall. Fasten off and secure the end firmly.
Assembly: Sew the nose centered over the seam between the brim and the beard. It should overlap the lower red edge and the top of the first shell tier. Sew the 2 leaves to the upper left of the hat in a V shape. Stack the 3 berries in a tight triangle over the leaves’ base.
Final Blocking
- Weave in all ends except the ones you will use for tacking.
- Pin the ornament face up on a blocking mat at 3.5 in (8.9 cm) × 4.2 in (10.7 cm).
- Pin each beard fan at its center arc so the shells open evenly.
- Pin the hat sides straight, and make sure the folded tip sits centered.
- Mist with water until damp. Don’t soak it.
- Let it dry completely, which takes about 4–6 hours.
- Unpin it and check the measurements again.
Final Quality-Control Checklist
- Brim: 17 sts, 3.4 in (8.6 cm) wide
- Hat: Rows 1–10 decrease 15 → 13 → 11 → 9, and V-columns show on the front
- Tip flap is folded down and tacked at the center
- Trim has 8 even scallops from edge to edge
- Beard tiers have 4, 3 and 2 shells, and every fan is outlined by its arcs
- Nose is centered, and the holly is on the upper left
- Hanging loop is secure and centered
- Finished size is 3.5 in (8.9 cm) × 4.2 in (10.7 cm)
Troubleshooting
- The hat leans to one side: You may have missed a decrease. Recount each decrease row.
- The waistcoat stitch is too tight: Pull up a slightly taller loop, or work it with a hook 0.25 mm larger.
- The beard fans curl: Your arc chains are too tight. Loosen them, or block the beard firmly.
- The tiers don’t line up under the gaps: Make sure each new shell goes into a junction sc, not into a center sc.
- The scallops crowd together: You worked into both loops. Use only the free front loops.
- The nose puckers: Sew around its outer edge with small, loose stitches.
Care
Hand wash in cool water, press out the water in a towel, and reshape the ornament to dry flat. Store it flat or hanging so the beard fans don’t get crushed.

Final Notes
The measurement chain starts with the brim. Seventeen stitches at gauge give a brim 3.4 in (8.6 cm) wide. The hat narrows from 15 to 9 stitches over 1.8 in (4.6 cm). The beard’s 4–3–2 shell tiers come straight from those same 17 loops and add 2.0 in (5.1 cm). Together that gives a 3.5 in (8.9 cm) × 4.2 in (10.7 cm) gnome. Check the size at each checkpoint and the ornament will turn out right.
Happy crocheting!