
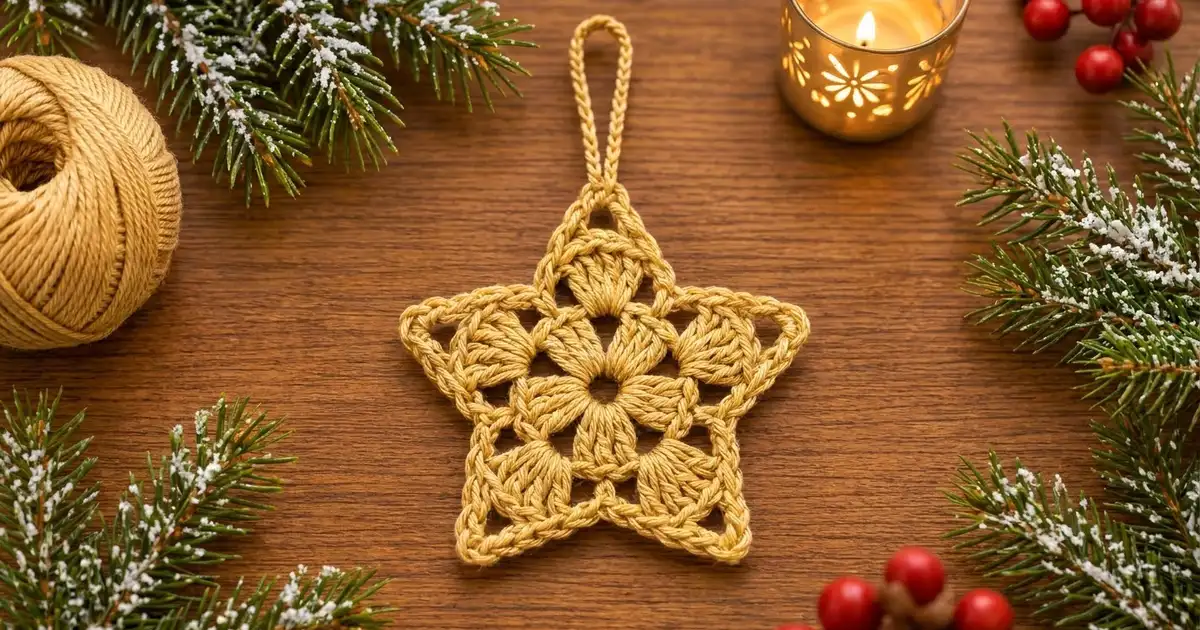
The Golden Glow Star is a lacy five-pointed ornament worked in one warm golden shade. It has a small flower at its center: five puffy clusters wrapped in a smooth ring of single crochet. Fanned shells and open, chain-outlined points give it a light, airy look that catches the glow of tree lights.
The style is classic and a little vintage. It works on a tree, as a gift tag, or tied to a wrapped package. Choose a matte cotton in honey, wheat, or antique gold and the star reads like straw or brass without any metallic thread.
This pattern uses US crochet terms. The finished star measures about 4.5 in (11.4 cm) from point to point and 4.25 in (10.8 cm) tall without the loop. The hanging loop adds about 1.75 in (4.4 cm).
The construction is simple. You work in the round from a magic ring: a cluster flower, a single crochet circle, five shells, a chain framework for the points, and a single crochet border with a sharp tip on each point. The hanging loop is built into the last round, so you have nothing to sew on afterward.
Finished Size and Construction
- Finished size: 4.5 in (11.4 cm) point to point; 4.25 in (10.8 cm) tall
- Hanging loop: about 1.75 in (4.4 cm) above the top point
- Skill level: Easy / advanced beginner
- Terminology: US crochet terms
- Yarn weight: Worsted weight (#4), cotton or cotton blend
- Hook: 3.75 mm (F-5)
- Number of pieces: 1 (single motif)
- Layout: Single star, worked in the round
- Piece size before border: 4 in (10.2 cm) point to point after Round 4
- Border depth: about 0.25 in (0.6 cm) on each side
Materials
Yarn advice: Use a smooth, tightly plied worsted cotton. Cotton keeps the points crisp and blocks very well. Acrylic works too, but the star will be softer and the tips may curl. Avoid fuzzy or brushed yarns, because they hide the lace holes.
Color:
– Golden beige (honey/wheat): 12 g, about 25 m (27 yd) per star
Tools:
– 3.75 mm (F-5) crochet hook
– Tapestry needle
– Scissors
– Stitch marker
– Rust-proof pins and a blocking mat or folded towel
– Spray bottle with water
– Optional: fabric stiffener or a light starch spray
The yarn amount includes a margin of about 20% for your gauge swatch, tails, and small tension differences. One 50 g ball will make at least 4 stars.
Abbreviations (US Terms)
- ch – chain
- sl st – slip stitch
- sc – single crochet
- dc – double crochet
- sk – skip
- sp – space
- st(s) – stitch(es)
- beg – beginning
- [ ] – repeat the instructions in brackets as directed
Special stitches:
- 3-dc cluster (dc3cl): Yarn over, insert hook in the ring or stitch, pull up a loop, yarn over and pull through 2 loops (2 loops on hook). Repeat 2 more times in the same place (4 loops on hook). Yarn over and pull through all 4 loops.
- Beginning cluster (beg cl): Ch 2, then work a 2-dc cluster in the same place. Make the cluster like a dc3cl, but repeat only twice (3 loops on hook) before pulling through all loops. The ch 2 plus the 2-dc cluster count as 1 cluster.
Gauge and Checkpoints
Gauge is not critical for an ornament, but it controls the final size and how sharp the points look. Make one test star first and measure it at each checkpoint below before you make a batch.
Checkpoints:
– After Round 1: Cluster flower about 1.25 in (3.2 cm) across
– After Round 2: Solid circle 2 in (5.1 cm) across
– After Round 3: About 3 in (7.6 cm) across, measured over the shells
– After Round 4: About 4 in (10.2 cm) point to point (stretch the arcs gently)
– After Round 5 and blocking: 4.5 in (11.4 cm) point to point
If your star is too big: Go down to a 3.5 mm (E-4) hook, or tighten your chains. Loose chains in Round 4 are the most common cause of a large star with floppy points.
If your star is too small or cupping: Go up to a 4.0 mm (G-6) hook. If only the circle in Round 2 cups, make your single crochets a little looser and keep the hook size.

Pattern
Round 1 – Cluster Flower
Make a magic ring.
Beg cl in ring, ch 3, [dc3cl in ring, ch 3] 4 times. Join with sl st to the top of the beg cl. Pull the ring closed, leaving a small hole about 0.25 in (0.6 cm) wide.
Count: 5 clusters and 5 ch-3 sps.
Round 2 – Single Crochet Circle
Ch 1. Sc in the top of the same cluster, 5 sc in the next ch-3 sp, [sc in the top of the next cluster, 5 sc in the next ch-3 sp] 4 times. Join with sl st to the first sc.
Count: 30 sc (5 sections of 6 sts).
Each section of 6 sts begins with the sc over a cluster. In this pattern the 6 sts are called A (over the cluster), then B, C, D, E, and F (over the chain space). The circle should lie flat. If it ruffles, check that you have exactly 5 sc in each space.
Round 3 – Shells
Ch 1. Sc in the same st (A), sk 2 sts (B and C), 7 dc in the next st (D), sk 2 sts (E and F), [sc in the next st (A), sk 2 sts, 7 dc in the next st, sk 2 sts] 4 times. Join with sl st to the first sc.
Count: 40 sts in total: 5 sc and 35 dc (5 shells of 7 dc).
The 5 sc sit over the clusters and become the star’s valleys. The shells sit between the clusters and become the bases of the points. Each shell is centered on its section because 2 sts are skipped on each side.
Round 4 – Point Framework
Ch 1. Work the following in the same sc and across the next shell: sc in the same sc, ch 3, sk 1 dc, sc in the next dc (2nd dc of the shell), ch 8, sk 3 dc, sc in the next dc (6th dc of the shell), ch 3, sk the last dc.
Then repeat for the remaining four points: [sc in the next sc, ch 3, sk 1 dc, sc in the next dc, ch 8, sk 3 dc, sc in the next dc, ch 3, sk the last dc] 4 times. Join with sl st to the first sc.
Count: 15 sc (5 valley sc + 10 shell sc), 10 ch-3 sps, and 5 ch-8 sps.
Each ch-8 arc rises over the top 3 dc of its shell and forms the outline of a point. The ch-3 spaces next to the valleys leave the small triangular holes seen in the finished star. Place a stitch marker in the first ch-8 arc. This point will become the top point with the hanging loop.
Checkpoint: About 4 in (10.2 cm) point to point when you gently pull each arc into a peak.
Border
Border Gauge
The border is 1 round of sc about 0.25 in (0.6 cm) deep, worked mostly into chain spaces. At this gauge, 8 sc cover about 1.5 in (3.8 cm) along one side of a point.
Round 5 – Border and Hanging Loop
Ch 1.
Top point (marked arc): Sc in the same sc (valley), 3 sc in the next ch-3 sp, sc in the next sc, (4 sc, ch 20, 4 sc) in the ch-8 arc, sc in the next sc, 3 sc in the next ch-3 sp.
Remaining 4 points: [Sc in the next sc (valley), 3 sc in the next ch-3 sp, sc in the next sc, (4 sc, ch 3, 4 sc) in the ch-8 arc, sc in the next sc, 3 sc in the next ch-3 sp] 4 times.
Join with sl st to the first sc. Fasten off, leaving an 8 in (20.3 cm) tail.
Count per point: 17 sc, plus 1 ch-3 tip (ch-20 loop on the top point).
Count per side of a point: 8 sc from the valley up to the tip: 3 sc + 1 sc + 4 sc. The valley sc between two points is counted once, with the point to its right.
Total: 85 sc, 4 ch-3 tips, and 1 ch-20 hanging loop.
Why the Math Works
Each point has 2 sides of 8 sc plus 1 valley sc: 8 + 8 + 1 = 17. Five points give 5 × 17 = 85 sc. Every stitch from Round 4 is used once:
- The 15 sc of Round 4 each get 1 sc (15).
- The 10 ch-3 sps each get 3 sc (30).
- The 5 ch-8 arcs each get 8 sc (40).
15 + 30 + 40 = 85. ✓
Each ch-8 arc gets 8 sc, 1 per chain, so it lies flat. The ch-3 tip (or ch-20 loop) sits between the 4 sc on each side, so it adds no extra sc and pinches the arc into a sharp point.
Hanging Loop Finish
The ch-20 loop makes a hanging loop about 1.75 in (4.4 cm) tall. For a sturdier loop, join the yarn at the base of the loop, work 1 sl st in each of the 20 chains, and fasten off. Weave in all ends along the back of the border and the shells, not through the open holes.
Final Blocking
- Weave in the ends, but don’t trim them yet.
- Spray the star with water until it is evenly damp, or dip it and squeeze it gently in a towel.
- Lay it face up on a blocking mat.
- Pin the center hole open, keeping it about 0.25 in (0.6 cm) wide.
- Pin each of the 5 ch-3 tips outward so the star measures 4.5 in (11.4 cm) from point to point. Check that all 5 points are the same distance from the center: about 2.25 in (5.7 cm).
- Pin each valley inward a little so the sides of each point are straight.
- Straighten the shells so each fan opens evenly.
- For a stiff ornament, spray lightly with starch or brush on diluted fabric stiffener.
- Let it dry completely, at least 6 hours, before unpinning.
- Trim the yarn tails close to the work.
Final Quality-Control Checklist
- [ ] The center hole is small and closed firmly with the magic ring tail.
- [ ] There are 5 clusters, 5 shells, and 5 points, evenly spaced.
- [ ] Each point has 17 sc and a crisp ch-3 tip.
- [ ] The total border is 85 sc.
- [ ] The star measures 4.5 in (11.4 cm) point to point after blocking.
- [ ] The hanging loop is about 1.75 in (4.4 cm) and sits centered on the top point.
- [ ] The star lies flat, with no cupping in the center and no ruffling at the edges.
- [ ] All ends are hidden and invisible from the front.
Troubleshooting
The center circle cups or ruffles. Count the Round 2 stitches. You need exactly 6 sts per section: 1 over the cluster and 5 in the space. If it still cups, loosen your sc. If it ruffles, tighten them.
The shells are lopsided. Check that you skipped exactly 2 sts on each side of the shell. The shell must go in the 4th st of each 6-st section.
The points are floppy or rounded. Your ch-8 arcs are too loose. Chain more tightly, or go down 0.25 mm in hook size for Round 4 only. Block with starch.
The points pull and pucker. Your chains are too tight. Go up a hook size for the chains only. Also make sure you work exactly 4 sc on each side of the tip, not 5.
The points are different sizes. You probably skipped a different number of dc on one shell. Each arc must skip the middle 3 dc (3rd, 4th, and 5th).
The loop twists. Before blocking, pin the loop flat and straight above the top point.
Care
Hand wash in cool water with mild soap, press out the water in a towel, and reshape and pin to dry flat. Reapply starch if the points soften after washing.

Final Notes
The measurement chain for this star is short and easy to check:
- 1.25 in (3.2 cm) flower after Round 1
- 2 in (5.1 cm) circle after Round 2
- 3 in (7.6 cm) after the shells in Round 3
- 4 in (10.2 cm) framework after Round 4
- 4.5 in (11.4 cm) finished star after the 0.25 in (0.6 cm) border and blocking
If your first star hits these numbers, every star after it will match, and a batch of these looks great on a tree. Make one, check it, then make as many as you like.
Happy crocheting!