

The Starlit Doorway Curtain is made of long, airy strips of crochet. Each strip is a column of navy lattice squares, and each square holds a gold eight-pointed star. The strips hang from a rod like a beaded curtain, so light comes through the openwork and the stars catch the glow of holiday lights.
There are only two colors: deep navy for the lattice and border, and warm gold for the stars. The style is part folk-art, part winter night sky, so it suits Christmas and also works all year round.
This pattern uses US crochet terms. Each finished strip measures about 4.7 in (11.9 cm) wide by 72.7 in (184.7 cm) long, plus 2 in (5.1 cm) hanging loops. The full curtain has six strips.
You’ll crochet 108 identical square motifs and slip stitch them into six columns of 18 squares. Then you’ll add a two-round single-crochet border and two hanging loops to each strip, and block.
Finished Size and Construction
- Finished strip size: 4.7 x 72.7 in (11.9 x 184.7 cm), plus 2 in (5.1 cm) loops
- Skill level: Intermediate
- Terminology: US
- Yarn weight: DK (#3) cotton
- Hook: 3.5 mm (E-4)
- Number of pieces: 108 squares (18 per strip, 6 strips)
- Layout: 6 separate strips, each 1 square wide x 18 squares tall
- Square size: 4 x 4 in (10.2 x 10.2 cm)
- Strip size before border: 4 x 72 in (10.2 x 182.9 cm)
- Border depth: 0.33 in (0.8 cm) per side, 2 rounds
Materials
Choose a smooth mercerized or matte cotton in DK weight. Cotton holds the star points crisp, doesn’t stretch much while hanging, and blocks well. Avoid fuzzy or very stretchy acrylic, which can make long strips grow.
- Navy (Color A): 800 g / about 1,840 m
- Gold (Color B): 300 g / about 690 m
These quantities include about 10% extra for gauge differences and swatching.
Tools:
– 3.5 mm (E-4) crochet hook
– Tapestry needle
– Scissors
– Stitch markers
– Blocking mats, rust-proof pins and a spray bottle
– Tape measure
– Curtain rod or tension rod, up to 1.25 in (3.2 cm) in diameter
Abbreviations (US Terms)
- ch – chain
- sl st – slip stitch
- sc – single crochet
- hdc – half double crochet
- dc – double crochet
- tr – treble crochet (yo twice)
- dtr – double treble crochet (yo 3 times)
- sp – space
- st(s) – stitch(es)
- RS – right side
- rep – repeat
Special stitch – Star Point: Ch 6. Sl st in 2nd ch from hook, then sc in next ch, hdc in next ch, dc in next ch and tr in last ch. That makes 5 sts along the chain. The skipped ch at the top is the point tip.
Gauge and Checkpoints
Gauge: 22 sc and 24 rows = 4 in (10.2 cm). One finished square = 4 x 4 in (10.2 x 10.2 cm) after light blocking.
Make and block one full square before you make all 108. Over 108 squares, a small error adds up quickly.
Checkpoints:
– After Round 2 (star): about 3 in (7.6 cm) from tip to tip
– After Round 5 (square): 4 in (10.2 cm) per side, with 23 sts per side
– After joining one strip: 4 x 72 in (10.2 x 182.9 cm)
– After the border: 4.7 x 72.7 in (11.9 x 184.7 cm)
If your square is too big, go down 0.5 mm in hook size. If it’s too small, go up 0.5 mm. If only the star is off but the outer square is right, keep your hook and simply block the points into place.
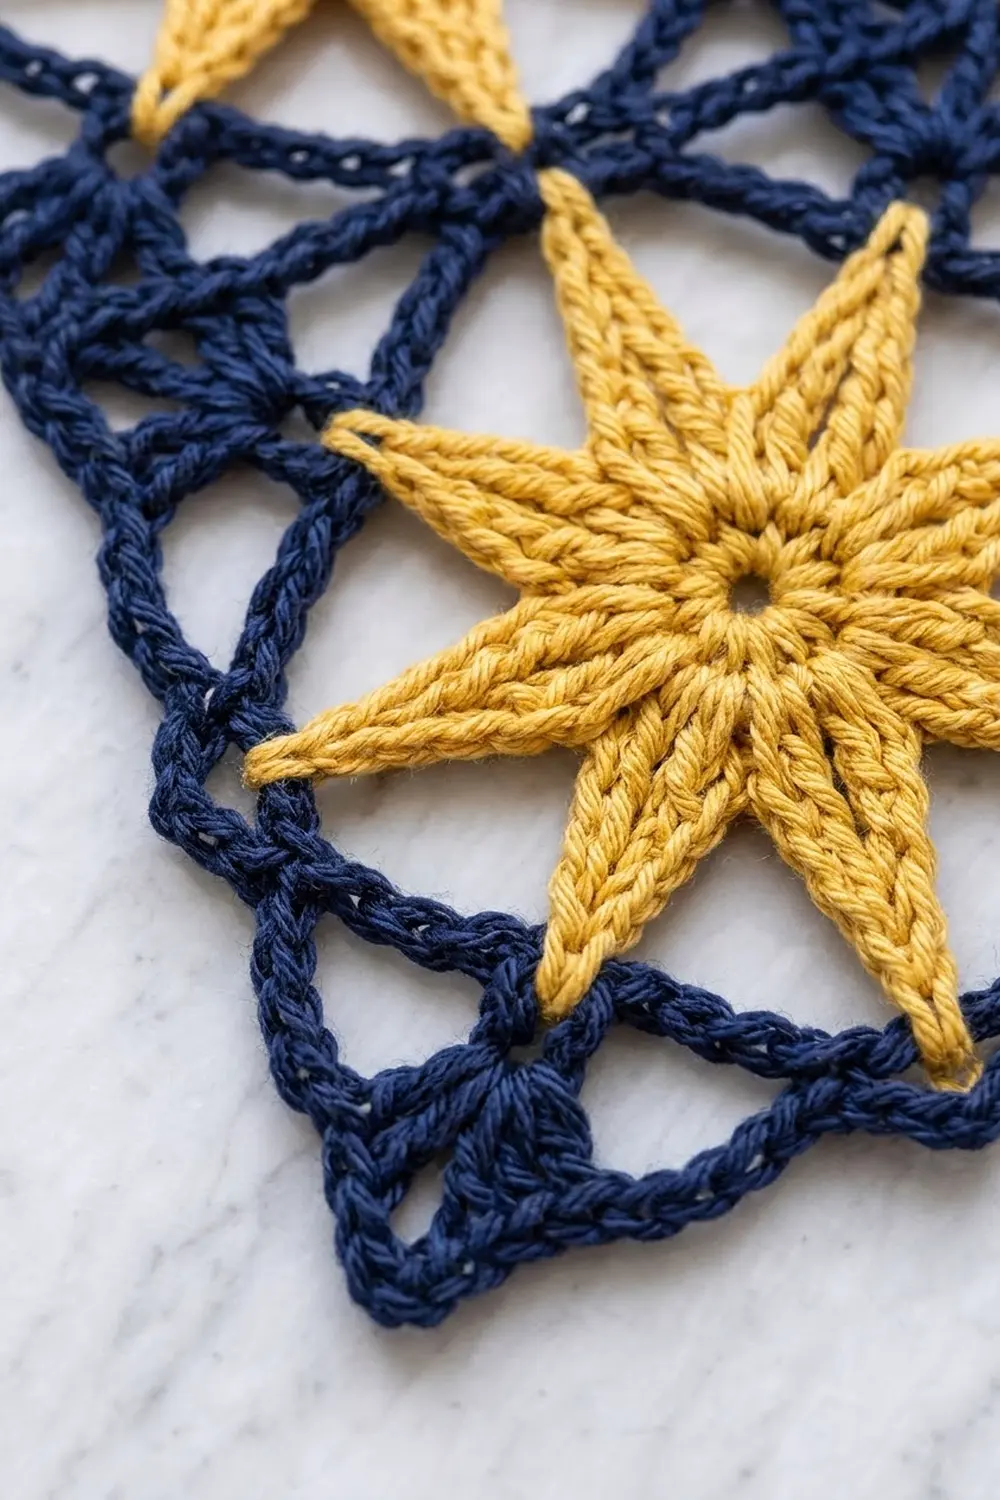
Square Motif
Make 108.
Round 1 (Gold): Ch 5 and sl st to the first ch to form a ring. Ch 3 (counts as dc), then work 15 dc in the ring. Sl st to the top of the beginning ch-3. (16 dc)
Keep the ring slightly open. The small center hole is part of the look.
Round 2 (Gold – star points): Ch 1, then sc in the same st as the join.
– Work a Star Point. Skip the next dc and sc in the next dc.
– Rep from * around, but on the last repeat sl st to the first sc instead of working the sc.
(8 sc and 8 Star Points of 5 sts each)
Each point is about 1 in (2.5 cm) long, wide at the base and narrow at the tip. Fasten off and weave in the ends.
Round 3 (Navy – octagon): Join Navy with sc in the tip of any point.
– Ch 6, then sc in the tip of the next point.
– Rep from * 6 more times, then ch 6 and sl st to the first sc.
(8 sc, 8 ch-6 sps)
The arches create the open spaces between the points.
Round 4 (Navy – squaring lattice): The sc where you joined Round 3 is a corner. The corners are at alternate point tips.
– Ch 5 (counts as dtr), then work (dtr, ch 3, 2 dtr) in the same sc to make the first corner.
– Ch 3, tr in the next ch-6 sp, ch 3, sc in the next sc (side tip), ch 3, tr in the next ch-6 sp, ch 3. Work (2 dtr, ch 3, 2 dtr) in the next sc for the corner.
– Rep from * 2 more times.
– Ch 3, tr in the next ch-6 sp, ch 3, sc in the next sc, ch 3, tr in the next ch-6 sp, ch 3. Sl st to the top of the beginning ch-5.
(16 dtr, 8 tr, 4 sc = 28 sts; 16 side ch-3 sps, 4 corner ch-3 sps)
The tall dtr groups pull the corners out into a square, and the ch-3 spaces form the open lattice.
Round 5 (Navy – solid edge): Sl st in the next dtr and in the corner ch-3 sp.
– Ch 1, then work 3 sc in the same corner sp.
– Sc in the next 2 dtr. [3 sc in the next ch-3 sp, sc in the next st] 3 times. Work 3 sc in the next ch-3 sp, then sc in the next 2 dtr. Work 3 sc in the corner sp.
– Rep from * 2 more times, then rep from * to ** once. Sl st to the first sc.
(88 sc)
Each repeat has 3 + 2 + 12 + 3 + 2 = 22 sc, and 4 x 22 = 88.
On each side, count from one corner center (the middle sc of a 3-sc corner) to the next, including both. That gives 23 sts per side, with each corner st shared by two sides.
Fasten off with a long tail on half of the squares if you want to use it for joining. Weave in the other ends. Block lightly to 4 in (10.2 cm).
Make All Pieces
- Gold: 108 star centers (Rounds 1–2)
- Navy: 108 lattice frames (Rounds 3–5)
Each strip uses 18 squares, and the curtain has six strips. Each column below is one strip, and the gaps between columns show that the strips hang separately:
Strip: 1    2    3    4    5    6
      [*]  [*]  [*]  [*]  [*]  [*]   row 1 (top)
      [*]  [*]  [*]  [*]  [*]  [*]   row 2
       :    :    :    :    :    :
      [*]  [*]  [*]  [*]  [*]  [*]   row 18 (bottom)
To change the length, add or remove squares. Each one changes the length by 4 in (10.2 cm).
Joining
Method: Slip-stitch join through the outer loops.
- Hold two squares with their right sides together and the edges lined up. Match the corner centers.
- With Navy, insert the hook through the outer loop of the first square’s corner center and the matching corner center on the second square. Pull up a loop.
- Sl st through both layers in each matching pair of sts across the side: 23 sl sts, corner center to corner center.
- Without fastening off, add the next square to the bottom edge of the second one and repeat until all 18 squares are joined in one column.
Stitch-to-stitch logic: Each side has exactly 23 sts, so every st has a partner and the seam lies flat with no easing.
Tension: Join loosely. If the seam puckers, the strip will hang shorter and curl. Use a hook 0.5 mm larger for joining if needed.
Checkpoint: Lay the strip flat. It should measure 4 x 72 in (10.2 x 182.9 cm) without stretching.
Border
Work this border on each strip. The border has the same gauge as the squares: 22 sc = 4 in (10.2 cm), and 2 rounds add about 0.33 in (0.8 cm) on each side.
Starting count per long side: 18 squares x 23 sts = 414 sts. This includes each square’s own corner sts, and nothing extra is added at the seams. Each short side has 23 sts.
Each of the four outer corner sts belongs to both a long side and a short side. So the perimeter has 2 x 414 + 2 x 23 − 4 = 870 sts.
Round 1: With RS facing, join Navy in any st along a long side. Ch 1.
– Work 1 sc in each st around, with 3 sc in each of the 4 outer corner sts.
– At the seams, work 1 sc in each of the two corner sts that sit side by side.
– Sl st to the first sc.
(870 sc worked 1 per st + 8 extra at the corners = 878 sc)
Per side: 416 sc on each long side and 25 sc on each short side. These counts include the corner centers at both ends.
Round 2: Ch 1, then sc in each sc around, with 3 sc in each corner center sc. Sl st to the first sc.
(878 sc worked 1 per st + 8 extra = 886 sc; 418 sc per long side, 27 sc per short side)
Hanging loops: With RS facing, find the top short edge (27 sc).
1. Join Navy in the 3rd sc from the left corner center. Ch 18, skip 3 sc, then sl st in the next sc (the 7th from the corner).
2. Turn and work 24 sc over the ch-18 loop. Sl st into the joining st and fasten off.
3. Repeat this at the right end of the edge, counting in from the right corner.
The finished loops are about 2 in (5.1 cm) tall and fit a rod up to 1.25 in (3.2 cm) across.
Why the math works: Round 1 works exactly 1 sc per existing st, so each side keeps its length. The only extra sts are the 2 added at each corner, which let the corners turn flat without cupping. Round 2 repeats that logic. The border therefore adds width and depth but no ruffle or pull along the 72 in (182.9 cm) sides.
Final Blocking
- Wet-block or spray-block each strip. Cotton responds well to a full soak.
- Roll the strip in a towel to remove the extra water.
- Pin it flat to 4.7 x 72.7 in (11.9 x 184.7 cm). Block in sections if your mats are short.
- Pin each gold star point outward so all eight points are even and sharp.
- Open the lattice spaces with your fingertips and square the corners of each motif.
- Let it dry completely, then unpin. Hang the strips for a day to settle before trimming the rod spacing.
Final Quality-Control Checklist
- Each square has 16 dc in Round 1 and 8 even Star Points
- Each square has 88 sc in Round 5, with 23 sts per side
- All 17 seams per strip are flat, with 23 sl sts each
- Each strip has 418 sc per long side and 27 sc per short side after the border
- Both loops on each strip match in size and placement
- All six strips are the same length, within 0.5 in (1.3 cm)
- All ends are woven in securely with no knots showing
Troubleshooting
Star points curl: Check that you start each point in the 2nd ch from the hook, and block the points firmly.
Square cups in the middle: The Round 3 chains are too tight. Make them looser or add 1 ch to each arch.
Square ruffles: The Round 4 dtr sts are too tall. Try a smaller hook just for that round.
Strip is shorter than 72 in (182.9 cm): The seams are pulling in. Rejoin them more loosely.
Strips hang at different lengths: Re-block the short ones damp, then hang them with a light weight clipped to the bottom to dry.
Loops stretch: Add a second row of sc over the loop.
Care
Hand wash cold and lay flat to dry, then re-block lightly if needed. Don’t tumble dry, because long strips can stretch and tangle.

Final Notes
Everything here follows one measurement chain. A star of about 3 in (7.6 cm) sits inside a square of 4 in (10.2 cm) with 23 sts per side. Eighteen squares joined stitch to stitch make a 4 x 72 in (10.2 x 182.9 cm) strip with 414 sts per long side. Two border rounds take it to 4.7 x 72.7 in (11.9 x 184.7 cm), and two loops hang it. Check each stage and the six strips will hang evenly in your doorway.
Happy crocheting!