

This hanging vine strand looks like a cutting from an olive branch. Two slim cream stems run side by side from a small hanging loop. Along them, pairs of olive-green leaves alternate with pairs of plump cream olives, and each olive has an open slit down its center.
The palette is just two colors: soft olive green and warm cream. The style is light, botanical, and a little vintage. You can hang one strand in a window, or make a set and hang them side by side as a bead-style door curtain. The pattern uses US crochet terms throughout, and every stitch count and size checkpoint is included.
One finished strand is about 13 in (33.0 cm) long, including the loop, and about 4.25 in (10.8 cm) wide at the leaf tips.
First you make 8 leaves and 8 olives. Then you chain the left stem from the loop down to the tip, attaching the left-hand motifs as you go. Next you chain the right stem back up, attaching the right-hand motifs and pinning the two stems together at every tier. Finally, a slip-stitch border turns the plain chains into firm, corded stems.
Finished Size and Construction
- Finished size: 13 in (33.0 cm) long × 4.25 in (10.8 cm) wide
- Skill level: Intermediate
- Terminology: US crochet terms
- Yarn weight: DK / light worsted (#3), cotton or cotton blend
- Hook: 3.5 mm (E-4)
- Number of pieces: 1 strand, built from 16 small motifs (8 leaves, 8 olives) and 2 stems
- Layout: 4 leaf tiers and 4 olive tiers that alternate, with one motif on each side per tier
- Piece size: leaf 2.25 in × 1 in (5.7 cm × 2.5 cm); olive 1.5 in × 1.1 in (3.8 cm × 2.8 cm)
- Size before border: each stem is 60 ch, or 12 in (30.5 cm)
- Border depth: adds no length; thickens each stem to about 0.125 in (0.3 cm)
Materials
Mercerized cotton or a cotton blend works best. It gives crisp leaf points, keeps the olive slits open, and is stiff enough to hang straight. Avoid fuzzy yarns, because they fill in the slits.
- Color A, olive green (leaves): 8 g / 18 m per strand
- Color B, cream (olives, stems, border): 10 g / 23 m per strand
These amounts include about a 20% margin, so there’s enough for a test piece and small mistakes.
Tools:
- 3.5 mm (E-4) crochet hook
- Tapestry needle
- 2 stitch markers
- Scissors
- Ruler or tape measure
- Blocking mat and rust-proof pins
- Spray bottle with water
Abbreviations (US Terms)
- ch: chain
- sl st: slip stitch
- sc: single crochet
- hdc: half double crochet
- dc: double crochet
- BLO: back loop only
- sp: space
- st(s): stitch(es)
- rnd: round
Special stitch: junction join. Take your hook out of the working loop. Insert the hook from front to back through the marked join point of a motif, then pick up the dropped loop and pull it through. This attaches the motif without adding a stitch. Junction joins never count toward the stem chain totals.
Gauge and Checkpoints
Gauge: 20 sc and 22 rows = 4 in (10.2 cm). Chain gauge is 5 ch = 1 in (2.5 cm).
Make a test piece first. Make 1 leaf and 1 olive before anything else, then check them against these sizes:
- Leaf after Rnd 2: 2.25 in × 1 in (5.7 cm × 2.5 cm)
- Olive after Rnd 3: 1.5 in × 1.1 in (3.8 cm × 2.8 cm), with an open slit about 0.8 in (2.0 cm) long
- 10 ch: 2 in (5.1 cm)
If your pieces are too big, go down 0.25 mm in hook size. If they are too small, go up 0.25 mm.
Chain gauge matters most, because it sets both the stem length and the spacing between tiers. If your motifs match gauge but your chains are loose, keep the same hook for the motifs and go down one hook size for the stems.
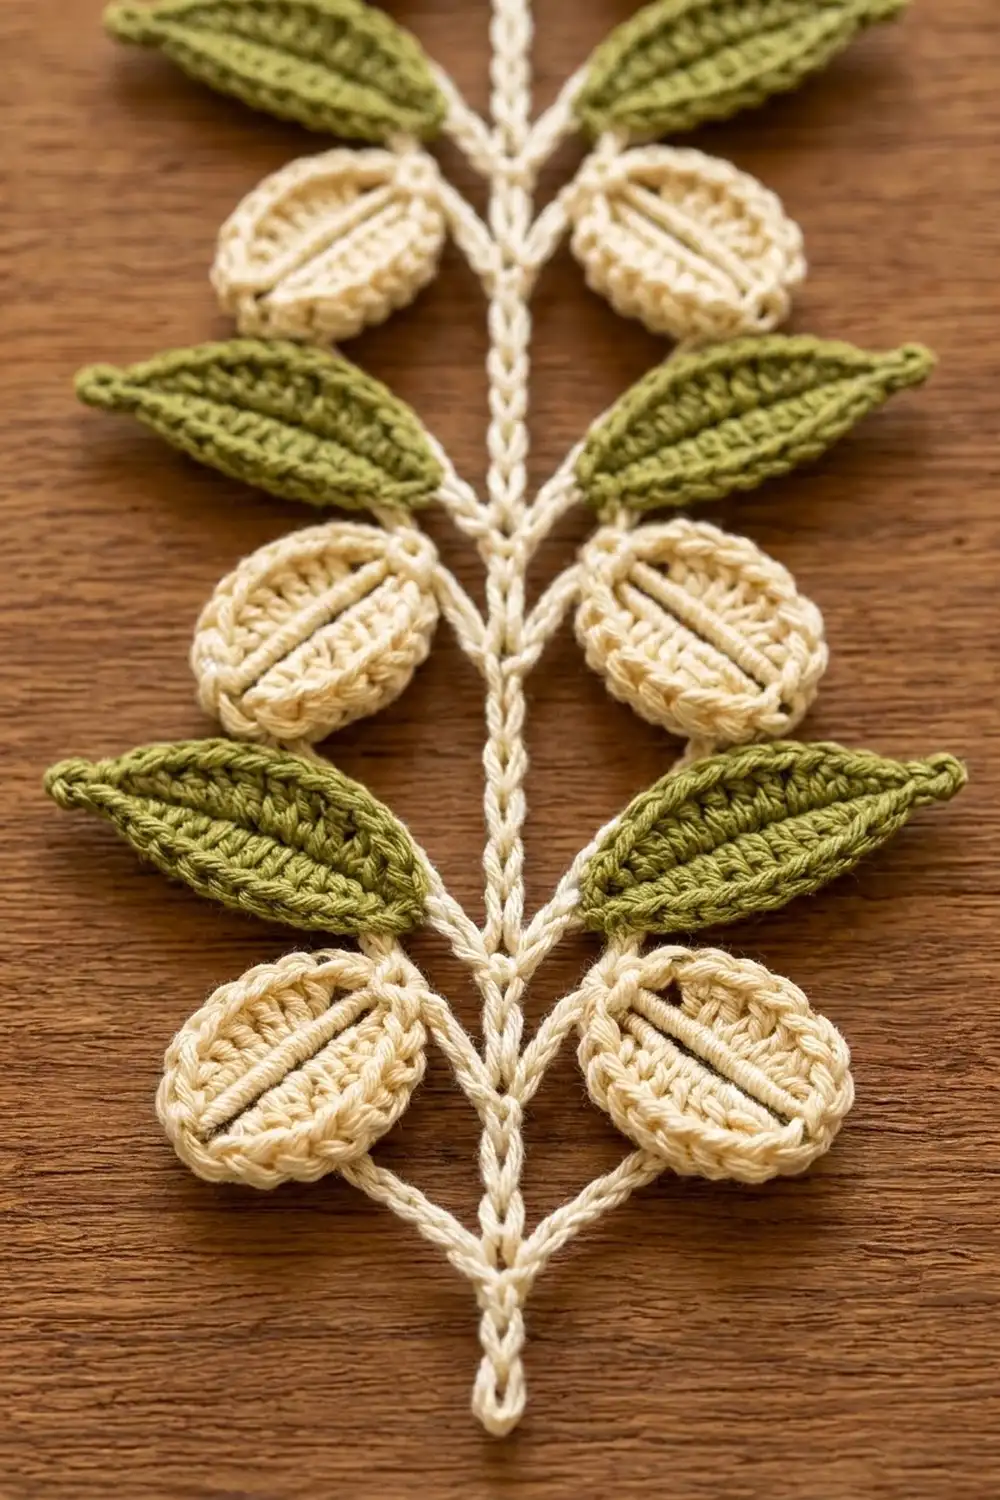
Leaves (Make 8)
Use Color A.
Ch 11.
Rnd 1: Sc in 2nd ch from hook, hdc in next ch, dc in next 5 ch, hdc in next ch, sc in next ch. Work 3 sc in last ch (this is the tip). Turn the piece so you can work along the other side of the foundation chain: sc in next ch, hdc in next ch, dc in next 5 ch, hdc in next ch, sc in next ch. Ch 2 (base point), then sl st in first sc. (21 sts + ch-2 sp)
Rnd 2: Ch 1. Sc in next 9 sts. Across the tip: sc in next st, (sc, ch 2, sc) in center tip st, sc in next st. Sc in next 9 sts. Work (sc, ch 1, sc) in the ch-2 base sp. Sl st in first sc. (24 sc + ch-2 tip sp + ch-1 base sp)
Vein: Don’t fasten off yet. Work 9 surface sl sts along the center foundation chain, from base to tip. Fasten off and weave in the ends.
Join point: Put a marker in the ch-1 base sp.
Checkpoint: 2.25 in × 1 in (5.7 cm × 2.5 cm), with sharp points at both ends. Keep the vein side as the right side for all 8 leaves.
Olives (Make 8)
Use Color B. The open slit forms because you work into each chain of a flattened ring, not into the center of the ring.
Ch 10, then sl st in first ch to form a loop. Flatten the loop so that ch 1 and ch 6 sit at the two ends, with 4 ch along each side.
Rnd 1: Ch 1. Work 3 sc in ch 1, sc in ch 2–5, 3 sc in ch 6, sc in ch 7–10. Sl st in first sc. (14 sc)
Pull gently on the long sides. The center should open into a slit, not a round hole. Tip: if the slit keeps closing, slide a pencil through it while you work Rnd 2.
Rnd 2: Ch 1. [2 sc in each of next 3 sts, hdc in next 4 sts] twice. Sl st in first sc. (20 sts: 12 sc + 8 hdc)
This is an increase round. At each end, the 3 sts become 6. The 4 hdc on each side plump out the sides.
Rnd 3 (rim): Working in BLO, sl st in each st around. (20 sl sts) Fasten off and weave in the ends.
Join point: Put a marker in the 3rd sl st of Rnd 3. This is the center of one end.
Checkpoint: 1.5 in × 1.1 in (3.8 cm × 2.8 cm), with a slit about 0.8 in (2.0 cm) long.
Assembly: Building the Stems
Lay out the motifs in tier order, from top to bottom: leaf, olive, leaf, olive, leaf, olive, leaf, olive. Each tier has one motif on the left and one on the right. Leaves point up and out. Olives hang down and out from their marked end.
Tip: pin all 16 motifs in place on your blocking mat first, then crochet the stems right over the layout. That way every motif faces the right way, and you don’t have to keep track of tiers in your head.
Left Stem
Use Color B.
- Loop: Ch 12, then sl st in first ch to form the hanging loop. (12 ch)
- Top section: Ch 8.
- Tiers 1 to 7: Junction join the left motif for that tier, then ch 6. Repeat for each tier from 1 to 7.
- Tier 8: Junction join the left olive.
- Tail: Ch 10.
- Tip: Ch 1. This tip ch doesn’t count toward either stem.
Left stem total: 8 + (7 × 6) + 10 = 60 ch, plus 8 junction joins that aren’t counted.
Checkpoint: 12 in (30.5 cm) from the base of the loop to the tip. Each 6-ch gap between tiers is 1.2 in (3.0 cm). The top section is 1.6 in (4.1 cm), and the tail is 2 in (5.1 cm).
Right Stem
Keep going up from the tip without cutting the yarn.
- Tail: Ch 10.
- Tier 8: Junction join the right olive, then sl st under the left stem’s tier 8 junction join. This pins the two stems together.
- Tiers 7 to 1: Ch 6, junction join the right motif for that tier, then sl st under the matching left junction. Repeat for each tier from 7 to 1.
- Top section: Ch 8, then sl st in the base of the hanging loop. Fasten off.
Right stem total: 10 + (7 × 6) + 8 = 60 ch. This matches the left stem exactly, which keeps the strand hanging straight.
Between junctions, the stems bow apart by about 0.25 in (0.6 cm), forming the narrow double line seen in the photo.
Border (Corded Stem Edging)
Border gauge: 1 sl st per stem ch. Work into the back bump of each chain so the sl st rolls over it and forms a firm, twisted cord. At the correct gauge, the border adds no length.
Join Color B at the base of the hanging loop.
- Loop: Sl st in each of the 12 loop ch. (12 sl sts)
- Side 1 (left stem): Working down, sl st in the back bump of each of the 60 ch. Skip the junction joins. (60 sl sts)
- Tip: Sl st in the tip ch. (1 sl st)
- Side 2 (right stem): Working up, sl st in the back bump of each of the 60 ch. Skip the junction joins. (60 sl sts)
Sl st in the first border st and fasten off.
Border total: 12 + 60 + 1 + 60 = 133 sl sts
Why the math works: Each side of the border starts from that stem’s own 60 ch. One sl st goes into each chain, so nothing is added or lost. The junction joins were never counted as chains, so skipping them keeps the motifs exactly where you placed them. The loop and tip also get 1 sl st per ch, for the same reason.
Checkpoint: The stem should still measure 12 in (30.5 cm). If the border shortened it by more than 0.5 in (1.3 cm), redo the border with a hook 0.5 mm larger.
Final Blocking
- Weave in any remaining tails along the back of the stems.
- Spray the strand until it is evenly damp but not dripping.
- Pin the hanging loop at the top. Pin the tip so the strand measures 13 in (33.0 cm) from loop to tip.
- Pin the two stems so they run parallel, about 0.25 in (0.6 cm) apart between junctions.
- Pin each leaf tip angled up and out. Check that the strand measures 4.25 in (10.8 cm) across a pair of leaves.
- Open each olive slit with a pin or toothpick, then pin each olive angled down and out.
- Let the strand dry completely before you take out the pins.
Final Quality-Control Checklist
- [ ] 8 leaves, each with 24 sc in Rnd 2, a ch-2 tip, and a vein
- [ ] 8 olives, each with 20 sl sts in Rnd 3 and an open slit
- [ ] Both stems have 60 ch
- [ ] From the top, the tiers go leaf, olive, leaf, olive, leaf, olive, leaf, olive
- [ ] The stems are pinned together at all 8 junctions
- [ ] The border has 133 sl sts
- [ ] The strand measures 13 in × 4.25 in (33.0 cm × 10.8 cm)
- [ ] All tails are woven in and hidden
Troubleshooting
- The olive slit closed up. You worked into the center of the ring instead of into each chain. Redo Rnd 1.
- The olive is round, not oval. Check that Rnd 2 increases only in the 3 end sts at each end.
- The leaf tip curls. Rnd 2 is too tight. Work it more loosely, or block it harder.
- The strand twists when it hangs. The stem counts don’t match. Recount both stems; each should have 60 ch.
- The stems gape apart. A pinning sl st is missing at one of the junctions.
- The motifs droop. The junction join went through only one loop. Redo it through both loops.
- The stems look loose and stringy. The border is too loose. Go down one hook size for the border only.
- The leaves face different ways. Join every leaf with its vein side facing up.
Care
Hand wash in cool water, roll the strand in a towel to remove water, and dry it flat, re-pinning if needed. Don’t tumble dry, because heat can shrink cotton unevenly and close the olive slits.
Making Multiple Strands for a Curtain
The photo also shows strands hung side by side as a curtain. Each strand is a separate piece. They aren’t joined to each other; each one hangs from the rod by its own loop.
Per strand: 8 leaves in Color A, plus 8 olives and the stems in Color B.
Example set for a curtain about 60 in (152.4 cm) wide: 15 strands, hung 4 in (10.2 cm) apart, center to center.
Rod: |S1|S2|S3|S4|S5|S6|S7|S8|S9|S10|S11|S12|S13|S14|S15|
Yarn for 15 standard strands: Color A 120 g / 270 m; Color B 150 g / 345 m.
To make a strand longer: add 1 leaf tier and 1 olive tier per repeat. Each repeat adds 2 leaves, 2 olives, and 12 ch to each stem, for 2.4 in (6.1 cm) of extra length. Add 12 sl sts to each side of the border too.
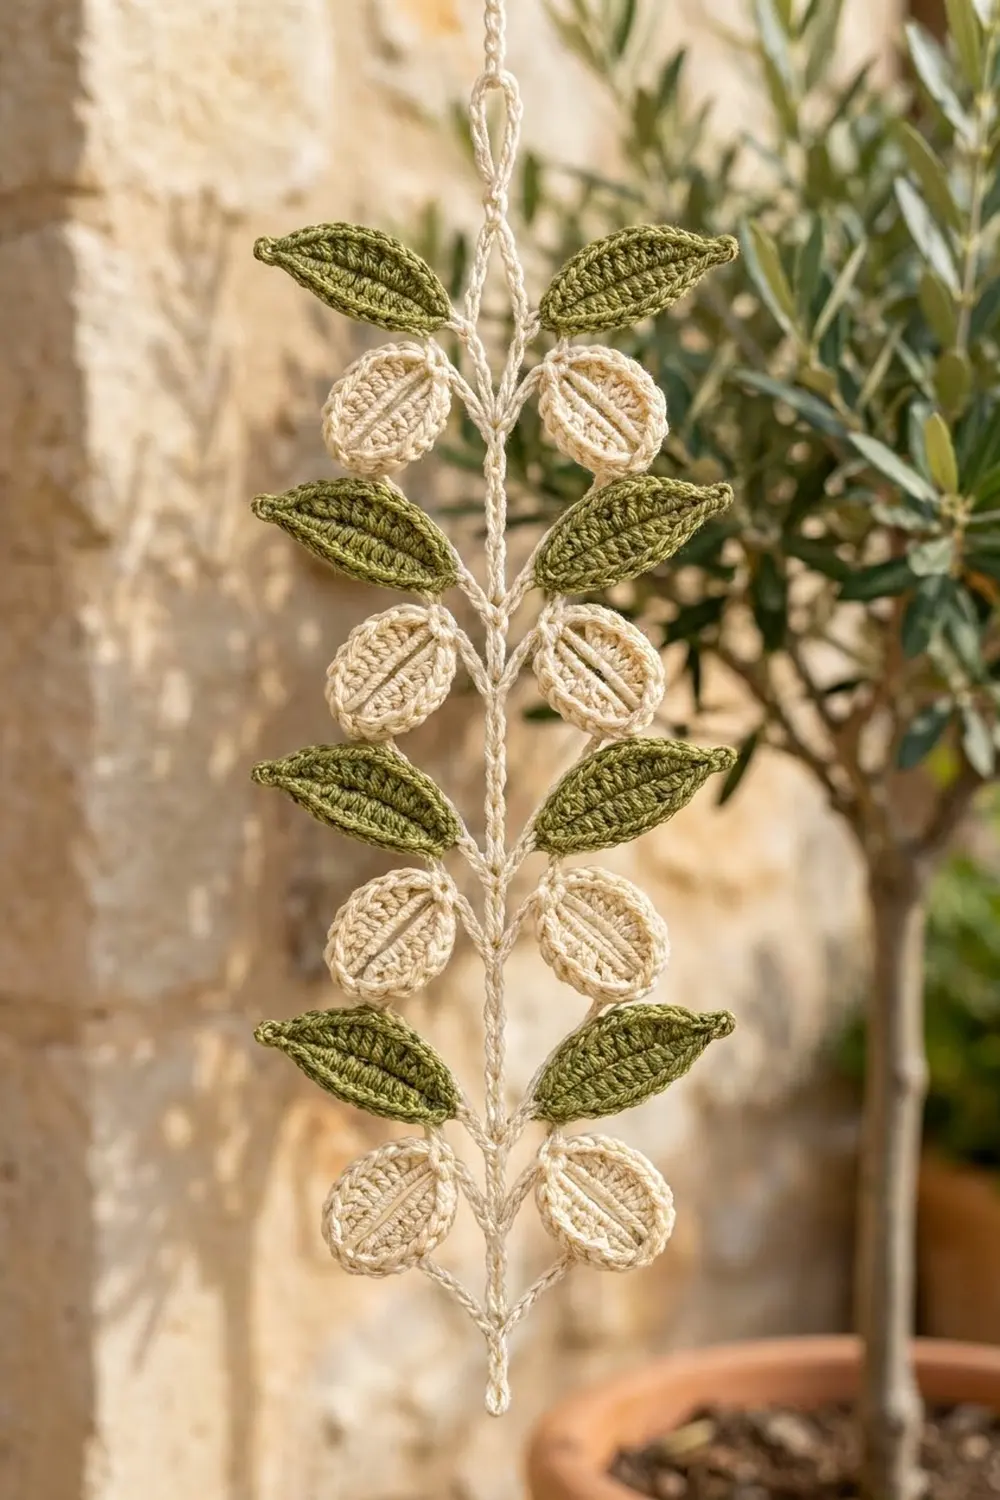
Final Notes
Here’s the measurement chain, from gauge to finished size:
- Gauge is 5 ch = 1 in (2.5 cm).
- A leaf is 2.25 in (5.7 cm) long and an olive is 1.5 in (3.8 cm) long.
- Each stem is 60 ch = 12 in (30.5 cm), with 6-ch gaps of 1.2 in (3.0 cm) between tiers.
- The border is 1 sl st per ch, so the length stays the same.
- The finished strand is 13 in × 4.25 in (33.0 cm × 10.8 cm).
Check each step of this chain as you go, and your vine will hang straight and even.
Happy crocheting!