

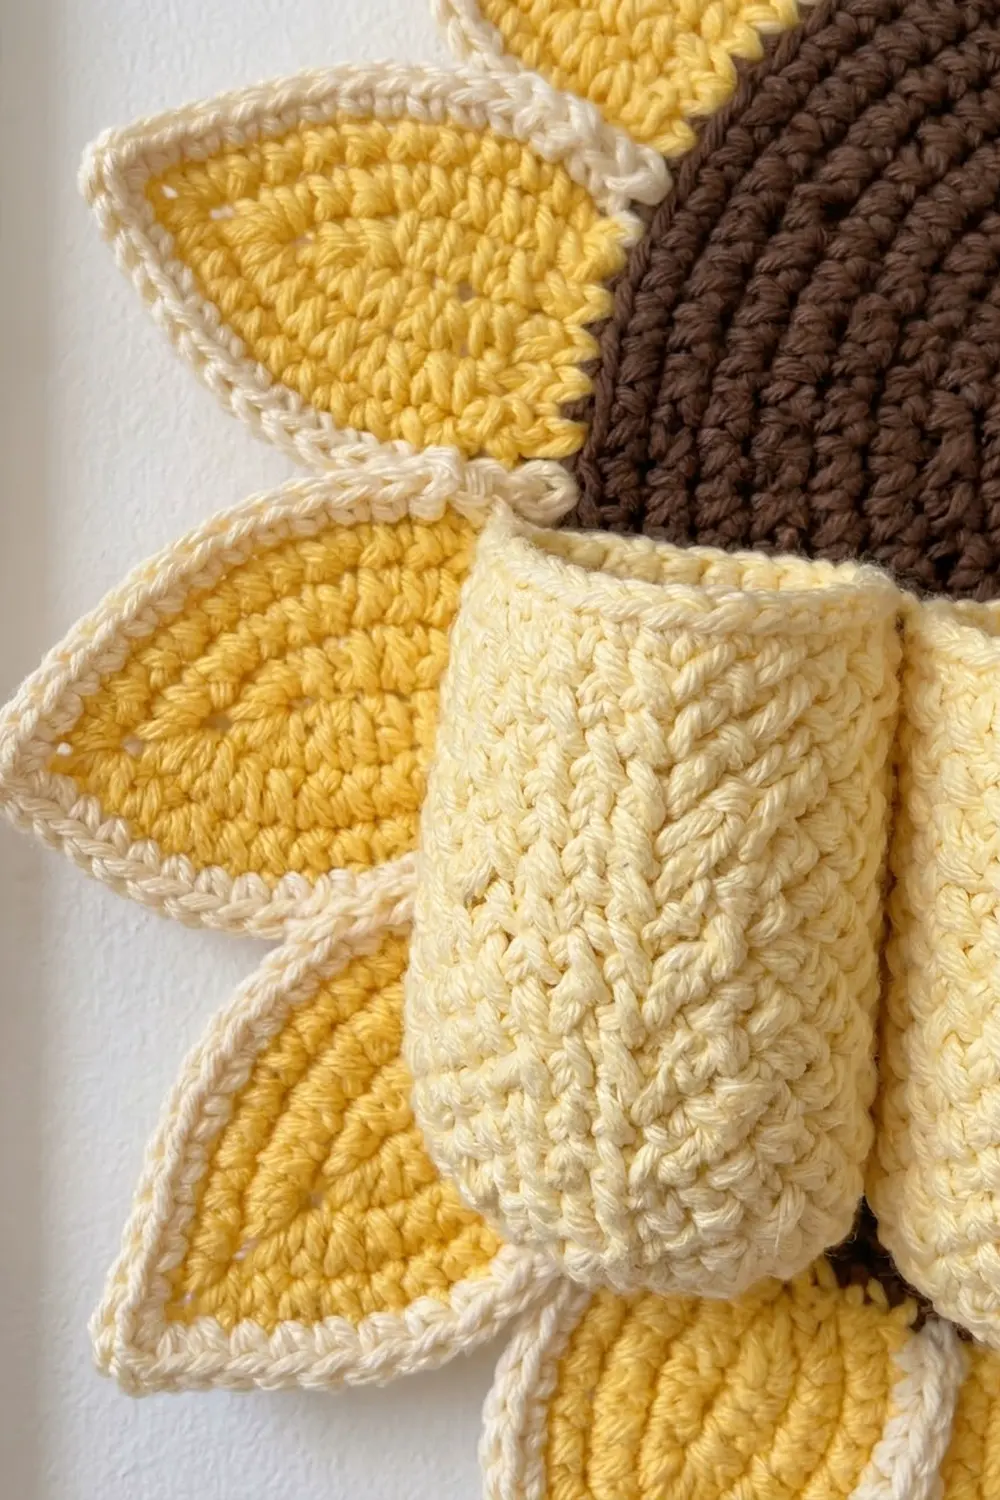
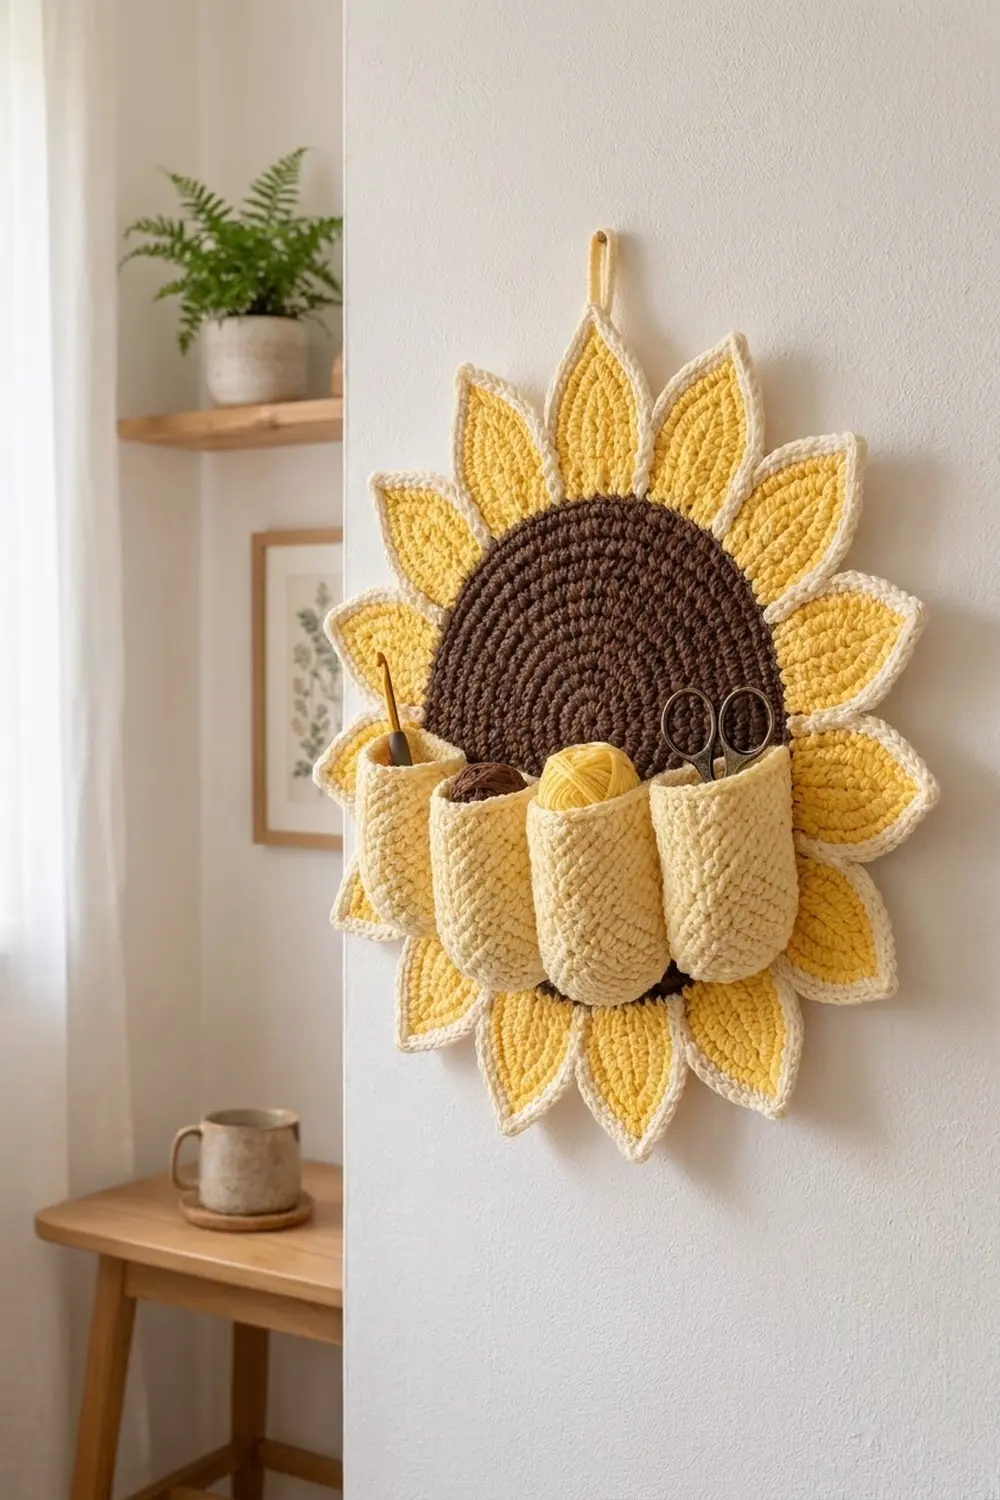
This cheerful sunflower hangs on the wall and keeps your small tools close. It has a dark chocolate-brown center, sixteen golden petals outlined in cream and a row of four soft butter-yellow pockets. The pockets fit hooks, scissors, small yarn balls or pens.
The look is warm and a little cottage-style. The brown spiral center contrasts strongly with the bright petals, and the knit-look pockets add a soft, padded texture.
This pattern uses US crochet terms. The finished organizer is 15 in (38.1 cm) across from petal tip to petal tip.
You will make one brown disc, sixteen petals, four pockets and one hanging loop. Then you sew everything together: the petals go behind the disc, the pockets go on the front, and the loop goes at the top.
Finished Size and Construction
- Finished size: 15 in (38.1 cm) across, tip to tip
- Skill level: Intermediate
- Terminology: US
- Yarn weight: Worsted (#4), cotton or cotton blend
- Hook: 4.5 mm (US 7)
- Number of pieces: 22 (1 disc, 16 petals, 4 pockets, 1 loop)
- Layout: Petals evenly spaced around the disc; 4 pockets in one row across the lower half
- Disc size: 8 in (20.3 cm) across
- Petal size before border: 3.75 × 1.5 in (9.5 × 3.8 cm)
- Petal size after border: 4.25 × 2 in (10.8 × 5.1 cm)
- Border depth: 0.25 in (0.6 cm), one round of cream sc
- Pocket size: 3 in (7.6 cm) tall, 2.25 in (5.7 cm) wide when flattened
Materials
Use a smooth, firm cotton yarn. Cotton holds the petal points crisp and keeps the pockets from sagging. Choose a yarn with about 100 m per 50 g.
- Brown (center): 60 g / 120 m
- Golden yellow (petals): 80 g / 160 m
- Cream (petal border and loop): 50 g / 100 m
- Pale butter yellow (pockets): 70 g / 140 m
All quantities include a margin of about 15% for gauge swatches and sewing tails.
Tools:
– 4.5 mm (US 7) crochet hook
– Tapestry needle
– 4 locking stitch markers, plus 16 more for petal placement
– Rust-proof pins
– Measuring tape
– Spray bottle and a blocking mat
Abbreviations (US Terms)
- ch – chain
- sc – single crochet
- hdc – half double crochet
- dc – double crochet
- sl st – slip stitch
- MR – magic ring
- BLO – back loop only
- st(s) – stitch(es)
- sp – space
- ws – waistcoat stitch
Waistcoat stitch (ws): Insert your hook through the center of the next stitch, between the two vertical legs of the “V” below, and not under the top loops. Yarn over and pull up a loop, then yarn over and pull through both loops on the hook. This makes the knit-look texture on the pockets.
Gauge and Checkpoints
Single crochet gauge: 15 sc and 16 rounds = 4 in (10.2 cm).
Waistcoat stitch gauge: 16 ws and 16 rounds = 4 in (10.2 cm).
Before you make many pieces, make the disc and one petal to test your gauge.
Checkpoints:
– Disc after Rnd 8: 4 in (10.2 cm) across
– Disc after Rnd 16: 8 in (20.3 cm) across
– Petal after Rnd 2: 3.75 × 1.5 in (9.5 × 3.8 cm)
– Petal after border: 4.25 × 2 in (10.8 × 5.1 cm)
If your pieces come out too big, go down 0.5 mm in hook size. If they come out too small, go up 0.5 mm. If the disc ruffles, your stitches are too loose for the increases, so go down one hook size. If it cups, go up one size.
Center Disc (Brown, Make 1)
Work in continuous rounds without joining. Place a marker in the first stitch of each round.
Rnd 1: 6 sc in MR. (6 sts)
Rnd 2: 2 sc in each st around. (12 sts)
Rnd 3: sc in next st, 2 sc in next st around. (18 sts)
Rnd 4: sc in next st, 2 sc in next st, sc in next 2 sts, 2 sc in next st 5 times, sc in next st. (24 sts)
Checkpoint: 2 in (5.1 cm) across.
Rnds 5–16: In each round, work 6 increases spaced evenly around. Each round has 6 more stitches than the round before. Stagger where the increases fall from round to round so the disc stays round, not hexagonal.
- Rnd 5: 30 sts
- Rnd 6: 36 sts
- Rnd 7: 42 sts
- Rnd 8: 48 sts (checkpoint: 4 in / 10.2 cm)
- Rnd 9: 54 sts
- Rnd 10: 60 sts
- Rnd 11: 66 sts
- Rnd 12: 72 sts (checkpoint: 6 in / 15.2 cm)
- Rnd 13: 78 sts
- Rnd 14: 84 sts
- Rnd 15: 90 sts
- Rnd 16: 96 sts
At the end, sl st into the next st to smooth the step, then fasten off. Weave in the ends on the back.
Final disc: 96 sts, 8 in (20.3 cm) across.
Petals (Golden Yellow, Make 16)
Each petal is worked all the way around both sides of a foundation chain. In these steps, the “first chain” is the one closest to the hook (it becomes the pointed tip), and the “last chain” is the slip-knot end (it becomes the rounded base).
Ch 13.
Rnd 1: Start in the 2nd ch from the hook.
– Side A: sc in the 2nd ch from hook, hdc in next 2 ch, dc in next 6 ch, hdc in next 2 ch. (11 sts)
– Base: 3 sc in the last ch. (3 sts)
– Turn the piece and work along the other side of the chain.
– Side B: hdc in next 2 ch, dc in next 6 ch, hdc in next 2 ch, sc in the same ch as the first sc. (11 sts)
– Tip: ch 2, then sl st to the first sc.
Total: 11 + 3 + 11 = 25 sts, plus one ch-2 tip sp.
Checkpoint: about 3.25 × 1 in (8.3 × 2.5 cm).
Rnd 2 (conversion round): Ch 1.
– Sc in the first 11 sts (Side A).
– 2 sc in each of the next 3 sts (Base, which now has 6 sts).
– Sc in the next 11 sts (Side B).
– (sc, ch 2, sc) in the ch-2 tip sp.
– Sl st to the first sc.
Count: 25 sts worked one per stitch, plus 3 extra at the base, plus 2 sc in the tip = 30 sc and one ch-2 sp. Fasten off.
Checkpoint: 3.75 × 1.5 in (9.5 × 3.8 cm).
The ch-2 space at the tip creates the point. The rounded base will be tucked behind the disc.
Make All Pieces
Count your finished pieces against this list:
- Brown: 1 disc (96 sts)
- Golden yellow: 16 petals (finish the border below before assembly)
- Pale butter yellow: 4 pockets (see below)
- Cream: 16 petal borders plus 1 hanging loop
Pockets (Pale Butter Yellow, Make 4)
Ch 6.
Rnd 1: sc in 2nd ch from hook, sc in next 3 ch, 3 sc in last ch. Working along the other side of the chain: sc in next 3 ch, 2 sc in the first ch. (12 sts)
Each end of the oval now has 3 stitches.
Rnd 2: 2 sc in next st, sc in next 3 sts, 2 sc in each of next 3 sts, sc in next 3 sts, 2 sc in each of last 2 sts. (18 sts)
Checkpoint: the oval base measures 1.75 × 0.75 in (4.4 × 1.9 cm).
Rnd 3: sc in BLO of each st around. (18 sts) This round turns the edge upward to start the walls.
Rnds 4–12: ws in each st around. (18 sts per round)
Rnd 13: sl st loosely in each st around. (18 sl sts) This makes a firm rim at the top.
Fasten off and leave a 24 in (61 cm) tail for sewing.
Checkpoint: 3 in (7.6 cm) tall. When flattened with 9 stitches on each face, the pocket is 2.25 in (5.7 cm) wide.
Hanging Loop (Cream, Make 1)
Ch 16. Sl st in the 2nd ch from the hook and in each ch across. (15 sl sts) Fasten off and leave a 10 in (25.4 cm) tail.
Layout Grid
Petals sit every 6 stitches on Rnd 16 of the disc (96 ÷ 16 = 6).
                [loop]
          P16   P1   P2
      P15                P3
    P14     BROWN DISC     P4
    P13                    P5
    P12  [K1][K2][K3][K4]  P6
      P11                P7
          P10   P9   P8
P1 is at 12 o’clock and the numbers go clockwise. K1–K4 are the pockets, placed left to right.
Joining
Petals to disc. Fold the disc in half and place a marker at the top center stitch of Rnd 16. Count around and mark every 6th stitch, for 16 markers in total. Each marker is the center line for one petal.
Lay the disc face down. Place each petal face down with its center line on a marker. Tuck the base of each petal 0.75 in (1.9 cm) under the disc edge, so the base lines up with the back of Rnd 13. Disc rounds are 0.25 in (0.6 cm) tall, so 3 rounds equal 0.75 in.
With cream or yellow yarn, whipstitch the petal’s base edge to the back loops of disc Rnd 13. Then tack each side of the petal to Rnd 16 at the disc’s edge. The petals will overlap a little at their bases. This is expected and keeps any gaps from showing.
Pockets to disc. Turn the disc face up. Flatten each pocket so 9 stitches form the back face and 9 stitches form the front face. Lay the four pockets side by side so their rims sit 0.75 in (1.9 cm) below the horizontal center line of the disc. The row is 4 × 2.25 in = 9 in (22.9 cm) wide. That is 0.5 in (1.3 cm) wider than the disc on each side, so the outer pockets rest on petals P4–P5 and P13–P12.
For each pocket, whipstitch these edges to the disc and petals:
– The 9 back stitches along the Rnd 3 ridge at the base
– Both side folds, through the 10 wall rounds (Rnds 3–12)
Leave the front face and the rim free so the pocket bulges and stays open. Sew one stitch to one stitch, or one round to one round, through the back of the pocket and the surface of the disc.
Tension: Pull each stitch snug but not tight. If you pull too hard, the disc puckers behind the pockets.
Loop: Fold the loop in half. Sew both ends to the back of P1, 0.75 in (1.9 cm) down from the base of the tip, so the loop sticks up 1.25 in (3.2 cm) above it.
Size checkpoint: The flower measures 15 in (38.1 cm) from tip to tip. That is 8 in (20.3 cm) of disc plus 2 × 3.5 in (8.9 cm) of visible petal (4.25 in petal minus the 0.75 in tucked under).
Border (Cream Petal Edging)
Do this round on all 16 petals before you join anything.
Border gauge: 15 sc = 4 in (10.2 cm). One round adds 0.25 in (0.6 cm) to each edge.
Join cream in the first sc of Rnd 2, at the start of Side A.
Rnd 3: Ch 1.
– Side A: sc in next 11 sts. (11 sts)
– Base: sc in next st, 2 sc in next st, sc in next 2 sts, 2 sc in next st, sc in next st. (8 sts)
– Side B: sc in next 11 sts. (11 sts)
– Tip: sc in next sc, (sc, ch 2, sc) in the ch-2 sp, sc in the last sc. (4 sts)
– Sl st to the first sc.
Count: 30 sts worked one per stitch, plus 2 base increases, plus 2 sc in the tip space = 34 sc and one ch-2 sp. Fasten off and weave in the ends.
Why the math works: The long sides are almost straight, so they keep exactly 11 stitches each and lie flat. Only the curved parts need extra stitches. The base gets 2 increases to follow its curve, and the tip gets its stitches inside the ch-2 space, which keeps the point sharp.
Each long side gains 0.25 in, so the width grows from 1.5 in to 2 in (3.8 to 5.1 cm). The tip and the base each gain 0.25 in, so the length grows from 3.75 in to 4.25 in (9.5 to 10.8 cm).
Final Blocking
- Lay the organizer face up on a blocking mat.
- Pin the disc into a true circle 8 in (20.3 cm) across.
- Pin each petal tip outward so tips on opposite sides are 15 in (38.1 cm) apart.
- Fill each pocket with a rolled washcloth so it holds a rounded shape.
- Mist everything evenly with water until damp. Don’t soak it.
- Let it dry completely, which takes 12–24 hours.
- Unpin it and check that the petals lie flat.
Final Quality-Control Checklist
- The disc has 96 sts and measures 8 in (20.3 cm).
- All 16 petals have 34 border sts and come to sharp tips.
- The petals are spaced every 6 stitches.
- The pockets are 3 in (7.6 cm) tall, sit level and touch each other.
- The pocket rims are open and the fronts bulge.
- The loop is sewn securely behind P1.
- The finished diameter is 15 in (38.1 cm).
- All ends are woven in on the back.
Troubleshooting
- Disc ruffles: Go down a hook size or take out one increase round.
- Disc cups: Go up a hook size and check that you have 6 increases in every round.
- Petal tip is rounded: Make sure you work the ch-2 in Rnds 1, 2 and 3.
- Petals curl: Block them pinned flat and steam lightly.
- Pockets lean forward: Sew the side folds all the way up to the rim.
- Pockets look flat: Sew only the back 9 stitches of the base, not the front ones.
- Organizer tilts on the wall: Recenter the loop on the P1 center line.
Care
Hand wash in cool water, press out the water in a towel and dry flat in shape. Don’t hang it to dry while it’s wet.
Final Notes
Here is how the measurements build on each other:
– The disc reaches 8 in (20.3 cm) at 96 stitches.
– Each petal grows to 3.75 × 1.5 in (9.5 × 3.8 cm), then to 4.25 × 2 in (10.8 × 5.1 cm) after the cream border.
– With 0.75 in (1.9 cm) of each petal tucked under, the flower measures 15 in (38.1 cm) across.
– Four pockets at 2.25 in (5.7 cm) each make a row 9 in (22.9 cm) wide.
If you check each stage against these numbers, your sunflower will come out the right size.
Happy crocheting!