
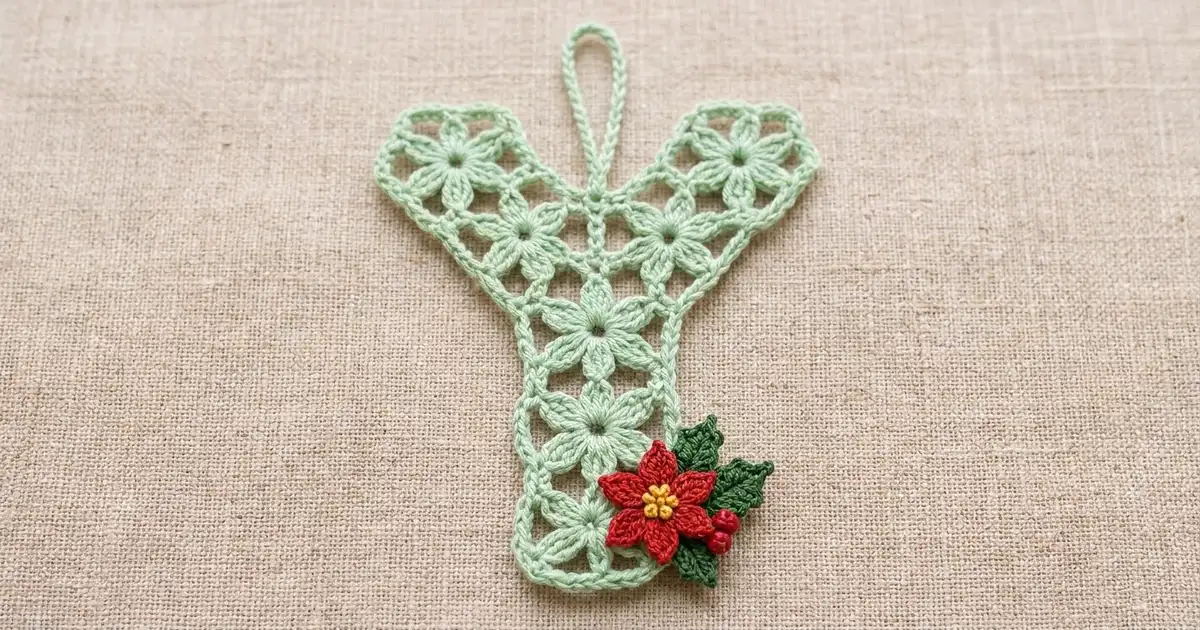
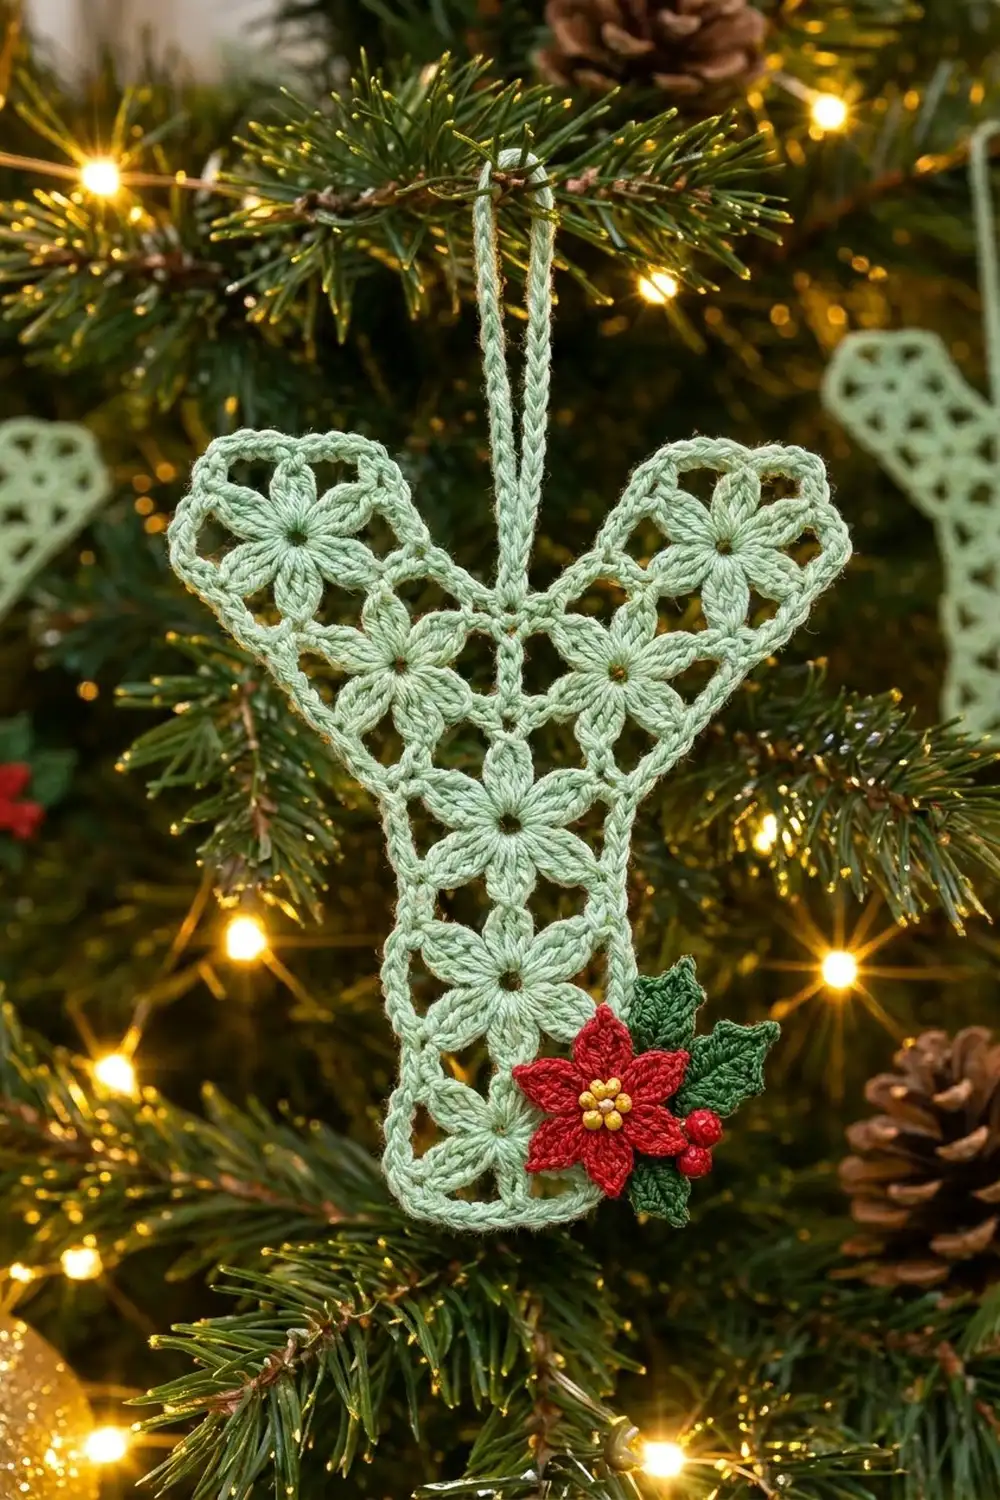
This lacy letter Y ornament is made from small six-petal flower hexagons in soft mint green. They are joined into one openwork monogram and outlined with a neat corded edge. A bright red poinsettia with dark green holly leaves and red berries sits at the lower right of the stem as a classic Christmas accent.
The look is light, vintage and delicate, like a snowflake shaped into a letter. Mint green is the main color, with red, dark green and a touch of yellow in the small appliqué. The pattern uses US crochet terms.
The finished ornament is about 5.4 in (13.7 cm) wide and 5.9 in (15.0 cm) tall, not counting the 2 in (5.1 cm) hanging loop.
The construction is simple:
1. Crochet 8 identical flower hexagons.
2. Whipstitch them into a Y shape.
3. Work a 2-round border around the whole outline.
4. Add a corded hanging loop and block.
5. Sew on the poinsettia appliqué.
Finished Size and Construction
- Finished size: 5.4 in (13.7 cm) wide x 5.9 in (15.0 cm) tall, plus a 2 in (5.1 cm) loop
- Skill level: Intermediate
- Terminology: US crochet terms
- Yarn weight: Size 3 cotton crochet thread
- Hook: 2.0 mm steel hook
- Number of pieces: 8 flower hexagons joined into one ornament, plus 1 poinsettia appliqué (2 petal layers, 2 leaves, 3 berries)
- Layout: A stem of 3 hexagons, 1 center hexagon, and 2 diagonal arms of 2 hexagons each
- Piece size: 1.25 in (3.2 cm) corner to corner, 1.1 in (2.8 cm) from one flat side to the opposite flat side
- Size before border: 5 in (12.7 cm) wide x 5.5 in (14.0 cm) tall
- Border depth: 0.2 in (0.5 cm), 2 rounds
Materials
Use a smooth, tightly twisted mercerized cotton thread in size 3. It shows the petal clusters and the corded edge clearly, and it blocks crisply. Thread with roughly 3.7 m per gram (about 185 m per 50 g) will match the amounts below.
- Mint green (MC): 15 g / 55 m
- Red (A): 2 g / 7 m
- Dark green (B): 2 g / 7 m
- Yellow (C): 1 g / 3 m
These amounts include a margin of about 20 percent for your test hexagon and for weaving in ends.
Tools:
- 2.0 mm steel crochet hook
- Tapestry needle with a small eye
- Sharp sewing needle and red or mint sewing thread (optional, for the appliqué)
- Rustproof pins and a foam blocking board
- Spray bottle or light fabric stiffener (optional)
- Ruler or tape measure
Abbreviations (US Terms)
- ch – chain
- sl st – slip stitch
- sc – single crochet
- hdc – half double crochet
- dc – double crochet
- sc2tog – single crochet 2 together
- rev sc – reverse single crochet (crab stitch)
- sp(s) – space(s)
- st(s) – stitch(es)
- RS – right side
- WS – wrong side
Special stitches:
- 3-dc cluster (cl): Yarn over, insert the hook in the st, pull up a loop, yarn over and pull through 2 loops. Repeat 2 more times in the same st (4 loops on the hook). Yarn over and pull through all 4 loops.
- Beginning cluster (beg cl): Ch 2, then work a 2-dc cluster in the same st. That means 2 partial dc, then yarn over and pull through all 3 loops.
- Picot: Ch 2, sl st in the top of the stitch you just made.
Gauge and Checkpoints
Gauge matters because any error is multiplied across eight hexagons. Make one complete hexagon first and measure it before you go on.
- After Round 1: about 0.4 in (1.0 cm) across
- After Round 2: about 0.8 in (2.0 cm) across the petal tips
- After Round 4: 1.25 in (3.2 cm) corner to corner and 1.1 in (2.8 cm) from flat side to flat side, lightly pressed
Each hexagon can be off by up to 1/16 in (0.2 cm). If your hexagon is too big, switch to a 1.75 mm hook. If it is too small, try a 2.25 mm hook. If only the corners curl, check that you worked exactly 3 sc into each corner space in Round 4.

Flower Hexagon (Make 8)
Work with MC.
Round 1: Make a magic ring. Ch 3 (counts as dc), then work 11 dc in the ring. Pull the ring closed and join with sl st to the top of the beginning ch-3. (12 dc)
Round 2 (petals): Beg cl in the same st, ch 3, skip the next st. Cl in the next st, ch 3, skip the next st; repeat from * 4 more times. Join with sl st to the top of the beg cl. (6 clusters, 6 ch-3 sps)
The six clusters are the petals. Skipping stitches leaves a small opening between each pair of petals, so the flower center stays open.
Round 3 (hexagon frame): Ch 5 (counts as dc + ch 2), then dc in the top of the same cluster (first corner made). Ch 2, dc in the next ch-3 sp, ch 2. (Dc, ch 2, dc) in the top of the next cluster, ch 2, dc in the next ch-3 sp, ch 2; repeat from * 4 more times. Join with sl st to the 3rd ch of the beginning ch-5. (18 dc, 18 ch-2 sps: 6 corner sps and 12 side sps)
Each cluster tip becomes a corner, so the petals point straight into the six corners of the hexagon.
Round 4 (conversion to a solid edge): Ch 1. Sc in the next dc, 3 sc in the corner ch-2 sp, sc in the next dc, 2 sc in the next ch-2 sp, sc in the next dc, 2 sc in the next ch-2 sp; repeat from * 5 more times. The first sc goes into the same st as the joining sl st. Join with sl st to the first sc and fasten off. On 4 of the hexagons, leave a 12 in (30.5 cm) tail for joining. (60 sc = 18 sc worked 1 per dc + 42 sc worked into spaces)
The middle sc of each 3-sc corner group is the corner stitch. Each side has 11 sts, counting both of its corner stitches, with 9 sts between them. Check: 6 sides x 9 sts + 6 corner sts = 60 sts. The center stitch of each side is the 5th of its 9 middle sts, and it sits directly above that side’s middle dc.
Weave in the starting tail on the WS. Lightly steam each hexagon flat before joining.
Make All Pieces
- Mint green: 8 flower hexagons
- Red: 1 large petal layer, 1 small petal layer, 3 berries
- Dark green: 2 holly leaves
- Yellow: French knots only
Lay each hexagon with one flat side at the top and one at the bottom. Label them as shown below. Each row of the grid is half a hexagon tall (0.55 in / 1.4 cm), so hexagons that touch diagonally sit one row apart.
L2  .   .   .   R2
.   L1  .   R1  .
.   .   C   .   .
.   .   .   .   .
.   .   S3  .   .
.   .   .   .   .
.   .   S2  .   .
.   .   .   .   .
.   .   S1  .   .
S1, S2 and S3 form the stem, and C is the center. L1 and L2 form the left arm, rising up and outward from C. R1 and R2 mirror them on the right.
Joining
Join the hexagons with a flat whipstitch through the back loops only, RS facing up, using the MC tails. The unused front loops form a neat line that echoes the corded edge.
Matching the stitches: Lay two hexagons flat with the sides you are joining touching. Start at a corner stitch on one hexagon and the matching corner stitch on the other. Whipstitch each pair of back loops together, working 11 sts on one hexagon to 11 sts on the other, and end at the opposite pair of corners. Every seam joins 11 pairs. No stitches are added or skipped.
Joining order (7 seams):
- S1 top side to S2 bottom side
- S2 top side to S3 bottom side
- S3 top side to C bottom side
- L1 lower-right side to C upper-left side
- R1 lower-left side to C upper-right side
- L2 lower-right side to L1 upper-left side
- R2 lower-left side to R1 upper-right side
Tension: Pull each stitch just snug enough to close the gap. Too tight and the seam puckers. Too loose and the seam stretches longer than the 1.25 in (3.2 cm) side.
Size checkpoint: After seam 3, the stem plus the center measures 4.4 in (11.2 cm) tall. After all 7 seams, the Y measures 5 in (12.7 cm) wide across the arm tips. It is 5.5 in (14.0 cm) tall from the bottom of S1 to the tops of L2 and R2.
Border
Border gauge: Work 1 sc into every stitch along a straight side. Each side stays 1.25 in (3.2 cm) long, and each round adds about 0.1 in (0.3 cm) of depth.
Counting the outline: The 8 hexagons have 48 sides between them. The 7 seams use 14 of those sides, which leaves 34 exposed sides. Going around the Y, the exposed sides meet at two kinds of points:
- Outer corners (20): hexagon corners where both sides are exposed. These are the points that stick out: 4 each on S1, L2 and R2, and 2 each on S2, S3, L1 and R1.
- Seam points (14): the two ends of each of the 7 seams. Here the corner stitches of two hexagons meet at an inward notch.
Stitches available: 34 sides x 9 middle sts = 306. Add 20 outer corner sts and 28 seam corner sts (14 pairs), for a total of 354 sts. This is the same as 34 sides x 11 sts, minus the 20 corner stitches that two sides share at each outer corner.
Round 1: Join MC with sl st in the corner st of any outer corner on S1. Ch 1, then work 3 sc in the same st. Then work around:
- Each side: 1 sc in each of the 9 middle sts
- Each outer corner: 3 sc in the corner st
- Each seam point: sc2tog over the 2 joined corner sts
Join with sl st to the first sc. (380 sts = 354 sts worked 1 per st, minus 14 merged by sc2tog, plus 40 extra at outer corners)
Check: 34 sides x 9 sc = 306. Add 20 outer corners x 3 sc = 60 and 14 seam points x 1 sc = 14. That totals 380.
Round 2: Ch 1, rev sc in each st around. Join with sl st to the first rev sc and fasten off. (380 rev sc)
Why the math works:
– Each straight side gets exactly 1 sc per stitch, so it stays the same length as the hexagon side and lies flat.
– The 2 extra stitches at each outer corner let the edge wrap around the point without pulling.
– The sc2tog at each seam point removes extra fabric from the inward notch, so it stays crisp instead of rippling.
– The rev sc round makes the twisted, corded edge.
Hanging loop: Find the top side of C, which is the notch between the arms. Count to the 5th of its 9 border sts. Join MC with sl st in that st, ch 40, and sl st in the same st. Turn, sl st in each ch back along the loop (40 sl sts), then sl st in the starting st. Fasten off. Folded, the loop stands about 2 in (5.1 cm) tall.
Poinsettia Appliqué
Large petal layer (A): Make a magic ring, work 5 sc in the ring, and join. Ch 7, sl st in the 2nd ch from the hook, sc in the next ch, hdc in the next ch, dc in the next 2 ch, hdc in the last ch, sl st in the next sc of the ring; repeat from * 4 more times. (5 petals) Fasten off. The layer is about 1.5 in (3.8 cm) across.
Small petal layer (A): Make a magic ring, work 5 sc in the ring, and join. Ch 5, sl st in the 2nd ch from the hook, sc in the next ch, hdc in the next ch, dc in the last ch, sl st in the next sc of the ring; repeat from * 4 more times. (5 petals) Fasten off. The layer is about 1 in (2.5 cm) across.
Holly leaf (B, make 2): Ch 10.
– First side: Sl st in the 2nd ch from the hook (leaf tip). Sc in the next ch, hdc in the next ch, dc and picot in the next ch, dc in the next ch, dc and picot in the next ch, hdc in the next ch, sc in the next ch, then (sc, picot, sc) in the last ch.
– Second side: Rotate and work along the other side of the chain: sc, hdc, dc and picot, dc, dc and picot, hdc, sc. Sl st into the first sl st and fasten off.
Each leaf has 5 picot points plus a pointed tip and is about 1 in (2.5 cm) long.
Berry (A, make 3): Make a magic ring, work 5 sc in the ring, pull it very tight and fasten off. Use the tail to gather the piece into a small ball.
Assembly:
1. Stack the small petal layer on the large one, turning it so its petals sit between the large petals.
2. Use C to make 4 French knots in the center.
3. Sew both leaves behind the flower, one pointing up and to the right and one pointing down.
4. Sew the 3 berries in a cluster at the right edge, between the leaves.
5. Sew the finished appliqué over the lower right edge of S1 and S2, letting the petals reach slightly past the border.
Final Blocking
- Weave in all ends. Leave the appliqué tails if you have not sewn it on yet.
- Wet the ornament with cool water, or mist it until it is damp.
- Pin it RS up on a foam board to 5.4 in (13.7 cm) wide and 5.9 in (15.0 cm) tall.
- Pin each of the 20 outer corners into a sharp point.
- Pin into each of the 14 seam notches to open them.
- Pin the center of each flower so the petals and the openings between them spread evenly.
- Lay the hanging loop straight up from the center notch.
- If you want a firmer ornament, mist it with stiffener. Let it dry completely.
- Remove the pins. Sew on the poinsettia now if you have not already.
Final Quality-Control Checklist
- Each hexagon has 60 sts and measures 1.25 in (3.2 cm) corner to corner.
- Every seam joins 11 sts to 11 sts, corner to corner.
- The Y measures 5 in x 5.5 in (12.7 cm x 14.0 cm) before the border.
- Border Rounds 1 and 2 each have 380 sts.
- The finished ornament measures 5.4 in x 5.9 in (13.7 cm x 15.0 cm).
- The hanging loop is centered in the notch between the arms.
- The poinsettia lies flat at the lower right of the stem with no gaps.
Troubleshooting
- Hexagon cups: Stitches are missing in Round 4. Recount to 60.
- Hexagon ruffles: The Round 3 chains are too loose. Go down a hook size for Rounds 3 and 4.
- Seams gape: Pull each whipstitch a little firmer, and check that all 11 pairs are joined.
- Notches ripple after the border: Check that every seam point has an sc2tog.
- Outer corners pull in: Make sure each outer corner stitch has 3 sc.
- Rev sc edge looks loose: Work the rev sc round with a 1.75 mm hook.
- Loop leans sideways: Recount the 9 border sts on C’s top side and reattach the loop at the 5th.
Care
Hand wash in cool water with mild soap, press out the water in a towel, and reshape the ornament flat to dry. Store it flat or hanging, away from heavy ornaments that could crush the petals.
Final Notes
The measurements build step by step:
– One hexagon has 60 sts and measures 1.25 in (3.2 cm) corner to corner.
– Eight hexagons joined with 7 seams make a Y of 5 in x 5.5 in (12.7 cm x 14.0 cm).
– Two border rounds of 380 sts add 0.2 in (0.5 cm) to every edge, for a finished ornament of 5.4 in x 5.9 in (13.7 cm x 15.0 cm).
If each checkpoint matches, the next stage will match too.
Happy crocheting!