

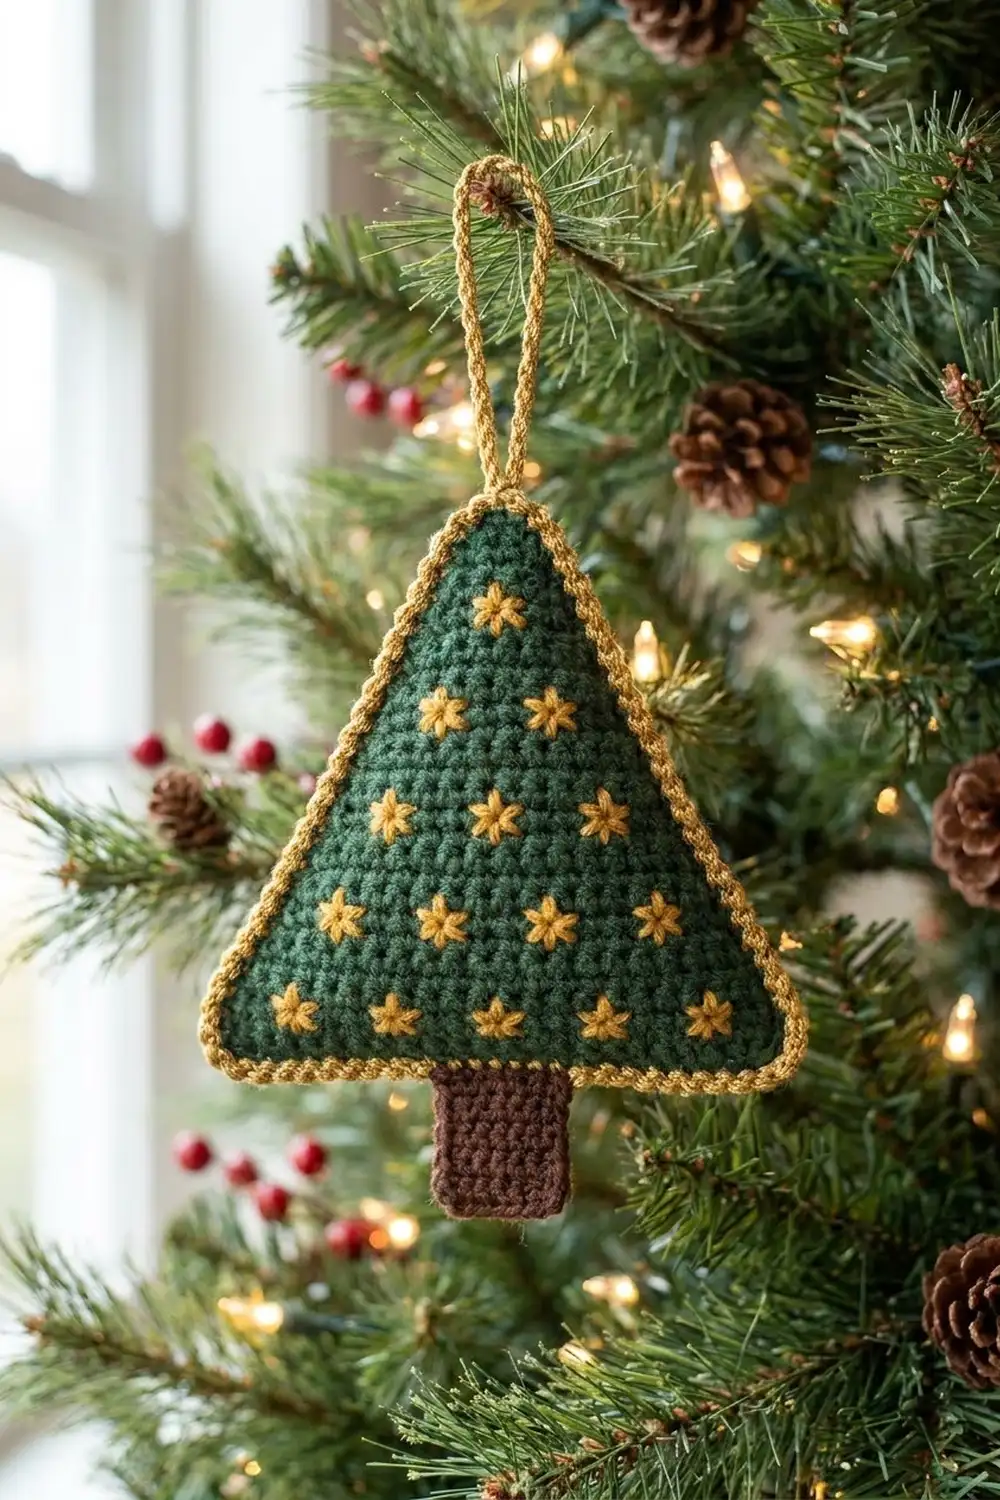
This little tree is a flat, cozy ornament with a deep forest-green body, sprinkled with tiny mustard-gold stars. A beaded gold edge wraps around the triangle and a gold chain loop sits at the tip. A short chocolate-brown trunk peeks out below.
The look is classic and warm: three colors, simple texture, and a tidy outline that hangs straight on a tree, a gift package, or a garland. The pattern uses US crochet terms throughout.
The finished ornament measures 4.0 in (10.2 cm) wide and 4.3 in (10.9 cm) tall from the tip to the bottom of the trunk. The loop adds about 1.2 in (3.0 cm).
Construction is simple. You work the green triangle top-down in single crochet rows and embroider the gold stars on top. Next you work a two-round gold border (single crochet, then reverse single crochet), and finally you add the trunk to the back loops at the center of the bottom edge.
Finished Size and Construction
- Finished size: 4.0 in (10.2 cm) wide × 4.3 in (10.9 cm) tall, plus a 1.2 in (3.0 cm) loop
- Skill level: Easy
- Terminology: US crochet terms
- Yarn weight: DK (light worsted, category 3), cotton or cotton blend
- Hook: 3.5 mm (E-4)
- Number of pieces: 1 (trunk is worked directly onto the tree)
- Layout: single flat triangle with trunk centered below
- Green triangle before border: 3.4 in (8.6 cm) wide × 2.9 in (7.4 cm) tall
- Border depth: about 0.3 in (0.8 cm) on every side
- Trunk: 1.0 in (2.5 cm) wide, 0.8 in (2.0 cm) visible below the border
Materials
Choose a smooth, mercerized or matte DK cotton. Cotton shows the stitches clearly, holds a crisp outline, and does not stretch out of shape when the ornament hangs. Acrylic DK also works, but the edges may need firmer blocking.
- Color A – Forest Green: 6 g / 13 m (14 yd)
- Color B – Mustard Gold: 7 g / 15 m (16 yd)
- Color C – Chocolate Brown: 2 g / 4 m (4 yd)
All quantities include a safety margin of about 25%.
Tools:
– 3.5 mm (E-4) crochet hook
– Blunt tapestry needle
– Scissors
– Stitch markers (2)
– Ruler or tape measure
– Pins and a foam blocking mat
– Spray bottle with water
Abbreviations (US Terms)
- ch – chain
- sc – single crochet
- rev sc – reverse single crochet (crab stitch)
- sl st – slip stitch
- st(s) – stitch(es)
- FLO / BLO – front loop only / back loop only
- RS / WS – right side / wrong side
- inc – 2 sc in the same stitch
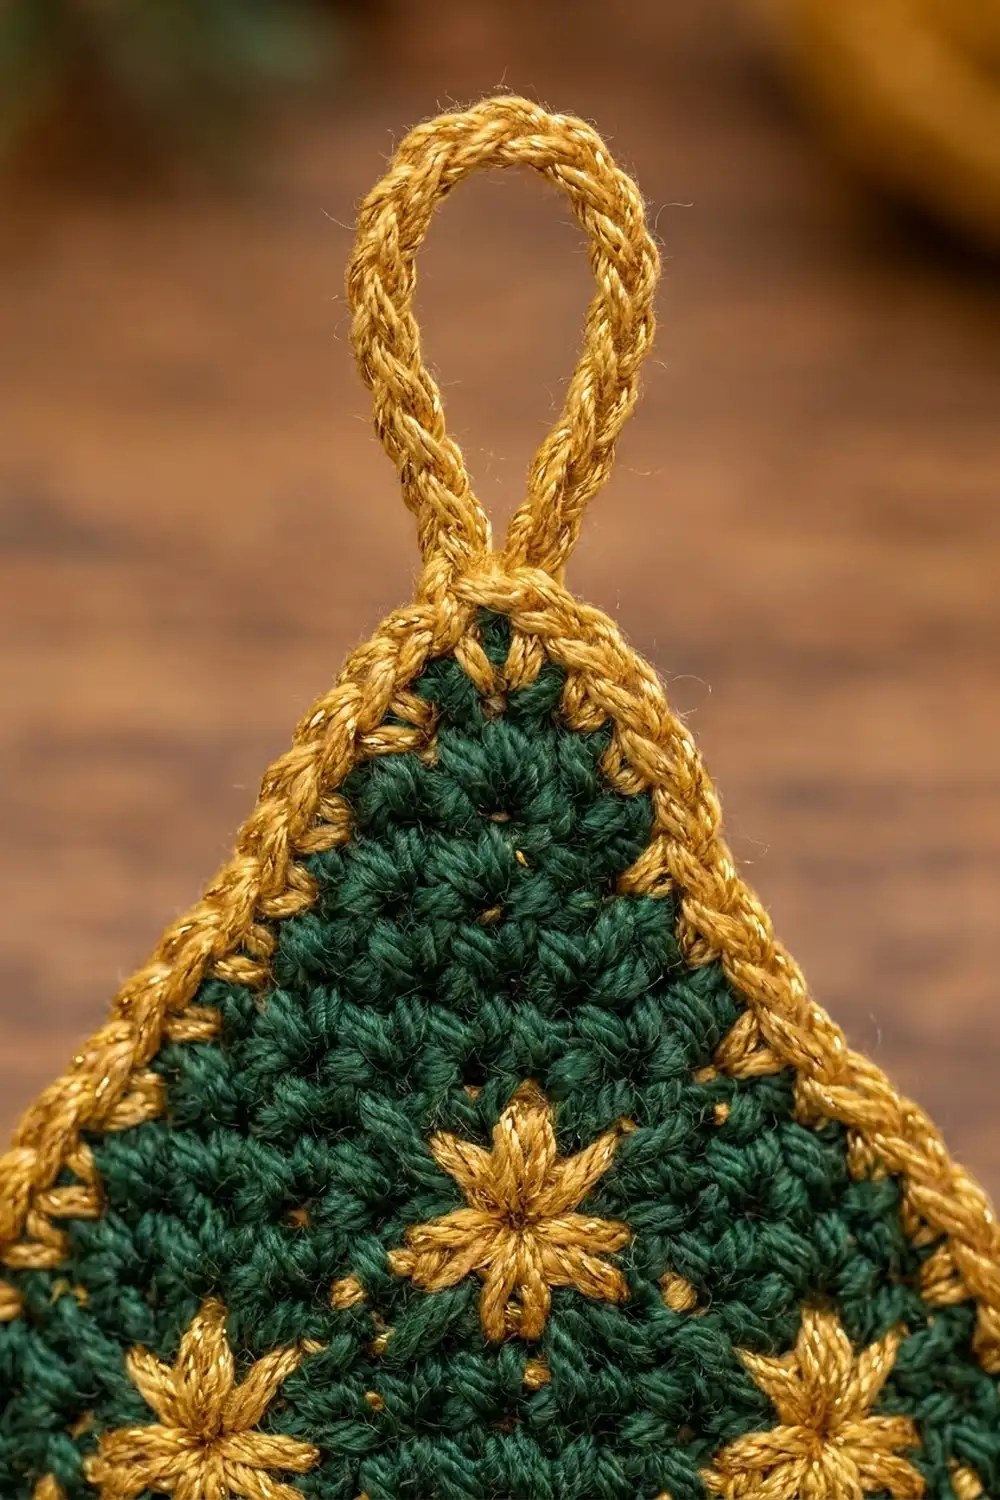
Reverse single crochet (rev sc): Work from left to right (right-handed). Insert the hook into the next stitch to the right, yarn over, pull up a loop, then yarn over and pull through both loops. This makes the beaded, rope-like edge.
Embroidered star: Make three straight stitches crossing at one center point: one horizontal stitch and two diagonal stitches. This forms a small six-point star about 0.4 in (1.0 cm) across.
Gauge and Checkpoints
Gauge: 20 sc and 22 rows = 4 in (10.2 cm) in sc rows. That is 5 sts and 5.5 rows per inch (2.54 cm).
Instead of a separate swatch, use the triangle as your test piece. Measure it at these checkpoints:
- After Row 6 (9 sts): 1.8 in (4.6 cm) wide at the bottom, 1.1 in (2.8 cm) tall
- After Row 10 (13 sts): 2.6 in (6.6 cm) wide, 1.8 in (4.6 cm) tall
- After Row 16 (17 sts): 3.4 in (8.6 cm) wide, 2.9 in (7.4 cm) tall
- After Border Round 1: about 3.8 in (9.7 cm) wide
- After Border Round 2: 4.0 in (10.2 cm) wide
If your piece is too big, go down to a 3.25 mm (D-3) hook. If your piece is too small, go up to a 3.75 mm (F-5) hook. Check at Row 6, because it’s quicker to restart then than after a full triangle. Keep your tension firm: a dense fabric shows off the stars and stops the ornament from curling.
Tree Body (Color A)
The body is worked flat in rows from the top point down. The turning ch-1 never counts as a stitch. Increase rows add one stitch at each end, so the stitch count grows by exactly 2.
Row 1 (RS): With A, ch 2. Work 3 sc in the 2nd ch from the hook. (3 sts)
Row 2: Ch 1, turn. Inc in the first st, sc in the next st, inc in the last st. (5 sts)
Row 3: Ch 1, turn. Sc in each st across. (5 sts)
Row 4: Ch 1, turn. Inc in the first st, sc across to the last st, inc in the last st. (7 sts)
Row 5: Ch 1, turn. Sc across. (7 sts)
Rows 6–15: Repeat Rows 4–5 five more times. Even rows are increase rows and odd rows are even rows.
- Row 6: 9 sts; Row 7: 9 sts
- Row 8: 11 sts; Row 9: 11 sts
- Row 10: 13 sts; Row 11: 13 sts
- Row 12: 15 sts; Row 13: 15 sts
- Row 14: 17 sts; Row 15: 17 sts
Row 16: Ch 1, turn. Sc across. (17 sts) Fasten off and weave in the ends.
Shape check: The slanted sides grow by one stitch every 2 rows. Every 2 rows (0.36 in / 0.9 cm of height) the edge moves out 1 st (0.2 in / 0.5 cm). That makes a clean, straight-sided tree. Each slanted side should measure about 3.2 in (8.1 cm).
Embroidered Stars (Color B)
Cut about 50 cm (20 in) of gold yarn at a time and thread the tapestry needle. Count rows from the top point (Row 1) and stitches from the right-hand edge with the RS facing you. Each star is centered on the listed stitch. Its arms reach one stitch to each side and one row above and below.
- Row 3: st 3 (1 star)
- Row 6: sts 3 and 7 (2 stars)
- Row 9: sts 3, 6 and 9 (3 stars)
- Row 12: sts 4, 8 and 12 (3 stars)
- Row 15: sts 3, 7, 11 and 15 (4 stars)
Total: 13 stars.
To make each star, bring the needle up one stitch to the left of the center and go down one stitch to the right of it. Then work the two diagonals, each from one row above to one row below, crossing through the same center hole. Keep the stitches resting on the fabric, not pulled tight. Carry the yarn on the WS only between stars in the same row. Start fresh for each new row so the strands don’t show through.
Border (Color B)
Border gauge: Each sc round adds about 0.2 in (0.5 cm) per side and the rev sc round adds about 0.1 in (0.3 cm). Together they make a 0.3 in (0.8 cm) border.
Round 1: With the RS facing, join B in the FLO of the first st of Row 16 (bottom right corner).
- Bottom corner: 3 sc in the FLO of this st.
- Bottom edge: sc in the FLO of the next 15 sts.
- Bottom corner: 3 sc in the FLO of the last st.
- Left side: 1 sc in each row-end of Rows 15 through 2 (14 sc), then 1 sc in st 1 of Row 1 (15 sc on this side).
- Top corner: 3 sc in the center st of Row 1.
- Right side: 1 sc in st 3 of Row 1, then 1 sc in each row-end of Rows 2 through 15 (15 sc on this side).
- Sl st to the first sc to join.
Round 1 count: 15 + 15 + 15 sc between corners, plus 3 corner groups × 3 sc = 54 sts.
Why the math works: The bottom edge has 17 sts. The two end stitches become corners and the 15 between them get 1 sc each. Each slanted side is about 3.2 in (8.1 cm) long. At 5 sts per inch that’s 16 sts, and the 15 side sc plus the shared corner stitches match it, so the side lies flat with no ruffling or cupping. Rows 1 and 16 are not worked into as row-ends because their own stitches are already used.
Place a marker in the center sc of each of the three corner groups.
Round 2 (rev sc + hanging loop): Ch 1. Do not turn. Work rev sc in each st around, with 2 rev sc in each marked corner st.
When you reach the top corner st, make the loop: work 1 rev sc, ch 14, then work 1 rev sc in the same st. Twist the chain loop gently before you go on so it looks like the twisted cord in the photo.
Sl st to the first rev sc to join.
Round 2 count: 54 sts + 3 extra corner sts = 57 rev sc, plus the ch-14 loop. Fasten off and weave in the ends.
Size checkpoint: The tree should now measure 4.0 in (10.2 cm) across the bottom and 3.5 in (8.9 cm) from the tip to the bottom edge, not counting the loop.
Trunk (Color C)
Border Round 1 was worked in the front loops along the bottom edge. That leaves the back loops of Row 16 free, so the trunk hangs from behind the gold border and the border runs unbroken across its top.
Row 1: Hold the tree with the bottom edge up and the RS facing. Count to the center 5 sts of Row 16 (sts 7–11). Join C in the BLO of st 7, then sc in the BLO of sts 7–11. (5 sts)
Rows 2–6: Ch 1, turn. Sc across. (5 sts)
Fasten off and weave the ends into the trunk only, so no brown shows through the green.
Trunk check: 1.0 in (2.5 cm) wide × 1.1 in (2.8 cm) long. The border covers the top 0.3 in (0.8 cm), so 0.8 in (2.0 cm) shows below. Total ornament height: 3.5 in + 0.8 in = 4.3 in (10.9 cm).
Final Blocking
- Lightly mist the ornament with water until it’s damp but not soaked.
- Place it RS up on the blocking mat.
- Pin the three corners first, 4.0 in (10.2 cm) apart along the bottom, with the tip centered 3.5 in (8.9 cm) above the bottom edge.
- Pin along each slanted side so the edges run straight. Make sure the rev sc beads stand up rather than flatten.
- Pin the trunk straight down, square to the bottom edge.
- Lay the loop flat, twisted, pointing straight up.
- Let it dry completely, usually 4–6 hours.
- Unpin and check the measurements again.
Final Quality-Control Checklist
- Green triangle has 17 sts across Row 16 and 16 rows total
- Both slanted sides are straight and the same length
- 13 stars in rows of 1, 2, 3, 3 and 4, evenly sized
- No gold strands showing through gaps on the RS
- Border Round 1 = 54 sts and Round 2 = 57 rev sc
- Corners are sharp, with no puckering
- Loop is centered on the tip and securely anchored
- Trunk is centered (5 sts, Row 16 sts 7–11) and square
- Finished size is 4.0 in (10.2 cm) × 4.3 in (10.9 cm)
- All ends are woven in and trimmed
Troubleshooting
Sides look wavy: You probably added extra sc into row-ends. Recount Round 1 for 15 sc between the corners on each side.
Edges cup inward: The border is too tight. Go up half a hook size for the border only.
Stars pucker the fabric: The stitches were pulled too tight. Remove them and re-stitch with a relaxed tension.
Tree leans to one side: You may have missed an increase. Check that every even row from 2 to 14 added exactly 2 sts.
Trunk is off-center: Count Row 16 from both ends. Sts 7–11 should leave 6 free sts on each side.
Loop stretches: Use a tighter chain, or work a row of sl st back along the chain.
Brown shows behind the border: Weave the trunk ends down into the trunk rows, not up into the tree.
Care
Hand wash in cool water with mild soap, press out the water in a towel, and dry flat, reshaping as it dries. Store flat or hang it so the loop and border stay crisp.
Final Notes
The size of this ornament follows one simple chain of measurements. The 17-stitch base and 16 rows make a 3.4 in × 2.9 in (8.6 cm × 7.4 cm) green triangle. The 54-stitch sc round and 57-stitch rev sc round add a 0.3 in (0.8 cm) gold border, bringing it to 4.0 in × 3.5 in (10.2 cm × 8.9 cm). The 5-stitch trunk adds 0.8 in (2.0 cm) more, for a finished height of 4.3 in (10.9 cm).
Check your size at each checkpoint, keep your star stitches relaxed, and pin the corners before the sides. Make one for your own tree, or a whole set for gift tags and garlands.
Happy crocheting!