

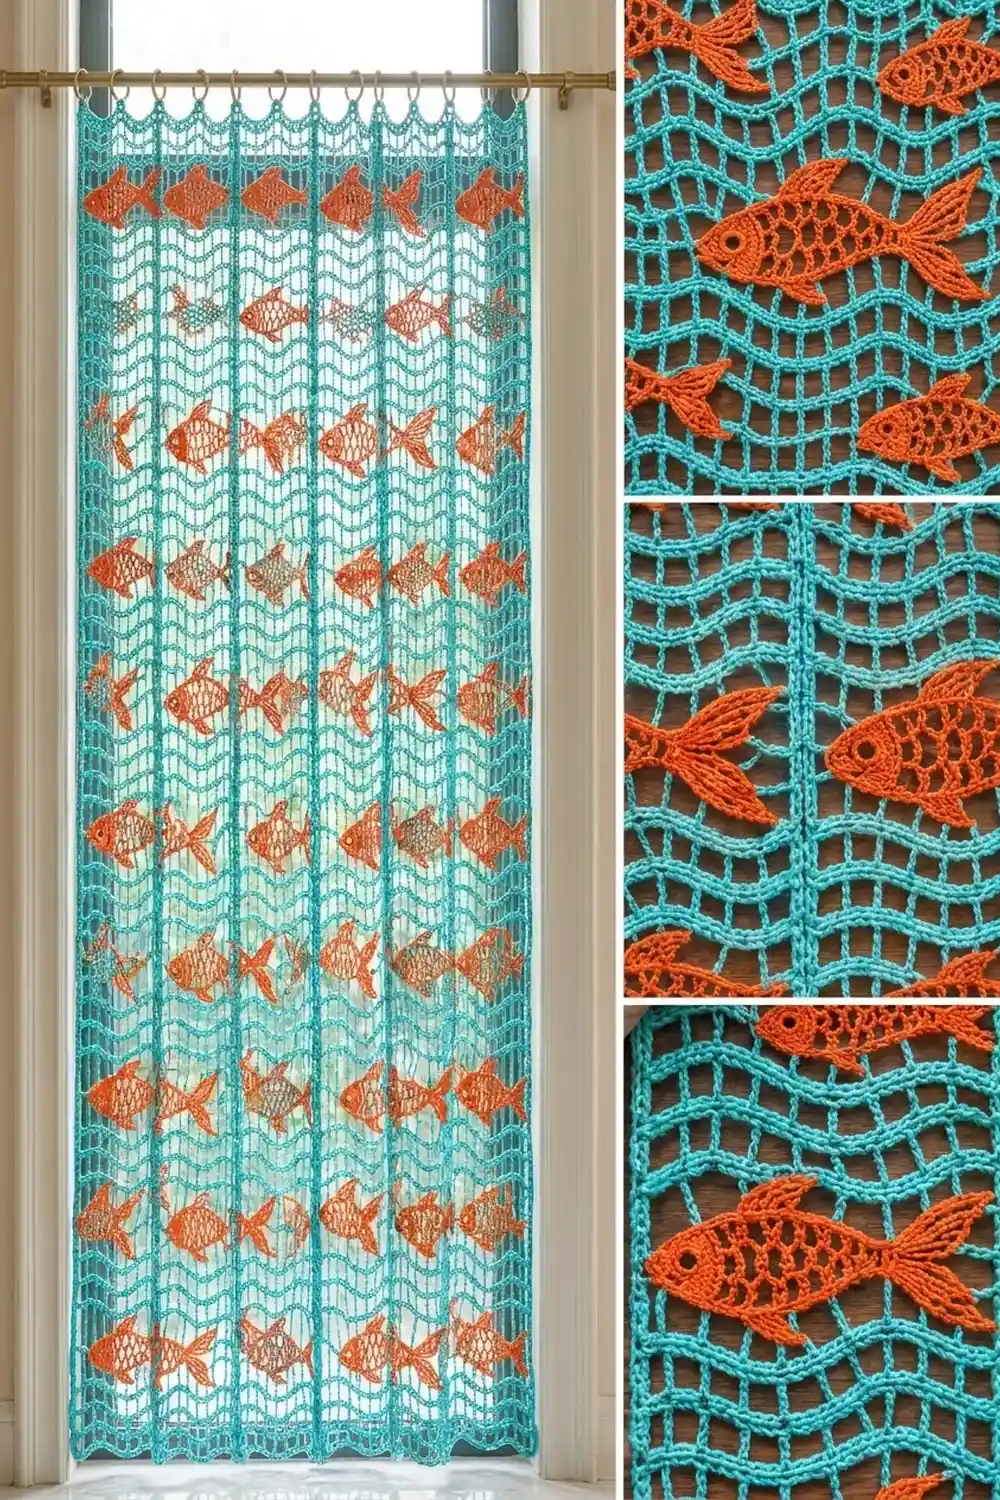
The Goldfish Waves Mesh Curtain gives you a school of bright orange fish swimming across rippling turquoise water. Light passes through the open mesh, so the waves stay visible from either side of the room, and the solid fish bodies stand out against the window.
The palette uses just two colors: turquoise for the water and orange for the fish. The look is playful and coastal, but the open structure keeps it airy enough for a living room or sunroom.
This pattern uses US crochet terms. The finished curtain measures 55 x 73 in (139.7 x 185.4 cm) including the border.
The curtain is made from six long ripple-mesh strips. You make the fish appliqués separately, sew them onto the strips, then join the strips with a raised single-crochet seam. Two rounds of single crochet finish the edge.
Finished Size and Construction
- Finished size: 55 x 73 in (139.7 x 185.4 cm)
- Skill level: Intermediate
- Terminology: US
- Yarn weight: DK (3) cotton
- Hook: 4 mm (G-6)
- Number of pieces: 6 mesh strips, 57 fish, 57 eye rings
- Layout: 6 strips side by side (1 row x 6 columns)
- Strip size: 9 x 72 in (22.9 x 182.9 cm)
- Fish size: 6 x 3 in (15.2 x 7.6 cm)
- Size before border: 54 x 72 in (137.2 x 182.9 cm)
- Border depth: 0.5 in (1.3 cm) on each side
Materials
Use a smooth mercerized cotton or a cotton blend. These have crisp stitch definition, hang well, and resist fading in a sunny window. Quantities below assume about 115 m per 50 g.
- Turquoise: 750 g (about 1,725 m) for strips, seams, and border
- Orange: 400 g (about 920 m) for fish and eyes
All quantities include a margin of roughly 10%.
Tools
– 4 mm (G-6) crochet hook
– Tapestry needle
– Stitch markers
– Measuring tape
– Blocking mats, rust-proof pins, and a spray bottle
– 12 curtain clip rings for hanging
Abbreviations (US Terms)
- ch – chain
- sl st – slip stitch
- sc – single crochet
- hdc – half double crochet
- dc – double crochet
- tr – treble crochet
- sp – space
- st(s) – stitch(es)
- RS / WS – right side / wrong side
- yo – yarn over
Special stitches
– Post: any vertical stitch in a mesh row (a dc, a decrease, or the beginning ch-2 + dc). You always work into the top of a post and skip the ch-2 spaces between posts.
– Peak shell: (dc, ch 2, dc, ch 2, dc) in the same post.
– Mesh dc2tog: [yo, insert hook in next post, yo, pull up a loop, yo, pull through 2] twice, skipping the ch-2 sp between them; yo, pull through all 3 loops.
– Mesh dc3tog: the same as mesh dc2tog, but worked over 3 posts; finish by pulling through all 4 loops.
– Picot: ch 3, sl st in 3rd ch from hook.
Gauge and Checkpoints
Mesh gauge: 13 posts (12 cells) = 9 in (22.9 cm) wide, and 5 rows = 3 in (7.6 cm) tall, measured on a straight vertical line after light blocking. One mesh row is 0.6 in (1.5 cm) tall.
Sc gauge: 4 sc = 1 in (2.5 cm).
Test one piece first. Make a 10-row swatch (Row 1 plus 9 ripple rows). It should measure 9 x 6 in (22.9 x 15.2 cm). Then make one complete fish.
Checkpoints
– After Row 1: 9 in (22.9 cm) wide.
– After Row 20: 12 in (30.5 cm) tall.
– After Row 118: 70.8 in (179.8 cm) tall.
– After both leveling rows: 72 in (182.9 cm) tall.
– Fish body after Rnd 4: 4.25 x 2 in (10.8 x 5.1 cm).
– Complete fish: 6 x 3 in (15.2 x 7.6 cm).
If your swatch is too big, go down 0.5 mm in hook size. If it is too small, go up 0.5 mm. Don’t add or remove cells to fix the size, because the wave repeat depends on exactly 13 posts.
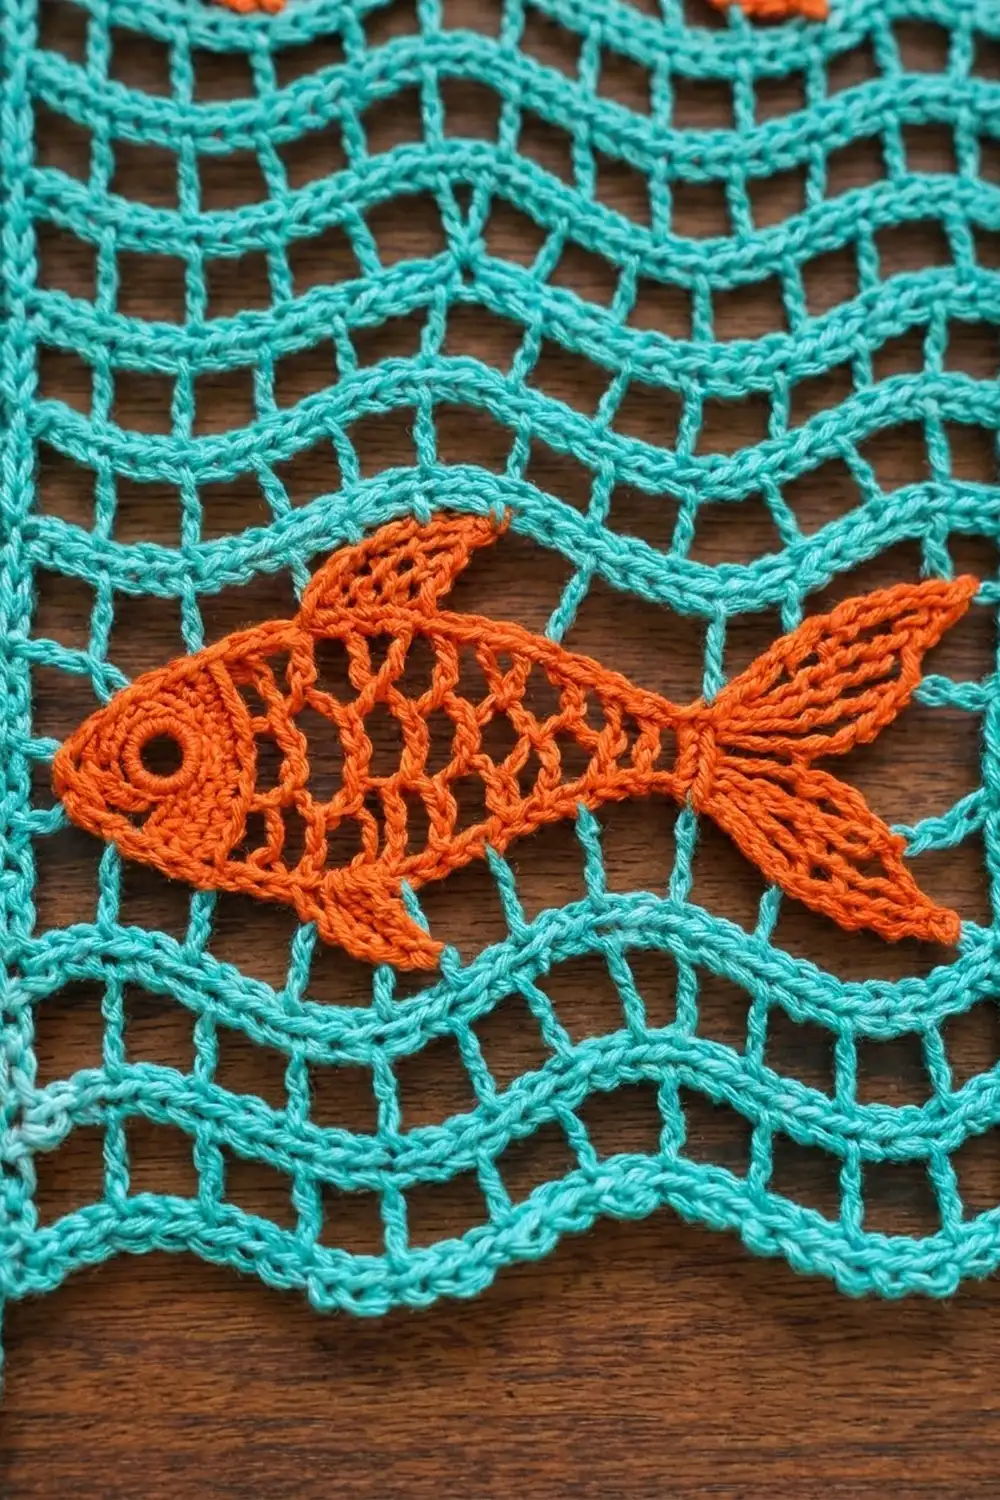
Mesh Strip (Make 6)
With turquoise, ch 41.
Row 1 (RS): Dc in 8th ch from hook. The first 7 ch count as dc + ch-2 sp. Ch 2, skip 2 ch, dc in next ch; rep from * across. Turn. (13 posts, 12 ch-2 sps)*
This row is flat. The ripple begins in Row 2, and it pulls the foundation edge into waves.
Row 2 (ripple row): Ch 2 (does not count on its own), then dc in next post. The ch-2 and this dc together form the edge decrease.
Continue: ch 2, dc in next post, ch 2, peak shell in next post, ch 2, dc in next post, ch 2, mesh dc3tog over next 3 posts, ch 2, dc in next post, ch 2, peak shell in next post, ch 2, dc in next post, ch 2, mesh dc2tog over last 2 posts. Turn. (13 posts, 12 ch-2 sps)
Why the count holds: each peak shell adds 2 posts, which is +4 for the row. The center dc3tog removes 2 posts, and each edge decrease removes 1, which is −4. The total stays at 13 posts.
Peaks fall on posts 3 and 9, counting from either end. Valleys fall on posts 1, 7, and 13. Because the layout is symmetrical, every row stacks peak over peak.
Rows 3–118: Rep Row 2. Row 118 is a WS row. Do not fasten off.
Top Leveling Row (Row 119, RS)
This row fills the valleys so the top edge comes out straight. Working into the posts and ch-2 sps of Row 118:
Ch 4 in first post (counts as tr), 2 tr in next sp, dc in next post, 2 dc in next sp, hdc in next post, 2 hdc in next sp, sc in peak post, 2 hdc in next sp, hdc in next post, 2 dc in next sp, dc in next post, 2 tr in next sp, tr in valley post.
Then mirror the sequence: 2 tr in next sp, dc in next post, 2 dc in next sp, hdc in next post, 2 hdc in next sp, sc in peak post, 2 hdc in next sp, hdc in next post, 2 dc in next sp, dc in next post, 2 tr in next sp, tr in last post. Fasten off.
(37 sts: 13 worked 1 per post + 24 worked 2 per sp)
Bottom Leveling Row
With RS facing, join turquoise at the right-hand foundation corner. Work along the free loops of the foundation chain, putting 1 st at the base of each post and 1 st in each of the 2 skipped chains below each sp.
The foundation edge sits high under the peaks, so the tall stitches go there:
Sc, 2 sc, hdc, 2 hdc, dc, 2 dc, tr, 2 dc, dc, 2 hdc, hdc, 2 sc, sc, 2 sc, hdc, 2 hdc, dc, 2 dc, tr, 2 dc, dc, 2 hdc, hdc, 2 sc, sc. Fasten off.
(37 sts)
Each leveling row adds about 0.6 in (1.5 cm) at its tallest point. The strip now measures 9 x 72 in (22.9 x 182.9 cm).
Per-side counts for one strip: top 37, bottom 37. Each side edge has 120 row ends: 1 bottom leveling row, 118 mesh rows, and 1 top leveling row.
Fish Appliqué (Make 57)
Body
With orange, ch 16.
Rnd 1: Sc in 2nd ch from hook and in next 13 ch, 3 sc in last ch (head end). Working along the opposite side of the chain, sc in next 13 ch, 2 sc in last ch (tail end). Join with sl st to first sc. (32 sc)
Number the stitches 1–32. Stitch 16 is the head center, and stitches 31, 32, and 1 share the tail-end chain.
Rnd 2 (lattice and solid head): Ch 1, sc in st 1, (ch 3, skip 1, sc in next) 5 times, ending in st 11.
Head: hdc in st 12, dc in st 13, 2 dc in each of sts 14–18, dc in st 19, hdc in st 20.
Second side: sc in st 21, (ch 3, skip 1, sc in next) 5 times, ending in st 31. Ch 3, skip st 32, sl st in first sc.
(12 sc, 11 ch-3 loops, 14 head sts)
Rnd 3: Sl st into first ch-3 loop, ch 1, sc in same loop, (ch 4, sc in next loop) 4 times, ch 2.
Sc in each of the next 6 head sts, 2 sc in each of the next 2, sc in each of the last 6 (16 head sc).
Ch 2, sc in next loop, (ch 4, sc in next loop) 5 times, ch 4, sl st in first sc.
(11 loop sc, 16 head sc, 10 ch-4 loops, 2 ch-2 sps)
Rnd 4 (outline): Ch 1. Work 1 sc in each sc, 4 sc in each ch-4 loop, and 2 sc in each ch-2 sp. Join.
(71 sc = 27 worked 1 per sc + 40 in loops + 4 in sps)
The Rnd 2 loops stay open under this outline and form the scale net. In Rnd 4:
– Sts 1–21 run along the top edge.
– Sts 22–23 sit in the first ch-2 sp, before the head.
– Sts 24–39 cover the head.
– Sts 40–41 sit in the second ch-2 sp, after the head.
– Sts 42–67 run along the belly.
– Sts 68–71 sit at the tail.
Hold the fish with the head pointing left and RS facing.
Tail
Row 1 (RS): Join orange in st 66. Ch 3 (counts as dc), dc in same st, 2 dc in each of the next 7 sts (sts 67–71, then sts 1–2). Turn. (16 dc)
Row 2: Ch 4 (counts as tr), 2 tr in next dc, (tr in next dc, 2 tr in next dc) twice, tr in next dc (10 tr in lobe). Sl st in each of the next 2 dc to form the notch. Then (tr in next dc, 2 tr in next dc) 3 times, tr in last dc (10 tr in lobe). Turn. (22 sts)
Row 3: Ch 1, (sc, picot, sc) in first tr, sc in next 9 tr, sl st in each of the 2 sl sts, sc in next 9 tr, (sc, picot, sc) in last st. Fasten off.
(24 sts + 2 picots)
The tall trebles fan out like rays, and the sl st notch splits the tail into two lobes.
Dorsal Fin
Join orange in st 6. Ch 4 (counts as tr), 2 tr in st 7, tr in st 8, dc in sts 9–10, hdc in sts 11–12, sc in st 13, sl st in st 14. Turn.
Ch 1, skip sl st, sc in next 8 sts. In the top of ch-4, work: sc, ch 4, sl st in 2nd ch from hook, sc in next ch, hdc in next ch. Sl st in st 5 of the body. Fasten off.
The tallest stitches sit on the tail side, so the pointed tip sweeps backward.
Belly Fin
Join orange in st 50. Ch 1, sc in st 50, hdc in st 51, dc in st 52, tr in st 53, (tr, picot, tr) in st 54, sl st in st 55. Fasten off.
Eye Ring
With orange, ch 4 and join into a ring. Work 8 sc in the ring and join. Leave a 6 in (15.2 cm) tail.
Sew the ring onto the solid head, 0.5 in (1.3 cm) behind the nose, leaving the center hole open.
Fish checkpoint: 6 x 3 in (15.2 x 7.6 cm), measured from nose to tail tip and from dorsal tip to belly fin.
Make All Pieces
- Turquoise: 6 strips (A–F)
- Orange: 57 fish and 57 eye rings
- Strips A, C, and E get 10 fish each.
- Strips B, D, and F get 9 fish each.
Center each fish across the strip width, leaving about 1.5 in (3.8 cm) on each side. Line up the body center with the listed mesh row, counting Row 1 as the bottom. Every fish faces left on the RS.
Row    A  B  C  D  E  F
114    F  .  F  .  F  .
108    .  F  .  F  .  F
102    F  .  F  .  F  .
 96    .  F  .  F  .  F
 90    F  .  F  .  F  .
 84    .  F  .  F  .  F
 78    F  .  F  .  F  .
 72    .  F  .  F  .  F
 66    F  .  F  .  F  .
 60    .  F  .  F  .  F
 54    F  .  F  .  F  .
 48    .  F  .  F  .  F
 42    F  .  F  .  F  .
 36    .  F  .  F  .  F
 30    F  .  F  .  F  .
 24    .  F  .  F  .  F
 18    F  .  F  .  F  .
 12    .  F  .  F  .  F
  6    F  .  F  .  F  .
Fish in the same strip are 12 rows apart, which is 7.2 in (18.3 cm). Neighboring strips are offset by 6 rows, or 3.6 in (9.1 cm).
To attach each fish, whipstitch around the Rnd 4 outline with orange, catching only the mesh bars underneath. Tack down the fin and tail tips. Sew all fish on before joining the strips.
Joining
Hold two strips with WRONG sides together and RS facing out, edges matched. The sc seam will form the raised ridge on the front.
Join turquoise through both bottom corners. Then work through both layers, matching row end to row end:
– Bottom leveling row end: 2 sc.
– Mesh rows 1–118: repeat the rhythm 2 sc, 2 sc, 3 sc, 2 sc, 3 sc over each 5 rows. This gives 23 repeats for 115 rows, then 2, 2, 3 over the last 3 rows. (283 sc)
– Top leveling row end: 3 sc.
Seam total: 288 sc (2 + 283 + 3). That is exactly 72 in x 4 sc per inch, so the seam matches the strip length.
Keep your tension even and slightly relaxed. If the seam is too tight, the curtain will hourglass; if it is too loose, the ridge will sag. Join A to B, B to C, and so on, through F.
Size checkpoint: 54 x 72 in (137.2 x 182.9 cm). The seam ridges lie on the surface and add no measurable width.
Border
Border gauge: 4 sc = 1 in (2.5 cm).
Starting counts:
– Top and bottom: 6 strips x 37 sts = 222 sts per side. Nothing is added at the seams; skip the top of each seam column.
– Left and right: 288 row-end sc per side, using the same rhythm as the joining.
Rnd 1: With RS facing, join turquoise in the top-right corner st. Work sc around, with 3 sc in each of the 4 corner sts (the first and last leveling sts on the top and bottom edges). Join.
(1,028 sc = 1,020 worked 1 per st or row end + 8 extra at corners)
Per side, not counting the 4 corner-center sc:
– Top: 222
– Bottom: 222
– Left: 290
– Right: 290
Rnd 2: Ch 1, sc in each sc, 3 sc in each corner-center sc. Join and fasten off.
(1,036 sc = 1,028 + 8)
Per side, not counting corner centers:
– Top: 224
– Bottom: 224
– Left: 292
– Right: 292
Why the math works: the side edges carry 288 sc over 72 in, which is exactly 4 sc per inch. The top and bottom carry 222 sts over 54 in, which is about 4.1 per inch, within gauge. Adding 2 extra sc at each corner in each round keeps the corners square without flaring.
Two rounds of sc add 0.5 in (1.3 cm) on every side, for a final size of 55 x 73 in (139.7 x 185.4 cm).
Final Blocking
- Lay the curtain RS up on blocking mats. Use a clean floor covered with towels if you need more space.
- Spray it evenly until it is damp, but not dripping.
- Pin the four corners to 55 x 73 in (139.7 x 185.4 cm).
- Pin along the border every 4 in (10.2 cm), keeping each seam straight.
- Leave the ripple waves alone; don’t stretch them flat.
- Flatten each fish with your palm and pin out the fin and tail tips.
- Let it dry completely before unpinning.
- Clip on 12 rings evenly along the top border, about 5 in (12.7 cm) apart.
Final Quality-Control Checklist
- Every strip has 13 posts in every mesh row.
- Peaks line up over peaks from bottom to top.
- Each strip measures 9 x 72 in (22.9 x 182.9 cm).
- Each seam has 288 sc, with the ridge on the RS.
- All 57 fish face left and follow the layout grid.
- Every eye ring has an open center.
- Border counts match: 1,028 sc after Rnd 1 and 1,036 sc after Rnd 2.
- The final size is 55 x 73 in (139.7 x 185.4 cm).
- All ends are woven securely into solid stitches.
Troubleshooting
- The strip gets narrower: You missed a peak shell or worked a dc3tog over the wrong posts. Count posts at the end of every row.
- The waves drift sideways: Your peak shells aren’t on posts 3 and 9. Count from the row’s starting edge.
- The leveling row isn’t straight: Make sure tr fall in the valleys and sc on the peaks.
- The seams pucker: Check the 2, 2, 3, 2, 3 rhythm. Too few sc tightens a seam.
- The fish cup: Rnd 4 is too tight. Go up 0.5 mm for that round only.
- The fish ruffle: Try 3 sc per ch-4 loop. This changes the count, so check the fin positions.
- The corners flare: You worked more than 3 sc in a corner stitch.
- The curtain grows when hanging: Cotton relaxes over time. Re-block it while it hangs, or use a hook 0.5 mm smaller.
Care
Hand wash in cool water with mild detergent, press out the water in a towel, and dry flat to the blocked measurements. Don’t tumble dry or wring.
Final Notes
Every measurement in this pattern links to the next. Thirteen posts make 9 in (22.9 cm), and 118 mesh rows plus two leveling rows make 72 in (182.9 cm). Six strips joined with 288-sc seams make 54 x 72 in (137.2 x 182.9 cm). Two border rounds bring the curtain to 55 x 73 in (139.7 x 185.4 cm).
Check your gauge at each stage and the curtain will hang straight.
Happy crocheting!