

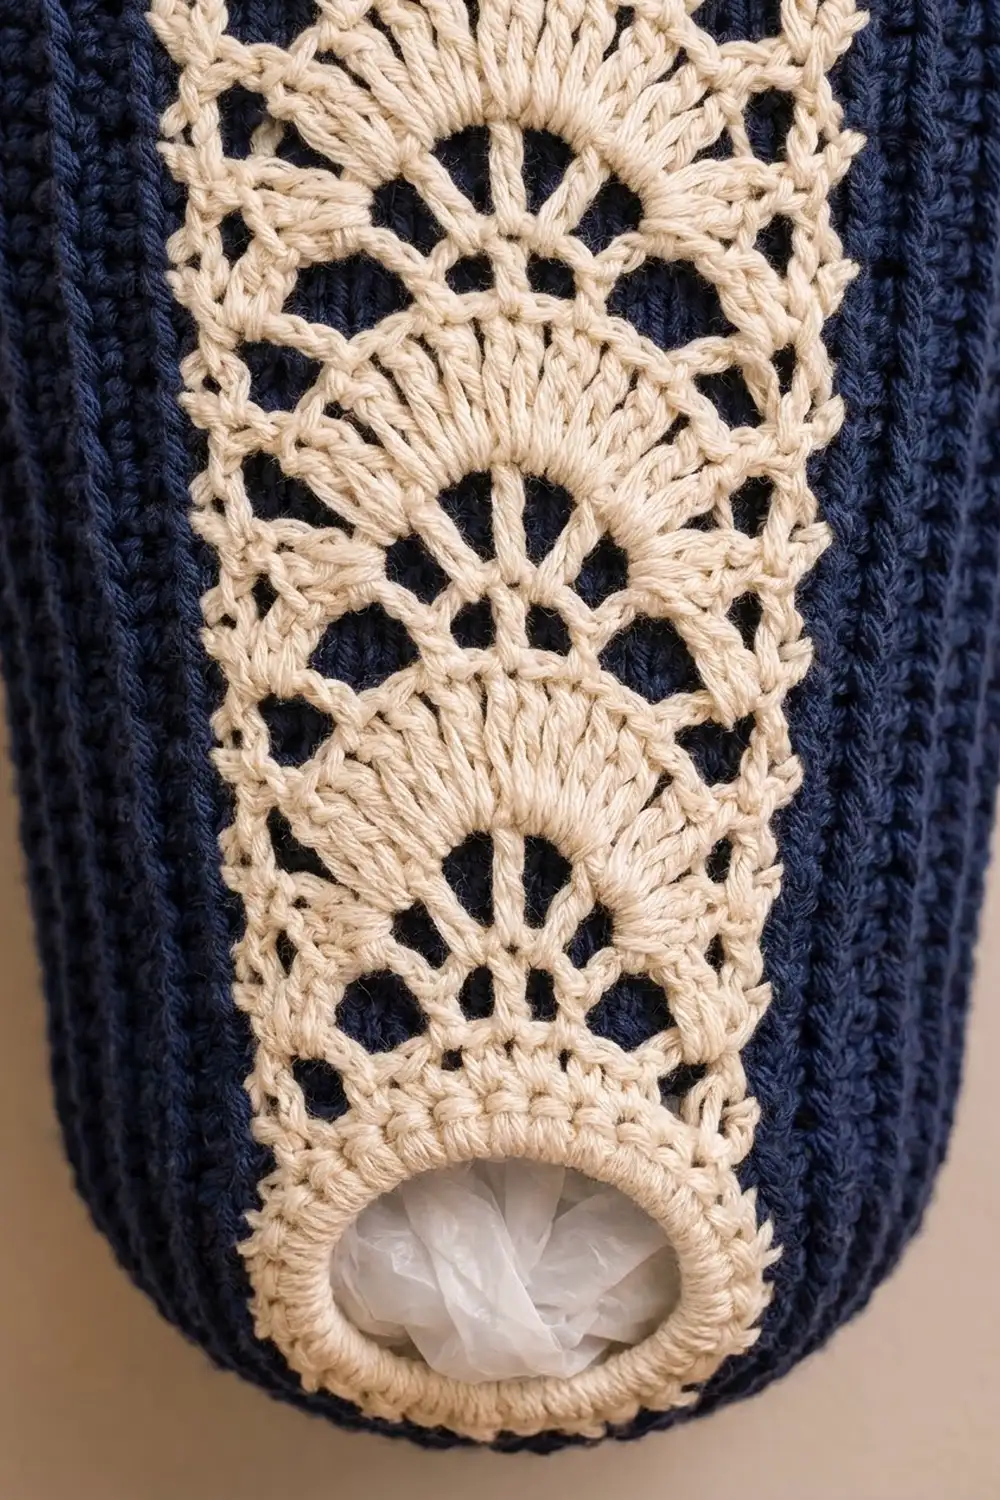
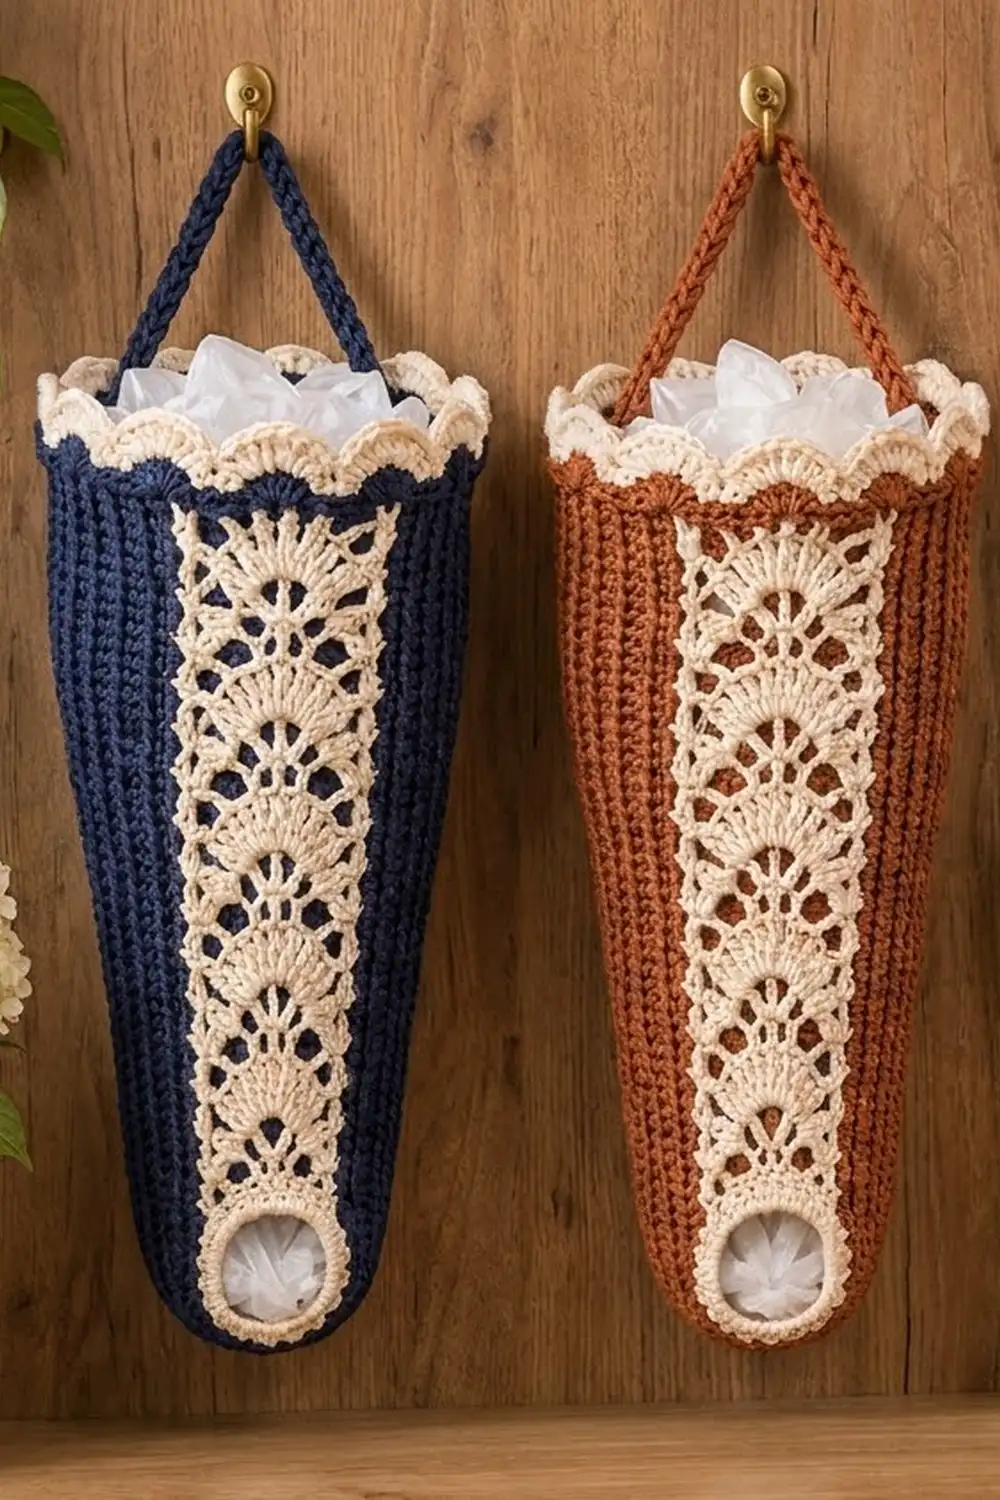
This plastic bag holder hangs from a hook and dispenses bags from the bottom. The body is a tapered cone in deep navy, covered in raised vertical ribs. A cream lace panel runs down the center front with stacked fans, a cream shell scallop finishes the wide top, and a cream ring frames the small round opening at the bottom.
The colors are navy and cream, a classic farmhouse-kitchen pairing. Rust and cream works just as well. The lace panel has open spokes, and the post-stitch ribs give the navy sections a firm, knit-like texture that keeps its shape when the holder is full.
All instructions use US crochet terms. The finished holder measures about 19 3/4 in (50.2 cm) long from the scallop tips to the bottom ring. The top circumference is 16 1/4 in (41.3 cm) and the bottom is 7 3/4 in (19.7 cm), plus a 14 in (35.6 cm) hanging cord.
The body is worked flat in rows from the bottom up, using intarsia: a navy section, the cream lace panel, and a second navy section. Increases at both outer edges make the taper. You then seam the back edges into a cone, add a cream scallop at the top and a cream ring at the bottom, and sew on a navy cord strap.
Finished Size and Construction
- Finished size: 19 3/4 in (50.2 cm) long; 16 1/4 in (41.3 cm) top circumference; 7 3/4 in (19.7 cm) bottom circumference
- Skill level: Intermediate (post stitches, intarsia color changes, simple lace)
- Terminology: US crochet terms
- Yarn weight: Worsted (#4), cotton or cotton blend
- Hook: US 7 (4.5 mm)
- Number of pieces: 1 body piece and 1 hanging cord. This is one holder, not a set of joined motifs.
- Layout: One cone, seamed at center back, with the lace panel centered on the front
- Piece size (flat, before seaming): 18 1/4 in (46.4 cm) tall; 7 3/4 in (19.7 cm) wide at the bottom edge, 16 1/4 in (41.3 cm) wide at the top edge
- Size before border: 18 1/4 in (46.4 cm) long cone
- Border depth: about 1 in (2.5 cm) at the top scallop and 1/2 in (1.3 cm) at the bottom ring
Materials
Use a smooth, firmly plied worsted cotton. Cotton holds the cone shape, has crisp stitch definition, and survives washing. Avoid fluffy or very splitty yarn, because the post stitches and fan spokes will blur.
- Color A, navy: 100 g, about 170 m (186 yd), for the body sections and cord
- Color B, cream: 50 g, about 85 m (93 yd), for the lace panel, scallop and bottom ring
These quantities include a margin of about 15 percent. A rust and cream version uses the same amounts.
Tools:
- US 7 (4.5 mm) crochet hook
- 3 small yarn bobbins or butterflies for intarsia
- Tapestry needle
- Scissors
- 4 locking stitch markers
- Tape measure
- Rolled towel or a paper cone for blocking
Abbreviations (US Terms)
- ch: chain
- sl st: slip stitch
- sc: single crochet
- sc2tog: single crochet 2 together
- dc: double crochet
- FPdc: front post double crochet
- BPdc: back post double crochet
- sk: skip
- st(s): stitch(es)
- sp: space
- RS / WS: right side / wrong side
- rep: repeat
Special stitch: Rib stitch. In the navy sections, work FPdc on RS rows and BPdc on WS rows. Each column then sits raised on the RS, which gives you the vertical ribs. The first and last stitch of every row are always a plain dc, so the seam edge stays straight.
Turning chain: The ch 2 at the start of a row never counts as a stitch.
Intarsia: Use a separate strand for each section (navy, cream, navy). To change color, work the last yarn over of the final stitch in the new color. Twist the strands once on the WS at each change so no holes form. Never carry yarn across the panel.
Gauge and Checkpoints
Gauge: 16 sts and 9 rows = 4 in (10.2 cm) in rib stitch.
Make a test swatch first: ch 20 and work 10 rows of rib stitch on 18 sts. Measure the middle 16 sts. If 16 sts measure more than 4 in (10.2 cm), go down a hook size. If they measure less, go up a hook size.
The lace panel is 15 sts wide and should measure 3 3/4 in (9.5 cm). One fan repeat is 4 rows, about 1 3/4 in (4.4 cm) tall.
Checkpoints while working:
- After Row 1: flat width 7 3/4 in (19.7 cm)
- After Row 9: height 4 in (10.2 cm)
- After Row 20: width 12 1/4 in (31.1 cm), height about 8 7/8 in (22.5 cm)
- After Row 36: width 16 1/4 in (41.3 cm), height 16 in (40.6 cm)
- After Row 41: height 18 1/4 in (46.4 cm)
If the piece is too wide: your stitches are loose. Change to a smaller hook. Don’t drop stitches, because the panel math depends on exact counts.
If the piece is too short: loosen your tension or go up a hook size. Don’t add rows, because the fan repeat is fixed at 4 rows.
Lace Panel Rows
The cream panel is always 15 sts. Chains count as stitch positions, so every row ends with 15 positions to work into.
Row A (fan row): dc in first st, ch 2, sk 3 sts, sc in next st, sk 2 sts, 7 dc in next st, sk 2 sts, sc in next st, ch 2, sk 3 sts, dc in last st. (1 dc + 2 ch + 1 sc + 7 dc + 1 sc + 2 ch + 1 dc = 15)
Row B (spoke row): dc in first dc, ch 3, sk ch-2 sp and sc, dc in first dc of fan, [ch 1, sk 1 dc, dc in next dc] 3 times, ch 3, sk sc and ch-2 sp, dc in last dc. (15)
Row C (spoke row): dc in first dc, ch 3, sk ch-3 sp, dc in next dc, [ch 1, sk ch-1 sp, dc in next dc] 3 times, ch 3, sk ch-3 sp, dc in last dc. (15)
Row D (arch row): dc in first dc, 3 dc in ch-3 sp, dc in next dc, [dc in ch-1 sp, dc in next dc] 3 times, 3 dc in ch-3 sp, dc in last dc. (15 dc)
The fan grows from a single stitch in Row A, opens into spokes in Rows B and C, and closes into a solid arch in Row D. Because you work bottom up, the fans point upward on the finished holder.
Body
With navy, ch 33.
Row 1 (RS): With navy, dc in 3rd ch from hook and in next 7 ch (8 navy dc). Change to cream: dc in next 15 ch. Change to a second navy strand: dc in last 8 ch. Turn. (31 sts: 8 navy, 15 cream, 8 navy)
Row 2 (WS): Navy: ch 2, dc in first st, BPdc in next 7 sts. Cream: work Row A. Navy: BPdc in next 7 sts, dc in last st. Turn. (31)
Row 3 (RS): Navy: ch 2, dc in first st, FPdc in next 7 sts. Cream: work Row B. Navy: FPdc in next 7 sts, dc in last st. Turn. (31)
Row 4 (WS, increase): Navy: ch 2, dc in first st, 2 dc in next st, BPdc in each st to panel. Cream: work Row C. Navy: BPdc in each st to last 2 sts, 2 dc in next st, dc in last st. Turn. (33 sts: 9 navy, 15 cream, 9 navy)
Row 5 (RS): Navy: ch 2, dc in first st, FPdc to panel. Cream: work Row D. Navy: FPdc to last st, dc in last st. Turn. (33)
Rows 6–36: Keep the panel sequence going: Row A, then B, C, D, and repeat. Work rib stitch in the navy sections. On every even (WS) row, increase as in Row 4, so each navy section grows by 1 st. Odd rows have no increases.
Stitch totals at the end of each increase row:
- Row 6: 35
- Row 8: 37
- Row 10: 39
- Row 12: 41
- Row 14: 43
- Row 16: 45
- Row 18: 47
- Row 20: 49
- Row 22: 51
- Row 24: 53
- Row 26: 55
- Row 28: 57
- Row 30: 59
- Row 32: 61
- Row 34: 63
- Row 36: 65
You work 17 increase rows (Rows 4–36, even rows only), with 2 sts added per row. That gives 31 + 34 = 65 sts: 25 navy, 15 cream, 25 navy.
Rows 37–41: Work even on 65 sts, with no increases, and continue the panel sequence. Row 41 is a Row D, so the panel ends on a solid arch. Fasten off all strands.
Panel check: Row 1 is solid, then Rows 2–41 make 10 full repeats of A–D, giving 10 fans.
Seaming
Fold the piece RS together so the two navy side edges meet. With navy and a tapestry needle, whipstitch the edges together through the plain edge dc of each row, 41 rows. Keep your tension even and don’t pull it tight, or the seam will pucker. Turn RS out. The lace panel now runs down the center front, opposite the seam.
Check: The top opening should be 16 1/4 in (41.3 cm) around and the bottom opening 7 3/4 in (19.7 cm) around.
Border
Border gauge: Along the edges, place 1 sc in each stitch. The rib gauge is 16 sts per 4 in (10.2 cm), so sc worked 1 per stitch matches the fabric width and the edge stays flat.
Top Scallop
Rnd 1: With RS facing, join cream at the back seam on the Row 41 edge. Ch 1, sc in each of the 65 sts, plus 1 extra sc at the seam. Sl st to first sc. (65 + 1 = 66 sc)
Rnd 2: Ch 1, sc in first sc, *sk 2 sc, 7 dc in next sc, sk 2 sc, sc in next sc; rep from * 10 more times, omitting the final sc on the last repeat. Sl st to first sc. (11 shells, 11 sc)
Why the math works: Each scallop repeat uses 6 sts (2 skipped, 1 shell st, 2 skipped, 1 sc). 66 ÷ 6 = 11 exactly, so the last shell meets the first sc with no partial repeat. The single extra sc in Rnd 1 is placed at the hidden back seam, so it doesn’t show.
Fasten off.
Bottom Ring
Rnd 1: With RS facing, join cream at the back seam on the foundation chain edge. Ch 1, sc in each of the 31 foundation ch, plus 1 extra sc at the seam. Sl st to first sc. (31 + 1 = 32 sc)
Rnd 2: Ch 1, [sc in next 2 sc, sc2tog] 8 times. Sl st to first sc. (24 sc)
Rnd 3: Ch 1, sc in each sc around. Sl st to first sc. (24 sc)
Why the math works: 32 ÷ 4 = 8 decrease repeats, with 3 sts left from each, so 8 × 3 = 24. The ring draws the narrow end in to an opening about 1 3/4 in (4.4 cm) across. That holds the bags in but still lets one pull out at a time.
Fasten off and weave in the ends.
Hanging Cord
With navy, make a Romanian cord. Ch 2, sc in 2nd ch from hook. Turn the work clockwise, insert the hook under the 2 strands on the left edge, and sc. Repeat the turn and sc until the cord measures 14 in (35.6 cm). Fasten off, leaving a 10 in (25.4 cm) tail at each end.
Lay the holder flat with the panel centered. Mark the side folds at stitch 17 and stitch 49 of Row 41; these are the points 16 sts to each side of the panel center (stitch 33). Sew one cord end to the inside of each fold, 1 in (2.5 cm) below Rnd 1 of the scallop. Stitch through several rows so the weight is spread out.
Final Blocking
- Weave in all ends along same-color stitches, especially at the intarsia changes.
- Soak the holder in cool water for 10 minutes, then press out the water in a towel. Do not wring.
- Stuff it with a rolled towel or a paper cone to get the taper.
- Pat the lace panel flat and center it on the front. Open each fan with your fingertips.
- Pin the 11 scallops evenly around the top edge.
- Check that it measures 19 3/4 in (50.2 cm) from scallop tips to ring, with 16 1/4 in (41.3 cm) around the top.
- Let it dry completely while standing upright or hanging, then remove the stuffing.
Final Quality-Control Checklist
- Body stitch count reached 65 at Row 36
- Panel stayed 15 sts wide in every row
- 10 fans are visible, all pointing up
- No holes at the color changes
- Seam is flat and sits directly opposite the panel
- Top has 11 even scallops
- Bottom ring has 24 sc and a round opening
- Cord is secure on both sides, and the holder hangs straight and level
Troubleshooting
The panel slants or drifts sideways: Your counts are off in Row A or B. Recount to 15 positions, counting each chain as 1.
Holes at color changes: Twist the strands on the WS each time you change color.
The cone twists when hung: The seam tension is uneven. Re-seam more loosely and block again.
The scallop ruffles: Your shells are too loose. Use a hook one size smaller for Rnd 2.
Bags fall out of the bottom: Add a 4th round of sc2tog decreases to the ring.
The ribs look flat: Make sure you used FPdc on RS rows and BPdc on WS rows, not the other way around.
Care
Hand wash or machine wash in cool water on a gentle cycle, then reshape and dry flat or hanging. Don’t tumble dry, because the cotton can shrink and the cone will lose its shape.
Final Notes
The measurement chain runs like this: the gauge of 16 sts per 4 in (10.2 cm) gives 31 sts = 7 3/4 in (19.7 cm) at the bottom. Seventeen increase rows bring it to 65 sts = 16 1/4 in (41.3 cm) at the top. At 9 rows per 4 in (10.2 cm), 41 rows make a body 18 1/4 in (46.4 cm) long. The top border adds 66 sc and 11 scallops, and the bottom ring gathers 32 sc down to 24. Both borders together bring the finished length to 19 3/4 in (50.2 cm). Check each link in the chain as you go and your holder will match.
Happy crocheting!