

The Harbor Lattice Hanging Basket is a two-tier wall organizer made of two identical D-shaped baskets. Each basket hangs from a wooden dowel. A crocheted cord loops over a single wall hook, and two side cords hold the lower basket below the upper one. The baskets are a good fit for toilet paper, soap bottles, brushes, and folded washcloths.
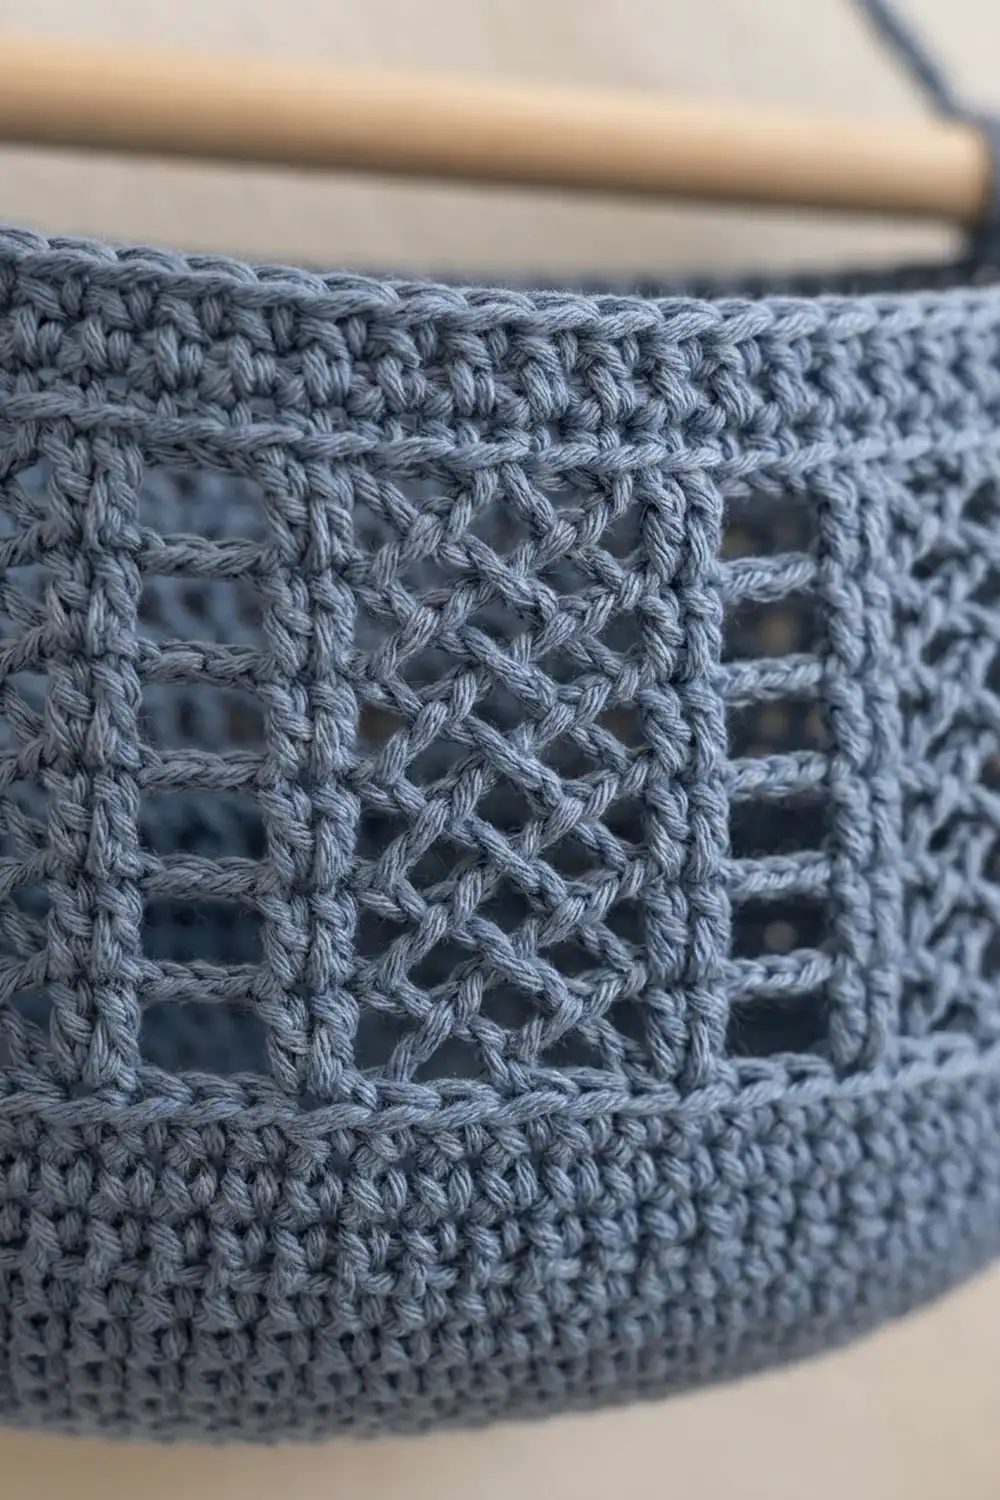
The whole piece is one dusty denim blue cotton. Each basket has a flat base, a straight back that sits against the wall, and a rounded front. The walls have a solid single crochet band at the bottom and top. Between those bands is an openwork band of ladder columns (double crochet posts separated by chain spaces), alternating with panels of crossed double crochet that read as a small diamond lattice.
The pattern uses US crochet terms. Each basket is 12 in (30.5 cm) wide, 4.5 in (11.4 cm) deep, and 5.5 in (14.0 cm) tall. Hung, the organizer is 15 in (38.1 cm) wide across the dowels and about 19 in (48.3 cm) from the hook to the base of the lower basket.
You crochet the D-shaped base in turned rows, then work the walls in joined rounds with two dowel slots near the top. A reverse single crochet rim finishes each basket. Last, you make three slip-stitch cords and tie everything together with the dowels.
Finished Size and Construction
- Finished size (hung): 15 in (38.1 cm) wide x about 19 in (48.3 cm) tall
- Skill level: Intermediate
- Terminology: US
- Yarn weight: Worsted (#4) cotton
- Hook: 4.5 mm (US 7)
- Number of pieces: 5 crocheted pieces (2 baskets, 1 hanging cord, 2 side cords) plus 2 dowels
- Layout: 1 column x 2 baskets, stacked vertically
- Piece size (each basket): 12 in (30.5 cm) wide x 4.5 in (11.4 cm) deep x 5.5 in (14.0 cm) tall
- Size before border: wall height 5.2 in (13.2 cm)
- Border depth: 0.3 in (0.8 cm), one round of reverse single crochet
Materials
Choose a firm worsted cotton or cotton blend. Cotton keeps its shape when the basket is loaded. Soft acrylics let the walls slump, so avoid them.
- Dusty Blue: 200 g, about 340 m (372 yd), assuming a yarn of about 170 m per 100 g. Each basket uses about 80 g, and the cords use about 8 g.
These quantities include a margin of about 15 percent to cover your swatch and differences in tension.
Tools:
- 4.5 mm (US 7) crochet hook
- 2 wooden dowels, 5/8 in (1.6 cm) diameter, 15 in (38.1 cm) long
- 4 locking stitch markers
- Tapestry needle
- Scissors
- Measuring tape
- 1 sturdy wall hook
Abbreviations (US Terms)
- ch: chain
- sc: single crochet
- dc: double crochet
- sl st: slip stitch
- st(s): stitch(es)
- sk: skip
- sp: space
- BLO: back loop only
- rnd: round
- rev sc: reverse single crochet
Special stitches:
- X-st (crossed double crochet): Sk next st and dc in the st after it. Then dc in the skipped st, working in front of the dc you just made. Uses 2 sts and makes 2 sts.
- Reverse sc: Work sc from left to right (right to left if you crochet left-handed), inserting the hook into the next st to the right. This makes a corded edge.
- Sl st cord: Ch the number given. Sl st in the back bump of the 2nd ch from hook and in each ch across. The cord ends up with one fewer st than the chain.
Gauge and Checkpoints
- Single crochet: 16 sc and 18 rows = 4 in (10.2 cm)
- Lattice band: 16 sts = 4 in (10.2 cm) wide; 2 rnds = 1 in (2.5 cm) tall
- Cord (yarn held double): 4 sl sts = 1 in (2.5 cm)
Make one complete basket and measure it before you start the second. Every later measurement depends on the base.
Checkpoints:
- After Row 10, the base measures about 7.75 in (19.7 cm) along the straight edge and 2.25 in (5.7 cm) deep.
- After Row 20, the base measures 12 in (30.5 cm) wide and 4.5 in (11.4 cm) deep.
- After Rnd 7, the wall is 1.3 in (3.3 cm) tall above the base fold.
- After Rnd 12, the wall is 3.8 in (9.7 cm) tall.
- After Rnd 18, the wall is 5.2 in (13.2 cm) tall.
If the base comes out wider than 12.5 in (31.8 cm), start over with a 4 mm hook. If it’s narrower than 11.5 in (29.2 cm), start over with a 5 mm hook. A different hook won’t fix a base that cups or ruffles; see Troubleshooting for those.
Basket Base (Make 2)
You work the base in turned rows. The foundation chain lies along the straight back edge. Each row curves around the front, so the row ends also land on the back edge. The ch 1 at the start of a row doesn’t count as a stitch.
Row 1: Ch 14. Work 3 sc in 2nd ch from hook, sc in next 11 ch, 3 sc in last ch. Turn. (17 sts)
Row 2: Ch 1, sc in each st across. Turn. (17 sts)
Row 3 (increase): Ch 1, 2 sc in each of next 3 sts, sc in next 11 sts, 2 sc in each of next 3 sts. Turn. (23 sts)
Row 4 and all even rows through Row 20: Ch 1, sc in each st across. Turn. Each even row keeps the count of the row before it.
Row 5: Ch 1, (sc in next st, 2 sc in next st) 3 times, sc in next 11 sts, (sc in next st, 2 sc in next st) 3 times. Turn. (29 sts)
Rows 7–19 (odd rows): Ch 1, (sc in next k sts, 2 sc in next st) 3 times, sc in next 11 sts, (sc in next k sts, 2 sc in next st) 3 times. Turn. Start with k = 2 on Row 7 and add 1 on each odd row after that, so k = 8 on Row 19.
Stitch counts for the increase rows:
- Row 7: 35 sts
- Row 9: 41 sts
- Row 11: 47 sts
- Row 13: 53 sts
- Row 15: 59 sts
- Row 17: 65 sts
- Row 19: 71 sts
Row 20: Ch 1, sc in each st across. Don’t fasten off. (71 sts)
Each increase row adds 3 sts at each curved end, for 6 sts per row. The 11 center sts never change, which keeps the middle of the front straight.
Basket Walls
Rnd 1 (base edging): Ch 1, turn. Sc in each of the 71 sts of Row 20. Then continue along the straight back edge:
- Over the first 20 row ends, work 18 sc. To do this, work 9 sc over every 10 row ends, skipping every 10th row end.
- Sc in the free loop of each of the 13 foundation chains.
- Over the last 20 row ends, work 18 sc the same way.
Join with sl st to the first sc. That’s 71 front sts plus 49 back sts, one per position, with 0 extra sts. (120 sts)
Place markers in sts 1 and 71. These are the two back corners. Move the markers up as you work.
Rnd 2: Ch 1, sc in BLO of each st around. Join. (120 sts) This makes a crisp fold, so the wall stands upright.
Rnds 3–7: Ch 1, sc in each st around. Join. (120 sts)
Rnd 8 (lattice set-up): Ch 3 (counts as first dc), ch 1, sk next st, dc in next st, ch 1, sk next st, X-st 3 times. Dc in next st, ch 1, sk next st, dc in next st, ch 1, sk next st, X-st 3 times. Repeat from * to * 10 more times. Join with sl st to the top of the ch-3. (12 repeats x 10 sts = 120 sts)
Rnds 9–12: Ch 3 (counts as first dc), ch 1, sk ch-1 sp, dc in next dc, ch 1, sk ch-1 sp, then work 3 X-sts over the 6 dc of the X-sts below. Dc in next dc, ch 1, sk ch-1 sp, dc in next dc, ch 1, sk ch-1 sp, X-st 3 times. Repeat from * to * 10 more times. Join. (120 sts)
The ladder posts stack into vertical columns with open rungs between them. The crossed stitches stack into diamond lattice panels.
Rnd 13 (conversion): Ch 1, sc in each dc and in each ch-1 sp around. Join. That’s 120 sc, one in each existing st or sp, plus 0 added. (120 sts)
Rnds 14–15: Ch 1, sc in each st around. Join. (120 sts)
Rnd 16 (dowel slots): Ch 1, sc in first st, ch 4, sk next 4 sts, sc in next 61 sts, ch 4, sk next 4 sts, sc in last 50 sts. Join. (1 + 4 + 61 + 4 + 50 = 120 sts)
Each slot sits 1 st in from a back corner. It’s 1 in (2.5 cm) wide, which gives the 5/8 in (1.6 cm) dowel enough room.
Rnd 17: Ch 1, sc in each sc and 4 sc in each ch-4 sp. Join. (120 sts)
Rnd 18: Ch 1, sc in each st around. Join. (120 sts) The wall should now be 5.2 in (13.2 cm) tall.
Make All Pieces
- Baskets: 2, in Dusty Blue, both made exactly as written
- Hanging cord: 1, with yarn held double. Ch 105 and work a sl st cord. (104 sts = 26 in / 66.0 cm)
- Side cords: 2, with yarn held double. For each one, ch 53 and work a sl st cord. (52 sts = 13 in / 33.0 cm each)
Layout:
              [ wall hook ]
               /         \
      hanging cord     hanging cord
             /             \
   o======= Dowel 1 =======o
   |      [ Basket 1 ]      |
  side                    side
  cord                    cord
   |                        |
   o======= Dowel 2 =======o
          [ Basket 2 ]
Joining
The baskets aren’t sewn to each other. The dowels and cords hold them together.
- Thread the dowels. Push each dowel in through one slot, across the inside of the back wall, and out through the other slot. About 1.5 in (3.8 cm) should stick out on each side.
- How each cord loop works. Each cord end uses 3 in (7.6 cm), or 12 sts. The first 8 sts (2 in / 5.1 cm) wrap around the dowel, which is about its circumference. The last 4 sts (1 in / 2.5 cm) lie flat against the cord. Whipstitch these 4 sts to the 4 cord sts beside them, one stitch to one stitch, so the join is no wider than the rest of the cord.
- Attach the side cords. Loop one end of each side cord around an end of Dowel 1, right beside the basket wall. Loop the other end around the same-side end of Dowel 2. This leaves 7 in (17.8 cm) of free cord between the dowels.
- Attach the hanging cord. Loop each end around an end of Dowel 1, just outside the side cord. This leaves 20 in (50.8 cm) of free cord, which hangs over the hook as two 10 in (25.4 cm) legs.
Tension: Make the whipstitches snug but not tight, so the cord doesn’t pucker. Wrap the loops firmly enough that they can’t slide off the dowel ends.
Size checkpoint: Hang the organizer empty. The dowels should be level and 7 in (17.8 cm) apart. The whole piece should measure about 19 in (48.3 cm) from the hook to the base of the lower basket.
Border
The border is worked only around the top edge of each basket. The baskets aren’t joined edge to edge, so each one gets its own border with the same counts.
Border gauge: 4 rev sc = 1 in (2.5 cm). This matches the sc gauge, so the rim won’t flare or pull in.
Rnd 19: Ch 1, rev sc in each st around: 71 sts across the curved front and 49 sts across the straight back. Join and fasten off. (120 sts)
Why the math works: After Rnd 1, the walls have no increases or decreases, so every round has 120 sts. That’s 71 at the front and 49 at the back, the same split as the base edge. Rnd 13 replaces each ch-1 with exactly one sc, and Rnd 17 puts exactly 4 sc into each 4-ch slot, so no sts are gained or lost. The border puts one rev sc into each of the 120 sts, so the rim is the same size as the base perimeter: 30 in (76.2 cm) around.
Final Blocking
- Weave in all ends on the inside of the baskets.
- Mist each basket until it’s damp. Don’t soak it.
- Stuff each basket firmly with a folded towel to straighten the walls.
- Press the back wall flat and smooth the front into an even curve.
- Ease the lattice band gently up and down until the ladder columns are straight and vertical.
- Air dry for 24 hours before you thread the dowels.
Final Quality-Control Checklist
- Each base measures 12 in (30.5 cm) x 4.5 in (11.4 cm).
- Every wall round has 120 sts, with 12 lattice repeats.
- The ladder columns run vertically and line up all the way around.
- Both slots sit at the back corners and line up with each other.
- The rev sc rim is even, with no gaps.
- The dowels hang level, each sticking out 1.5 in (3.8 cm) on both sides.
- Each cord loop is whipstitched over 4 sts and holds firmly.
Troubleshooting
- The base cups: You’re crocheting too tightly at the curves. Use a hook one size larger for the base only.
- The base ruffles: Use a hook one size smaller for the base only.
- Points form at the curved ends: On Rows 9, 13, and 17, work each end repeat as (2 sc in next st, sc in next k sts) so the increases don’t stack.
- The lattice repeats don’t fit: Count Rnd 7 again. It must have exactly 120 sts.
- The walls slump: Switch to a firmer cotton, or line the base with plastic canvas cut to shape.
- The dowel is tight in the slots: Sand the dowel lightly, or use a 1/2 in (1.3 cm) dowel instead.
Care
Take out the dowels and hand wash the baskets in cool water. Reshape them over a towel and let them dry flat.

Final Notes
Every measurement in this pattern builds on the one before it. A gauge of 16 sc and 18 rows per 4 in (10.2 cm) gives a 12 in (30.5 cm) x 4.5 in (11.4 cm) base and a 120-st wall. The walls rise to 5.2 in (13.2 cm), and the 0.3 in (0.8 cm) rim brings each basket to 5.5 in (14.0 cm). Cords at 4 sts per inch make exact 3 in (7.6 cm) dowel loops, a 7 in (17.8 cm) gap between the tiers, and an organizer about 19 in (48.3 cm) tall. Check each measurement when you reach it, and the finished piece will hang straight and level.
Happy crocheting!