

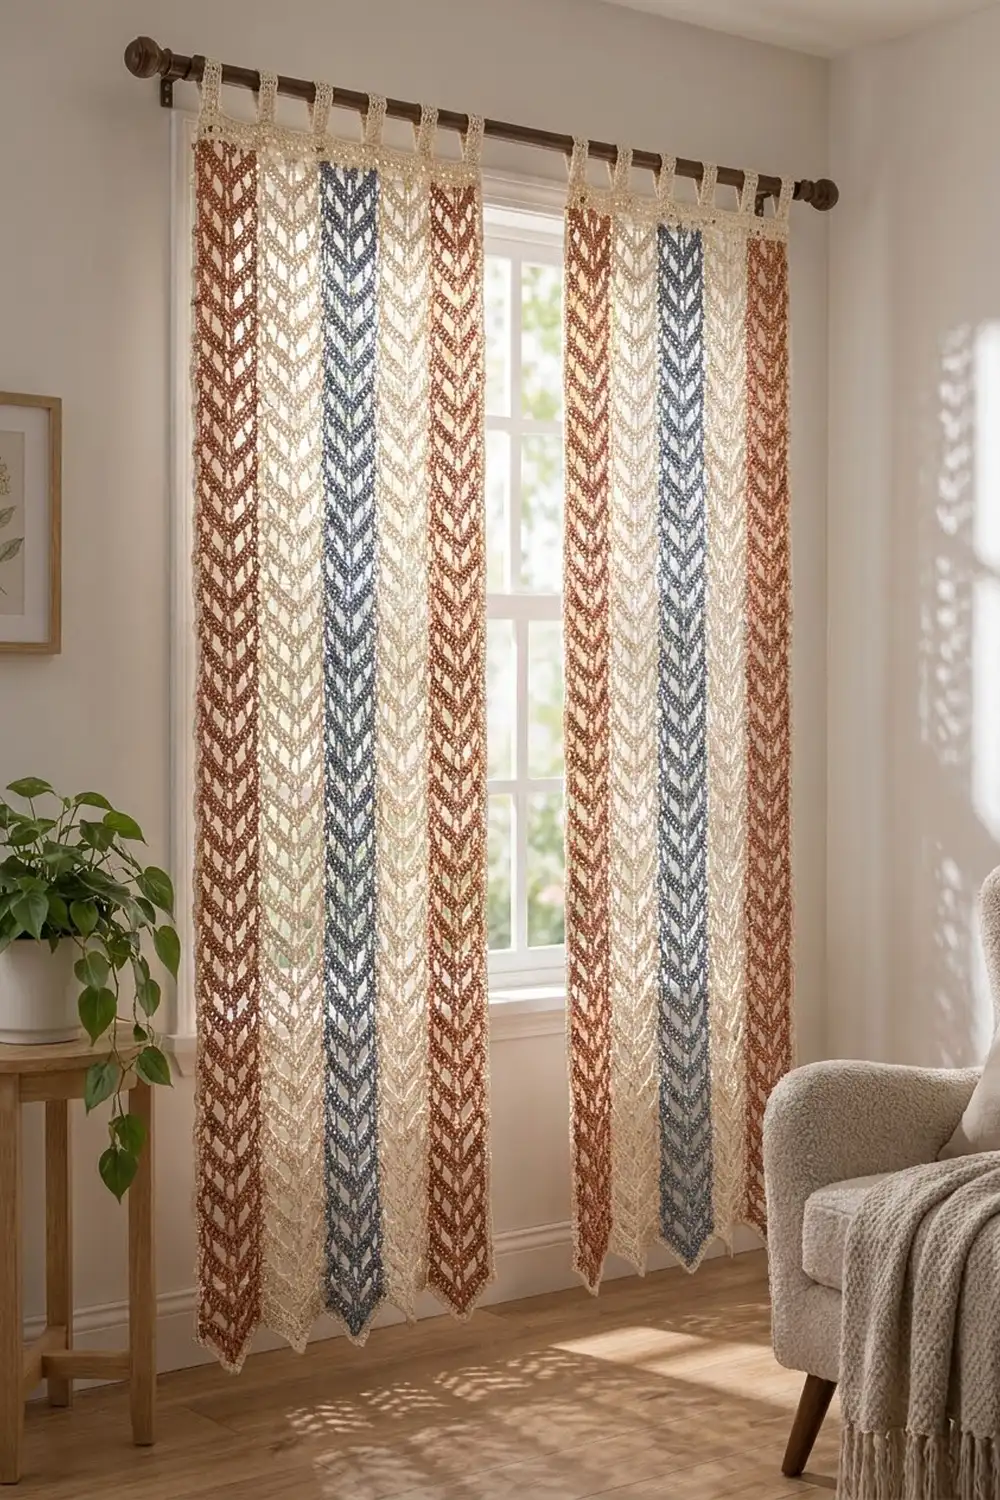
These lacy curtain panels are made from narrow vertical strips. Each strip shows a column of stacked chevrons that point downward. Solid double crochet rows alternate with open mesh rows, so daylight comes through in neat V-shaped rows. The stripes still read clearly from across the room.
The colors are warm and calm: rust on the outer edges, soft cream in between, and a dusty denim blue down the center of each panel. A plain cream band runs across the top with six cream tabs for the curtain rod. Every strip ends in its own pointed tip, which gives the hem a zigzag edge.
The pattern uses US crochet terms. Each finished panel measures 26.25 in (66.7 cm) wide and 51.75 in (131.4 cm) long at the side edge, including the top band. The strip points hang about 2 in (5.1 cm) lower, and the tab loops add another 2 in (5.1 cm) above the band.
The construction is simple and modular:
- Crochet 10 single-color strips in rows, from the pointed bottom up.
- Level the top of each strip.
- Whipstitch five strips together for each panel.
- Work the top band and tabs straight across.
Finished Size and Construction
- Finished panel size: 26.25 in (66.7 cm) wide x 51.75 in (131.4 cm) long at the side edge
- Point depth: about 2 in (5.1 cm) below the side edge
- Tab loops: 2 in (5.1 cm) tall when folded
- Skill level: Intermediate
- Terminology: US
- Yarn weight: #4 worsted, cotton or cotton blend
- Hook: US H-8 (5 mm)
- Number of pieces: 10 strips (5 per panel), making 2 panels
- Layout per panel: 5 strips side by side, 1 strip deep
- Strip size: 5.25 in (13.3 cm) wide x 50.75 in (128.9 cm) long at the side edge
- Panel size before border: 26.25 in (66.7 cm) x 50.75 in (128.9 cm)
- Border depth: 1 in (2.5 cm), top band only; the sides and points have no border
Materials
Choose a smooth, mercerized or combed cotton in worsted weight. Cotton keeps the chevron points crisp, blocks well, and doesn’t stretch much when it hangs. Avoid fuzzy or very slippery yarns, because the mesh rows lose their definition.
- Rust (Color A): 500 g, about 950 m (4 strips)
- Cream (Color B): 600 g, about 1,140 m (4 strips, seams, top bands, and tabs)
- Denim blue (Color C): 250 g, about 475 m (2 strips)
Each strip uses roughly 110 g. All quantities include a margin for your gauge strip and small tension differences.
Tools:
- US H-8 (5 mm) crochet hook
- Tapestry needle
- Stitch markers
- Rust-proof blocking pins and foam mats
- Measuring tape
- Spray bottle
- Scissors
Abbreviations (US Terms)
- ch – chain
- sc – single crochet
- hdc – half double crochet
- dc – double crochet
- tr – treble crochet
- sk – skip
- sp – space
- st(s) – stitch(es)
Special stitch – dc3tog (double crochet three together): [Yarn over, insert hook in next st, yarn over and pull up a loop, yarn over and pull through 2 loops] 3 times, yarn over and pull through all 4 loops on hook. This forms the center point of each chevron and counts as 1 st.
Stitch counting note: The beginning ch-3 counts as 1 dc. In mesh rows, each ch-1 counts as 1 st, so every pattern row has 21 sts.
Gauge and Checkpoints
Strip gauge: 16 sts and 8 rows = 4 in (10.2 cm) in chevron pattern. Measure straight across the strip and along the side edge.
Band gauge: 16 sc and 16 rows = 4 in (10.2 cm).
Make one complete strip first and use it as your gauge test. Check these points as you go:
- After Row 16: width 5.25 in (13.3 cm), side edge 8 in (20.3 cm)
- After Row 50: side edge 25 in (63.5 cm)
- After Row 100: side edge 50 in (127.0 cm)
- After Row 103: top edge straight, side edge 50.75 in (128.9 cm)
Measure with the strip flat and gently smoothed, not stretched.
- Strip too wide: go down one hook size.
- Strip too narrow: go up one hook size.
- Width correct but length wrong: keep your hook and work more or fewer pattern rows. Always end on an even-numbered mesh row before the leveling rows.

Strip Pattern
Make 10 strips in total. Each strip is one color. Don’t cut the yarn between rows.
Foundation: Ch 24.
Row 1 (solid row): Dc in 4th ch from hook (skipped ch-3 counts as dc), dc in next 8 ch, dc3tog over next 3 ch, dc in next 8 ch, 2 dc in last ch, turn. (21 sts)
The skipped chains and first dc act as an increase at the right edge. They match the 2-dc increase at the left edge. The dc3tog pulls the center down, so the bottom of the strip forms a V point.
Row 2 (mesh row): Ch 3 (counts as dc), dc in first st, [ch 1, sk next st, dc in next st] 4 times, dc3tog over next 3 sts, [dc in next st, ch 1, sk next st] 4 times, 2 dc in top of turning ch, turn. (21 sts: 2 + 8 + 1 + 8 + 2)
Row 3 (solid row): Ch 3 (counts as dc), dc in first st, dc in next 8 sts (working into each dc and each ch-1 sp), dc3tog over next 3 sts, dc in next 8 sts, 2 dc in top of turning ch, turn. (21 sts)
Each dc3tog must sit directly above the one in the row below. For the first few rows, place a marker in the center dc3tog to keep the point lined up.
Rows 4–100: Repeat Rows 2 and 3, ending with a Row 2 mesh row. (21 sts in every row; 50 solid rows and 50 mesh rows in total)
Checkpoint: The strip should be 50 in (127.0 cm) long at the side edge. The top edge still dips into a V.
Leveling Rows
These three rows fill the V at the top so the band has a straight edge to work into.
Row 101: Ch 1, sc in first 3 sts, hdc in next 3 sts, dc in next 3 sts, tr in next 3 sts, dc in next 3 sts, hdc in next 3 sts, sc in last 3 sts, turn. (21 sts: 3 + 3 + 3 + 3 + 3 + 3 + 3)
Row 102: Ch 1, sc in first 4 sts, hdc in next 4 sts, dc in next 5 sts, hdc in next 4 sts, sc in last 4 sts, turn. (21 sts: 4 + 4 + 5 + 4 + 4)
Row 103: Ch 1, sc in each st across. (21 sc) Fasten off, leaving a short tail.
Checkpoint: The top edge is straight. The strip measures 5.25 in (13.3 cm) wide and 50.75 in (128.9 cm) long at the side edge. If the center still dips, work Row 102 once more on every strip so they all match.
Make All Pieces
Make the following strips:
- Rust (Color A): 4 strips
- Cream (Color B): 4 strips
- Denim blue (Color C): 2 strips
That makes 10 strips in total, 5 per panel.
Layout for each panel, viewed from the right side with the top at the top:
Panel 1:  [ A ][ B ][ C ][ B ][ A ]
Panel 2:  [ A ][ B ][ C ][ B ][ A ]
The color order is symmetrical, so the two panels hang as a matched pair. Weave in all ends before joining. Hide the tails inside solid rows so they don’t show in the mesh.
Joining
Join the strips with cream yarn, using a whipstitch through the row ends. Every seam in this layout touches a cream strip, so the cream seams blend into the design.
Stitch-to-stitch logic:
- Place two strips right sides together, with the points at the bottom and Row 103 at the top.
- Start at the foundation corner.
- Work 2 whipstitches into each dc row-end (Rows 1–100).
- Work 1 whipstitch into each sc row-end (Rows 101–103).
That gives 203 whipstitches per seam (200 + 3). Match row to row on both strips. If the rows start to drift, stop and realign them.
Join the first strip to the second, the second to the third, and so on. Each panel has 4 seams. Joining adds no stitches to the top edge, so each panel top still has 5 x 21 = 105 sts.
Tension: Pull each whipstitch just snug enough to close the gap. Too tight, and the seam puckers and shortens the side. Too loose, and the strips separate when the panel hangs.
Size checkpoint: Each joined panel measures 26.25 in (66.7 cm) wide (5 x 5.25 in) and 50.75 in (128.9 cm) long at the side edge.
Border: Top Band and Tabs
The border is worked in cream across the top edge only. The sides and the pointed hem stay unbordered so the zigzag stays crisp.
Border gauge: 16 sc and 16 rows = 4 in (10.2 cm).
Band Row 1 (right side facing): Join cream in the first st of Row 103 at the top right corner. Ch 1, sc in each st across all 5 strips, turn. (105 sc: 21 per strip x 5 strips, with no extra sts at the seams)
Band Rows 2–4: Ch 1, sc in each st across, turn. (105 sc) Don’t fasten off after Row 4; you will start the first tab here.
The band is now 4 rows deep, or 1 in (2.5 cm).
Tab placement: The tabs sit over these stitches:
- sts 1–5
- sts 21–25
- sts 41–45
- sts 61–65
- sts 81–85
- sts 101–105
That is 6 tabs of 5 sts, with 5 gaps of 15 sts: (6 x 5) + (5 x 15) = 30 + 75 = 105. The tab centers are 20 sts apart, or 5 in (12.7 cm).
Each tab:
- Ch 1, sc in the 5 sts of the tab position, turn. (5 sc)
- Work 15 more rows of 5 sc, for 16 rows in total.
- Fasten off, leaving a 12 in (30.5 cm) tail.
- Join cream in the first st of the next tab position and repeat until all 6 tabs are made.
Each tab is 1.25 in (3.2 cm) wide and 4 in (10.2 cm) long. Fold each tab to the wrong side and whipstitch its last row to the wrong side of Band Row 1. This forms a 2 in (5.1 cm) loop.
Why the math works: Each strip top has 21 sts. At 4 sc per inch, 21 sts = 5.25 in (13.3 cm). Five strips give 105 sts, and 105 / 4 = 26.25 in (66.7 cm), which is exactly the width of the joined panel. The band doesn’t gather or ruffle the strips.
Final Blocking
- Weave in all remaining ends.
- Soak both panels in cool water for 15 minutes, then gently press out the water. Don’t wring.
- Roll each panel in a towel to remove extra moisture.
- Lay one panel flat on the blocking mats, right side up.
- Pin the top band straight to 26.25 in (66.7 cm).
- Pin both side edges straight to 51.75 in (131.4 cm), measured from the top of the band to the side corner.
- Pin each strip point downward so it sits about 2 in (5.1 cm) below the side edge. Pin both sides of each V straight.
- Open the mesh rows slightly with your fingers so the ch-1 spaces line up.
- Let the panel dry completely, then repeat with the second panel.
- Compare the two panels side by side. Mist and re-pin any area that doesn’t match.
Final Quality-Control Checklist
- Each strip has 21 sts in every pattern row.
- All dc3tog points line up vertically down the center of each strip.
- Every strip ends with a straight Row 103.
- The color order is A, B, C, B, A on both panels.
- Each seam has its row ends matched one to one.
- The band has 105 sc in every row.
- Each panel has six tabs, evenly spaced and securely sewn.
- Each panel measures 26.25 in (66.7 cm) wide and 51.75 in (131.4 cm) long at the sides.
- Both panels hang at the same length.
Troubleshooting
The point drifts to one side. The dc3tog isn’t centered. Count 9 sts in from the edge before each dc3tog and use a marker.
The edges curl or ripple. Check that you worked 2 sts at both edges. A missed increase pulls the edge inward, and an extra one makes it wave.
The mesh holes look uneven. Your ch-1s may be too tight. Make each chain as tall as a loose loop on the hook.
The strips are different lengths. Count rows, not inches, and make sure every strip has exactly 103 rows.
The band ruffles. You added sts at a seam. Rework Band Row 1 with exactly 21 sc per strip.
The top still dips. Work one extra Row 102 on every strip before the band.
Care
Hand wash in cool water with mild detergent and lay flat to dry, reshaping the points while damp. Don’t hang wet panels, because the weight of the water will stretch them.
Final Notes
The measurement chain works like this:
- 21 sts at 4 sts per inch make a 5.25 in (13.3 cm) wide strip.
- 100 pattern rows at 2 rows per inch make it 50 in (127.0 cm) long.
- Three leveling rows bring each strip to 50.75 in (128.9 cm).
- Five strips make a 26.25 in (66.7 cm) panel with 105 sts across the top.
- A 1 in (2.5 cm) band brings the side length to 51.75 in (131.4 cm).
Check each step of that chain and your two panels will hang straight, even, and matched.
Happy crocheting!