

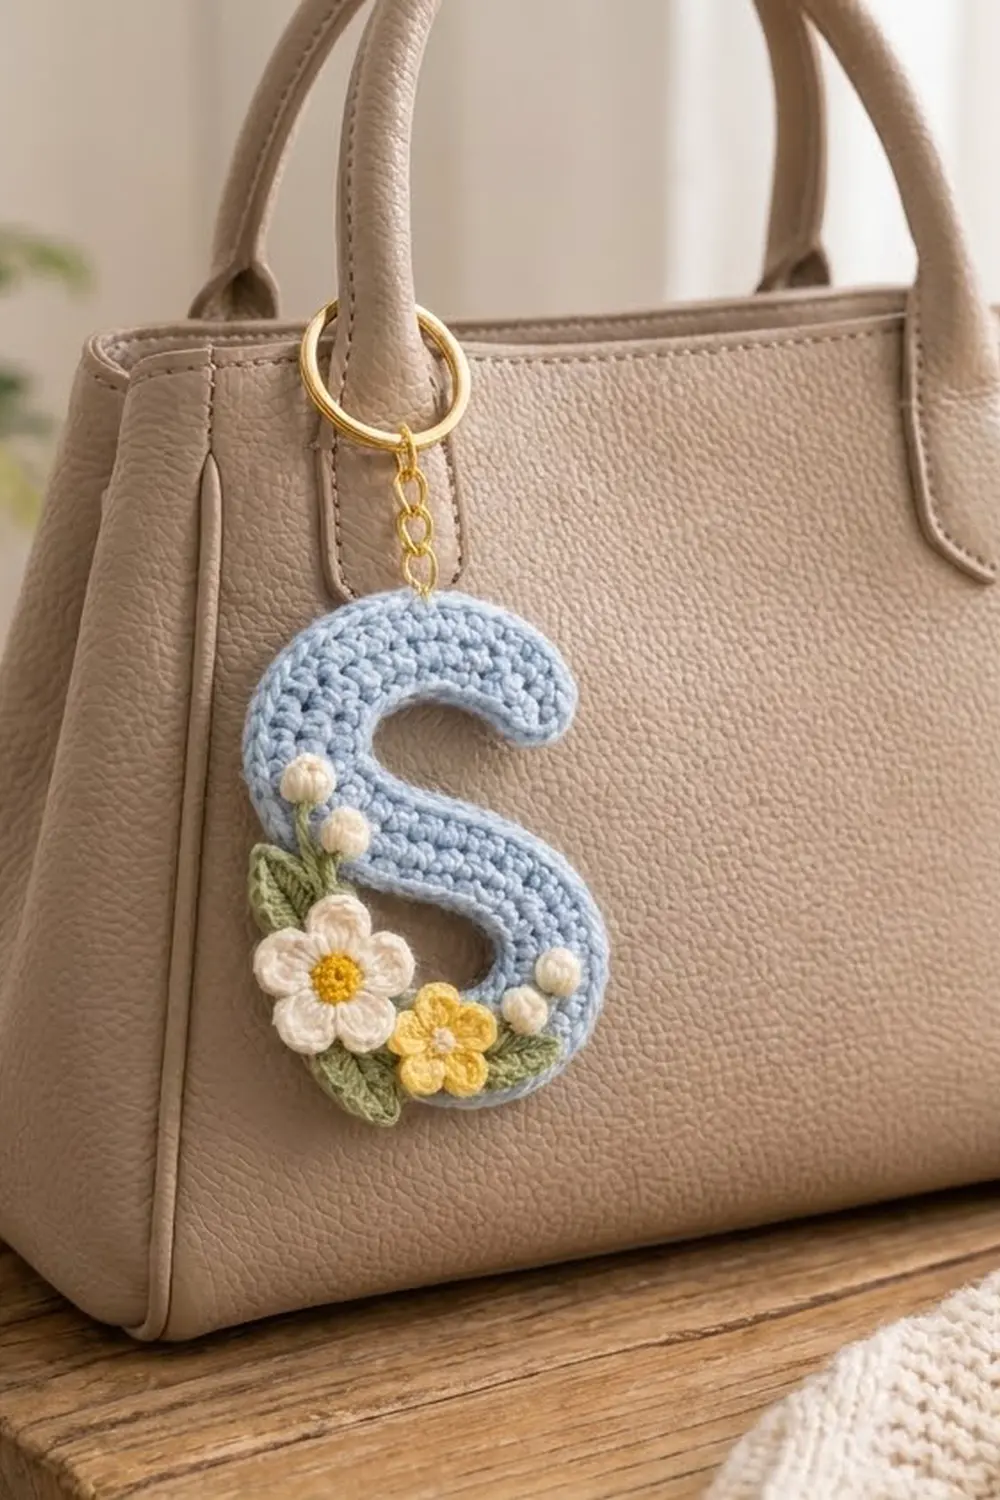
This little letter S keychain is soft, flat and sweet. It is a single curvy letter worked in powder blue cotton, with a small cluster of flowers sewn onto the lower left curve. The cluster has one cream flower with a yellow center, one butter-yellow flower with a cream center, three cream bud bobbles and three sage-green leaves. A gold split ring on a short chain turns it into a bag charm or key fob.
The style is clean and modern. The letter is made of tight single crochet and half double crochet, so the surface has a fine, even texture. A final round of single crochet gives the letter a neat, slightly raised rim all the way around.
This pattern uses US crochet terms. The finished letter measures 4 in (10.2 cm) tall and 3 in (7.6 cm) wide, with a stroke width of 1 in (2.5 cm).
Construction is simple. You chain a line along the center of the S, then work three rounds all the way around that chain. Increases go on the outside of each curve and none go on the inside, which bends the strip into an S. Pin blocking sets the final shape. The flowers, buds and leaves are made separately and sewn on.
Finished Size and Construction
- Finished size: 4 in (10.2 cm) tall x 3 in (7.6 cm) wide
- Skill level: Easy to intermediate
- Terminology: US crochet terms
- Yarn weight: Sport weight (2, fine) cotton
- Hook: 2.5 mm (US B-1/C-2)
- Number of pieces: 1 letter, plus 8 small appliqués sewn on
- Layout: One letter S, with flowers clustered on the lower left curve
- Stroke width: 1 in (2.5 cm)
- Size before border: 3.75 in (9.5 cm) x 2.75 in (7.0 cm), stroke 0.75 in (1.9 cm)
- Border depth: 1/8 in (0.3 cm) on every edge
Materials
Use a smooth mercerized cotton or cotton blend. Cotton holds the curves after blocking and shows the stitch texture clearly. Avoid fuzzy or very stretchy yarn, because the letter will lose its crisp outline.
- Light Blue (main): 8 g, about 24 m
- Cream (petals, center, buds): 3 g, about 9 m
- Butter Yellow (petals, center): 2 g, about 6 m
- Sage Green (leaves, bud stems): 2 g, about 6 m
All quantities include a small margin for tails and a test swatch.
Tools:
- 2.5 mm (US B-1/C-2) crochet hook
- Tapestry needle
- 2 stitch markers
- Scissors
- Rust-proof pins and a blocking board
- A hand-drawn S outline on plain paper, 4 in x 3 in (10.2 x 7.6 cm)
- Gold split key ring, 1 in (2.5 cm) across
- Gold chain, 1.5 in (3.8 cm) long, with 2 jump rings
- 2 pairs of flat-nose pliers
Abbreviations (US Terms)
- ch: chain
- sl st: slip stitch
- sc: single crochet
- hdc: half double crochet
- dc: double crochet
- st(s): stitch(es)
- MR: magic ring
- inc: 2 sts in the same stitch
- rnd: round
Special stitch: bud bobble. In the MR, ch 2, work 4 dc, then sl st to the top of the ch-2. Pull the ring fully closed. The dc fold together into a small round ball.
Gauge and Checkpoints
Gauge: 12 sc x 13 rows = 2 in (5.1 cm) in Light Blue with the 2.5 mm hook.
Make a quick swatch, or use the foundation chain as your test. Your 36-ch foundation should measure about 6 in (15.2 cm) when relaxed.
Checkpoints:
- After Rnd 1: stroke width about 0.4 in (1.0 cm).
- After Rnd 2: stroke width 0.75 in (1.9 cm). Laid in an S, the letter is about 3.75 in (9.5 cm) x 2.75 in (7.0 cm).
- After Rnd 3: stroke width 1 in (2.5 cm). The letter is 4 in (10.2 cm) x 3 in (7.6 cm).
If your letter is too big, go down to a 2.25 mm hook. If it is too small, go up to a 2.75 mm hook. The stitch counts stay the same and only the size changes.

Letter S
Work in joined rounds without turning. Place a marker in the first st of each round.
The chain runs along the center line of the S. Start the chain at the upper tip of the S, so the end at your hook is the lower tip. Number the working chains 1 to 35, starting with the 2nd ch from the hook.
- Ch 1 is the lower tip.
- Ch 2–12 form the lower curve.
- Ch 13–23 form the diagonal spine.
- Ch 24–34 form the upper curve.
- Ch 35 is the upper tip.
On the first pass, the lower curve is the outside edge and the upper curve is the inside edge. On the return pass this flips. That flip is what makes an S instead of a C.
Foundation: With Light Blue, ch 36.
Rnd 1 (sc):
- Sc in 2nd ch from hook (ch 1). (1 st)
- Lower curve, outside (ch 2–12): [sc in next 2 ch, inc in next ch] 3 times, sc in next 2 ch. (14 sts)
- Spine (ch 13–23): sc in each of next 11 ch. (11 sts)
- Upper curve, inside (ch 24–34): sc in each of next 11 ch. (11 sts)
- Upper tip (ch 35): 3 sc in last ch. (3 sts)
Rotate the piece and work along the bottom loops of the chain.
- Upper curve, outside (ch 34–24): [sc in next 2 ch, inc in next ch] 3 times, sc in next 2 ch. (14 sts)
- Spine (ch 23–13): sc in each of next 11 ch. (11 sts)
- Lower curve, inside (ch 12–2): sc in each of next 11 ch. (11 sts)
- Lower tip (ch 1): 2 sc in ch 1. (2 sts)
Sl st to the first sc to join. (78 sts)
Check: the first pass is 1 + 14 + 11 + 11 + 3 = 40 and the return pass is 14 + 11 + 11 + 2 = 38, for 78 in total. Each tip now holds 3 sts.
Rnd 2 (hdc): Ch 1 (does not count).
- 2 hdc in the first st. (2 sts)
- Lower curve, outside (next 14 sts): [hdc in next st, inc in next st] 7 times. (21 sts)
- Spine (next 11 sts): hdc in each st. (11 sts)
- Upper curve, inside (next 11 sts): hdc in each st. (11 sts)
- Upper tip (next 3 sts): inc in each st. (6 sts)
- Upper curve, outside (next 14 sts): [hdc in next st, inc in next st] 7 times. (21 sts)
- Spine (next 11 sts): hdc in each st. (11 sts)
- Lower curve, inside (next 11 sts): hdc in each st. (11 sts)
- Lower tip (last 2 sts): inc in each st. (4 sts)
Sl st to the first hdc to join. (98 sts)
Check: 2 + 21 + 11 + 11 + 6 + 21 + 11 + 11 + 4 = 98. Each tip now holds 6 sts. At the lower tip, that is the first 2 sts plus the last 4.
Lay the piece flat and gently shape it into an S. Check for the 0.75 in (1.9 cm) stroke and the 3.75 in x 2.75 in (9.5 x 7.0 cm) outline. Do not fasten off.
Border
The border is Rnd 3, a single round of sc that forms the raised rim. The border gauge is the same as the body: 6 sc per 1 in (2.5 cm) along a straight edge. One round of sc adds 1/8 in (0.3 cm) to every edge, which takes the stroke from 0.75 in (1.9 cm) to 1 in (2.5 cm).
Rnd 3 (sc): Ch 1 (does not count).
- Lower tip, first part (first 2 sts): sc in next st, inc in next st. (3 sts)
- Lower curve, outside (next 21 sts): [sc in next 2 sts, inc in next st] 7 times. (28 sts)
- Spine (next 11 sts): sc in each st. (11 sts)
- Upper curve, inside (next 11 sts): sc in each st. (11 sts)
- Upper tip (next 6 sts): [sc in next st, inc in next st] 3 times. (9 sts)
- Upper curve, outside (next 21 sts): [sc in next 2 sts, inc in next st] 7 times. (28 sts)
- Spine (next 11 sts): sc in each st. (11 sts)
- Lower curve, inside (next 11 sts): sc in each st. (11 sts)
- Lower tip, second part (last 4 sts): [sc in next st, inc in next st] 2 times. (6 sts)
Sl st to the first sc to join. (118 sts) Fasten off and weave in the ends on the back.
Check: 3 + 28 + 11 + 11 + 9 + 28 + 11 + 11 + 6 = 118. Each tip now holds 9 sts.
Why the math works:
- Tips: Each tip is a half circle. A half circle needs about 3 extra sts per round to lie flat, so each tip grows from 3 to 6 to 9 sts.
- Outside curves: These grow from 14 to 21 to 28 sts. Adding 7 sts per round lengthens the outer edge so it wraps around the curve.
- Inside curves and spine: These stay at 11 sts in every round. The short inner edge pulls against the long outer edge, so each half of the strip bends.
- Symmetry: The upper and lower halves have the same counts, mirrored. Both curves bend by the same amount, so the letter is balanced.
Flowers, Buds, and Leaves
Leave a 6 in (15.2 cm) tail on every appliqué for sewing.
Cream flower (make 1): 1.1 in (2.8 cm) across when finished.
- Rnd 1: With Butter Yellow, 10 sc in MR. Sl st to the first sc to join. Fasten off. (10 sts)
- Rnd 2: Join Cream in any st. [Sl st in next st, (hdc, 3 dc, hdc) in next st] 5 times. Sl st to the first sl st. (5 petals)
Yellow flower (make 1): 0.8 in (2.0 cm) across when finished.
- Rnd 1: With Cream, 5 sc in MR. Sl st to the first sc to join. Fasten off. (5 sts)
- Rnd 2: Join Butter Yellow in any st. [(Ch 2, 2 dc, ch 2, sl st) in same st, sl st in next st] 5 times. The last sl st goes into the joining st. (5 petals)
Buds (make 3): With Cream, work 1 bud bobble. Fasten off and use the tail to close the back. Each bud is 0.35 in (0.9 cm) across.
Leaves (make 3): 0.75 in (1.9 cm) long when finished.
- With Sage Green, ch 6.
- Sc in 2nd ch from hook, hdc in next ch, dc in next 2 ch, hdc in next ch. Work (ch 2, sl st) in the last ch for the tip.
- Working along the other side of the chain: hdc in next ch, dc in next 2 ch, hdc in next ch, sc in last ch. Sl st to the first sc. Fasten off.
Assembly:
- Lay the letter flat with the lower curve opening to the left.
- Place the cream flower on the left edge where the spine meets the lower curve, overlapping the edge by about 1/8 in (0.3 cm).
- Place the yellow flower just below and to the right of it, on the bottom of the lower curve.
- Tuck one leaf behind the upper left of the cream flower, one behind its lower left, and one to the right of the yellow flower.
- Place one bud above the cream flower, one between the two flowers, and one to the right of the yellow flower.
- Pin everything in place. Sew the leaves first, then the flowers, then the buds. Use small stitches that catch only the front of the letter so nothing shows on the back.
- With Sage Green, add 2 short straight stitches under each bud as a stem.
Hardware: Find the highest point of the upper curve, around st 71 of Rnd 3. Open a jump ring with two pairs of pliers. Pass it under both loops of that st and its neighbor, add the chain, and close the ring. Attach the split ring to the top of the chain with the second jump ring.
Final Blocking
- Draw an S outline on paper at 4 in (10.2 cm) x 3 in (7.6 cm), with a 1 in (2.5 cm) stroke. Place it under a sheet of plastic on the blocking board.
- Lightly mist the letter with water. If the appliqués are already sewn on, avoid soaking them.
- Pin the outer edge of the upper curve first, then the lower curve, then both tips.
- Pin the inner curves last, easing the 11-st inside edges into a smooth arc.
- Check the stroke width at 3 points. Each should be 1 in (2.5 cm).
- Let the letter dry fully, for at least 6 hours. Unpin it and gently shape the petals with your fingers.
Final Quality-Control Checklist
- Rnd 1 has 78 sts, Rnd 2 has 98 sts and Rnd 3 has 118 sts.
- Both tips hold 9 sts in Rnd 3 and look like neat half circles.
- The letter measures 4 in (10.2 cm) x 3 in (7.6 cm).
- The stroke is an even 1 in (2.5 cm) wide.
- The border rim is smooth, with no gaps at the tips.
- Two flowers, three buds and three leaves are sewn on firmly.
- No sewing stitches show on the back.
- Both jump rings are fully closed with no gap.
Troubleshooting
The outside curves ruffle. Your tension is loose. Go down a hook size, or check that you worked exactly 7 increases per curve in each round.
The letter cups or buckles. Your increases are too tight. Work the increase sts a little more loosely, or block more firmly.
The tips look pointed. Spread the tip increases evenly as written. Do not stack them in one st.
The S looks like a C. You probably increased on the wrong curve on the return pass. The outside curve is the lower curve on the first pass and the upper curve on the return pass.
The petals look flat. Pinch each petal into shape while damp and let it dry.
The charm tilts. Move the jump ring one st left or right until the letter hangs straight.
Care
Hand wash in cool water with mild soap. Lay flat to dry and reshape the S. Do not tumble dry or wring.
Final Notes
The measurements build step by step. A 36-ch foundation of about 6 in (15.2 cm) gives a 0.4 in (1.0 cm) stroke after Rnd 1. Rnd 2 brings the stroke to 0.75 in (1.9 cm) and the letter to 3.75 in (9.5 cm) x 2.75 in (7.0 cm). The border adds 1/8 in (0.3 cm) to every edge. That gives a finished letter of 4 in (10.2 cm) x 3 in (7.6 cm) with a 1 in (2.5 cm) stroke. If each checkpoint matches, the finished keychain will match too.
Happy crocheting!