

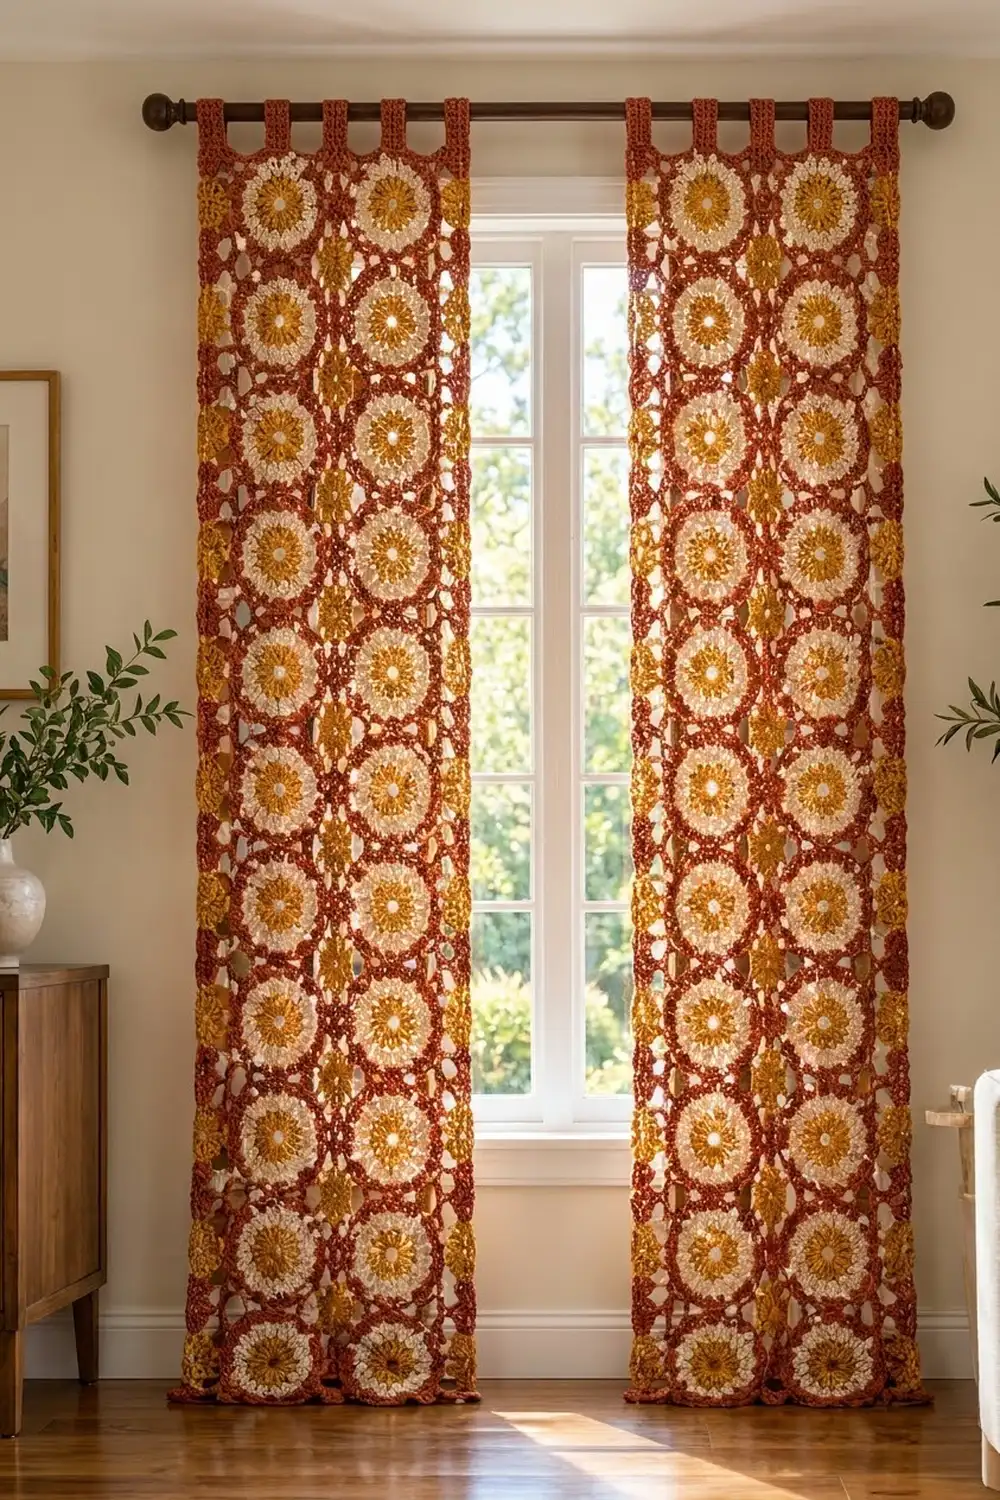
The Harvest Sun Curtain Panel is a tall, lacy panel made from 24 identical circle-in-square motifs. Each motif has a golden sunburst center, a wide cream ring and a scalloped rust frame. Small gold clusters sit at the motif corners, so wherever motifs meet you get a little gold flower.
The colors are warm and autumnal: rust, mustard gold and cream. The style is retro-boho. Light comes through the open scallops, and the panel hangs from a rod on four rust tabs.
This pattern uses US crochet terms. One finished panel measures 14 in wide x 79 in long (35.6 cm x 200.7 cm) before the tabs. With the tabs folded over a rod, it hangs about 82 in (208.3 cm) from the top of the rod. Make two panels for a pair.
Here is the order of work. You crochet 24 motifs in the round and join them flat in a grid 2 motifs wide and 12 motifs tall. Then you add a 2-round single crochet border and work four tabs along the top edge.
Finished Size and Construction
- Finished size (one panel): 14 in x 79 in (35.6 cm x 200.7 cm), plus tabs
- Skill level: Intermediate
- Terminology: US crochet terms
- Yarn weight: Worsted (#4)
- Hook: 5.5 mm (US I-9)
- Number of pieces: 24 motifs per panel, plus 4 tabs worked onto the border
- Layout: 2 motifs wide x 12 motifs tall
- Motif size: 6.5 in x 6.5 in (16.5 cm x 16.5 cm)
- Size before border: 13 in x 78 in (33.0 cm x 198.1 cm)
- Border depth: 0.5 in (1.3 cm) on every side
Materials
Choose a smooth worsted-weight yarn that shows stitches clearly. Cotton or a cotton blend hangs well and resists stretching. Acrylic is lighter but may grow slightly over a long drop. The amounts below assume about 200 m per 100 g.
Yarn for one panel:
- Color A, Gold: 200 g / 400 m
- Color B, Cream: 220 g / 440 m
- Color C, Rust: 360 g / 720 m
Double every amount for a pair of panels. These amounts include about 10% extra for your test motif and yarn tails.
Tools:
- 5.5 mm (US I-9) crochet hook
- Tapestry needle
- Scissors
- Stitch markers
- Measuring tape
- Blocking mats and rust-proof pins
- Spray bottle
Abbreviations (US Terms)
- ch – chain
- sl st – slip stitch
- sc – single crochet
- hdc – half double crochet
- dc – double crochet
- sp(s) – space(s)
- sk – skip
- st(s) – stitch(es)
- RS / WS – right side / wrong side
- BLO – back loop only
Special stitch – 3-dc cluster (cl): Yarn over, insert hook in the indicated space, yarn over and pull up a loop, yarn over and draw through 2 loops; repeat from * to * 2 more times (4 loops on hook), yarn over and draw through all 4 loops.
Beginning cluster (beg cl): Ch 3, then work a 2-dc cluster in the same space. The ch-3 counts as the first leg.
Gauge and Checkpoints
Make one complete motif before anything else. Block it lightly and measure it flat. This one motif sets the size of the whole panel.
Motif gauge: One motif = 6.5 in x 6.5 in (16.5 cm x 16.5 cm), with 21 dc per side.
Checkpoints while you work:
- After Round 1: 1.5 in (3.8 cm) across
- After Round 2: 3 in (7.6 cm) across
- After Round 4: 4.75 in (12.1 cm) across
- After Round 5: 5.75 in (14.6 cm) across, measured scallop tip to scallop tip
- After Round 7: 6.5 in (16.5 cm) square
If your motif is too big: use a 5.0 mm hook. If each of the 12 motifs in a column is 0.25 in (0.6 cm) too long, the panel ends up 3 in (7.6 cm) too long.
If your motif is too small: use a 6.0 mm hook.
If it cups: your Round 5 chains are too tight. Loosen them, or add one chain to each loop in that round only. Keep the stitch count the same.
If it ruffles: your dc rounds are loose. Go down one hook size for Rounds 1 to 4 only.
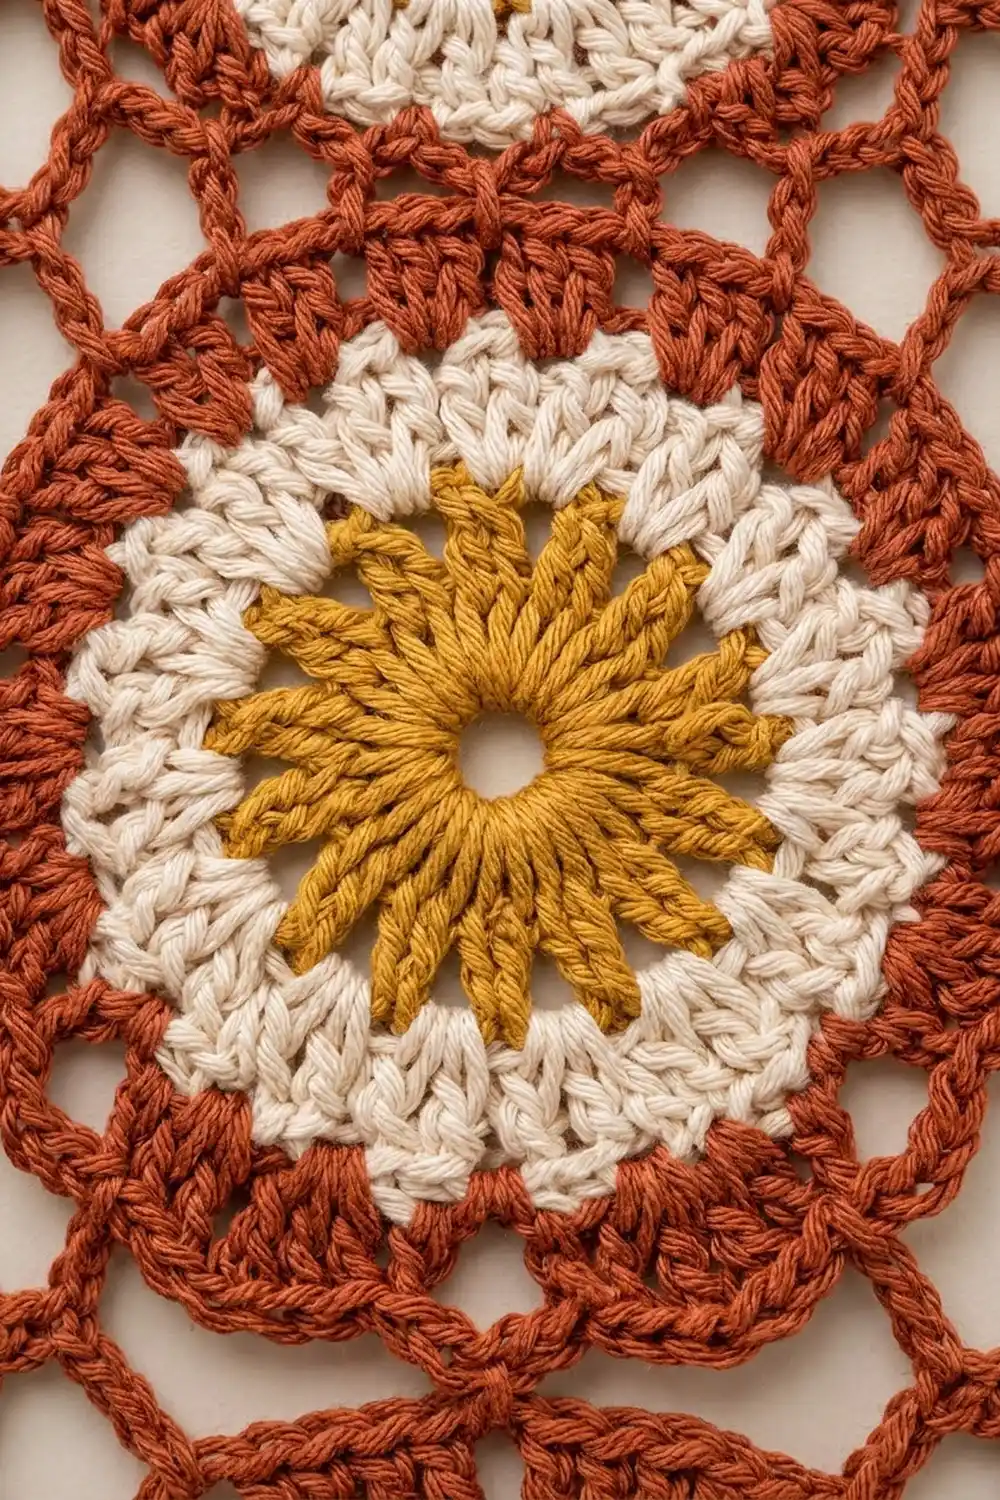
Motif (Make 24)
Each motif uses all three colors. Join each round with a sl st to the first st unless told otherwise. The beginning ch-3 counts as a dc throughout.
Round 1 (Color A, Gold): Make a magic ring. Ch 3, work 15 dc in the ring. Pull the ring snug but leave a small open center. Join. (16 dc)
Round 2 (Color A): Ch 3, dc in the same st, 2 dc in each st around. Join. (32 dc) Fasten off Color A.
The two gold rounds form the sunburst center with a small open eye.
Round 3 (Color B, Cream): Join Color B in any st. Ch 3, 2 dc in the next st, dc in the next st, 2 dc in the next st; repeat from * to * 14 more times. Join. (48 dc)
Round 4 (Color B): Ch 2 (does not count as a st), hdc in each of the next 2 sts, 2 hdc in the next st; repeat from * to * 15 more times. Join to the first hdc. (64 hdc) Fasten off Color B.
Rounds 3 and 4 form the wide cream ring.
Round 5 (Color C, Rust): Join Color C in any hdc. Ch 1, sc in the same st, ch 5, sk 3 sts, sc in the next st; repeat from * to * 14 more times, ch 5, sk 3 sts, join to the first sc. (16 sc and 16 ch-5 loops)
Each repeat uses 4 hdc, and 16 x 4 = 64, so the loops land evenly. This round makes the scalloped rust circle. Fasten off Color C.
Round 6 (Color A, Gold – squaring round): Join Color A in any ch-5 loop. This is your first corner. Beg cl, ch 3, cl in the same loop. [Ch 3, sc in the next loop] 3 times, ch 3, (cl, ch 3, cl) in the next loop; repeat from * to * 2 more times, [ch 3, sc in the next loop] 3 times, ch 3, join to the top of the beg cl.
Count: 8 cl, 12 sc, 4 corner ch-3 sps and 16 side ch-3 sps. Each side uses 1 corner loop plus 3 side loops, and 4 x 4 = 16 loops. Fasten off Color A.
The gold clusters sit at the corners. Round 7 covers the gold side chains.
Round 7 (Color C, Rust): Join Color C in any corner ch-3 sp. Ch 3, (dc, ch 2, 2 dc) in the same sp. Dc in the top of the next cl, [3 dc in the next ch-3 sp, dc in the next sc] 3 times, 3 dc in the next ch-3 sp, dc in the top of the next cl, (2 dc, ch 2, 2 dc) in the corner ch-3 sp; repeat from * to * 2 more times. Work the side sequence once more, ending with dc in the top of the last cl. Join to the top of the beginning ch-3 and fasten off.
Count: 21 dc per side, 84 dc total, plus 4 corner ch-2 sps. Each side is 2 corner dc + 1 + (3 + 1 + 3 + 1 + 3 + 1 + 3) + 1 + 2 corner dc = 21. The 21 already includes the 2 corner dc at each end of that side. The ch-2 corner spaces do not count as stitches.
On the WS, weave each end through stitches of its own color.
Make All Pieces
Make 24 motifs for one panel, or 48 for a pair. Every motif is identical:
- Color A (Gold): Rounds 1, 2 and 6 – about 7 g per motif
- Color B (Cream): Rounds 3 and 4 – about 8 g per motif
- Color C (Rust): Rounds 5 and 7 – about 11 g per motif
Block all motifs to 6.5 in (16.5 cm) square before joining. Lay them out in this grid of 2 columns x 12 rows (M = motif):
Row 1:  M  M
Row 2:  M  M
Row 3:  M  M
Row 4:  M  M
Row 5:  M  M
Row 6:  M  M
Row 7:  M  M
Row 8:  M  M
Row 9:  M  M
Row 10: M  M
Row 11: M  M
Row 12: M  M
Joining
Join with a flat slip stitch seam through the back loops, using Color C. It adds almost no bulk and keeps the panel at its full 13 in (33.0 cm) width.
Method: Place two motifs side by side, RS up, with the edges to be joined touching. Insert the hook through the back loops of both facing corner ch-2 sps and sl st. Then sl st through the back loops of each matching pair of dc, 1 to 1, across all 21 dc. Finish with a sl st through both facing corner ch-2 sps at the other end. (23 sl sts per seam: 21 for the dc + 2 for the corner spaces)
Both edges have exactly 21 dc, so every stitch has a partner. Nothing is skipped and nothing is added.
Order: First join the 2 motifs in each of the 12 rows. Then join the rows to each other with long horizontal seams. At each point where four motifs meet, work through the corners that are already joined. The four gold corner clusters come together as a small gold flower.
Tension: Keep your sl sts as loose as the dc they join, and pull each loop up to dc height if needed. A tight seam will pucker and shorten the panel.
Size checkpoint: After you join the first 4 rows, the piece should measure 13 in x 26 in (33.0 cm x 66.0 cm). The full joined panel should measure 13 in x 78 in (33.0 cm x 198.1 cm).
Border
Border gauge: 13 sc = 4 in (10.2 cm). At this gauge, 42 sc fit across the 13 in (33.0 cm) top edge without stretching or ruffling.
Starting counts: Each motif side has 21 dc. A short edge is 2 motifs, so it has 2 x 21 = 42 dc. A long edge is 12 motifs, so it has 12 x 21 = 252 dc. At each seam, pass over the 2 joined corner ch-2 sps without working into them. No stitches are added at seams.
Round 1 (Color C, RS facing): Join Color C in any outer corner ch-2 sp. Ch 1, (sc, ch 2, sc) in the same sp. Sc in each dc to the next outer corner, passing over the seams. Work (sc, ch 2, sc) in each outer corner. Join.
- Short sides: 42 sc worked 1 per dc + 2 corner sc = 44 sc
- Long sides: 252 sc worked 1 per dc + 2 corner sc = 254 sc
- Total: 2 x 44 + 2 x 254 = 596 sc, plus 4 corner ch-2 sps
Round 2: Sl st into the corner ch-2 sp. Ch 1, (sc, ch 2, sc) in the same sp. Sc in each sc around, with (sc, ch 2, sc) in each corner. Join and fasten off.
- Short sides: 44 sc worked 1 per st + 2 corner sc = 46 sc
- Long sides: 254 sc worked 1 per st + 2 corner sc = 256 sc
- Total: 2 x 46 + 2 x 256 = 604 sc, plus 4 corner ch-2 sps
Why the math works: Each sc in Round 1 sits on exactly one dc, so the border has the same stitch count as the panel edge. At 13 sc per 4 in, 42 sc is 12.9 in, which settles onto the 13 in (33.0 cm) edge. Each corner group adds 1 sc to each side it touches, so every side gains 2 sc per round and the corners turn smoothly. Each sc round adds 0.25 in (0.6 cm), so the 2 rounds make a 0.5 in (1.3 cm) border. The panel finishes at 14 in x 79 in (35.6 cm x 200.7 cm).
Tabs (Make 4)
Work the tabs along one short edge, which becomes the top. That edge has 46 sc. Starting with the corner sc at one end, mark them like this:
- Sk 2 sts, tab on 6 sts, sk 6, tab on 6, sk 6, tab on 6, sk 6, tab on 6, sk 2.
- Check: 2 + 6 + 6 + 6 + 6 + 6 + 6 + 6 + 2 = 46.
Row 1: With RS facing, join Color C in the first st of a tab. Ch 1, sc in the same st and in each of the next 5 sts. Turn. (6 sc)
Rows 2–24: Ch 1, sc in each st across. Turn. (6 sc)
Each tab measures about 1.75 in (4.4 cm) wide x 6 in (15.2 cm) long. Fasten off with a long tail. Fold the tab to the WS and whipstitch the last row to the back of the border, right behind Row 1 of the tab. This makes a 3 in (7.6 cm) loop for the rod. Repeat for the other 3 tabs.
Final Blocking
- Weave in any remaining ends.
- Lay the panel flat on mats, RS up. If you are short on space, block one section at a time.
- Pin the 4 outer corners first, to 14 in x 79 in (35.6 cm x 200.7 cm).
- Pin along each seam line so every motif sits at 6.5 in (16.5 cm).
- Gently open the Round 5 scallops with your fingers so each loop is round.
- Spray until damp, not soaked. You can lightly steam cotton instead.
- Let it dry completely, at least 24 hours, before unpinning.
- Hang the panel for a day before you set the final rod height. Cotton may relax by up to about 1 in (2.5 cm).
Final Quality-Control Checklist
- Every motif has 84 dc in Round 7, with 21 dc per side.
- Every motif measures 6.5 in (16.5 cm) square.
- All 24 motifs face RS up in the grid.
- Each seam has 23 sl sts and lies flat.
- Gold corners meet neatly at every intersection.
- Border Round 2 has 46 sc on each short side and 256 sc on each long side.
- The 4 tabs are evenly spaced and sewn on securely.
- The panel measures 14 in x 79 in (35.6 cm x 200.7 cm).
- No ends show on the RS when you hold the panel up to the light.
Troubleshooting
Motif is not square: Check Round 6. Each side must use exactly 4 ch-5 loops, with the pair of corner clusters in the first one.
Cream ring ripples: Round 4 is too loose. Work it with a 5.0 mm hook.
Scallops pull the motif into a bowl: Your ch-5 loops are too tight. Chain more loosely, or work ch 6 in Round 5 only.
Panel is narrower at the seams: Your sl st join is too tight. Rip it back and pull each loop up taller.
Border ruffles: You may have worked into the joined corner spaces at the seams. Pass over them instead.
Border pulls in: Use a 6.0 mm hook for the border only.
Panel grows when hung: Re-block it flat and let it dry fully. For future panels, choose a firmer cotton blend.
Care
Hand wash in cool water with mild soap, press out the water in a towel and dry flat. Do not hang the panel while it is wet, because the weight will stretch it.
Final Notes
Here is the full measurement chain. One motif measures 6.5 in (16.5 cm) with 21 dc per side. Two motifs across and twelve down give 13 in x 78 in (33.0 cm x 198.1 cm). The 2-round border adds 0.5 in (1.3 cm) to every edge, for a finished panel of 14 in x 79 in (35.6 cm x 200.7 cm). Four tabs finish the top.
Measure your first motif carefully. If it is right, the rest of the panel will come out right too.
Happy crocheting!