

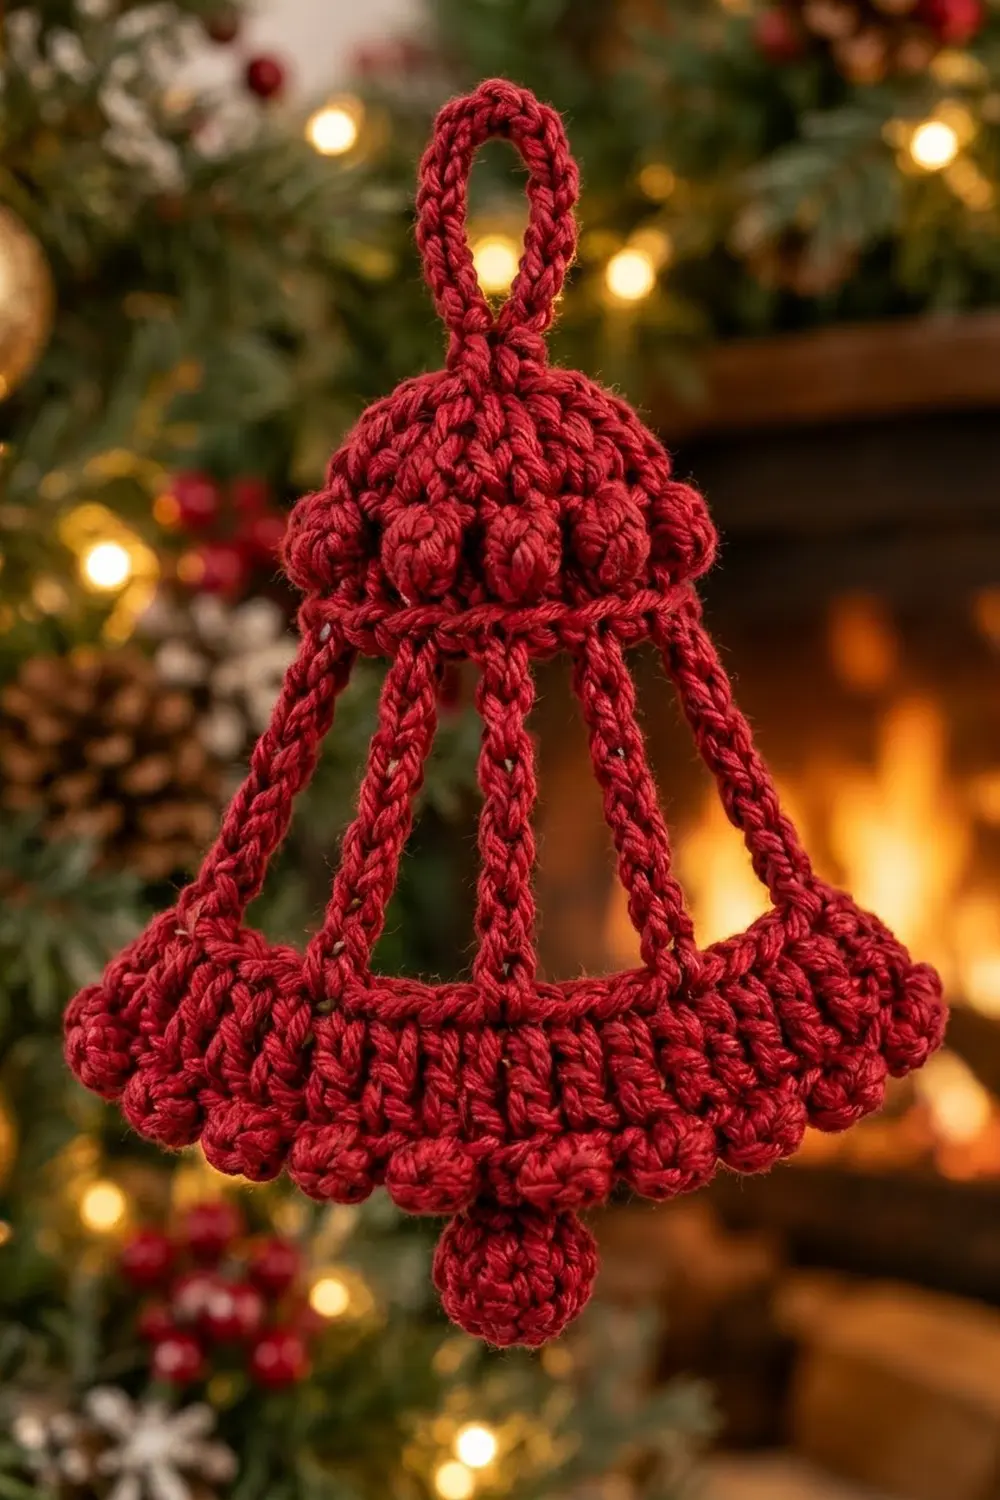
The Hearthside Bell is a lacy Christmas ornament with a classic bell shape. It has a small rounded crown with a row of bobbles and a raised band. Below the band, open chain ribs fan out to a solid flared skirt with a row of bobbles along the hem. A small round clapper hangs at the bottom center, and a corded loop at the top makes it ready for the tree.
The sample is worked in one color, a deep cranberry red, in mercerized cotton. Cotton keeps the stitches crisp, so the bobbles stay round and the ribs stay neat. The ornament lies flat, and on the tree it reads clearly from any distance: a crisp outline, an open center, and textured edges.
This pattern uses US crochet terms. The finished bell is 5 in (12.7 cm) wide at the hem and 4.5 in (11.4 cm) tall from the base of the loop to the hem bobbles. It is 5 in (12.7 cm) tall with the clapper and 6.25 in (15.9 cm) tall with the hanging loop.
The bell is worked flat from the top down. You work the crown in rows and fasten off. Then you make the six chain ribs in one continuous pass, which also forms the base chain for the skirt. The skirt is worked in rows across that base chain, and the bobble hem is the last row. A small stuffed clapper and a corded loop finish the piece.
Finished Size and Construction
- Finished size: 5 in (12.7 cm) wide × 4.5 in (11.4 cm) tall (bell body only)
- Overall height: 6.25 in (15.9 cm) including loop and clapper
- Skill level: Easy-intermediate
- Terminology: US
- Yarn weight: Sport (#2), mercerized cotton
- Hook: 3.25 mm (US D/3)
- Number of pieces: 1 ornament (the main bell plus a small clapper ball sewn on)
- Layout: One flat piece, with no joining
- Crown band width: 2.7 in (6.9 cm)
- Size before border: 5 in (12.7 cm) wide × 4.2 in (10.7 cm) tall
- Border depth: 0.3 in (0.8 cm), one bobble row along the hem only
Materials
Yarn: Sport-weight mercerized cotton holds its shape best. A cotton blend also works. Acrylic gives softer bobbles and slightly floppier ribs. Choose a smooth, tightly plied yarn so the chains look like neat cords.
- Cranberry red: about 12 g (approximately 37 m / 40 yd) per ornament
This quantity includes a margin of about 30% for testing gauge, stuffing the clapper, and weaving in ends. For a set of bells, multiply by the number of ornaments.
Tools:
- 3.25 mm (US D/3) crochet hook
- Tapestry needle
- 2 stitch markers
- Scissors
- Blocking mat and rustproof pins
- Spray bottle with clean water
- Optional: fabric stiffener or starch for a firmer finish
Abbreviations (US Terms)
- ch – chain
- sl st – slip stitch
- sc – single crochet
- hdc – half double crochet
- dc – double crochet
- sc2tog – single crochet 2 together
- BLO – back loop only
- st(s) – stitch(es)
- sp – space
- RS / WS – right side / wrong side
- bo – bobble (see below)
Special stitch – Bobble (bo): [Yarn over, insert hook in the indicated st, yarn over and pull up a loop, yarn over and pull through 2 loops] 4 times in the same st (5 loops on hook). Yarn over and pull through all 5 loops. One bobble counts as 1 st. Bobbles are always worked on WS rows so they pop toward the RS.
Gauge and Checkpoints
Gauge: 24 sc and 24 sc rows = 4 in (10.2 cm), which is 6 sc per 1 in (2.5 cm).
You don’t need a separate swatch. Make the crown first and use it as your test piece. It is almost all sc, so it shows your gauge before you start the ribs and skirt.
Checkpoints:
- Crown Row 1 (6 sts): 1 in (2.5 cm) wide
- Crown Row 5 (10 sts): about 1.7 in (4.3 cm) wide
- Crown Row 8 (16 sts): 2.7 in (6.9 cm) wide; crown height 1.4 in (3.6 cm)
- Each rib: about 1.9 in (4.8 cm) long, with a vertical drop of about 1.7 in (4.3 cm)
- Skirt Row 1 (26 sts): about 4.3 in (10.9 cm) wide
- Skirt Row 4 (30 sts): 5 in (12.7 cm) wide; skirt height 1.1 in (2.8 cm)
If your crown is too big, switch to a 3.0 mm hook. If it is too small, switch to a 3.5 mm hook. An error of 0.2 in (0.5 cm) at Row 8 grows to about 0.4 in (1.0 cm) at the hem, so fix your gauge now.
Crown
The crown is worked in rows. Row 1 is a WS row.
Row 1 (WS): Ch 7, sc in 2nd ch from hook and in each ch across, turn. (6 sts)
Row 2 (RS): Ch 1, 2 sc in first st, sc in next 4 sts, 2 sc in last st, turn. (8 sts)
Row 3 (WS): Ch 1, sc in each st across, turn. (8 sts)
Row 4 (RS): Ch 1, 2 sc in first st, sc in next 6 sts, 2 sc in last st, turn. (10 sts)
Rows 1–4 form the rounded dome at the top of the bell.
Row 5 (WS, bobble row): Ch 1, sc in first st, [bo in next st, sc in next st] 4 times, sc in last st, turn. (10 sts: 4 bobbles + 6 sc)
Check the RS: the four bobbles should sit in a neat line across the crown.
Row 6 (RS): Ch 1, 2 sc in first st, sc in next 8 sts, 2 sc in last st, turn. (12 sts)
Row 7 (WS): Ch 1, 2 sc in first st, sc in next 10 sts, 2 sc in last st, turn. (14 sts)
Row 8 (RS, band): Ch 1, working in BLO, 2 sc in first st, sc in next 12 sts, 2 sc in last st. (16 sts)
The unused front loops of Row 7 form a raised ridge across the RS. This ridge is the band between the crown and the ribs. Fasten off and weave in the end.
Measure now: the crown should be 2.7 in (6.9 cm) wide and 1.4 in (3.6 cm) tall.
Ribs
All six ribs are worked in one continuous pass. For each rib, you chain up to the band and slip stitch into it. Then you slip stitch back down the chain, which gives the rib a firm, corded double thickness. The short chains between the ribs become the base chain for the skirt.
Hold the crown with the RS facing you and Row 8 at the bottom. Number the Row 8 sts from 1 to 16, starting at the right edge. Place a marker in st 1 and in st 16.
Rib row: Make a slipknot on your hook. It becomes the bottom of Rib 1.
- Rib 1: Ch 12, sl st through both loops of band st 1, then sl st in each of the 12 ch back down.
- Ribs 2–6: [Ch 4 (base segment), ch 12, sl st in the band st 3 sts to the left of the last joined st, sl st in each of the 12 ch back down] 5 times.
The ribs join at band sts 1, 4, 7, 10, 13, and 16, so 2 band sts are skipped between neighboring ribs. Do not fasten off. You finish at the bottom of Rib 6, at the left edge.
Count: 6 ribs and 5 base segments of ch 4.
The ribs are 3 sts apart at the top and 5 positions apart at the bottom (1 rib base + 4 ch), which makes the bell flare. All the ribs are the same length. The outer ribs angle out farther, so the inner ribs hang slightly lower. This gives the top of the skirt its gentle downward curve.
Skirt
Row 1 (WS): Turn, ch 1, sc in base ch of Rib 6, [4 sc in next ch-4 sp, sc in base ch of next rib] 5 times, ending in the base of Rib 1, turn. (26 sts: 6 rib-base sc + 20 sc in spaces)
Work each rib-base sc under both the chain and the slip stitch so the rib is anchored firmly.
Row 2 (RS): Ch 2 (does not count as a st), hdc in each st across, turn. (26 sts)
Row 3 (WS): Ch 3 (does not count as a st), 2 dc in first st, dc in next 24 sts, 2 dc in last st, turn. (28 sts)
Row 4 (RS): Ch 3 (does not count as a st), 2 dc in first st, dc in next 26 sts, 2 dc in last st, turn. (30 sts)
Measure now: Row 4 should be 5 in (12.7 cm) wide, and the skirt 1.1 in (2.8 cm) tall. The whole piece should be 4.2 in (10.7 cm) tall before the border. Do not fasten off.
Border (Bobble Hem)
The border is a single bobble row along the bottom of the skirt only. The crown and side edges stay plain, as in the sample.
Border gauge: The bobble row is worked 1 st in each st. It keeps the skirt gauge of 6 sts per 1 in (2.5 cm) and adds 0.3 in (0.8 cm) of depth.
Row 5 (WS, bobble hem): Ch 1, [sc in next st, bo in next st, sc in next st] 10 times. (30 sts: 10 bobbles + 20 sc)
Fasten off and weave in the ends.
Why the math works: The repeat is 3 sts (sc, bo, sc). Row 4 has 30 sts, and 30 ÷ 3 = 10 full repeats with nothing left over. The row starts and ends with a sc, so the corners stay smooth. The bobbles fall on sts 2, 5, 8 … 29. That leaves the two center sts (15 and 16) as plain sc between bobbles 5 and 6, which is where the clapper attaches.
Clapper
Work in continuous rounds. Do not join.
Rnd 1: 6 sc in a magic ring. (6 sts)
Rnd 2: 2 sc in each st around. (12 sts)
Rnds 3–4: Sc in each st around. (12 sts)
Rnd 5: Sc2tog 6 times. (6 sts)
Stuff firmly with yarn scraps. Fasten off, leaving a 6 in (15.2 cm) tail. Thread the tail through the front loops of the last 6 sts and pull tight to close. The ball should be about 0.6 in (1.5 cm) across.
Attach: With the RS of the bell facing you, sew the clapper to the hem at sts 15–16, between bobbles 5 and 6. About 0.5 in (1.3 cm) of the ball should hang below the hem. Take 3–4 small stitches through the base of the bobble row so the ball stays centered and doesn’t swing.
Hanging Loop
With the RS facing, join yarn with a sl st in the free loop of the foundation chain at the base of Crown Row 1, st 3. Ch 18, then sl st in the free loop at the base of st 4. Sl st in each of the 18 ch around the loop so it has the same corded look as the ribs. Fasten off and weave in the end.
The loop should extend about 1.25 in (3.2 cm) above the crown.
Final Blocking
- Weave in any remaining ends along the back of solid sections, not inside the ribs.
- Spritz the ornament with water until it is damp but not dripping. For a stiffer bell, use diluted fabric stiffener instead.
- Lay it RS up on the blocking mat.
- Pin the hem straight at 5 in (12.7 cm) wide, pinning between the bobbles, not through them.
- Pin the band at 2.7 in (6.9 cm) wide, centered above the hem.
- Straighten each rib and pin it at the midpoint. Check that the gaps between ribs are even.
- Shape the top edge of the skirt into a gentle curve and pin the body to 4.5 in (11.4 cm) tall.
- Press the crown and bobbles gently with your fingertips to round them.
- Lay the loop flat above the crown. Let everything dry completely before unpinning.
Final Quality-Control Checklist
- The crown has 4 bobbles in one line, all on the RS.
- The band ridge runs straight across the RS.
- There are 6 ribs, joined at band sts 1, 4, 7, 10, 13, and 16.
- There are 5 base segments of ch 4, and Skirt Row 1 has 26 sts.
- Skirt Row 4 has 30 sts and measures 5 in (12.7 cm).
- The hem has 10 evenly spaced bobbles.
- The clapper is centered between bobbles 5 and 6.
- The body is 4.5 in (11.4 cm) tall, and the overall height is 6.25 in (15.9 cm).
- No ends show on the RS.
Troubleshooting
Bobbles are on the wrong side. Work bobble rows with the WS facing. Make sure Crown Row 1 was a WS row, and track which side each row is on.
Ribs are twisted. Check that the chain isn’t twisted before you slip stitch into the band. Untwist it, then join.
Ribs are different lengths. Recount each chain. One extra chain is easy to see after blocking.
Skirt ruffles. Your dc are looser than your sc. Use a hook 0.25 mm smaller for Skirt Rows 3–4 only.
Skirt cups inward. Your tension is too tight. Use a hook 0.25 mm larger for the skirt rows.
Clapper droops. Add more stuffing and anchor the top of the ball with an extra stitch.
Hem corners flare. Make sure the first and last sts of Row 5 are sc, not bobbles.
Care
Hand wash in cool water with mild soap, roll in a towel to press out the water, and dry flat. Reblock and restiffen as needed, and store the ornament flat in tissue paper.
Final Notes
The crown grows from 6 to 16 sts and measures 2.7 in (6.9 cm) at the band. Six 12-ch ribs drop about 1.7 in (4.3 cm) to a 26-st base that measures 4.3 in (10.9 cm). The skirt widens to 30 sts, or 5 in (12.7 cm), and the bobble hem divides those 30 sts into 10 even repeats. If your gauge is right at Crown Row 8, every later measurement will follow.
Happy crocheting!