

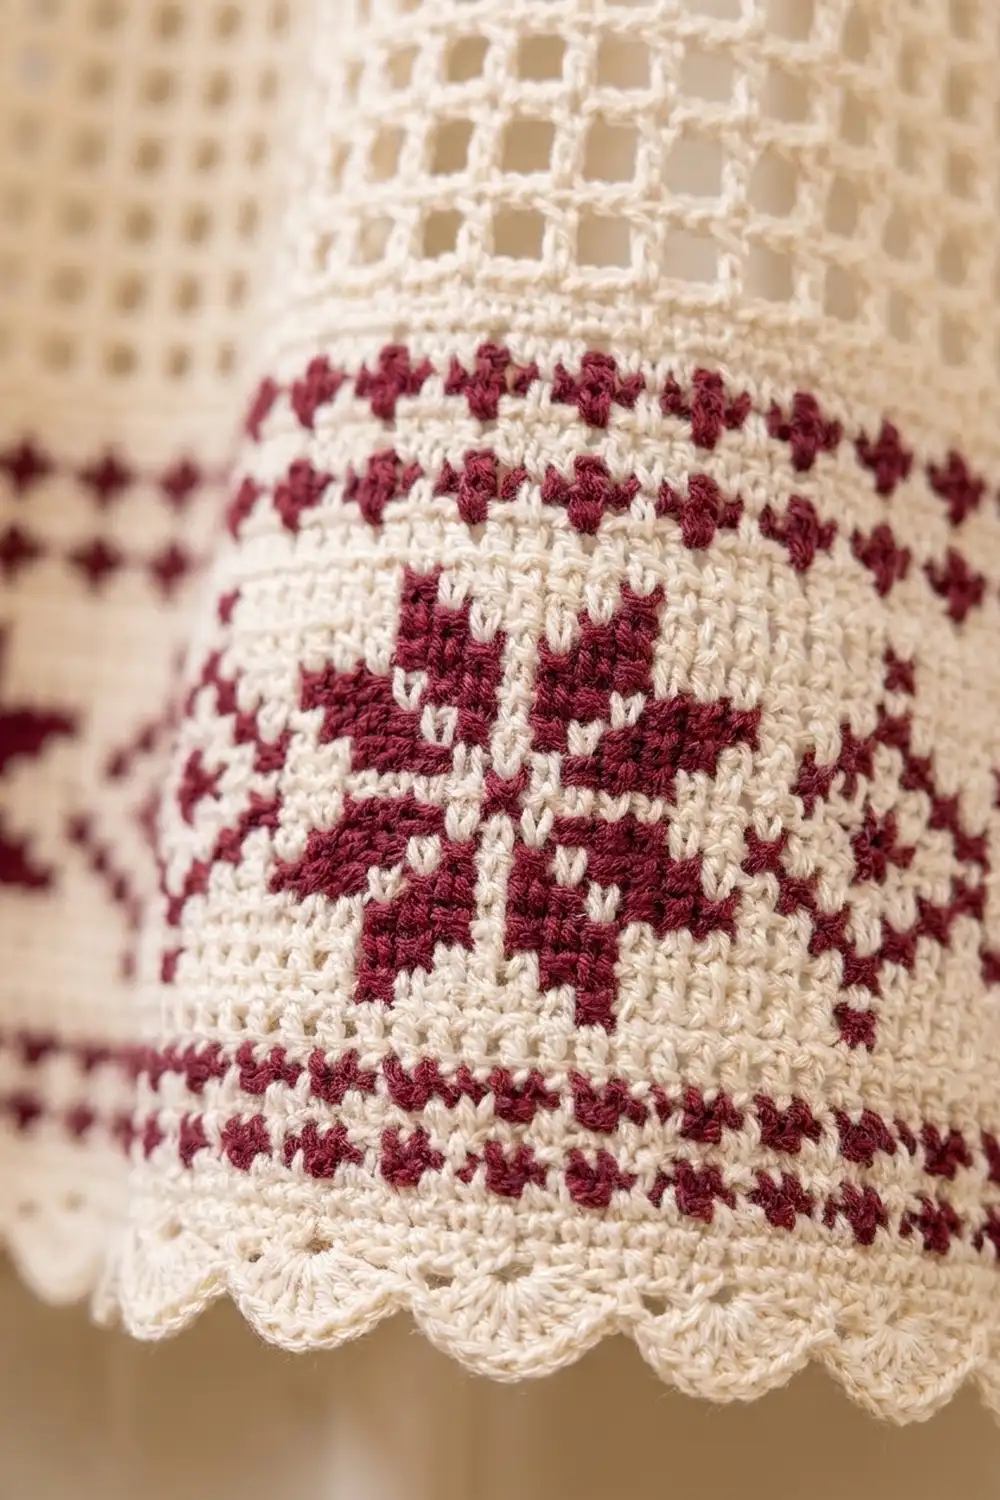
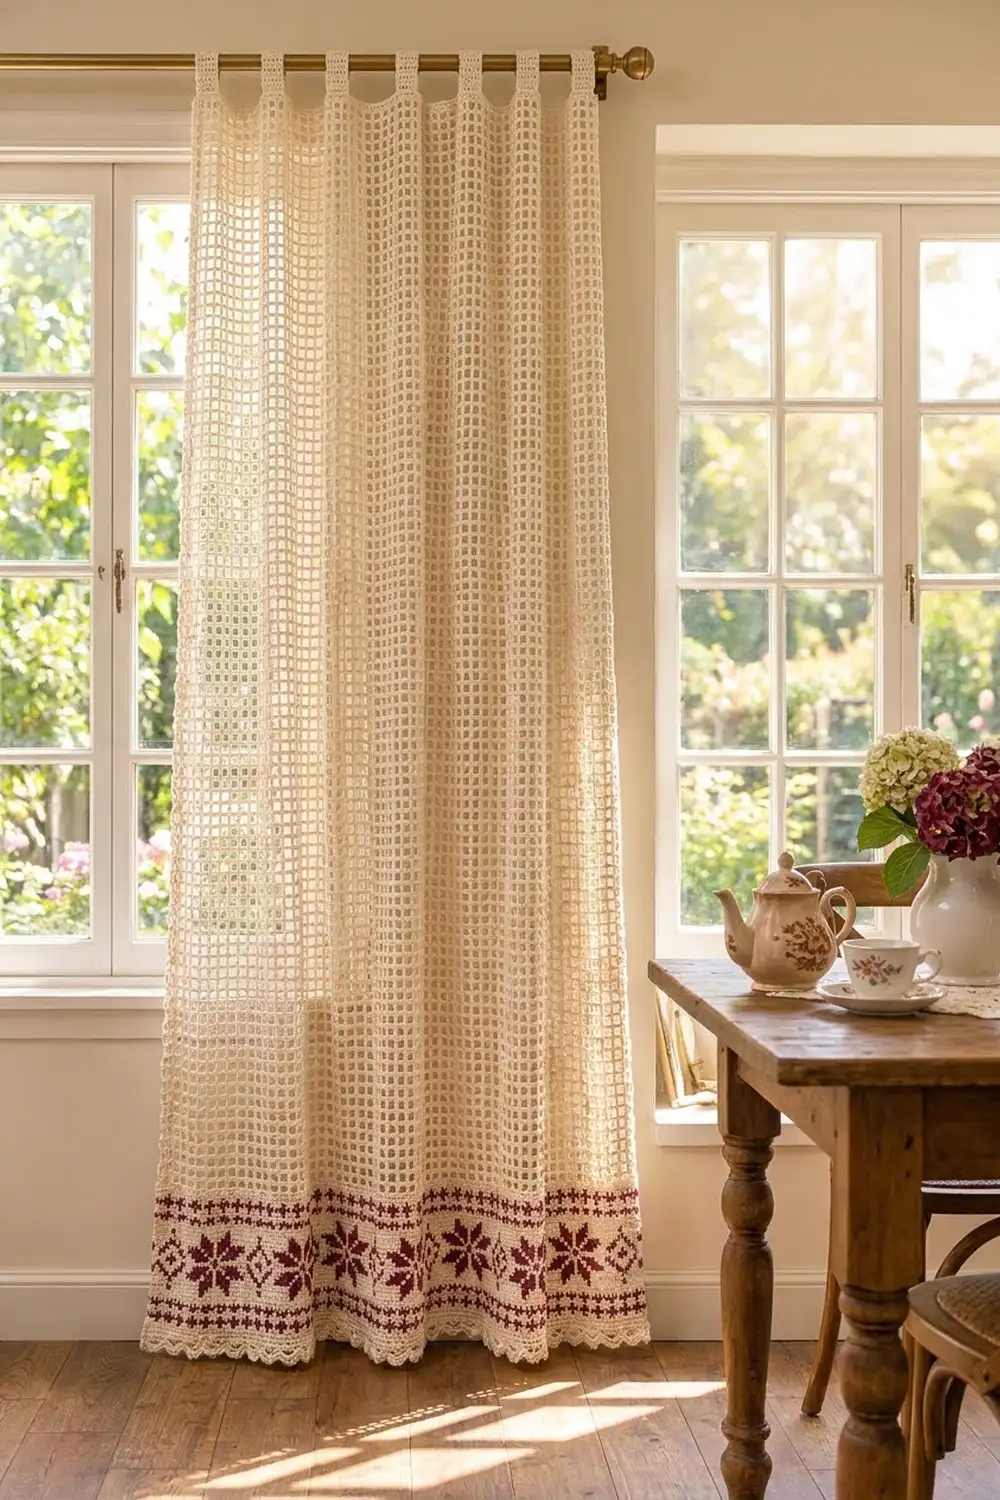
The Hearthside Star Filet Curtain Panel is a light, airy curtain worked in cream filet mesh, with a dense burgundy and cream colorwork band near the hem. The band holds a row of eight-point Nordic stars alternating with small open diamonds, framed above and below by checkered and solid burgundy lines. A cream scalloped edge finishes the bottom, and nine tabs at the top slide straight onto a curtain rod.
The style is cottage-meets-Scandinavian: soft daylight filters through the open grid while the band adds weight and color at the bottom. It works year-round, but the star motif feels especially cozy in winter.
This pattern uses US crochet terms. One finished panel measures about 29.6 in (75.2 cm) wide and 63 in (160.0 cm) long, plus tab loops of 2.5 in (6.4 cm), for a total hanging length of 65.5 in (166.4 cm).
The panel is one single piece worked bottom-up in rows. You start with a single crochet colorwork band, convert to filet mesh, finish with a short solid top band, add a two-round border with scallops along the hem, then work and fold the tabs. For a pair, simply make a second identical panel.
Finished Size and Construction
- Finished size: 29.6 in x 63 in (75.2 cm x 160.0 cm), plus 2.5 in (6.4 cm) tab loops
- Skill level: Intermediate (tapestry color changes, row-end edging)
- Terminology: US terms
- Yarn weight: DK / light (#3) cotton
- Hook: 4.0 mm (US G-6)
- Number of pieces: 1 panel (tabs are worked directly onto it)
- Layout: one vertical panel; colorwork band at the bottom, mesh above, solid band and tabs at the top
- Piece size before border: 29 in x 62 in (73.7 cm x 157.5 cm)
- Border depth: 0.3 in (0.8 cm) on sides and top; 0.75 in (1.9 cm) at the scalloped hem
Materials
Choose a smooth, mercerized or combed cotton in DK weight, about 120 m per 50 g. Cotton keeps the mesh crisp, holds blocking well, and resists sagging better than acrylic on a long hanging piece.
- Color A – Cream: 400 g / 960 m
- Color B – Burgundy: 50 g / 120 m
Quantities are for one panel and include a margin of roughly 10–15%. Double them for a pair.
Tools:
- 4.0 mm (US G-6) crochet hook
- Tapestry needle
- Sharp scissors
- Locking stitch markers (at least 10)
- Measuring tape
- Blocking mats and rust-proof pins, or a clean floor with towels
- Spray bottle
Abbreviations (US Terms)
- ch – chain
- sc – single crochet
- dc – double crochet
- sl st – slip stitch
- sp – space
- st(s) – stitch(es)
- RS / WS – right side / wrong side
- A / B – cream / burgundy
Tapestry sc (color change): Work the last sc before a color change until 2 loops remain on the hook, then yarn over with the new color and pull through. While working, lay the unused color along the tops of the stitches and work over it so it is carried invisibly inside the sc.
Mesh square: 1 dc + ch 1 = one square, 2 sts wide.
Shell: 5 dc in the same st.
Gauge and Checkpoints
Single crochet gauge: 20 sc and 24 rows = 4 in (10.2 cm), worked with a carried strand.
Mesh gauge: 10 mesh squares and 9 rows = 4 in (10.2 cm).
Before starting the panel, make a test swatch: ch 26, work 24 rows of sc carrying B inside the stitches, then convert to mesh and work 9 mesh rows. Block it, let it dry, and measure. Both sections should be 5 in (12.7 cm) wide.
Checkpoints:
- Foundation row (145 sc): 29 in (73.7 cm) wide, laid flat without stretching.
- End of colorwork band (30 rows): 5 in (12.7 cm) tall.
- After every 9 mesh rows: 4 in (10.2 cm) more height.
- End of mesh (126 rows): 56 in (142.2 cm) of mesh.
- End of top band: body is 62 in (157.5 cm) long.
If too big: go down one hook size (3.75 mm). If too small: go up to 4.5 mm. If only the mesh is off, change hook size for the mesh section only, so both sections match the 29 in (73.7 cm) width.
Part 1: Colorwork Band
With A, ch 146.
Row 1 (RS): Sc in 2nd ch from hook and in each ch across, turn. (145 sc)
From here, every row is ch 1 (does not count as a st), work 145 sc, turn. Carry B inside the stitches from Row 5 through Row 27, even on rows worked only in A, so the band has an even thickness.
Rows 2–4: With A, sc across. (145 sc)
Row 5 (checker): [1A, 1B] 72 times, 1A. (73 A, 72 B)
Row 6: With B, sc across. (145 sc)
Row 7: Repeat Row 5.
Rows 8–9: With A, sc across.
Rows 10–22 (motif rows): Each row is built from a 24-st repeat: 2A, star (13 sts), 2A, diamond (7 sts).
- RS rows (11, 13, 15, 17, 19, 21): 1A edge st, then [2A, star row, 2A, diamond row] 6 times.
- WS rows (10, 12, 14, 16, 18, 20, 22): [diamond row, 2A, star row, 2A] 6 times, then 1A edge st.
Each row totals 1 + (6 x 24) = 145 sc. Because both motifs are symmetrical, every line reads the same in either direction.
Star (13 sts wide):
- Motif row 1 (Row 10): 6A, 1B, 6A
- Motif row 2: 5A, 3B, 5A
- Motif row 3: 1A, 1B, 3A, 3B, 3A, 1B, 1A
- Motif row 4: 1A, 2B, 2A, 3B, 2A, 2B, 1A
- Motif row 5: 1A, 3B, 1A, 3B, 1A, 3B, 1A
- Motif row 6: 4A, 2B, 1A, 2B, 4A
- Motif row 7 (center): 1A, 4B, 3A, 4B, 1A
- Motif rows 8–13: repeat motif rows 6, 5, 4, 3, 2, 1 in that order
Diamond (7 sts wide):
- Motif rows 1–3: 7A
- Motif row 4: 3A, 1B, 3A
- Motif row 5: 2A, 1B, 1A, 1B, 2A
- Motif row 6: 1A, 1B, 3A, 1B, 1A
- Motif row 7: 1B, 2A, 1B, 2A, 1B
- Motif rows 8–10: repeat motif rows 6, 5, 4
- Motif rows 11–13: 7A
This gives 6 stars and 6 diamonds across the panel. The open center of each star comes from the 3A gap in the center row and the single A sts that split the arms.
Rows 23–24: With A, sc across.
Row 25: Repeat Row 5.
Row 26: With B, sc across.
Row 27: Repeat Row 5. Fasten off B, leaving a 6 in (15.2 cm) tail to weave in.
Rows 28–30: With A, sc across. (145 sc)
Checkpoint: 30 rows, 5 in (12.7 cm) tall, 29 in (73.7 cm) wide.
Part 2: Filet Mesh
Mesh Row 1 (conversion row): Ch 4 (counts as dc + ch 1), skip next sc, dc in next sc, [ch 1, skip next sc, dc in next sc] across, turn. The dc sts land in sc 1, 3, 5 … 145.
Count: 145 sc become 73 dc (1 per odd-numbered st, with the turning ch counting as the first) + 72 ch-1 sps = 72 mesh squares.
Mesh Row 2: Ch 4 (counts as dc + ch 1), dc in next dc, [ch 1, dc in next dc] across, working the last dc in the 3rd ch of the turning ch, turn. (73 dc, 72 squares)
Mesh Rows 3–126: Repeat Mesh Row 2.
Place a marker every 9 rows. Each group of 9 rows should add 4 in (10.2 cm). After 126 rows (14 groups), the mesh measures 56 in (142.2 cm).
Part 3: Top Band
Row 1 (conversion row): Ch 1, sc in each dc and each ch-1 sp across, ending with sc in the 3rd ch of the turning ch, turn.
Count: 73 sc (1 per dc) + 72 sc (1 per ch-1 sp) = 145 sc.
Rows 2–6: Ch 1, sc across, turn. (145 sc) Do not fasten off.
Checkpoint: The body measures 29 in x 62 in (73.7 cm x 157.5 cm).
Border
Border gauge: Same as the sc gauge: 5 sc per inch along every edge. On the sides, place sc into row ends so they match this gauge.
Round 1 (A): Ch 1 and work around the rectangle. Each side’s count below is complete, and each corner is a ch-1 sp between two sides.
- Top: 145 sc, 1 in each st.
- Corner: ch 1.
- Left side: 310 sc, made up of:
- 5 sc in the row ends of the top band’s 6 rows
- 280 sc along the 126 mesh rows: 2 sc in each row end, plus 1 extra sc in the 4th and 9th row of each group of 9, for 20 sc per 9 rows x 14 groups
- 25 sc along the band’s 30 rows (5 sc per 6 rows)
- Corner: ch 1.
- Bottom: 145 sc, 1 in each foundation ch on the underside.
- Corner: ch 1.
- Right side: 310 sc, mirroring the left.
- Corner: ch 1. Join with a sl st to the first sc.
Count: 145 + 310 + 145 + 310 = 910 sc + 4 corner ch-1 sps.
Why it works: Each side is 62 in (157.5 cm) long, and 62 x 5 = 310 sc. That breaks down as 5 + 280 + 25 = 310 sc. The top and bottom match the 145-st width exactly, so the panel stays square with no ruffling or cupping.
Round 2: Ch 1. Along the top and both sides, sc in each sc (145, 310, 310) and ch 1 over each corner sp.
Along the bottom: sc in the first sc, [skip 2 sc, shell in next sc, skip 2 sc, sc in next sc] 24 times.
Count on the bottom: 145 = 1 + (24 x 6), which gives 24 shells and 25 sc. Join and fasten off.
Why it works: Each scallop uses exactly 6 sts, and 145 – 1 = 144 = 24 x 6. Scallops begin and end with a sc at each corner, so the hem is symmetrical.
Tabs
There are 9 tabs, each 9 sts wide, with 8 gaps of 8 sts: (9 x 9) + (8 x 8) = 145.
With the RS facing, count the 145 top sts and mark the tab positions as sts 1–9, 18–26, 35–43, 52–60, 69–77, 86–94, 103–111, 120–128, and 137–145.
Each tab: Join A in the first st of the tab. Ch 1, sc in 9 sts, turn. Work 35 more rows of 9 sc (36 rows total, 6 in / 15.2 cm). Fasten off, leaving a 12 in (30.5 cm) tail.
Fold each tab to the WS so that its last row lies 1 in (2.5 cm) below the top edge, across the top band. Whipstitch it in place. This gives a 2.5 in (6.4 cm) loop: of the 6 in (15.2 cm) of tab, 1 in (2.5 cm) is sewn down and 5 in (12.7 cm) forms the loop.
Final Blocking
- Weave in all ends along the sc band, in matching colors.
- Soak the panel in cool water for 15 minutes, then gently press the water out. Do not wring.
- Roll it in towels to remove excess moisture.
- Lay it flat on mats or towels, RS up.
- Pin the corners to 29.6 in x 63 in (75.2 cm x 160.0 cm).
- Pin along the sides every 4 in (10.2 cm) and straighten the mesh so the columns run vertical.
- Pin the point of each scallop, keeping them evenly spaced.
- Let it dry completely, ideally 24–48 hours, before unpinning.
Final Quality-Control Checklist
- 145 sts across the band, mesh (73 dc / 72 squares), and top band
- 6 stars and 6 diamonds, evenly centered
- Burgundy carried strands are invisible from the RS
- Mesh columns are straight; no skipped squares
- 310 sc on each side and 145 on the top and bottom in Round 1
- 24 even scallops
- 9 tabs of equal length, sewn level
- Blocked size: 29.6 in x 63 in (75.2 cm x 160.0 cm)
Troubleshooting
- The band is narrower than the mesh: Tapestry sc often tightens. Use a 4.5 mm hook for the band only.
- Burgundy peeks through: Keep the carried strand at the back of the stitch, and tug it gently every few sts.
- The mesh leans: Always work the final dc into the turning chain, not the last ch-1 sp.
- The sides ripple: You have too many border sc. Recount against the 310 target.
- The sides pull in: You have too few border sc. Add sts evenly along the mesh section.
- Tabs twist: Sew each tab end straight across, matching its sts to the band sts.
Care
Hand wash or machine wash on a gentle cycle in a mesh bag in cool water, then lay flat to dry and re-pin if needed. Avoid hanging the curtain wet, because cotton mesh stretches lengthwise under its own weight.
Final Notes
The whole panel follows one measurement chain. A 145-st foundation at 5 sts per in gives 29 in (73.7 cm). The 30-row band adds 5 in (12.7 cm), the 126 mesh rows add 56 in (142.2 cm), and the 6-row top band adds 1 in (2.5 cm), for 62 in (157.5 cm). The border brings the panel to 29.6 in x 63 in (75.2 cm x 160.0 cm), and the tabs add 2.5 in (6.4 cm) of loop. Check your gauge at each stage and the panel will hang straight and true.
Happy crocheting!