

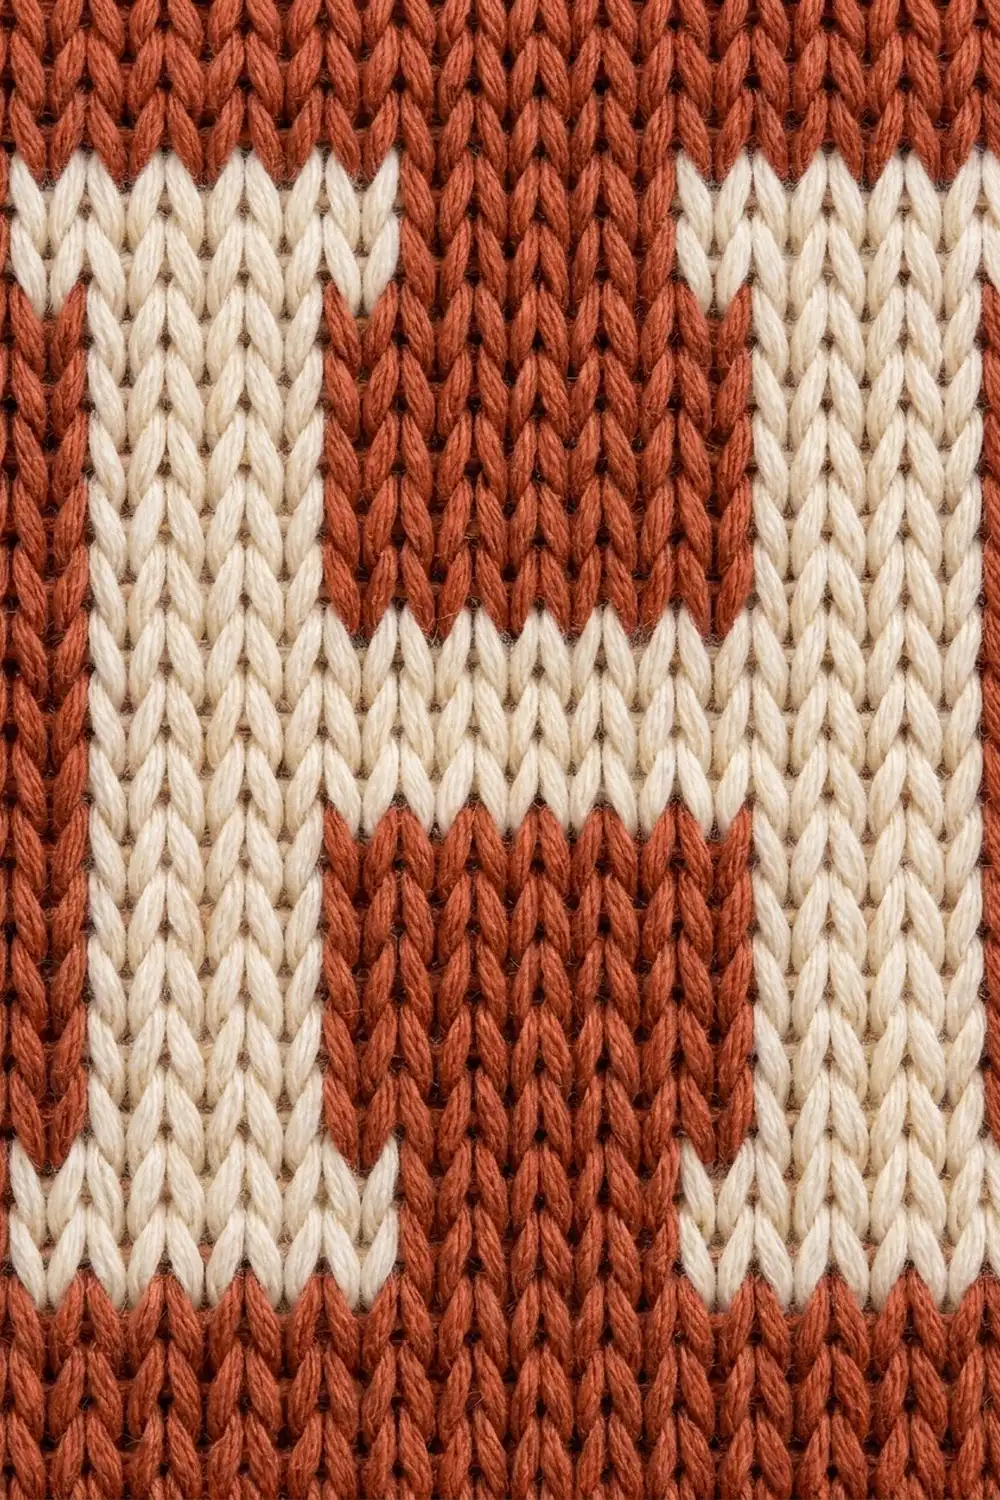
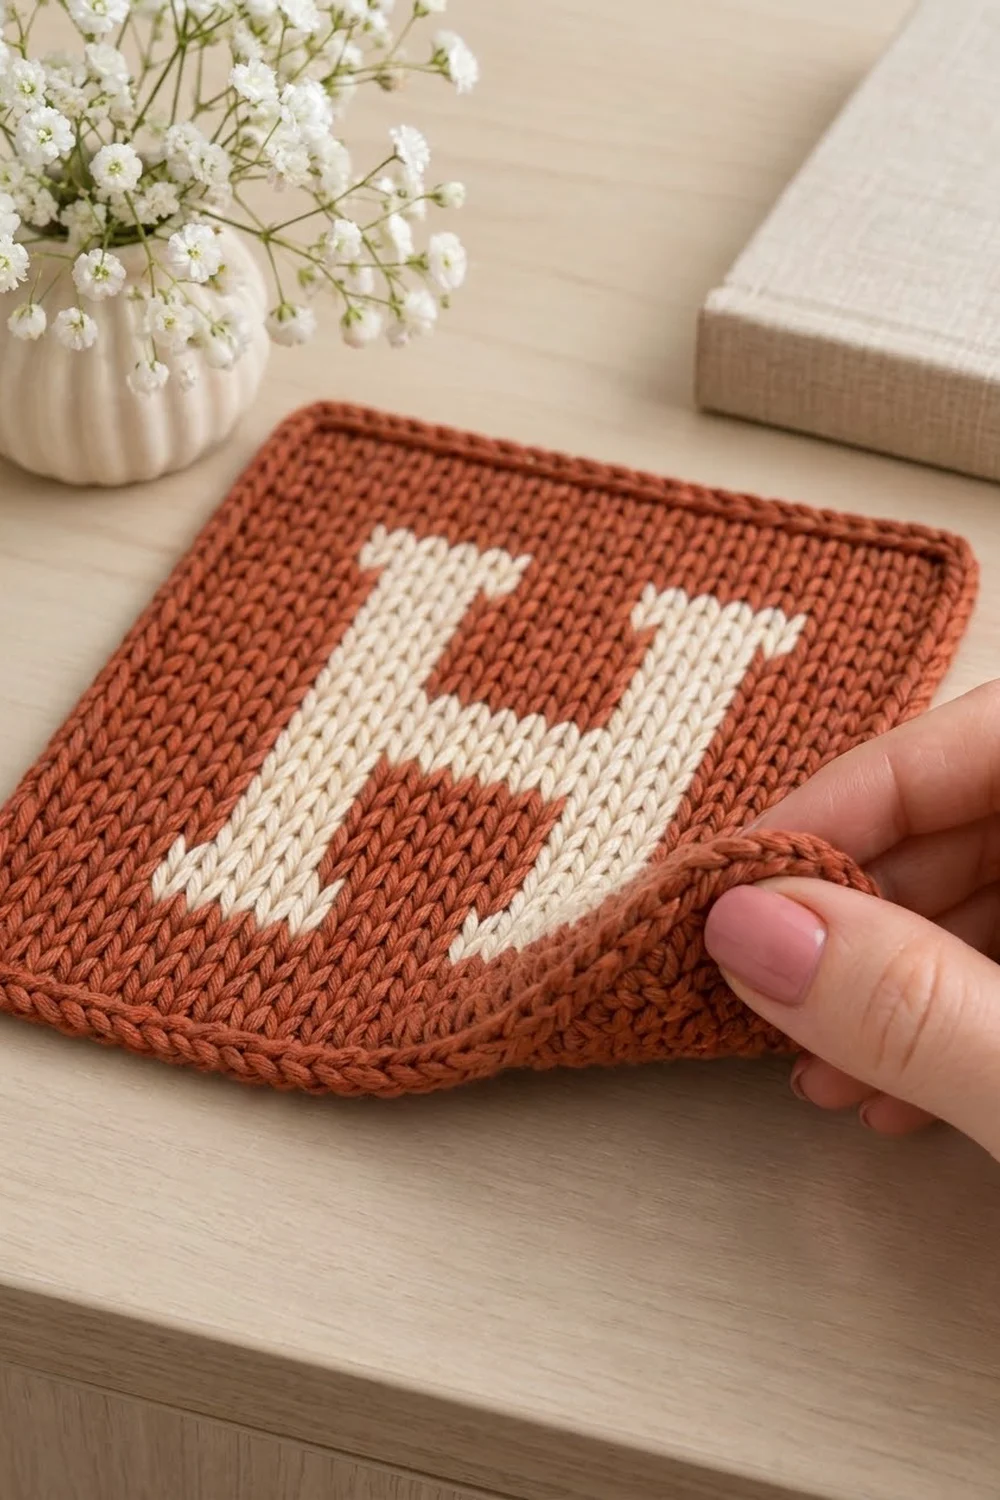
This Heritage Letter H Monogram Square looks like knitting but is made entirely with a crochet hook. Rows of waistcoat stitch build up tidy columns of V’s, and a bold serif capital “H” stands out in cream against a warm terracotta background.
The colors are earthy and calm, and the style is classic. Bookish serifs on the letter make it look like an old-fashioned printed initial. Use the finished square as a mug rug, a personalized gift, a small wall hanging, or a cushion patch.
This pattern uses US crochet terms. The finished square measures 6.5 x 6.5 in (16.5 x 16.5 cm) including the border.
You start with a foundation chain and one plain single crochet row. Then you work 32 rows of waistcoat stitch, changing colors intarsia-style to place the letter. Finally, you add a single crochet round and a slip-stitch ridge round around the edge.
Finished Size and Construction
- Finished size: 6.5 x 6.5 in (16.5 x 16.5 cm)
- Skill level: Intermediate (intarsia color changes)
- Terminology: US crochet terms
- Yarn weight: DK (#3 light)
- Hook: 4.5 mm (US 7)
- Number of pieces: 1
- Layout: One single square; nothing to join
- Piece size before border: 6 x 6 in (15.2 x 15.2 cm), 30 stitches x 33 rows
- Border depth: 0.25 in (0.6 cm) on each side
- Letter size: 16 stitches wide x 23 rows tall, about 3.2 x 4.2 in (8.1 x 10.7 cm)
Materials
Choose a smooth DK yarn with good stitch definition. Cotton or a cotton blend shows the V columns most clearly and works well for a mug rug. Avoid fuzzy or very splitty yarns, because the waistcoat stitch hook placement needs a clear view of each stitch.
The amounts below assume a yarn of about 112 m per 50 g:
- Terracotta (Color T): 30 g / 67 m
- Cream (Color C): 10 g / 22 m
These quantities include a safety margin of roughly 25% for the gauge swatch, bobbin tails, and weaving in.
Tools:
– 4.5 mm (US 7) crochet hook
– 5 small yarn bobbins or clothespins
– Tapestry needle
– Stitch markers (2)
– Scissors
– Measuring tape or ruler
– Blocking mat, rustproof pins, and a spray bottle
Abbreviations (US Terms)
- ch – chain
- sc – single crochet
- sl st – slip stitch
- st(s) – stitch(es)
- BLO – back loop only
- RS / WS – right side / wrong side
- T / C – terracotta / cream
Special stitch – Waistcoat stitch (wst), RS rows: Each stitch below has two front vertical legs that form a V. Insert your hook from front to back through the center of that V, between the legs and below the top loops. Yarn over, pull up a loop, yarn over, and pull through 2 loops.
Special stitch – WS waistcoat stitch (wwst), WS rows: With the WS facing, insert your hook through the center of the stitch below, between its two back strands. This is directly behind the V on the RS. Yarn over, pull up a loop, yarn over, and pull through 2 loops. This keeps the V columns stacked in straight lines on the RS.
Color change: Work the last stitch of the old color until 2 loops remain on the hook. Drop the old color to the WS, yarn over with the new color, and pull through. Twist the two strands once at each change so no holes form.
Gauge and Checkpoints
Gauge: 20 sts and 22 rows = 4 in (10.2 cm) in waistcoat stitch.
Waistcoat stitch is dense, so treat the first rows of the square as your test piece. Work Rows 1–6 and then measure:
- After Row 1: The width should be 6 in (15.2 cm).
- After Row 5: The height should be about 0.9 in (2.3 cm).
- After Row 18: The height should be about 3.3 in (8.4 cm), and the crossbar should be complete.
- After Row 33: The piece should be 6 x 6 in (15.2 x 15.2 cm).
- After the border: The square should be 6.5 x 6.5 in (16.5 x 16.5 cm).
If your piece is too wide, go down to a 4.0 mm hook. If it is too narrow, go up to a 5.0 mm hook. Waistcoat stitch tightens quickly, so pull up each loop to the height of your hook shaft so the next row can be worked into easily.
Main Pattern: The Monogram Square
Columns are counted from right to left on RS rows, as you work them. The letter is symmetrical, so every color sequence reads the same in both directions, and WS rows use the same counts.
Each row has exactly 30 sts. The ch 1 at the start of a row never counts as a stitch.
Bobbin setup: Wind 2 bobbins of T at about 6 m each for the side margins, 1 bobbin of T at about 3 m for the center gap, and 2 bobbins of C at about 9 m each. Use the main T ball for the bottom and top margins.
Bottom Margin
Foundation: With T, ch 31.
Row 1 (RS): Sc in 2nd ch from hook and in each ch across. Turn. (30 sc)
Row 2 (WS): Ch 1, wwst in each st across. Turn. (30 sts)
Row 3 (RS): Ch 1, wst in each st across. Turn. (30 sts)
Rows 4–5: Repeat Rows 2–3. (30 sts each)
Place a marker on the RS so you can always tell the sides apart. From here on, all even rows are WS rows worked in wwst, and all odd rows are RS rows worked in wst.
Checkpoint: The piece is 6 in (15.2 cm) wide and about 0.9 in (2.3 cm) tall.
Bottom Serifs
At the start of Row 6, set up your bobbins in this order: T (side margin, which is the main ball), C bobbin 1, T center bobbin, C bobbin 2, and a T side bobbin.
Row 6 (WS): 5 T, 8 C, 4 T, 8 C, 5 T. Turn. (30 sts)
Row 7 (RS): 5 T, 8 C, 4 T, 8 C, 5 T. Turn. (30 sts)
The serifs are 8 sts wide, with a 4-st terracotta gap between them.
Serif Step
Row 8 (WS): 6 T, 6 C, 6 T, 6 C, 6 T. Turn. (30 sts)
Each serif narrows by 1 st on each side. This creates the stepped flare that makes the letter look like a printed serif H.
Lower Legs
Rows 9–15: 7 T, 5 C, 6 T, 5 C, 7 T. Turn at the end of each row. (30 sts each)
Each leg is 5 sts wide, and the center gap is 6 sts. At the end of Row 15, cut the T center bobbin and C bobbin 2, leaving 6 in (15.2 cm) tails.
Crossbar
Rows 16–18: 7 T, 16 C, 7 T. Turn at the end of each row. (30 sts each)
Work all 16 cream sts with C bobbin 1. The crossbar is exactly as wide as the two legs and the gap combined (5 + 6 + 5 = 16), so its edges line up with the outer edges of the legs.
Checkpoint: The height is about 3.3 in (8.4 cm).
Upper Legs
Join a new T center bobbin and a new C bobbin 2 at their positions in Row 19.
Rows 19–25: 7 T, 5 C, 6 T, 5 C, 7 T. Turn at the end of each row. (30 sts each)
Top Serif Step
Row 26 (WS): 6 T, 6 C, 6 T, 6 C, 6 T. Turn. (30 sts)
Top Serifs
Rows 27–28: 5 T, 8 C, 4 T, 8 C, 5 T. Turn at the end of each row. (30 sts each)
Cut both C bobbins, the T center bobbin, and the right T side bobbin, leaving 6 in (15.2 cm) tails. Continue with the main T only.
Top Margin
Rows 29–33: With T only, ch 1, work wst or wwst (as the row requires) in each st across. Turn at the end of each row. (30 sts each)
Row 33 is an RS row. Do not fasten off; you will start the border from here.
Checkpoint: The piece measures 6 x 6 in (15.2 x 15.2 cm). The letter measures 3.2 x 4.2 in (8.1 x 10.7 cm), with a 5-stitch margin on the left and right and a 5-row margin top and bottom.
Weave in all intarsia tails on the WS now. Weave each tail into stitches of its own color and follow the direction of the rows, so nothing shows through on the front.
Border
Border gauge: Work 1 sc per stitch along the top and bottom, and 1 sc per row end along the sides. A corner group is 3 sc. In each group, the first sc belongs to one side, the middle sc is the corner center, and the last sc belongs to the next side.
Round 1 (Single Crochet Round)
With the RS facing and T still attached, ch 1.
- Top edge: 3 sc in the first st, sc in each of the next 28 sts, 3 sc in the last st.
- First side: Sc in each of the 31 row ends between the corners. Skip the row ends of Rows 33 and 1, because those corners are already covered.
- Bottom edge: Work into the free loops of the foundation chain: 3 sc in the first loop, sc in each of the next 28 loops, 3 sc in the last loop.
- Second side: Sc in each of the 31 row ends.
- Join with a sl st to the first sc.
Count per side:
– Top and bottom: 1 + 28 + 1 = 30 sts each
– Sides: 1 + 31 + 1 = 33 sts each
– Corner centers: 4
– Total: 30 + 33 + 30 + 33 + 4 = 130 sc
Why the math works: The top and bottom have 30 sc, exactly 1 per body stitch. That matches the stitch gauge of 5 sts per inch, so these edges stay at 6 in (15.2 cm). The sides have 33 sc, exactly 1 per row. Waistcoat rows are slightly shorter than they are wide, so the side sc pack in a little more closely. Round 2 is worked firmly, which draws these extra stitches in so the sides lie flat instead of waving.
The 3-sc corners add just enough fabric to turn each corner smoothly. This gives the rounded corners you see on the finished square.
Round 2 (Slip-Stitch Ridge)
Sl st in BLO of each sc around, including the corner centers. Join with a sl st to the first sl st. (130 sl sts)
Keep the slip stitches even and moderately firm. The unworked front loops of Round 1 and the slip-stitch chain sitting on top form the raised, rope-like ridge around the edge.
Fasten off and weave in the end.
Checkpoint: The square is 6.5 x 6.5 in (16.5 x 16.5 cm). The border adds 0.25 in (0.6 cm) on each side.
Final Blocking
- Wet the square fully in lukewarm water and gently squeeze out the excess. Do not wring or twist it.
- Roll it in a towel and press to remove more moisture.
- Lay it RS up on the blocking mat.
- Pin one corner. Then measure 6.5 in (16.5 cm) along the edge and pin the next corner. Repeat until all 4 corners are pinned.
- Check that both diagonals are equal. Each one should be about 9.2 in (23.4 cm).
- Smooth the V columns so they run straight up and down, and nudge the crossbar so it sits level.
- Pin along each edge every 1 in (2.5 cm) without stretching the border.
- Let the square dry completely, which takes 12–24 hours.
Final Quality-Control Checklist
- Every row has 30 sts, and the stitch columns run straight.
- The letter is 16 sts wide and 23 rows tall, with a 5-stitch and 5-row margin on all four sides.
- The serifs step out by 1 st and then 2 sts at both the top and bottom.
- The crossbar lines up with the outer edges of the legs.
- No holes appear at color changes, and no cream shows through on the RS.
- The border totals are 130 sc and 130 sl sts.
- The finished square measures 6.5 x 6.5 in (16.5 x 16.5 cm), and the corners are evenly rounded.
Troubleshooting
The square leans to one side. You are probably inserting your hook into the wrong place on WS rows. Make sure each wwst goes directly behind the V, not between two stitches.
There are holes at color changes. Twist the old and new strands once at every change, and keep the dropped strand on the WS.
The fabric is too stiff to work into. Pull up taller loops, or go up half a hook size.
The sides ripple after the border. Work Round 2 more firmly. If they still ripple, skip 1 row end at the center of each side in Round 1. Remove 1 st from each side’s total (32 instead of 33), so the round total drops to 128 sc.
The corners are cupping. Your corner sc are too tight. Work the 3-sc corner groups a little looser.
The letter edges look jagged. This is normal before blocking. Wet blocking will even out the stitches.
Care
Hand wash in cool water with mild soap, then reshape and dry flat. If you used cotton, you can press it lightly with a warm iron through a cloth.
Final Notes
The measurement chain is simple. Your gauge of 20 sts and 22 rows = 4 in (10.2 cm) produces a body of 30 sts x 33 rows at 6 x 6 in (15.2 x 15.2 cm). The 130-stitch border adds 0.25 in (0.6 cm) per side, bringing the square to 6.5 x 6.5 in (16.5 x 16.5 cm). If you check your size after Rows 1, 5, 18, and 33, the letter will come out centered and crisp.
To make a different initial, sketch the letter on a grid 30 sts wide and 33 rows tall, keeping the same 5-stitch and 5-row margins.
Happy crocheting!