
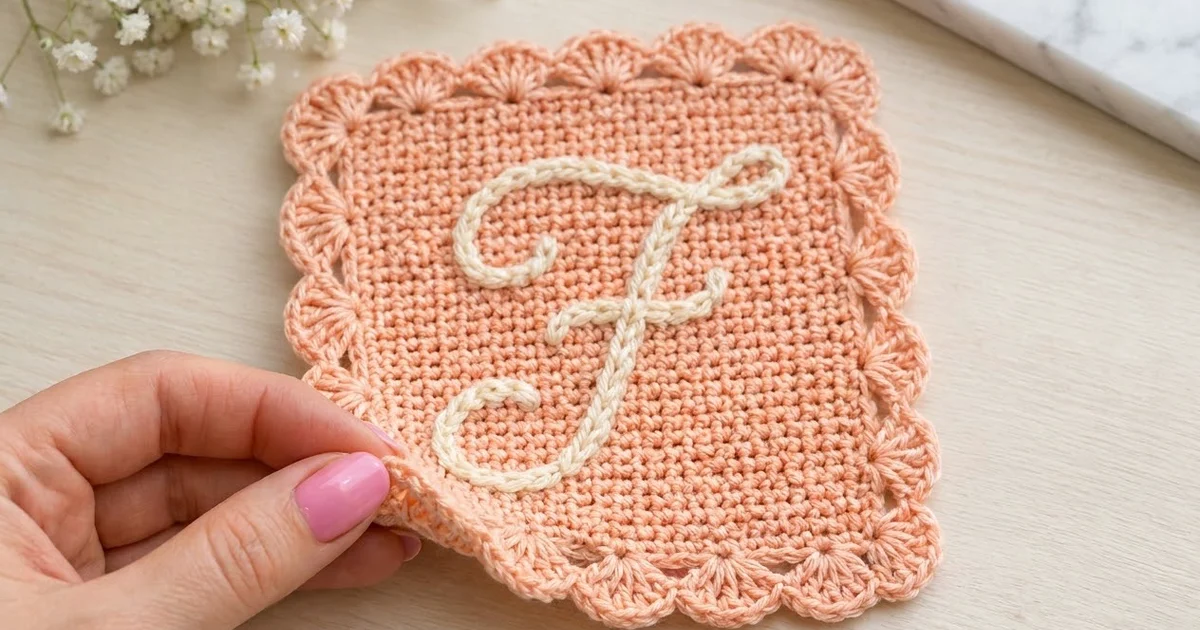
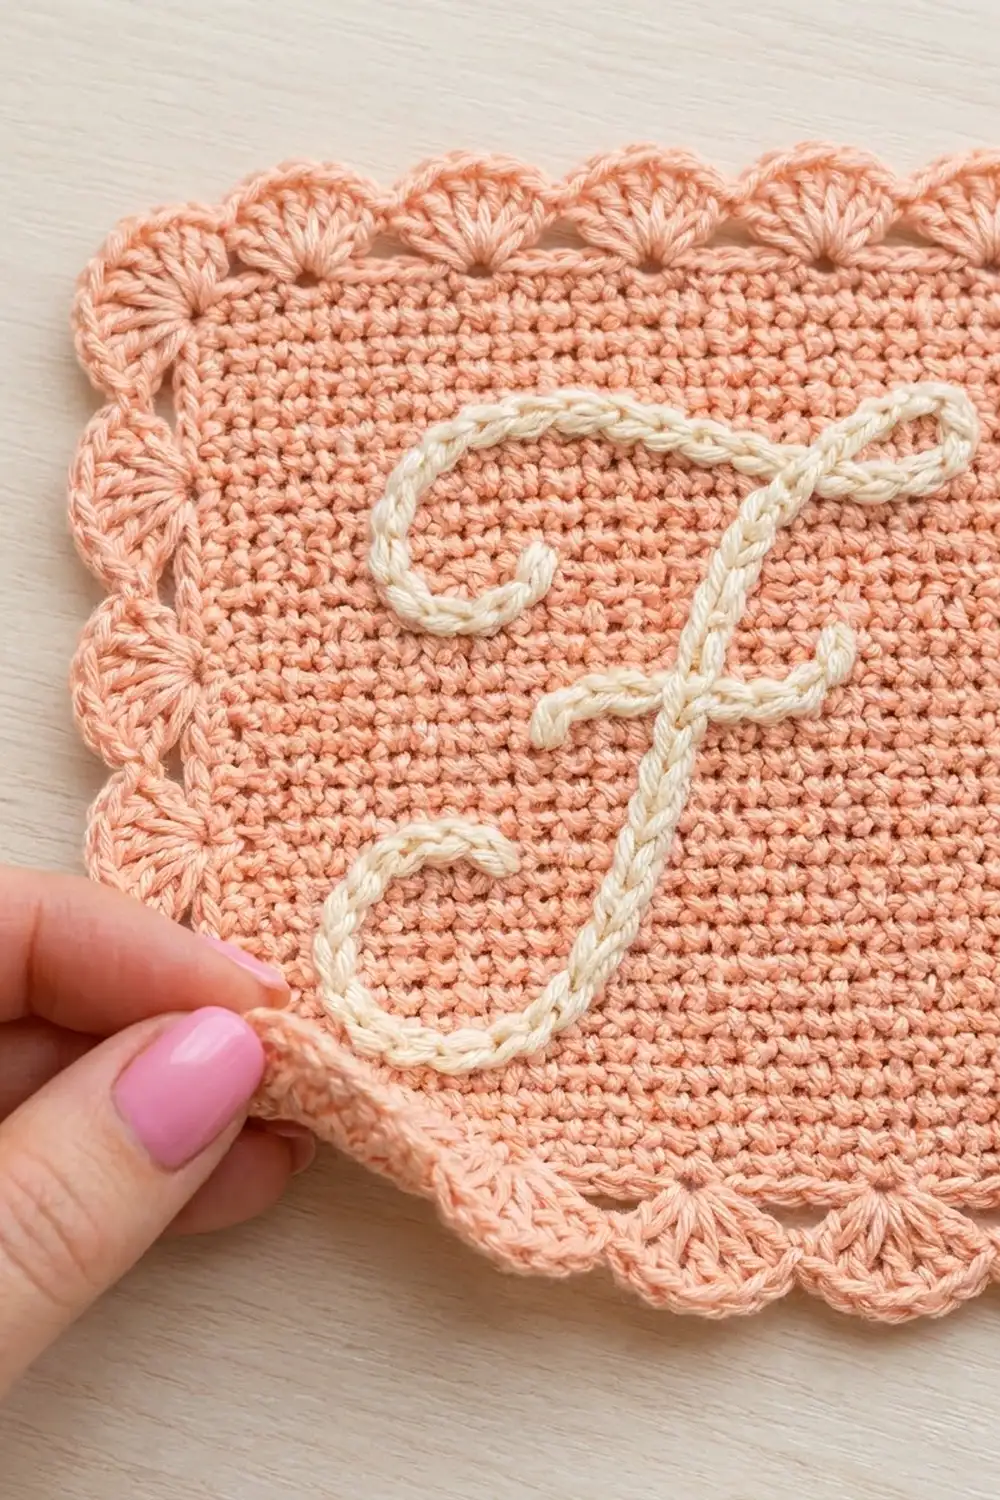
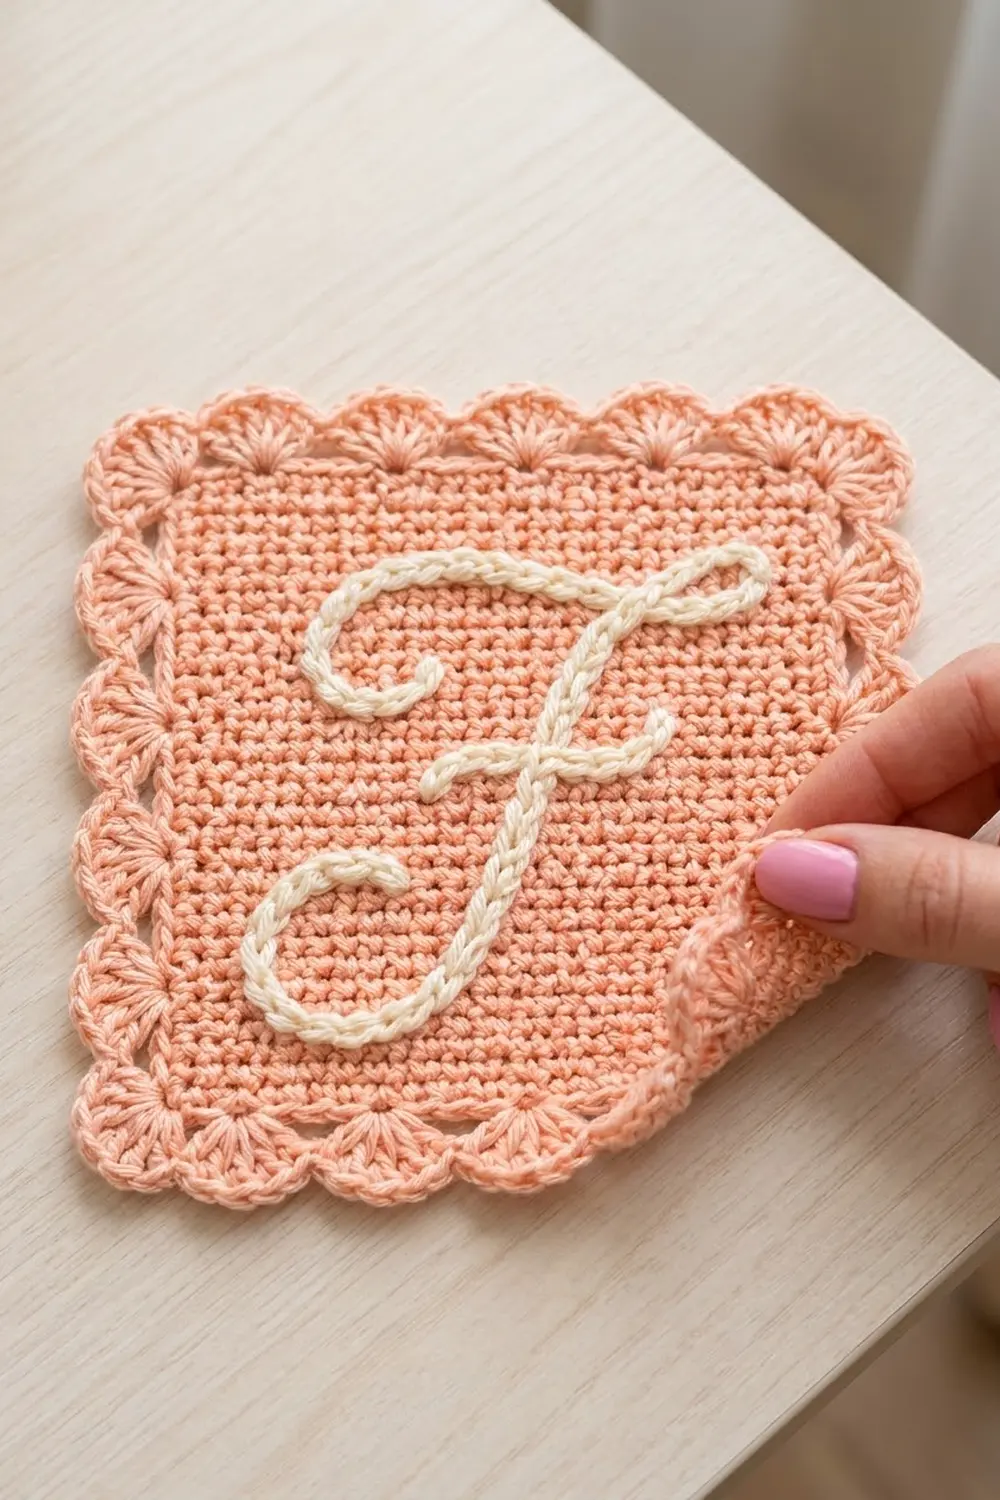
This monogram square pairs a soft peach background with a raised cream script letter. The body is plain single crochet, which gives the letter a smooth, even surface to sit on. A scalloped shell border finishes the edges.
The letter shown is a cursive capital “F”. It is worked in surface slip stitch after the body is finished. That means you can trace any initial you like onto the same square. The pattern uses US crochet terms throughout.
The finished square measures 8 in x 8 in (20.3 cm x 20.3 cm). Use it as a mug rug, a personalized coaster, a gift tag, or a framed nursery piece.
Construction is simple. You crochet a single-crochet panel in rows, draw the letter on it with surface slip stitch, and then add a two-round border that turns into scallops on every side.
Finished Size and Construction
- Finished size: 8 in x 8 in (20.3 cm x 20.3 cm)
- Skill level: Easy to intermediate (surface slip stitch needs a steady hand)
- Terminology: US crochet terms
- Yarn weight: DK (light #3) cotton or cotton blend
- Hook: 4.0 mm (G-6)
- Number of pieces: 1
- Layout: One square panel, no joining needed
- Body size: 29 sts x 32 rows, about 6.5 in x 6.5 in (16.5 cm x 16.5 cm)
- Size before border: 6.5 in (16.5 cm) square
- Border depth: 0.75 in (1.9 cm) on each side, adding 1.5 in (3.8 cm) to each dimension
Materials
Yarn: Use a smooth DK cotton or cotton blend. It shows stitch definition clearly and keeps the scallops crisp. Mercerized cotton gives a slight sheen, and matte cotton gives a softer look, like the one pictured.
- Color A, peach (body and border): 35 g / about 80 m (87 yd)
- Color B, cream (letter): 5 g / about 12 m (13 yd)
These quantities include a margin of about 15% for your gauge swatch and tension differences.
Tools:
- 4.0 mm (G-6) crochet hook
- Tapestry needle
- 4 locking stitch markers
- Washable fabric marker or tailor’s chalk
- Scissors
- Blocking mat and rust-proof pins
- Spray bottle with water
Abbreviations (US Terms)
- ch: chain
- sc: single crochet
- dc: double crochet
- sl st: slip stitch
- sk: skip
- st(s): stitch(es)
- RS / WS: right side / wrong side
- rep: repeat
Special stitch: surface slip stitch (surf sl st). Hold Color B behind the work. Insert the hook from front to back through a gap between stitches and pull up a loop. Insert the hook into the next gap along your traced line, yarn over behind the work, and pull the loop up through the fabric and through the loop on the hook. Rep from * to *. Each stitch makes one visible “V” link on the RS.
5-dc shell: 5 dc in the same stitch.
Corner shell: 7 dc in the same stitch.
Gauge and Checkpoints
Gauge: 18 sc x 20 rows = 4 in (10.2 cm) in single crochet with a 4.0 mm hook.
Make a swatch of 20 sts x 22 rows and measure the center 4 in (10.2 cm). Since this pattern is a single square, the body itself works as your real test. Check it after 10 rows, before you commit to the whole panel.
Checkpoints:
- After Row 10: the panel is 6.5 in (16.5 cm) wide and 2 in (5.1 cm) tall.
- After Row 32: the body is 6.5 in x 6.5 in (16.5 cm x 16.5 cm).
- After Border Rnd 1: the square is 7 in (17.8 cm) on each side.
- After Border Rnd 2: the square is 8 in (20.3 cm) on each side.
If your fabric is too big, go down 0.5 mm in hook size. If it is too small, go up 0.5 mm. Keep the stitch counts the same. The border math depends on the counts, not on the measurements.
If your rows are taller than gauge but your stitches are correct, the body will turn out rectangular. Stop at the row where it measures square, as long as the row count is even. Along the side edges in Border Rnd 1, you’ll still need exactly 27 sc between the corners.
Body Panel
Using Color A, ch 30.
Row 1 (RS): Sc in 2nd ch from hook and in each ch across, turn. (29 sts)
Row 2: Ch 1 (does not count as a st), sc in each st across, turn. (29 sts)
Rows 3–32: Rep Row 2. (29 sts in every row)
At the end of Row 32, do not fasten off. Place the live loop on a locking marker so it can’t unravel. You’ll come back to it for the border.
The body has 32 rows. Row 1 is a RS row, so every odd row is RS. The last row, Row 32, is a WS row. That means you finish with the RS facing away from you, which sets you up to start the border on the RS after one turn.
Checkpoint: 6.5 in x 6.5 in (16.5 cm x 16.5 cm). Count 29 sts in the last row.
Surface Slip Stitch Letter
Mapping the Letter
Lay the panel RS up with Row 1 at the bottom. Number the columns 1–29 from left to right, and the rows 1–32 from bottom to top. Trace the letter with a washable marker, using these guide points:
Top bar (Stroke 1):
- Start at column 9, row 25.
- Curve up and left to column 6, row 27.
- Arc over to column 8, row 29.
- Sweep right along rows 28–29 to column 22.
- Make a small upward loop through column 25, row 29, and end at column 23, row 28.
Stem (Stroke 2):
- Start at column 20, row 28.
- Slant down and left to column 15, row 17.
- Continue down to column 12, row 7.
- Curl left through column 9, row 5, and column 5, row 6.
- Hook up and end at column 7, row 9.
Crossbar (Stroke 3):
- Run from column 12, row 17, to column 19, row 18.
The finished letter stands about 5 in (12.7 cm) tall. It leaves a margin of about 0.75 in (1.9 cm) of plain fabric at the top and 0.75 in (1.9 cm) at the bottom.
Working the Letter
With Color B, work surf sl st along each stroke. Move one gap per stitch, whether you’re going horizontally (between stitches) or vertically (between rows).
On diagonals, alternate one stitch gap and one row gap. This keeps the chain links even in size.
Keep the tension loose. Pull each loop up to the height of a sc stitch. Tight surface stitches pucker the fabric and shrink the square.
At the end of each stroke, cut the yarn and pull the tail to the WS. Weave it into the back of the sc stitches only, so nothing shows through on the RS.
Checkpoint: The panel still lies flat and still measures 6.5 in (16.5 cm) in both directions. If it has pulled in, take out the stroke that puckers and rework it more loosely.
Border
Border gauge: Rnd 1 matches the body gauge at 4.5 sc per inch (2.5 cm). It adds 0.25 in (0.6 cm) to each side. The shells in Rnd 2 stand 0.5 in (1.3 cm) tall.
Rnd 1 (sc round)
Return the live Color A loop to the hook and turn so the RS faces you. You’re now working along the top edge.
- Ch 1, then work 3 sc in the first st (corner). Place a marker in the center sc of the 3.
- Sc in each of the next 27 sts.
- Work 3 sc in the last st (corner) and mark the center sc.
- Rotate the work to the left side edge. There are 32 row ends. The end of Row 32 holds the corner you just made, and the end of Row 1 will hold the next corner. That leaves 30 row ends in between. Work 27 sc evenly across them by skipping 1 row end after every 10 sc (sc in 10, sk 1, sc in 10, sk 1, sc in 7).
- Work 3 sc in the first foundation ch (corner) and mark the center sc.
- Sc in each of the next 27 foundation chains.
- Work 3 sc in the last foundation ch (corner) and mark the center sc.
- Along the right side edge, work 27 sc over the 30 row ends, using the same spacing as the left side.
- Join with a sl st to the first sc.
Count per side: 1 corner-side sc + 27 sc + 1 corner-side sc = 29 sts between corner centers. Add the 4 corner centers and you get 4 x 29 + 4 = 120 sts total.
Checkpoint: 7 in x 7 in (17.8 cm x 17.8 cm).
Rnd 2 (shell round)
- Sl st into the next corner center (the marked st). Ch 3, which counts as the first dc, then work 6 dc in the same st. That makes the first corner shell (7 dc).
- *Sk 2, sc in next st, [sk 2, 5-dc shell in next st, sk 2, sc in next st] 4 times, sk 2.
- Work a corner shell (7 dc) in the marked corner center.*
- Rep from * to * twice more, then work from * to the corner once more. Leave out the final corner shell, because it was made at the start of the round.
- Join with a sl st to the top of the beginning ch-3.
- Fasten off.
Count per side: 4 shells (20 dc) + 5 sc between the corner shells.
Round total: 28 dc in the corner shells + 80 dc in the side shells + 20 sc = 128 sts.
Why the Math Works
Each side has 29 stitches between the corner centers. The shell sequence uses them like this:
- sk 2 (2 sts)
- 1 sc (1 st)
- four repeats of [sk 2, shell, sk 2, sc] (6 sts each, 24 sts)
- sk 2 (2 sts)
That gives 2 + 1 + 24 + 2 = 29. Every side ends exactly at the next corner, so you get 4 even scallops plus a corner scallop that fans around each corner.
The body’s 27 interior stitches per side come straight from its 29-stitch width minus the 2 corner stitches. That’s why the count works out without any fudging.
Checkpoint: 8 in x 8 in (20.3 cm x 20.3 cm).
Final Blocking
- Weave in all remaining ends on the WS, following the stitch lines.
- Pin the square RS up on a blocking mat at 8 in x 8 in (20.3 cm x 20.3 cm). Start with the 4 corner shells.
- Pin the center dc of each side shell outward so all the scallops are the same height.
- Spray until the square is evenly damp but not dripping.
- With your fingertips, smooth the letter so the chain links lie flat and even.
- Let it dry completely, at least 6–8 hours, before unpinning.
- If you used fabric marker, remove any visible marks following the marker’s instructions before you block.
Final Quality-Control Checklist
- The body has 29 sts across and 32 rows.
- The body measures 6.5 in (16.5 cm) square.
- Border Rnd 1 has 120 sts, with 27 sc between the corner-side stitches on each side.
- Each side has 4 shells of 5 dc and 5 sc.
- All 4 corners have 7-dc shells.
- The finished square measures 8 in x 8 in (20.3 cm x 20.3 cm).
- The letter strokes are smooth and evenly sized, with no puckering.
- No tails show on the RS.
- The square lies flat without rippling or cupping.
Troubleshooting
The square ripples along the edges. Border Rnd 1 has too many stitches. Recount for 27 sc between the corner-side stitches.
The edges cup inward. Your Rnd 1 stitches are too tight, or you have too few of them. Use a looser tension, or go up a hook size for the border only.
The letter puckers the fabric. The surface slip stitches are too tight. Rework them, pulling each loop taller.
The letter looks jagged. You skipped gaps on the diagonals. Alternate stitch gaps and row gaps evenly.
A side doesn’t come out to 4 shells. Your Rnd 1 count on that side is off. Fix Rnd 1. Don’t fudge the skips in Rnd 2.
The corners look pinched. Make sure the corner shell has 7 dc and goes into the marked center st.
The body is rectangular. Your row gauge differs from the stitch gauge. Adjust the number of rows (keep it even), but keep 27 sc along each side edge.
Care
Hand wash in cool water with a mild detergent, press out the water in a towel, and dry flat, reshaping the scallops. Cotton can be warm-ironed on the WS under a cloth if it’s needed.
Final Notes
The whole square depends on one simple chain of measurements:
- 18 sc = 4 in (10.2 cm)
- 29 sts x 32 rows = 6.5 in (16.5 cm) square
- 120 sts in Border Rnd 1 = 7 in (17.8 cm)
- 4 shells per side plus 4 corner shells = 8 in (20.3 cm) finished
If your counts match at each checkpoint, the scallops will land evenly on every side. Once you’re comfortable with the letter mapping, trace a different initial on the same grid and make a full set for friends and family.
Happy crocheting!