

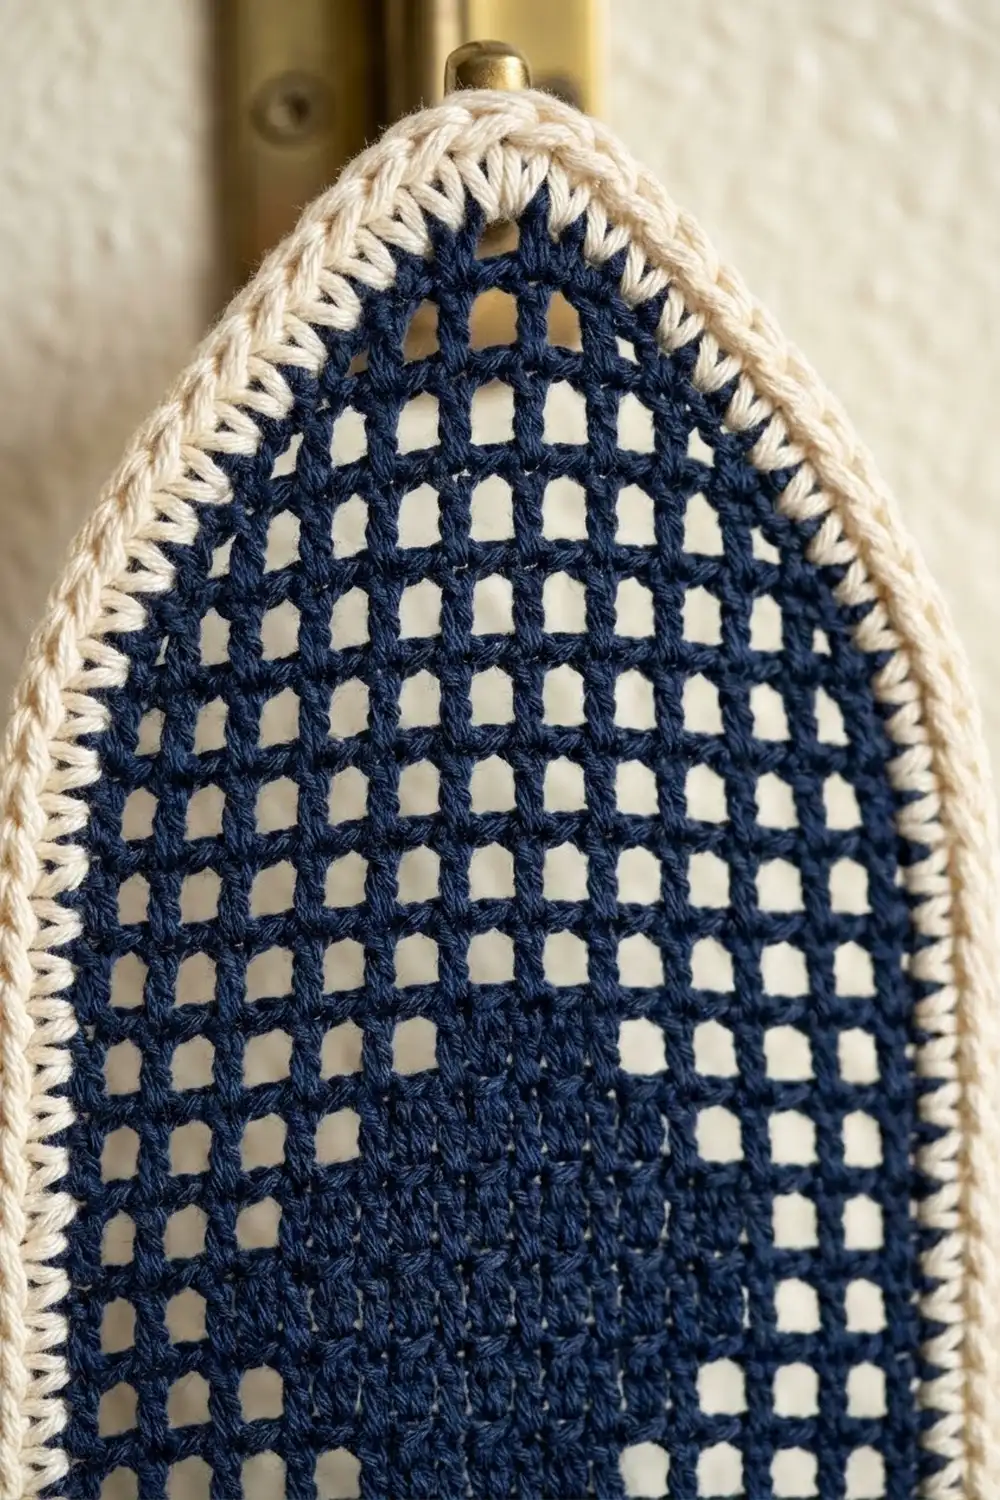
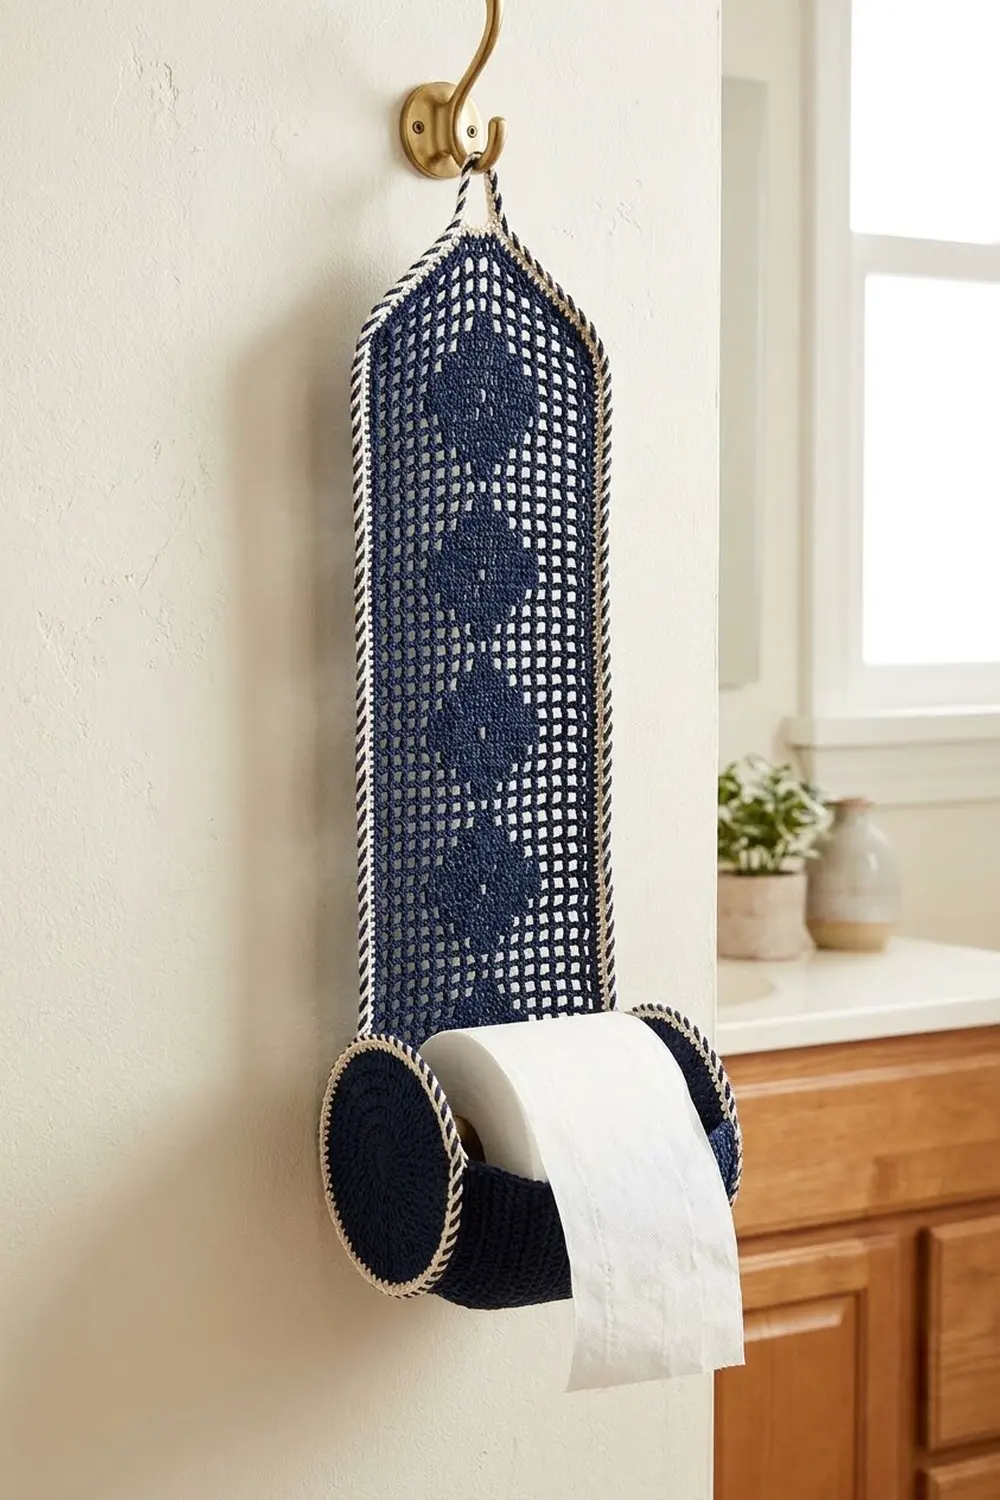
This hanging toilet paper holder has an open filet mesh back panel with a calm column of solid diamonds down the center. The panel rises to a pointed arch and hangs from a slim loop. At the bottom, a soft cradle holds one standard roll between two round end discs.
The colors are simple: deep navy blue for the body and cream for a twisted crab stitch edge around the panel and both discs. The style is modern farmhouse with a hint of Moorish window, and it suits neutral bathrooms, wood vanities and brass hardware.
The pattern uses US crochet terms. The finished panel measures 6.5 in (16.5 cm) wide by 17 in (43.2 cm) tall, plus a 1.5 in (3.8 cm) hanging loop. The cradle holds a roll up to about 4.5 in (11.4 cm) across and 4 in (10.2 cm) wide.
Construction is straightforward. You work the panel flat in filet mesh from the bottom up, shape the arch with stepped decreases, then add a two-round border and a hanging tab. Next you make two flat single crochet circles and one single crochet rectangle, and sew them into a U-shaped cradle on the front of the panel.
Finished Size and Construction
- Finished panel size: 6.5 in x 17 in (16.5 cm x 43.2 cm), plus a 1.5 in (3.8 cm) loop
- Skill level: Intermediate
- Terminology: US crochet terms
- Yarn weight: Worsted (#4) cotton
- Hook: 4.5 mm (US 7)
- Number of pieces: 4 (1 panel, 2 end discs, 1 cradle)
- Layout: The panel hangs vertically; the cradle and discs sit across its lower front
- Panel size before border: 5.5 in x 16 in (14.0 cm x 40.6 cm)
- Disc size: about 5.25 in (13.3 cm) across
- Cradle size: 8.25 in x 5.5 in (21.0 cm x 14.0 cm)
- Border depth: 0.5 in (1.3 cm) on every panel edge
Materials
Choose a smooth, firm worsted cotton or cotton blend. Cotton keeps the mesh squares open, resists stretching under the weight of the roll and handles bathroom humidity well. Avoid fuzzy or very drapey yarns, because they blur the filet grid.
- Color A, navy blue: 110 g / 187 m (about 204 yd)
- Color B, cream: 20 g / 34 m (about 37 yd)
These amounts assume a cotton of about 170 m per 100 g. They include roughly a 15% margin for swatching and seaming.
Tools:
- 4.5 mm (US 7) crochet hook
- Tapestry needle
- Stitch markers (4 or more)
- Scissors and a measuring tape
- Blocking mat, rust-proof pins and a spray bottle
- One toilet paper roll for test-fitting
Abbreviations (US Terms)
- ch: chain
- sl st: slip stitch
- sc: single crochet
- dc: double crochet
- sk: skip
- sp: space
- st(s): stitch(es)
- tch: turning chain
- BLO: back loop only
- RS / WS: right side / wrong side
- rev sc: reverse single crochet (crab stitch)
Special stitches:
- Open square (Sp): Ch 1, sk next st, dc in next dc.
- Filled square (Bl): Dc in next st (ch-1 sp or dc), dc in next dc.
- Rev sc (crab stitch): Work from left to right (if you are right-handed). Insert the hook in the next st to the right, yarn over and pull up a loop, then yarn over and pull through both loops. This makes the twisted, corded edge.
Every full-width mesh row has 12 dc posts and 11 squares, for 23 sts in total. That stays the same whether a square is open or filled, because a filled square only swaps one ch for one dc.
Gauge and Checkpoints
- Filet mesh: 8 squares and 8 rows = 4 in (10.2 cm). One square is 0.5 in (1.3 cm) wide and tall.
- Single crochet: 16 sc and 18 rows = 4 in (10.2 cm).
Make one piece first as a test. An end disc is quick and confirms your sc gauge. Then work the first 10 rows of the panel and measure before going further.
Checkpoints:
- Disc after Rnd 5: about 2.5 in (6.4 cm) across
- Disc after Rnd 10: about 4.75 in (12.1 cm) across
- Panel after Row 10: 5.5 in wide x 5 in tall (14.0 cm x 12.7 cm)
- Panel after Row 28: 14 in (35.6 cm) tall
- Panel after Row 32: 16 in (40.6 cm) tall
- Cradle after Row 12: about 2.75 in (7.0 cm) tall
If your pieces are too big, go down one hook size. If they are too small, go up one hook size. If only the mesh height is off, change how far you pull up the first loop of each dc instead of changing hooks.
Back Panel
With Color A, ch 25.
Row 1 (RS): Dc in 4th ch from hook and in each ch across. Turn. (22 dc + tch = 23 sts)
This solid row makes the bottom edge stable.
Row 2: Ch 4 (counts as dc and ch-1 sp), sk next st, dc in next st; *ch 1, sk next st, dc in next st; repeat from * across, working the last dc in the top of the tch. Turn. (11 Sp; 12 dc + 11 ch = 23 sts)
Rows 3-4: Ch 4 (counts as dc and ch-1 sp), sk next ch-1 sp, dc in next dc; work Sp across, working the last dc in the 3rd ch of the tch. Turn. (11 Sp; 23 sts)
From here on, every row starts with ch 4 (counts as first dc and ch-1 sp) and ends with a dc in the 3rd ch of the tch. The first and last squares are always open, and square 6 is the center square.
Diamond rows:
- Row 5: 5 Sp, 1 Bl, 5 Sp. (23 sts)
- Row 6: 4 Sp, 3 Bl, 4 Sp. (23 sts)
- Row 7: 5 Sp, 1 Bl, 5 Sp. (23 sts)
- Rows 8-9: 11 Sp. (23 sts)
When an open square sits over a filled square, ch 1 and skip the dc below. When a filled square sits over an open square, work the dc into the ch-1 sp.
Rows 10-27: Repeat Rows 5-9 three more times, then work Rows 5-7 once more. The diamonds fall on Rows 5-7, 10-12, 15-17, 20-22 and 25-27, for 5 diamonds in total.
Row 28: 11 Sp. Turn. (23 sts)
Checkpoint: the panel should now measure 5.5 in x 14 in (14.0 cm x 35.6 cm).
Arched Top
Each arch row drops one square at each end, which forms the stepped point.
Row 29: Sl st in first ch-1 sp and in next dc, ch 4 (counts as dc and ch-1 sp), sk next ch-1 sp, dc in next dc; *ch 1, sk next ch-1 sp, dc in next dc; repeat from * 7 more times. Leave the last square unworked. Turn. (9 Sp; 10 dc + 9 ch = 19 sts)
Row 30: Repeat Row 29, working the repeat 5 more times. Turn. (7 Sp; 8 dc + 7 ch = 15 sts)
Row 31: Repeat Row 29, working the repeat 3 more times. Turn. (5 Sp; 6 dc + 5 ch = 11 sts)
Row 32: Repeat Row 29, working the repeat 1 more time. (3 Sp; 4 dc + 3 ch = 7 sts)
Fasten off. Checkpoint: the panel is 16 in (40.6 cm) tall at the center point.
End Discs (Make 2)
With Color A, work in continuous spiral rounds. Place a marker in the first st of each round.
- Rnd 1: Make a magic ring and work 6 sc in the ring. (6)
- Rnd 2: 2 sc in each st. (12)
- Rnd 3: *Sc in next st, 2 sc in next st; repeat from * around. (18)
- Rnd 4: *Sc in next 2 sts, 2 sc in next st; repeat from * around. (24)
- Rnd 5: *Sc in next 3 sts, 2 sc in next st; repeat from * around. (30)
- Rnd 6: *Sc in next 4 sts, 2 sc in next st; repeat from * around. (36)
- Rnd 7: *Sc in next 5 sts, 2 sc in next st; repeat from * around. (42)
- Rnd 8: *Sc in next 6 sts, 2 sc in next st; repeat from * around. (48)
- Rnd 9: *Sc in next 7 sts, 2 sc in next st; repeat from * around. (54)
- Rnd 10: *Sc in next 8 sts, 2 sc in next st; repeat from * around. Sl st in next st and fasten off. (60)
- Rnd 11: Join Color B in any st. *Sc in next 9 sts, 2 sc in next st; repeat from * around. Join with sl st to first sc. (60 worked 1-per-st + 6 added = 66)
- Rnd 12: Ch 1, rev sc in each st around. Join and fasten off. (66 worked 1-per-st + 0 added = 66)
Each disc measures about 5.25 in (13.3 cm) across. Rnd 12 is only a trim round: it adds texture, not width.
Roll Cradle
With Color A, ch 34.
Row 1: Sc in 2nd ch from hook and in each ch across. Turn. (33)
Rows 2-25: Ch 1, sc in each st across. Turn. (33)
Fasten off, leaving a long tail. The cradle measures 8.25 in (21.0 cm) along its long edges and about 5.5 in (14.0 cm) along its short edges, which matches the panel width before the border. Each long edge has 33 sts, exactly half of a disc’s 66 edge sts.
Make All Pieces
| Piece | Qty | Color A | Color B |
|---|---|---|---|
| Back panel | 1 | Body, border Rnd 1, tab | Border Rnd 2 |
| End disc | 2 | Rnds 1-10 | Rnds 11-12 |
| Cradle | 1 | All rows | None |
Assembly layout (front view):
        /\        <- hanging loop
       /  \       <- arched top, Rows 29-32
      | <> |
      | <> |      <- 5 diamonds, center column
      | <> |
      | <> |
   (O)|====|(O)   <- discs + cradle across lower panel
      |____|      <- Row 1 bottom edge
Side view:
 panel |  ( disc )
       | /  roll  \
       |(    O     )
       | \________/  <- cradle U under roll
Joining
Step 1: Join the cradle to the discs. Hold one disc against one long edge of the cradle, WS together, with the cradle on the inside. Mark 33 sts in a row on Rnd 11 of the disc. With Color A and a tapestry needle, whipstitch 1 cradle st to 1 disc st. Go through the back of each Rnd 11 st, just inside the cream crab stitch, so the cream edge stays visible on the outside. Repeat with the second disc on the other long edge. You now have a half-cylinder with a full circle at each end.
Step 2: Join the cradle to the panel. Lay the panel RS up. Place one short edge of the cradle straight across the panel along the top of Row 5, which is 2.5 in (6.4 cm) above the bottom edge. The cradle curves forward and down, so its lowest point lines up with the bottom of the panel. Whipstitch the cradle’s 25 row ends into the 23 sts of Row 5. Put 2 row ends into the first st and 2 into the last st (23 sts + 2 extra row ends = 25).
Step 3: Tack the discs. Where each disc touches a side edge of the panel, tack it with 4 or 5 small stitches into the border Rnd 1 sc. This keeps the discs upright and square to the panel.
Tension: Keep the whipstitch snug but not tight. Pulling hard puckers the cradle and leaves less room for the roll.
Size checkpoint: Test-fit a roll. It should drop into the cradle from above, sit between the discs with about 0.5 in (1.3 cm) to spare and lift out with a gentle pull.
Border
Work the border on the panel before assembly. Only the panel gets a border, so all counts come from its own edges with nothing added at seams.
Border gauge: 16 sc = 4 in (10.2 cm), or 4 sc per 1 in (2.5 cm).
Rnd 1 (Color A): With RS facing, join in the first foundation ch at the bottom right corner. You will work along the 23 foundation ch loops (the last one is the base of the tch).
- Bottom: 3 sc in first ch (corner), sc in next 21 ch, 3 sc in last ch (corner). (23 worked 1-per-st + 4 added = 27)
- Left side: 2 sc in each of the 28 row ends of Rows 1-28. (56)
- Left slope: 3 sc along each step of Rows 29-32. (12)
- Top: 2 sc in first st, sc in next 5 sts, 2 sc in last st. (7 worked 1-per-st + 2 added = 9)
- Right slope: 3 sc along each step of Rows 32-29. (12)
- Right side: 2 sc in each of the 28 row ends. (56)
Join with sl st to first sc. (27 + 56 + 12 + 9 + 12 + 56 = 172 sts)
Rnd 2 (Color B): Join Color B in any st. Ch 1, rev sc in each st around. Join and fasten off. (172 worked 1-per-st + 0 added = 172)
Why the math works: Each dc row end is 0.5 in (1.3 cm) tall. Two sc at 4 sc per 1 in (2.5 cm) also cover 0.5 in (1.3 cm), so the sides lie flat. The bottom puts 23 sc on 5.5 in (14.0 cm), which is within 5% of gauge and relaxes during blocking. The 3-sc groups turn the bottom corners, and the extra sc at each end of the top soften the arch point.
Hanging Tab
With Color A and RS facing, join in the BLO of the 3 center sts at the top point.
Row 1: Sc in each of the 3 sts. Turn. (3)
Rows 2-14: Ch 1, sc in each st. Turn. (3)
The tab is about 3.1 in (7.9 cm) long. Fold it to the WS and sew the last row to the back of the panel just below the base of the tab. This makes a loop about 1.5 in (3.8 cm) tall.
Final Blocking
- Weave in all ends before blocking. Run them through solid stitches, not across mesh holes.
- Pin the panel RS up on the mat at 6.5 in x 17 in (16.5 cm x 43.2 cm).
- Pin each mesh column straight. A ruler laid along the dc posts helps.
- Open each square to 0.5 in (1.3 cm).
- Mist with water until damp but not soaked.
- Pin both discs flat at 5.25 in (13.3 cm) and the cradle at 8.25 in x 5.5 in (21.0 cm x 14.0 cm).
- Let everything dry completely, about 24 hours, before you assemble the holder.
Final Quality-Control Checklist
- The panel measures 6.5 in x 17 in (16.5 cm x 43.2 cm)
- Every full-width mesh row has 23 sts and 11 squares
- All 5 diamonds are centered on square 6
- The arch steps are even on both sides
- Border Rnd 1 has 172 sts and lies flat
- Both discs have 66 sts and measure 5.25 in (13.3 cm)
- The cradle has 33 sts per row and 25 rows
- The cream crab stitch shows on the outside of both discs
- The hanging loop is centered and secure
- A roll fits and lifts out without stretching the cradle
Troubleshooting
The mesh squares look like tall rectangles. Pull up a shorter first loop on each dc, or go down one hook size for the panel only.
The diamonds are off-center. Count squares, not stitches. The center is always square 6 of 11.
The panel edges wave. Border Rnd 1 is too loose. Work 3 sc per 2 row ends instead and recount.
The discs cup. Go up one hook size for the outer rounds, and check that you added 6 sts in each round.
The discs ruffle. You added too many increases. Recount each round.
The roll is too tight. Add 2 rows to the cradle. This widens the space between the discs by about 0.5 in (1.3 cm).
Care
Hand wash in cool water with mild soap, press out the water in a towel and dry flat. Reshape the discs and mesh while damp.
Final Notes
Here is how the measurements fit together. Each filet square is 0.5 in (1.3 cm), so 11 squares make a 5.5 in (14.0 cm) wide panel and 32 rows make it 16 in (40.6 cm) tall. The 0.5 in (1.3 cm) border brings it to 6.5 in x 17 in (16.5 cm x 43.2 cm).
The discs grow to 66 edge sts, and each long edge of the cradle has 33 sts, exactly half of that. The cradle’s 25 rows match the panel width, so the pieces line up during assembly.
Check your gauge early, count every row and block before you sew. Happy crocheting!