

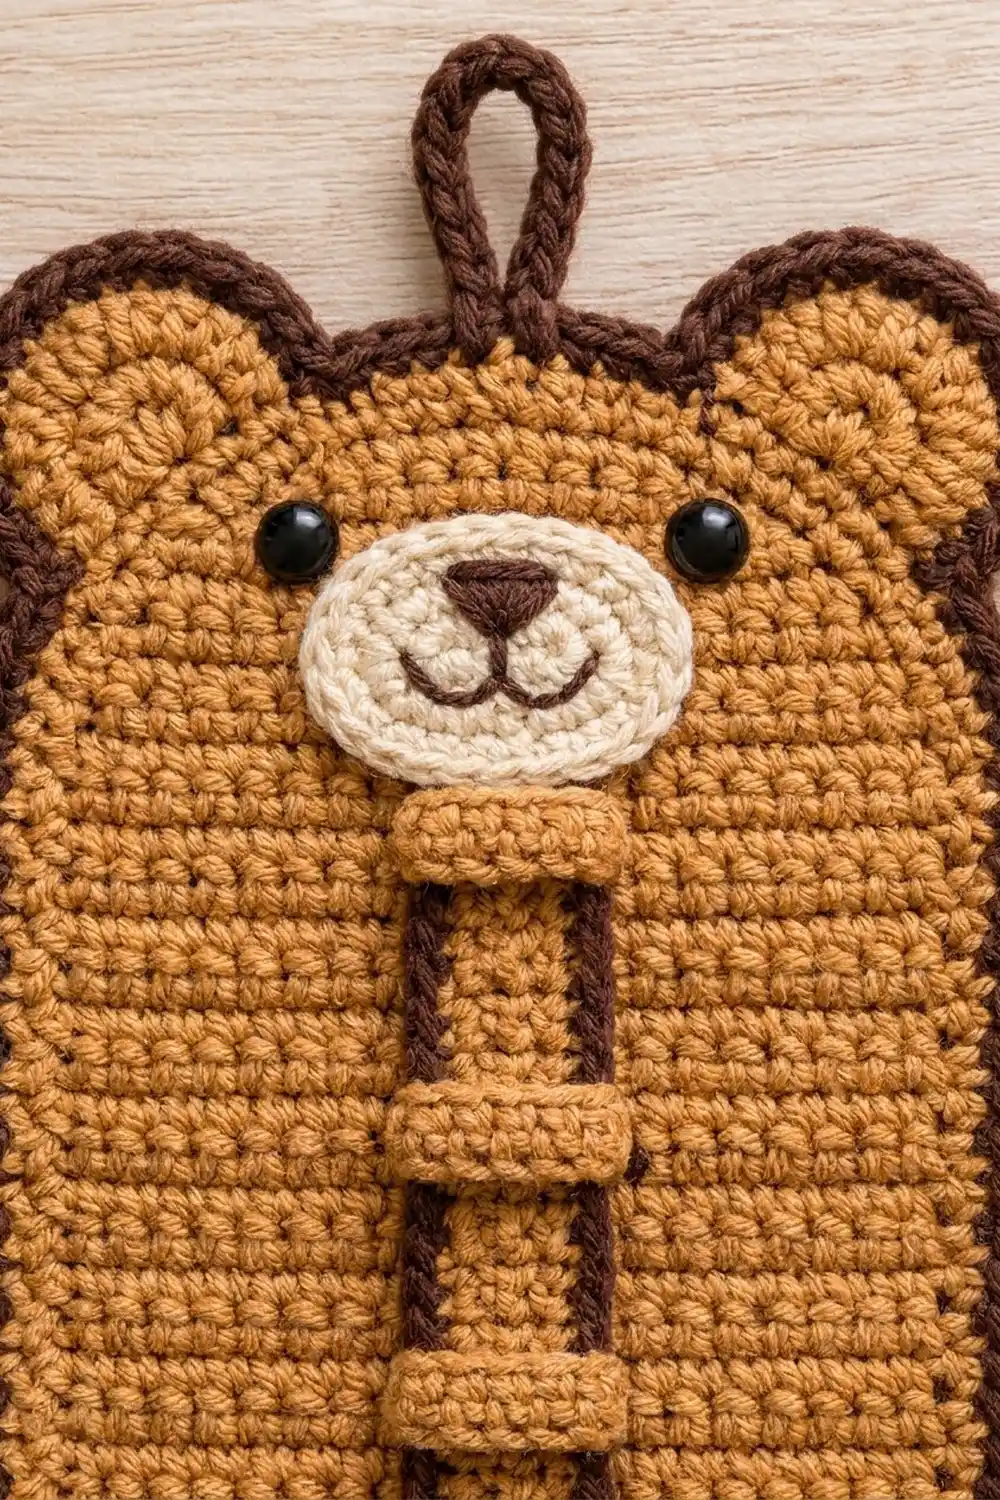
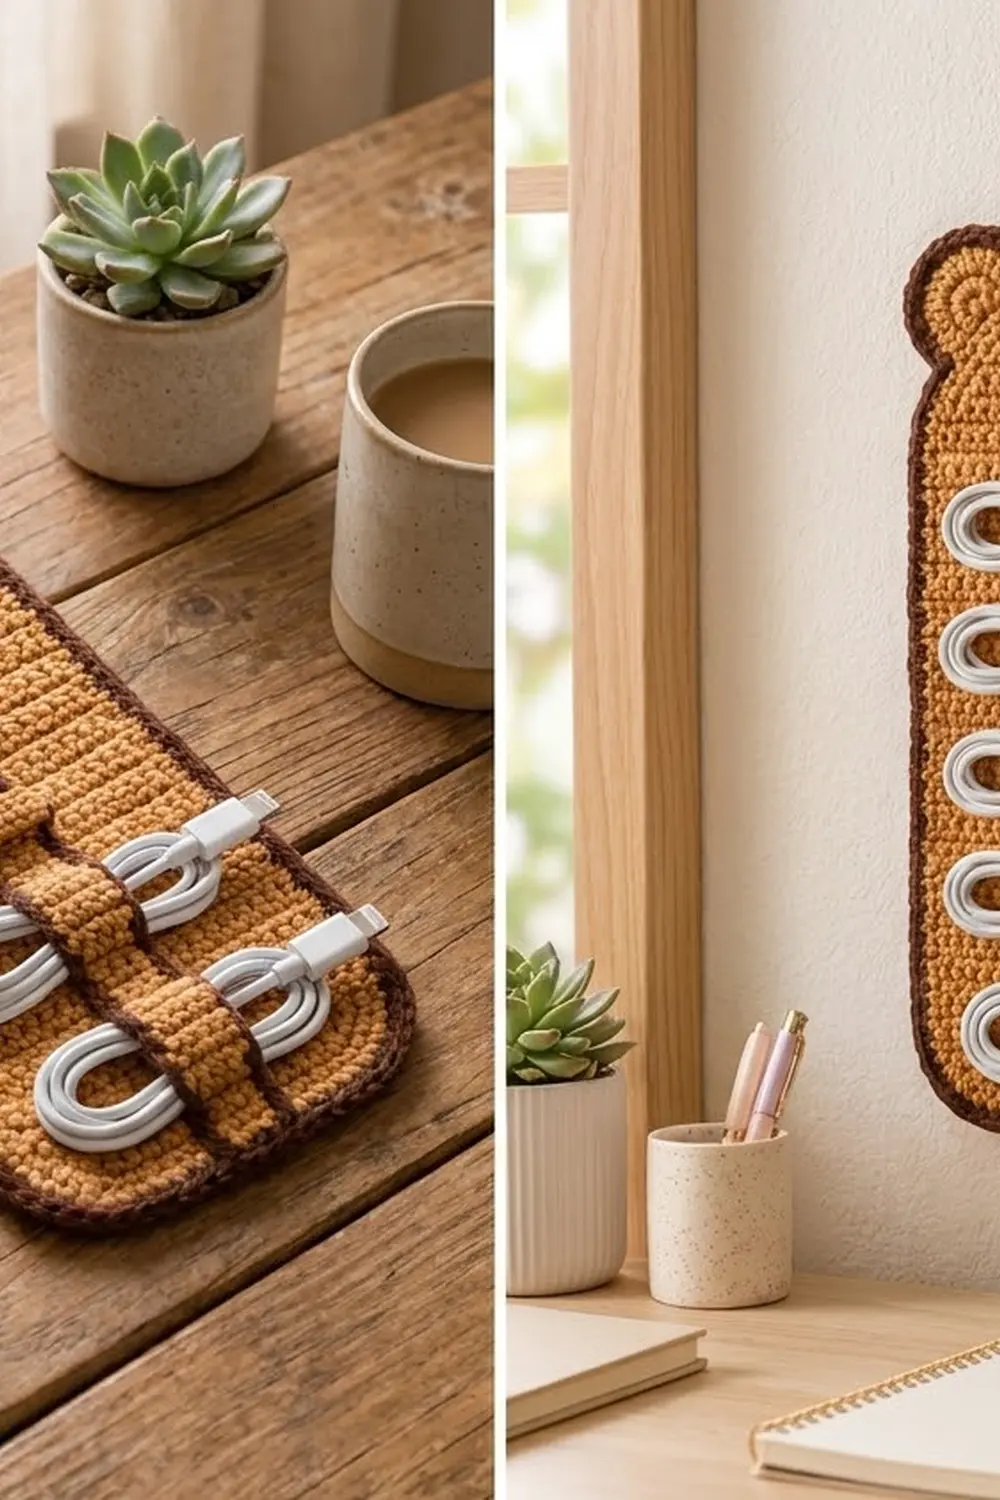
This little bear keeps your charging cables tidy and off the desk. It is a flat wall panel with rounded corners, made in warm camel with a chocolate-brown border. It has two round ears, a cream oval muzzle, black safety eyes and a stitched nose and mouth. A narrow strip with brown edges runs down the center, and six small keepers wrap around it to hold coiled cables in place.
The style is simple and graphic: solid single crochet texture, clean blocks of color and a friendly face. Hang it from a hook or knob by its brown loop and tuck one coiled cable under each keeper.
This pattern uses US crochet terms. The finished body measures 6.5 x 11 in (16.5 x 27.9 cm). With the ears, the piece is about 12 in (30.5 cm) tall, and about 13 in (33.0 cm) to the top of the hanging loop.
Construction is straightforward. You work the panel in rows with gently rounded corners. Then you make the ears, muzzle, center strip, keepers and loop as small separate pieces. You sew on the face and strip, work a two-round border, and finally attach the ears and loop to the back.
Finished Size and Construction
- Finished size (body with border): 6.5 x 11 in (16.5 x 27.9 cm)
- Height with ears: about 12 in (30.5 cm); about 13 in (33.0 cm) including the loop
- Skill level: Easy / advanced beginner
- Terminology: US crochet terms
- Yarn weight: Worsted (#4), cotton or cotton blend
- Hook: 4.0 mm (G-6)
- Number of pieces: 12 crocheted pieces that make one item: 1 panel, 2 ears, 1 muzzle, 1 center strip, 6 keepers, 1 hanging loop
- Layout: One vertical panel, with the face at the top and the strip and keepers centered below
- Panel size before border: 5.5 x 10 in (14.0 x 25.4 cm)
- Border depth: 2 rounds, about 0.5 in (1.3 cm) per side
Materials
Choose a smooth worsted-weight cotton or cotton blend. Cotton holds its shape on the wall and keeps the keepers firm. Avoid fuzzy or very stretchy acrylics, because the keepers can loosen over time.
- Camel (main color, MC): 50 g, about 85 m
- Dark brown (contrast A, CA): 20 g, about 35 m
- Cream (contrast B, CB): 5 g, about 9 m
These amounts include a comfortable margin for gauge checks and sewing tails.
Tools:
- 4.0 mm (G-6) crochet hook
- Two 8 mm black safety eyes with washers
- Tapestry needle
- Stitch markers (4 or more)
- Scissors
- Measuring tape or ruler
- Rust-proof pins and a blocking mat
Abbreviations (US Terms)
- ch: chain
- sc: single crochet
- sc2tog: single crochet 2 together (decrease)
- sl st: slip stitch
- st(s): stitch(es)
- sp: space
- MR: magic ring
- MC / CA / CB: camel / dark brown / cream
Special technique (sc2tog): Insert hook in next st, yarn over, pull up a loop. Insert hook in following st, yarn over, pull up a loop. Yarn over and draw through all 3 loops on hook.
Gauge and Checkpoints
Gauge: 16 sc and 18 rows = 4 in (10.2 cm) in sc worked in rows. That is 4 sts and 4.5 rows per inch.
Use the panel itself as your test piece. Work Rows 1–20, then measure:
- Row 1 (18 sc): 4.5 in (11.4 cm) wide
- Row 3 (22 sc): 5.5 in (14.0 cm) wide
- After Row 20: about 4.4 in (11.2 cm) tall
- After Row 45: 5.5 x 10 in (14.0 x 25.4 cm)
- After border: 6.5 x 11 in (16.5 x 27.9 cm)
If your panel is too big, use a hook 0.5 mm smaller. If it is too small, use a hook 0.5 mm larger. Width matters more than height here, because the strip and keepers are sized to fit the panel. Make the small pieces with the same hook as the panel.
Main Pattern
Panel (make 1, MC)
The corners are rounded by increasing at both ends of the first rows and decreasing at both ends of the last rows. The ch 1 at the start of each row does not count as a stitch.
Row 1: With MC, ch 19. Sc in 2nd ch from hook and in each ch across. Ch 1, turn. (18 sc)
Row 2: 2 sc in first st, sc in next 16 sts, 2 sc in last st. Ch 1, turn. (20 sc)
Row 3: 2 sc in first st, sc in next 18 sts, 2 sc in last st. Ch 1, turn. (22 sc)
Rows 4–43: Sc in each st across. Ch 1, turn. (22 sc per row; 40 rows)
Row 44: Sc2tog, sc in next 18 sts, sc2tog. Ch 1, turn. (20 sc)
Row 45: Sc2tog, sc in next 16 sts, sc2tog. (18 sc)
Fasten off and weave in ends. Checkpoint: 5.5 x 10 in (14.0 x 25.4 cm).
Ears (make 2)
Work in joined rounds. Join each round with a sl st to the first sc, then ch 1 (does not count).
Round 1: With MC, 6 sc in MR. (6 sc)
Round 2: 2 sc in each st around. (12 sc)
Round 3: (Sc in next st, 2 sc in next st) 6 times. (18 sc)
Fasten off MC. Join CA in any st.
Round 4: With CA, (sc in next 2 sts, 2 sc in next st) 6 times. (24 sc)
Fasten off, leaving a 12 in (30.5 cm) tail for sewing. Checkpoint: about 2 in (5.1 cm) across.
Muzzle (make 1, CB)
Work in joined rounds around both sides of a starting chain to make an oval.
Round 1: With CB, ch 6. Sc in 2nd ch from hook, sc in next 3 ch, 3 sc in last ch. Working along the other side of the chain, sc in next 3 ch, 2 sc in same ch as first sc. Join. (12 sc)
Round 2: 2 sc in first st, sc in next 3 sts, 2 sc in each of next 3 sts, sc in next 3 sts, 2 sc in each of last 2 sts. Join. (18 sc)
Round 3: 2 sc in first st, sc in next 4 sts, (2 sc in next st, sc in next st) 3 times, sc in next 3 sts, (2 sc in next st, sc in next st) 2 times. Join. (24 sc)
Fasten off, leaving a 12 in (30.5 cm) tail. Checkpoint: about 2.25 x 1.5 in (5.7 x 3.8 cm).
Face details: With CA, embroider a small filled triangle for the nose in satin stitch, near the top center of the muzzle. Below it, work a short vertical straight stitch and two curved backstitches for a smiling mouth. Do this before you sew the muzzle on, so the back stays neat.
Center Strip (make 1)
Row 1: With MC, ch 29. Sc in 2nd ch from hook and in each ch across. Ch 1, turn. (28 sc)
Rows 2–3: Sc in each st across. Ch 1, turn. (28 sc)
Do not turn after Row 3. Fasten off MC and join CA at the end of Row 3.
Edging round: With CA, work along the long edge: sc in each of 28 sts, ch 1 at the corner. Sc in each of 3 row ends, ch 1. Sc in each of 28 sts along the starting chain, ch 1. Sc in each of 3 row ends, ch 1. Join. (62 sc + 4 ch-1 corner sps)
Fasten off, leaving a 12 in (30.5 cm) tail. Checkpoint: 7.5 x 1.1 in (19.1 x 2.8 cm).
Keepers (make 6)
Row 1: With MC, ch 12. Sc in 2nd ch from hook and in each ch across. Ch 1, turn. (11 sc)
Rows 2–3: Sc in each st across. Ch 1, turn. (11 sc)
Fasten off MC. With CA, sl st loosely in each st along the top edge (11 sl st), then along the starting-chain edge (11 sl st). Fasten off, leaving an 8 in (20.3 cm) tail. Checkpoint: about 2.75 x 0.7 in (7.0 x 1.8 cm).
Hanging Loop (make 1, CA)
With CA, ch 13. Sc in 2nd ch from hook and in each ch across. (12 sc) Fasten off, leaving a 10 in (25.4 cm) tail. Checkpoint: 3 in (7.6 cm) long.
Make All Pieces
Before you start assembly, check that you have:
- MC: 1 panel, 2 ear centers (Rounds 1–3), 1 strip center, 6 keepers
- CA: 2 ear rims (Round 4), 1 strip edging, 6 keeper edgings, 1 loop
- CB: 1 muzzle
Layout (front view, top to bottom):
      [Ear]   [Loop]   [Ear]
   +-------------------------+
   |   o     [Muzzle]     o  |
   |         |Strip|         |
   |         |=K1==|         |
   |         |=K2==|         |
   |         |=K3==|         |
   |         |=K4==|         |
   |         |=K5==|         |
   |         |=K6==|         |
   +-------------------------+
Joining (Assembly)
Sew every piece on with the tapestry needle and a matching yarn tail, using whipstitch through the outer loops. Rows on the panel are counted from the bottom, so Row 45 is the top row.
1. Eyes. Insert the safety eyes between Rows 41 and 42, in st 6 and st 17. Fasten the washers on the back.
2. Muzzle. Center the muzzle over sts 8–15, covering Rows 37–43. Its top edge sits about 0.5 in (1.3 cm) below the top of the panel. Whipstitch around all 24 edge sts, one sewing stitch per muzzle stitch.
3. Keepers. Wrap each keeper around the strip, right side out. Whipstitch the two short ends together (3 row ends to 3 row ends) at the back of the strip. Place the keeper centers 0.75 in (1.9 cm) from each strip end and 1.2 in (3.0 cm) apart. Six keepers with five gaps give 0.75 + (5 x 1.2) + 0.75 = 7.5 in (19.1 cm), which matches the strip length. Tack each keeper seam to the back of the strip with 2 small stitches so it can’t slide.
4. Strip. Center the strip over sts 10–13. Tuck the top end 0.25 in (0.6 cm) under the bottom edge of the muzzle at Row 37. The bottom end lands around Row 4, about 0.75 in (1.9 cm) above the bottom edge of the panel. Sew down only the top 0.5 in (1.3 cm) and the bottom 0.5 in (1.3 cm) of the strip. Leave the middle loose so cables can pass under the strip at each keeper.
Tension: Pull each stitch snug but not tight. The panel should lie flat, with no puckering around the muzzle.
Size checkpoint: The panel should still measure 5.5 x 10 in (14.0 x 25.4 cm).
Border
Border gauge: Each sc round adds about 0.25 in (0.6 cm) per side.
Join each round with a sl st to the first sc. The ch 1 at the start does not count.
Round 1 (MC, conversion round): Join MC at the bottom-right curve. Work:
- Bottom edge: 1 sc in each of the 18 starting-chain sts = 18 sc
- Each corner curve (along the stepped edges of Rows 1–3 or Rows 43–45): 4 sc evenly spaced = 4 sc
- Each long side (row ends of Rows 4–43, 40 rows): 36 sc, skipping every 10th row end = 36 sc
- Top edge: 1 sc in each of the 18 sts of Row 45 = 18 sc
Total: 18 + 18 + (2 x 36) + (4 x 4) = 124 sc. Fasten off MC. Checkpoint: about 6 x 10.5 in (15.2 x 26.7 cm).
Round 2 (CA, trim round): Join CA in the first st of a long side. Sc in each st along the straight sections. On each corner curve: sc in first st, 2 sc in each of next 2 sts, sc in last st (6 sc per curve).
Count: 124 sc worked 1-per-stitch + 8 extra (2 per curve x 4 curves) = 132 sc. By section: 18 bottom, 18 top, 36 per long side, 6 per curve. Fasten off and weave in ends.
Why the math works: At 4 sts per inch, 18 sts cover the 4.5 in (11.4 cm) straight top and bottom edges. 36 sts cover the 8.9 in (22.6 cm) straight sides (40 rows at 4.5 rows per inch). In Round 2 the straight edges stay 1:1 because they don’t get any longer. Only the curves grow, so only the curves get the 8 extra stitches. Final size: 6.5 x 11 in (16.5 x 27.9 cm).
Ears and loop: Place each ear behind a top corner so about 1 in (2.5 cm) shows above the top edge. Whipstitch through the back loops of the border and the back of the ear, keeping the stitches hidden from the front. Fold the loop in half and overlap the ends 0.5 in (1.3 cm) on the back at top center. Sew it on securely. The loop rises about 1 in (2.5 cm) above the border.
Final Blocking
- Lightly mist the piece with water, or soak it briefly and gently press out the extra water in a towel.
- Lay it face up on a blocking mat.
- Pin the panel to 6.5 x 11 in (16.5 x 27.9 cm), keeping the long sides straight.
- Ease the ears into round shapes and pin around their edges.
- Smooth the strip and keepers flat without stretching the keepers.
- Let the piece dry completely before you unpin it, usually 12–24 hours.
Final Quality-Control Checklist
- Panel measures 6.5 x 11 in (16.5 x 27.9 cm) after blocking
- Border Round 2 has 132 sc and lies flat around all 4 curves
- Ears match, with 1 in (2.5 cm) of each showing
- Eyes are level and the muzzle is centered
- Strip is centered and sewn down only along its top and bottom 0.5 in (1.3 cm)
- All 6 keepers are spaced evenly, 1.2 in (3.0 cm) apart, and tacked in place
- Loop is secure and centered
- All ends are woven in on the back
Troubleshooting
- Border ruffles on the curves: In Round 2, add 1 extra sc per curve instead of 2.
- Corners cup or pull: Add 1 extra sc per curve in Round 1, then re-check your count.
- Panel too narrow: Your gauge is tight. Start again with a larger hook.
- Keepers too loose on the strip: Remake them with ch 11 (10 sc).
- Keepers too tight: Remake them with ch 13 (12 sc).
- Cables slip out: Coil the cables more tightly, or add a small tack stitch between the strip and the panel halfway between keepers.
- Panel puckers around the muzzle: Re-sew with looser stitches, or block again with pins.
Care
Remove the cables first. Hand wash in cool water with mild soap, press out the water gently, and dry flat.
Final Notes
Everything starts from one gauge: 4 sts and 4.5 rows per inch. That gauge gives a 5.5 x 10 in (14.0 x 25.4 cm) panel. The first border round has 124 stitches and the second has 132, for a finished body of 6.5 x 11 in (16.5 x 27.9 cm). The 7.5 in (19.1 cm) strip runs from under the muzzle to about 0.75 in (1.9 cm) above the bottom edge, and the six keepers divide it evenly. Check each measurement as you go, and your bear will hang flat and hold cables neatly.
Happy crocheting!